Knots made of ropes of equal thickness
Tourists use many types of knotted joints, which are knitted using cords of equal diameter. Among them there are both complex and very simple. If you stick to certain patterns, you can easily learn how to knit them.
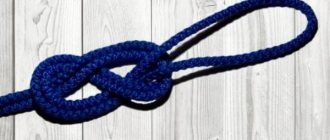
Straight
The straight knot, or Hercules' knot, is used to connect parts of a damaged rope, lengthen the cable, and pack heavy objects.
Technique:
- take two ropes and twist their ends;
- form a loop (open) from the free end of the upper cord;
- stretch the rope located below into it, mirroring the lower weave;
- tighten both cords.
Hercules Knot
Under heavy load, the straight knot creeps, which is why it is not used for rope belaying.
Important! To make it easier to untie the knot connection described, a stick is inserted into it.
Reef
A reef knot is used when something needs to be tightly connected and then quickly untied. Typically, sailors use it to tie boat covers, sails, and other deck equipment, and tourists use it to connect additional ropes with a variable load.
How to tie:
- form a lower half-knot and make a loop (as in the case of a straight knot);
- insert the end of another cord, folded in half, into it and tighten. You will get half a bow.
Reef node
Only non-synthetic ropes made from the same material are suitable for the reef knot.
Helpful information! A knotted connection with two half bows is called a double reef. It is used when packing packages and tying shoelaces.
Grapevine
The widespread grapevine knot is used wherever a person is faced with tying ropes, cables, threads, fishing line, and other connecting materials. You can see it on ships, in textile production, tourism, mountaineering, and agriculture.
Technique:
- Prepare two ropes with the same diameter.
- Wrap the end of the first cord once around the other to form a loop.
- Repeat the previous action.
- Pass the end you are using through all the holes parallel to the rope (closer to the end).
- Tighten the knot.
- Repeat the described procedure in the same way with a different running end.
- Tighten the ropes.
grapevine knot
Important! When tying a grapevine, it is important to tighten each knot tightly. The difference in diameters of the same type of cords used should not exceed 40%.
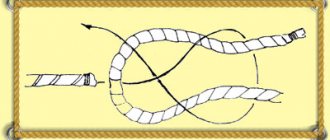
Serpentine
Typically, snake ties are used to connect fishing lines and cords.
Technique:
- Cross two ropes.
- Wrap the end of one of them around the other 6 times, then stretch it between the cords.
- With the end of the other rope, do the same procedure, but in the opposite direction.
- Tighten the knot, cut off unnecessary parts.
Attention! If all actions are performed correctly, the node connection will subsequently be located in the center.
Snake knot
Flat
A simple but reliable flat knot has many advantages, which is why it is often used in practice.
Step-by-step instruction:
- form a buttonhole from one rope and place it on the second;
- then draw the end of the last one over the first cord, bring it under its end, and direct it into a loop (circling itself from below);
- using equal efforts, fix the structure.
If the knot is not tied correctly, then as a result of periodic tugging, it will move closer to the end of the rope and become untied.
Flat knot
Hunter (Hunter knot)
Hunter's knotted connection perfectly holds parts of cables, as well as thin synthetic fishing lines. However, after the rated load it is extremely difficult to untie it.
How to tie:
- Form open loops on two ropes.
- Cross them.
- Pass both running ends into the resulting hole in opposite directions.
- Tighten.
Interesting! The hunting knot was invented and patented by the English physician Edward Hunter.
Hunter's knot
Counter figure eight (Flemish knot)
The advantage of the counter-eight knot connection is that it is easy to untie even after the heaviest loads.
Step-by-step instruction:
- Form a free figure eight on one of the ropes.
- Repeat this procedure with the second cord (on the opposite side), moving parallel to the main rope.
- Fix.
The counter eight does not slip and holds well on synthetic fishing line. The connection itself is considered strong.
Knitting pattern
Ready node
Variety of nodes
- "Button."
The weaving pattern of this knot is quite simple; it can be used in jewelry together with beads. When weaving it correctly, both loops should point in the same direction.
- Luck knot.
You've probably encountered such a knot more than once. The peculiarities of its weaving are that it is woven not with ends, but directly with loops.
- "Double Knot"
At first glance, such a knot seems quite simple, but the weaving pattern is very interesting. To weave it, threads of contrasting colors are usually used.
- "Snake Knot"
The snake knot got its name because of its resemblance to a snake. It is generally accepted that such a knot brings good luck to the owner and protects him from theft.
- Mystical knot.
Such a knot also brings good luck and symbolizes the secrets of the Universe. It is quite complicated in execution, but if you follow the scheme correctly, everything will definitely work out. Due to its volume and complexity of weaving, such a knot can be a wonderful gift or personal decoration for a mobile phone or keys.
- Lotus knot.
Read this: How to weave an owl from rubber bands using the example of a keychain or three-dimensional figurine
This knot is woven using a special pillow and a needle. Also, to use it, you should take two threads with a length of at least 50 cm.
Please note that two variants of this knot are indicated, it all depends on the direction of the thread during weaving, for example, if you weave in one direction, you will get a “round” cord, and if you change the direction after each knot, then you will end up with get tetrahedral.
There are still quite a large number of different nodes, some have been preserved since ancient times, and some have already changed over time. All of them are amazing and unique in their own way, and if you become seriously interested in this art, you can make amazing things that can become not just a talisman, but also an exquisite decoration, both for clothing and for your interior.
Knots made of ropes of different thicknesses
Situations often arise when it is necessary to connect cables of different diameters. Then it is recommended to use the following types of ligaments.
Shkotovy
A clew knot is used to connect the rope to the ring. It can only be used when the cable is under tension.
How to tie:
- Tie a closed loop on a rope (thicker).
- Insert the second cord into it, then pull it out, clasping the buttonhole at the base.
- Pull a thin rope under the loop and secure it.
The clew knot is considered ancient. It was discovered by archaeologists on a fishing net that was made 7 thousand years BC. e.
Knitting pattern
Ready node
Bramshkotovy
A double clew is in demand when towing if you need to connect to a rigid cable. It can withstand sudden jerks and sudden changes in direction.
Technique:
- make a closed loop (from thick rope);
- stretch the end of the second rope (with a smaller diameter) into it, wrap it around the thick buttonhole;
- make a full circle and stretch the free end of the thin cord under you;
- perform the next turn around the loop, bring it out again;
- tie control knots.
The windlass knot perfectly holds ropes of different diameters and artificial ropes of the same type.
Windlass knot
Academic
If you need to tie a rope with a rope, it is advisable to use an academic knot. It is also often used for tying large loads.
Technique:
- Cross the ends of the two ropes, twist them once, and pull them through.
- Repeat the weave, but twist the cords in the other direction.
- Tighten the ends evenly.
The resulting knotted connection does not slip, it simply unties, and in appearance resembles a pigtail. As a rule, they are used to connect different cables (natural, synthetic).
Academic node
Furrier
Numerous tests have shown that the furrier's knot is reliable and does not slip. After a heavy load it is difficult to untie it.
How to tie:
- Form and overlap open loops on two ropes.
- Place the end of each cord over the buttonhole, bring it under the ropes, and pull it out from the middle.
- When tightened, the ends flip over and rotate relative to one another.
To reduce the likelihood of excessive tightening, it is important to closely monitor the ends: they must turn over.
Furrier's knot (2 knitting methods)
Docker
Sailors often need to attach a thin cable to a thick rope: for example, when mooring a small ship to a pier. In such cases, docker node is suitable.
How to tie:
- Fold the thick cable in half.
- Stretch a thin rope into the resulting loop from below, wrap it around the base, and carefully pass it underneath.
- Pull it over the thick cable, pass it under 3 ropes, insert it into the buttonhole, and secure.
Advice! Such a nodal connection is recommended to be used as a temporary one; it is quickly untied.
Docker node
Frequently used sea knots
The bowline is a universal knot, as it can be easily tied on a rope of any thickness. It is also called a "gazebo knot". It will not untie on its own and does not slide along the rope, but it can be untied without effort if the need arises. The connection is one of the strongest. It is used for belaying, attaching to the ring and hook, mooring and connecting various cables.
Knitting pattern:
- A loop is created into which the running section is drawn.
- Next, it is brought behind the root part.
- Returned back to the loop.
- The small tip should remain in the second loop.
- Perform a tight tightening.
Eight got its name due to its external resemblance to the number of the same name. It is used as an independent option or as an element for tying other fasteners. Used for securing or stopping. Its peculiarity is that such an anchor knot can be easily untied when the rope gets wet.
Knitting pattern:
- The running edge is pulled along the root edge and drawn around it.
- The running end is brought behind itself and threaded into the resulting loop.
- Tighten tightly.
A noose is used to lift a load to a height, as well as attach a rope to a support. The chassis is wrapped around the object, and the root section is wrapped around the chassis several times. It is most reliable if a control tightening is used in the noose for fixation.
When using the maximum breaking load, after removing the load, the rope is easily untied. The connection is very strong and does not lose strength when wet. The carbine noose is widely used in mountaineering. The chassis is attached to a figure-of-eight carabiner, and the free part can wrap around a support, such as a tree.
The bayonet is tied from two knots. It is complex in design, suitable for towing and mooring. It is based on a simple half bayonet. The chassis is circled around the object, then several times around the root part. The bayonet is appropriate when the ship stays in port for a long time.
There are several variations of knitting. A variation of it is the anchor knot, which is also called a fishing bayonet. It is used in situations where strong thrust is involved, for example when lowering an anchor.
Straight knots are appropriate for fastening the running gear of two different cables. The disadvantage of the design is that it tightens very tightly after getting wet under excessive load, so it will be difficult to untie it. With intensive use, this anchor assembly may slip. Knitting pattern:
- The two root parts are connected.
- Move the running ends relative to each other and tighten.
- To prevent the structure from losing symmetry, the ends are brought out along both sides of the root sections.
The thief's knot is considered a type of straight knot; it is used for household needs, for example, tying bags of grain. It is knitted in a similar way, directing the ends of the structure diagonally in relation to the root part of the ropes. During loading, the connection may change shape, resembling a half-bayonet.
The displacement leads to mutual untangling of the ends. To prevent the rope from untying, change the location of the ends. They are pressed and the root parts are tightened. If the edges are hidden, the connection may be externally confused with a direct fastening.
The most fragile is the mother-in-law's knot. It is also called a woman's knot. It is not used in maritime affairs due to unreliability, but on shore it is successfully used for packaging goods and tying bags. The edges of the undercarriage are intertwined and tied. Despite the apparent strength, there is a high probability of the knot slipping and untying under strong tension.
The worst thing to do is connect ropes of different diameters. When choosing this design, the degree of danger should be assessed, since the connection will come undone at the most inopportune moment.
For mounting on base
The use of the following ligaments is impossible without support. The latter can be a tree, a bracket, a rod.
Fishing bayonet (anchor knot)
The fishing bayonet knot used on every ship has proven itself to be reliable and easy to untie. It does not damage the cable by bending or chafing.
Step-by-step instruction:
- Wrap the pin twice with rope.
- Place the end over the root end, tuck it under the loose turn to tie the first half bayonet.
- Continue wrapping the root end to make a second similar knot.
- Fix.
Under heavy loads and tension, the fishing bayonet does an excellent job of its main task - holding the anchor.
Anchor knot
Noose
In everyday life, the noose knot is often used: for example, when casting on loops while knitting, or tying up a parcel.
Step-by-step instruction:
- Make a loop at the end of the rope.
- Pull the open loop of the root end through it.
- Enlarge the last one and throw it on the object.
- Tighten carefully.
Attention! The noose must not be tied around the neck. The nodule may tighten and block blood flow.
Noose
Half bayonet and bayonet
Currently, a simple half-bayonet is used in maritime practice: sailors moor the ship with this knot. He is also a frequent assistant to hunters and climbers when there is a need to form a buttonhole that is thrown onto a pole.
How to tie:
- make a loop around the desired object;
- wrap the end of the rope around the root end and pull it through the hole formed;
- tighten.
Using a bayonet, towing is performed and the mooring lines are fixed. It consists of three half-bayonets, which is sufficient for most purposes.
Half bayonet
Bovine
A cow knot is an excellent solution if one end of the rope is already tied, and the free one needs to be attached. In everyday life, it is used to tie a leash to an animal and extend a linen cord.
Technique:
- Wrap the rope around the support (once).
- When forming a simple loop, use the running end to repeat the procedure already done, only in the opposite direction.
- Pull the end of the cord between the support and the rope and tighten.
Important! The cow knot is easy to untie, especially if you use ropes made of sliding material.
Cow knot
Whitened
Two half-bayonets tied on the same side make up a bleached knot. It belongs to the most durable, reliable tightening fasteners.
Step-by-step instruction:
- form a loop on the cable;
- Make the same one next to it, put it on the first one;
- put both buttonholes on the open support;
- pull the ends of the rope.
If the bundle is intended for closed objects, then it needs to be knitted differently:
- Wrap the rope around the support, forming a loop.
- Repeat the action, passing the end of the cord inside and fix it.
For trouble-free operation of the rope, it is important to load both ends of the rope equally.
Clove hitch
Shakhtarsky
In mines, a miner's unit is used to lift loads and move trolleys. In everyday life, it is used to tie a rope around a tree, pole or other object.
Technique:
- Wrap the rope around the support.
- Throw the first barrier (to the right).
- Pull the cord under the support.
- Make a second turn of the rope.
- Throw the running end over the main end and thread it under the starting hose.
- Tighten.
The miner's hub connection is simple, reliable, and original. In addition, it holds up well under constant load.
Mining node
Units for carrying loads
In everyday life, it is often necessary to move some objects or equipment. For such work to be completed successfully, it is first important to securely fix the moving objects. The diagrams of the following nodes will help with this.
Bowline
For its reliability, sailors call the bottle the king of knots. It unravels quickly and can be tied with only one hand, which is important during rescue operations.
Technique:
- Make a small loop.
- Thread the end of the rope through it.
- Wrap it around the base and pull it through the small buttonhole again.
With such a nodal connection, the rope is attached to metal rings, hooks, and various bases (vertical, horizontal).
Bowline
Noose with half bayonets
A self-tightening noose knot with half bayonets helps secure the rope on cylindrical objects with an uneven, rough surface.
Step-by-step instruction:
- Wrap the cable around the object.
- Wrap the end around the base.
- Pull it through the loop.
- Twist the last one several times.
- Tighten.
A noose with half bayonets is often used during loading or rigging work and moving heavy objects.
Noose with half bayonets
Barrel
Serves for fixing buckets, barrels, and other cylindrical containers for the purpose of hanging or lifting them.
Execution technologies:
- Place the container on the rope and tie a simple knot on top.
- Stretch the upper part of the latter so that the cord covers the object on the sides and on top.
- Connect the ends using a bowline and lift them up.
Attention! The rope should cover the container above the center of gravity, at the bottom located exactly in the middle.
Barrel knot
Double barrel
For reliable tying of high containers, objects, and other objects, the barrel assembly can be slightly changed: add one or more additional hoses. The result will be a similar (double, triple, multiple) node connection.
Double barrel knot
Bucket quick release
If a climber needs to descend from a height on a rope and then carry it with him, a bucket knot will help out. After use, it can be untied (with a jerk). Similarly, a bucket is lowered from a building window.
How to tie:
- Fold the whole rope in half.
- Wrap the resulting double running end around the handle of the container, but do not short it.
- Pull one part of the cord (located at the base) inside the open loop and, going around the other, pull it through the same loop.
- Fix.
Important! The bucket knot is considered extremely unreliable. It can unravel spontaneously or accidentally come undone.
Bucket quick release knot
Spanish gazebo (boatswain's)
The bundle is used in rescue operations. The victim’s legs are inserted into two non-tightening loopholes of the knot, a rope is tied at half a bayonet in the chest area, then the person is raised (lowered).
Step-by-step instruction:
- Form a large loop in the middle of the rope, and smaller ones on the sides.
- Fold the large buttonhole forward and pull 2 side loops through it.
- Fix it tightly.
In the navy, with the help of such a non-tie knot, they make a gazebo for performing external work. A board is inserted into the hinges and the sailor sits on it. Then he is lowered overboard and lifted onto the mast.
Spanish arbor knot
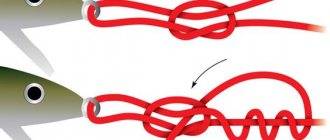
Fishing
Most often, a fisherman's knot is used to tie fishing lines, thin ropes, and attach various objects to the latter.
How to tie:
- Thread the thread into the hole of the hook (for fishing), form a loop.
- Wrap the remaining end around the base 5 times.
- Pull it through the previously created buttonhole, then through another loop, which was formed as a result of the previous operation.
A fixed knot connection is extremely difficult to untie, and spontaneous loosening is unlikely.
Fisherman's knot
Load loop
It consists of several parts and is used for securing loads on cars and trailers. The cargo loop is simple to use and convenient.
Step-by-step instruction:
- Create an artillery unit.
- Pass the free end through the ring of the carabiner, then through the loop of the previously formed ligament.
- Wrap the same end of the rope twice around the paired rope, each time forming a knot.
Load loop
Pirate's knot (quick untie)
The pirate rope allows you to lower the load and then take the rope with you from below. It is often used for short-term fixation of objects.
Technique:
- Form a loop from the rope and place it on a stick.
- On the other side, place another buttonhole with which to wrap the initial one.
- In front of the stick, make another loop from the end of the cord and pull it through the first.
- Tighten.
This self-tie knot is not recommended for use during rescue operations.
Knitting pattern
Ready node
Pen
When carrying large flat objects that cannot be grasped by hand, a “handle” bundle will come in handy.
How to tie:
- Measure the rope. It should completely surround the object being carried.
- Tie the ends of the cord with a regular knot.
- Move the rest of the rope to the other side so that it is a third of the height of the object.
- Grab the middle of the cord (both sides).
Gripping in the area of the center of gravity makes it possible to tilt the object while descending (ascending) the stairs.
Knot handle
Tightening knots
Tightening node connections will hold tightly if the permissible traction is applied to the cable (root part). Under the influence of the latter, the knot tightens itself.
Stirrup (bleaching unit)
The stirrup is used in mountaineering during ascents and descents. With the help of such a bundle it is possible to transport people and objects.
Step-by-step instruction:
- Take the rope in your crossed hands.
- Pull them apart, forming two loops at the same time.
- Fold the latter so that the running ends are located in the middle.
- Place the support you are using on the carabiner.
Under variable loads, the described nodal connection slips. It is also unreliable on a sliding rope.
Stirrup
Constrictor
Many people believe that the constrictor is the strongest fixing knot. It should be used only on voluminous or convex objects (without sharp corners).
Execution technology:
- Wrap the rope around the base so that the root end is under the chassis.
- Place the last one behind the support, wrap it on the other side, and pass it under the first loop.
- Tighten.
A constrictor is often used at home to tie a hose, tighten a carpet, tie a bag, or apply a tourniquet to an injured limb.
Knitting pattern
Ready-made constrictor knot
Classification of maritime knots
All names of sea knots came to us from other languages.
The term “anchor knot” was denoted by several different words depending on the design feature of the knitting:
- “knot” - they intertwine, connecting the running edge with the main one, a thickening is created at the end of the rope;
- “hitch” - designed to secure the running end to yards, masts, other gear and objects;
- “bend” - used to increase the length of the cable by tying the two ends.
Important!
The main section of the rope is a section that is permanently fixed. The running end is the free edge, which is not attached to anything; the rope begins to be tied from it.
Beginners are advised to master the technique of knitting basic knots, which are often used in sailing. You need to start with simple designs, gradually complicating the technique. Tying one knot should be brought to automaticity, only then begin to study a new design. It should be remembered that many node names come from English-language dialects. The same mount can have up to 7 names.
Additional nodes
For their safety, tourists must correctly tie knots on a rope and master different tying methods. It would be a good idea to study the auxiliary node connections.
Prusika
The Prusik knot is formed with a thin rope (rep cord) on a rope (the best proportion of diameters is 1:2). It can be tied with one hand.
Step-by-step instruction:
- Prepare a cord tied in a buttonhole.
- Inside the last knot, wrap the knot three times around the rope.
- Tighten.
In everyday life, a type of prusik is often used - line winding, which allows you to adjust the tension of the fastening. It is used to tie packages.
Prusika
Conductor
Under load, the conductor tightens well and does not slip. However, it is difficult to dissolve it later. It is used to connect a rope with a carabiner or a ring.
How to tie:
- Fold the rope in half and make a loop.
- Thread it through the double end and pull it off.
Important! If the fastening is used under unstable loads, it is necessary to make a control unit.
Conductor
Eight
The figure-eight locking knot is quick to execute, thickens the rope, and prevents slipping through the fastening and holes.
How to tie:
- Make a loop.
- Wrap the running end around its base, pass through the formed loop, and tighten.
Eight carabiners are attached to the cable, and fishing hooks are tied. A correctly tied knot does not move at all.
Eight
Movable bayonet
Typically, a movable bayonet is used to attach auxiliary ropes to the main one.
Execution technology:
- Use the end of the additional cord to tie a half bayonet around the rope.
- Repeat a similar procedure inside the formed loop.
This way the additional rope can be securely attached to the main one.
Movable bayonet
Artillery
It is possible to form a fixed loop on the main cord without resorting to auxiliary ones, using an artillery cord.
How to tie:
- Form a loop from the rope.
- Insert the free end into it.
- Then stretch the buttonhole slightly and pull the top turn inward.
The finished artillery assembly should be slightly tightened, after which it can be used as needed.
Artillery unit
Bachmann knot
The Bachmann knot belongs to the group of grasping joints. Under load, it presses the hook against the rope, preventing it from moving.
Technique:
- Place the long side of the carabiner on the main cord and thread the cord through.
- Fold the latter in half, circle the hook and the main rope three times.
The Bachmann knot does not hold the icy rope sufficiently and may slip. Because of this, it is not used for insurance.
Bachmann knot
Counter conductor made of ribbons
In mountaineering, a counter-conductor tape knot is used to connect two woven belts. It does not crawl under load, holds well, and is suitable for tying a couple of ribbons.
Step-by-step instruction:
- Tie a simple knot on the belt.
- Do the second strap in the same way, in the opposite direction.
- Tighten firmly.
The main disadvantage of the counter conductor is its strong tightening, which often does not allow the knot to be subsequently untied.
Counter conductor made of ribbons
Kamikaze
Kamikaze tying allows you to shorten the length of the rope without cutting or losing mechanical properties.
How to tie:
- Fold the cord three times (in the middle) to form the desired size.
- Tie half bayonets with the free ends and tighten tightly.
Attention! On a thin synthetic cable, a kamikaze can come undone.
Kamikaze
Dummy
A pacifier tie is used to tighten the top of a backpack. The pacifier is easy to untie: the ends of the rope need to be pulled in opposite directions.
Step-by-step instruction:
- Make a loop on the cord.
- Pull one part of the rope through it to form an eyelet and tighten it.
The pacifier is used when tying the following knots: double conductor, bowline.
Dummy
Fire escape
The fire escape's easy-to-make rope design allows you to quickly descend and ascend in any conditions.
Execution technology:
- Determine the required number of nodes and the distance between them.
- Make a spiral from the rope: the number of turns should be equal to the number of future knots.
- Pass the end of the cord through all the loops.
- Distribute the knots evenly along the entire length of the rope.
- Tighten each knot separately.
The fire escape is used by circus performers and industrial climbers.
Fire escape
Austrian conductor
An Austrian guide is used to form a loop in climbing ropes and rope ladders. This knot does not slip and unties quickly.
Step-by-step instruction:
- Form a figure eight from the cord.
- Lower the top loop down, place it under the intersection of the rope, and drag it into the bottom circle.
- Tighten the knot.
Tying an Austrian wire requires constant practice and is difficult to do with one hand or with mittens.
Austrian conductor
Grandma's and mother-in-law's knots
The popular women's and mother-in-law's knots represent 2 erroneous ways of performing a thieves' knot connection. Such names arose due to the everyday specificity of their use: they are used everywhere for tying ropes, but do not take into account the danger of sliding fastenings.
To tie a woman's knot, you need:
- Pass the two running ends one through the other in different directions.
- Repeat this procedure in reverse.
Technique for performing the mother-in-law knot:
- Form an incomplete loop from the rope.
- Insert the end of the second cord into the buttonhole (from above), go around the first rope, and bring it out.
Even strong tightening does not guarantee that with further tension the tied ropes will not come undone.
Babi knot
Thieves
Despite the fact that the thief's knot belongs to the sea, on a ship it is used only for domestic needs. This is due to low efficiency.
How to tie:
- Make a loop from the rope.
- Insert the second cable into it so as to grab the base and pull it out in the opposite direction.
- Tighten both ends.
If the rope is under significant tension, such a knotted connection may come undone. But it is often used at construction sites for tying bags.
Thief's Knot
Sliding loop
The sliding loop ligament is formed extremely simply:
- Create a simple knot on the rope.
- Thread the end of the cord into the formed loop.
- Tie a locking knot.
A sliding loop is used to tie a rope around an object, support, rope.
Sliding loop
Marking
Using a marking bundle, the wires rolled into a coil are tied. It secures the end of the cable and keeps the multilayer ring from unraveling.
Step-by-step instruction:
- Roll the rope into a coil, but shorten the last turn by a third and make a buttonhole.
- Wrap the skein tightly with the free end (8 times), which is then threaded through the loop.
- Tighten it tight.
The marking mount is used by signalmen when restoring a damaged cable.
Marking unit
Tripod assembly
It is possible to create an adjustable structure if you connect three racks in a special way.
Execution technology:
- Place racks in a row and place a rope on top.
- Use a cord to circle one of the outer ones and form a bleached knot.
- Wrap the rope around the posts 6 times.
- With the remaining end, wrap all the windings 2 times and tie the same knot again.
The finished tripod can be used as needed.
Tripod assembly
Cross knot
Used for cross-shaped connection of two sticks.
Step-by-step instruction:
- Create a knockout knot on the pole (near the intersection).
- Wrap the end of the rope (in a spiral) about six times around two crossbars.
- Approaching the beginning of the winding, tie the ends of the cable with a straight knot.
This combination of sticks will certainly be useful for tourists on a hike.
Cross knot
Japanese knots: basic weaving and ideas for inspiration
Japanese culture has always been famous for its mystical traditions, which were aimed at health, well-being and happiness. And not least among them is such a charming art as “knotwork”.
The basis of this art, as the name suggests, includes various Japanese knots, which are tied in different ways and presented to family and friends as a gift. Currently, this art has begun to expand beyond Japan and is widely used throughout the world.
We invite you to consider this art in more detail in this article.
This technique has the full name “Mezuhiki” and is woven from special paper or silk cords. It is customary to decorate various gifts, cards, jewelry and even clothes with such knots. Nowadays, it is not difficult to find such knots; they are widely used for various decorations in the oriental style, which has become very popular at the moment.
Making such an amulet or just a beautiful pendant for a gadget with your own hands is quite simple, the main thing is to follow the detailed diagrams, which we will now consider in detail.
Weaving Basics
It is generally accepted that this technique is based on three knots, from which various shapes can later be woven.
This knot is considered the first; it is tied in such a way that it cannot be untied later. According to legends, such a knot is tied to a one-time event that cannot or should not be repeated. And it is worth paying special attention to the location of the ends of the cord; it is generally accepted that if the event is joyful, then they should look up, and if it is sad, then down.
This knot has no beginning or end and symbolizes the repetition of events. Traditionally, they were used to decorate a child’s birthday gift or card.
This knot is ambiguous because it can be untied. It can symbolize either a one-time event or a repeat event. The location of the ends, as in the first node, is either positive, i.e. up, or negative, i.e. down.
Having learned these basics, you can safely proceed to more complex examples. We offer you several interesting units with diagrams.
Read this: How to weave with weaving tubes: answers to any questions
Variety of nodes
The weaving pattern of this knot is quite simple; it can be used in jewelry together with beads. When weaving it correctly, both loops should point in the same direction.
You've probably encountered such a knot more than once. The peculiarities of its weaving are that it is woven not with ends, but directly with loops.
At first glance, such a knot seems quite simple, but the weaving pattern is very interesting. To weave it, threads of contrasting colors are usually used.
The snake knot got its name because of its resemblance to a snake. It is generally accepted that such a knot brings good luck to the owner and protects him from theft.
Such a knot also brings good luck and symbolizes the secrets of the Universe. It is quite complicated in execution, but if you follow the scheme correctly, everything will definitely work out. Due to its volume and complexity of weaving, such a knot can be a wonderful gift or personal decoration for a mobile phone or keys.
This knot is woven using a special pillow and a needle. Also, to use it, you should take two threads with a length of at least 50 cm.
Please note that two variants of this knot are indicated, it all depends on the direction of the thread during weaving, for example, if you weave in one direction, you will get a “round” cord, and if you change the direction after each knot, then you will end up with get tetrahedral.
There are still quite a large number of different nodes, some have been preserved since ancient times, and some have already changed over time. All of them are amazing and unique in their own way, and if you become seriously interested in this art, you can make amazing things that can become not just a talisman, but also an exquisite decoration, both for clothing and for your interior.
Video on the topic of the article
How to tension a rope without sagging
If you stretch a rope between two supports, then under the influence of load and weather conditions it begins to sag over time. However, there is a way to maintain the initial tension (without using special devices):
- Tie the rope on the support with any knot that can be quickly untied.
- Make a figure eight in the center of the cord.
- Pull the rope through it so that a small loop is formed.
- Go around the other support with the free end, return to the figure eight, tie it to the second buttonhole using any knot.
- Tighten the finished structure as much as possible.
The described method of pulling a rope is used in simple situations: when drying clothes, fish, transporting small loads across a stream.
Important! To prevent the twisted rope from unraveling, it is recommended to use a ball-shaped rope end knot.
Today man uses many rope knots. Each of them is characterized by the complexity of its formation, has its own advantages and disadvantages, and is more effective in a given situation. In order to choose the most suitable ligament, if necessary, it is important to familiarize yourself with many knot connections and learn how to knit them correctly.
Was this information useful to you? Share in the comments!