Today there are many fishing knots. Many anglers themselves constantly modify them, adapting them to their needs and their vision of the strength of the gear. Most of the fishing knots we use for monofilament will also work for braided fishing line. But still, for braiding it is recommended to use some knots that give the greatest strength.
In today's article we will look at several of the most popular and simple knots when using braid. We will also try to understand why different manufacturers recommend different units for their products.
So, what should be the difference between fishing knots for braided fishing line and regular fishing line?
In fact, it is difficult to answer this question unambiguously. Braided cords from different manufacturers may have their own unique properties, which in turn may have different effects on the same tying method.
To produce braided fishing line, different types of fibers are used (for example Spectra or Dyneema). Finished braids have different methods of weaving fibers, their quantity, method of soldering or composition of the outer coating. That is why cord manufacturers try to recommend their own binding option. On the bobbin with braided material there may be a couple of binding options, or even a small brochure with recommendations for knots. It is the properties characteristic of their products that are taken into account when making these recommendations.
If we take one of the most popular manufacturers of braided lines today, Power Pro and Fire Line, we will see what different knots they recommend. Power Pro recommends Uni , and Fire Line recommends Palomar .
To determine reliable knots, it is necessary to understand how the knot elements themselves act on our fishing line. It is clear that the cord undergoes considerable deformation at any knot. When tying a hook or swivel, we tighten the knot, and the internal layers of any fishing line, including braided ones, shift. The internal structure of the cord changes, some layers are overextended, while others receive excessive tension, and this accordingly leads to a loss of strength.
Moreover, in addition to the selected knot, the tensile strength of the braid is significantly influenced by such factors as:
- Wetting the knot before tightening;
- Section shape;
- The thickness of the braid used.
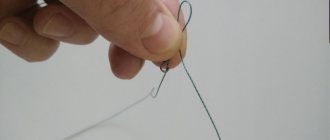
Wetting . It would be a good idea to once again remember the importance of wetting any knot when tightening. If it is tightened in a dry state, the braid will heat up significantly. Although this process is short-lived, it can significantly affect the structure of the outer and inner layers.
Moreover, the more complex the knot (that is, it contains many loops and twists), the more noticeable the effect of destruction from excessive friction is. With such knots, 10-15 centimeters of braided fishing line can undergo significant deformation.
Section shape . When the knot is tightened, the braid twists, and a round braid twists much less than a flat braid. This twisting further reduces strength, placing considerable stress on some fibers.
Braid thickness . The braid consists of several threads; it is clear that the larger the diameter, the more threads are used, and the strength of the cord increases accordingly. Accordingly, braids with a larger diameter will be less critical to deformation when tightening knots.
So how can you use the above findings to determine optimal nodes?
Well, first of all: do not forget to wet the knot not only when tightening it on the cord, but also on any fishing line. Secondly: you should choose a simple knitting method. It will have less impact on the line. Factors such as the cross-sectional shape of the braided fishing line and its diameter, although they influence the strength of the knot, should be taken into account when purchasing rather for economic reasons and the specific fishing conditions.
Rules
When tying knots from braided fishing line, it is worth considering the following features:
- Wetting. This is a mandatory requirement when performing nodes. When dry, the line heats up. Of course, this is a short-term process, but it affects the structure of the fishing line - it is destroyed.
- Section. As the knot is tightened, the line becomes twisted, which reduces its strength. Lines with rounded shapes have the least curl, unlike flat braided ones.
- Treatment. To increase the strength of the nodes, it is recommended to apply glue to the places of the nodes and fastenings. The maximum holding time should be at least 24 hours.
- Tying. When tying knots, you need to leave free ends of the fishing line at least 4 cm long. Then, after verifying their strength, the ends can be removed, taking into account the remainder of 4 mm.
Before considering the main components, introducing some concepts:
- running end - part of the fishing line that makes movements;
- root end - part of the fishing line not used for tying;
The best knots for attaching braid to braid
Triple Knot Method
Instructions:
- First you need to fold 2 braids, taking into account the alignment of the ends. Next, counting a segment of at least 20 cm from both ends, you need to clamp the fishing lines.
- After this, holding both fishing lines together, you need to form a loop.
- Then you should triple thread the ends of the braids into the formed loop.
- Next, you should tighten both ends of the folded braids.
- Finally, to fully form a strong knot, you need to pull each braid separately.
A high-quality assembly should not retain empty gaps between parts of the turn. This knot is characterized by maximum strength.
Centaurus method
Instructions:
- To begin with, the fishing lines need to be placed in a parallel manner.
- The running end of the fishing line is wrapped around the second fishing line at least 5 times. In the initial turn you need to leave an open part in the form of a small loop.
- The tip of the running gear of the braid is passed through the resulting loop in the initial turn and pulled tightly.
- Similar actions are performed exactly with the other fishing line.
- At the end, the ends of both lines should be stretched to the sides - the turns will move towards each other, forming a stop
The advantage of this method is its versatility and compactness. In addition, the strong fixation ensures stability and reliability while maintaining a load capacity of more than 95%.
Method "Blood Ties"
Instructions:
- The fishing lines need to be folded one on top of the other (crosswise) , leaving an end of at least 20 cm for each braid.
- You need to hold the intersection of the lines with your finger and make at least 8 turns of one line around the second.
- After this, the running end of the winding braid comes back and is passed through the crossed part of the lines. In this case, the through part of the lines should be clamped with a finger, with a loop at the base of the intersecting part.
- The running end of the second fishing line needs to perform similar actions , return it back and insert it into the free part of the fishing line pressed with a finger. Then you need to pull each knot in turn, of course, wetting the knots.
- Finally, you need to trim off the excess parts of the running ends of the fishing lines.
The characteristic difference and advantage of the unit is its strength and practicality.
Herbal knot
The grass knot is a universal type of knot.
Suitable for tying fishing lines of different types, but they should not be knitted with different diameters. The ends of this knot look at an angle of 90 degrees, so the knot can interfere with the line coming off the reel, but the knot is perfect for attaching gear. The grass knot has a good margin of safety, and is not afraid of even jerking loads, although it looks quite weak. You can knit it in two ways. The first method is simple, fold the two ends parallel to each other, and so that they face each other. Now bend the ends at right angles and place them on top of the adjacent end. Then, we bring the tip of each fishing line under the lying one and insert it into the resulting loop. We tighten the knot, making sure that the ends lie perpendicular to each other.
There is a second, more complex version of this knot. It starts in exactly the same way, after we have made loops on both sides, we cross the ends of the fishing line and insert them into the bottom of the loops. Now the knot turns out to be self-tightening, and plus it will hold the ends itself.
How to tie a braid to a leash?
Loop in loop method
Instructions:
- First, you need to take a braided line in the form of a main fishing line, leave a section of at least 40 cm, fold them in half, forming a simple loop.
- With the running ends of the fishing line, you need to perform at least 3 passing, winding actions along the loop, as a result of which a knot is formed.
- The knot is tightened by holding the loop and the free ends of the fishing line. During the tightening process, the knot should be wetted; (similar actions must be performed with the leading line).
- Next, the loop of the braid should be threaded into the loop of the leash, and the root tip of the leash should be threaded into the loop of the braid. As a result of the actions, the root ends of the fishing lines should be pulled together.
Loop in loop: 2 options
If operated correctly, the loops form an “8” shape.
The advantage of this method is the greatest strength, as well as practicality and ease of use. Equally easily used in tying leashes of any type. In addition, the process of dismantling and replacing with other leashes is very simple.
Clinch method
Instructions:
- Take a leash line with a length of at least 30 cm. The leash must be folded in a double layer, placed against the braided line and pressed with your finger.
- You need to throw the running end of the leash over the braided line and the auxiliary end, thereby forming the shape of a loop. In this case, the braid should be inside the loop.
- After this, you need to make at least 6 turns along the braid and one part of the leash. In this case, the loop should be held with your finger.
- At the end of the action , you need to move the running part of the fishing line to the loop, tighten the ends of the fishing lines;
- The remaining ends of the running lines must be trimmed, leaving at least 2 cm.
The advantage of this fastening method is that it can be used when fishing in difficult conditions: rocky bottom, snags and algae.
The most common fishing knots
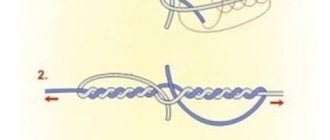
Uni node (Grinner)
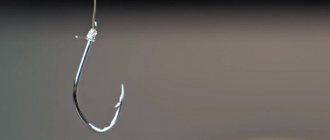
In order for fishing knots for braid to serve for a long time, they must have two important qualities: strength and reliability. These requirements are fully met by the “Uni” node , sometimes referred to as “Grinner”.
It has become widespread in situations where it is necessary to tie swivels and hooks with miniature eyes. If there is such a hole, no one can thread a double line through it. Many American manufacturers are calling for the need to use such a connection. However, you may not be able to tie it the first time. You will have to make several attempts to learn this simple task. The technique for tying a hook in this way is as follows.
- You need to take the end of the braid and push it through the eye.
- After this you need to make a loop.
- Then we take the end of the braid and wrap it around the main fishing line. The result should be another loop. You need to thread the end of the braid into it. Moreover, this must be done in such a way that it makes about 5-7 turns around the double fishing line.
- When the knot is ready, it needs to be tightened and the rest cut off.
Attaching the hook and swivel to the braid
With hooks:
Uni method
- The running end of the line should be inserted into the eye of the hook, taking into account the formation of a loop. The running part of the braid is placed on the upper side of the fishing line and threaded into the loop.
- Next, you need to wrap layers of braid around the chassis, making more than 8 turns.
- After this you need to tighten the knot.
Uni node
The node is considered the simplest, but at the same time the most reliable.
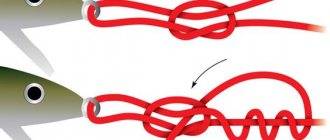
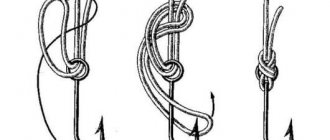
Clinch Knot Method
Instructions:
- The running end should form an open loop shape, the length of which should be 12 cm.
- The upper part of the loop is threaded through the ring of the hook and pulled out in this way, as a result of which the end of the undercarriage should be at least 6 cm.
- After this, the root end and the loop should be framed with a 6th reverse layer of the running end.
- Next, after completing the windings of the fishing lines, the chassis must be passed through the loop of the fishing line.
- The knot should be moistened and tightened tightly, and the excess parts of the fishing line should be cut off, leaving a length of at least 3 mm.
This method is the most common and quite practical. With it you can tie not only hooks, but also baits, swivels and a number of equipment elements.
With swivels:
"GRINNER" method
- First, the braid must be passed twice over the eye of the swivel for maximum strength.
- The running end of the fishing line should be placed on top of the fishing line in a cross position , forming a loop shape. You need to grab the braid, taking into account the 10 cm height above the swivel for tying the knot.
- After this, you need to pass the running gear of the braid along the loop and make 6 turns around the braid. In this case, it must be taken into account that having completed the last turn, the running end of the fishing line must be pulled to the outer side of the loop, thereby forming the shape of a knot.
- After moistening the knot, you need to gradually tighten the knot so that the position of the turns is tight.
- Finally, the main part of the fishing line needs to be pulled so that the knot should slide towards the eye of the swivel.
This type of knot is considered one of the most reliable, used in the case of tying elements with rings. A characteristic feature of the unit is its excellent load capacity, amounting to 90%.
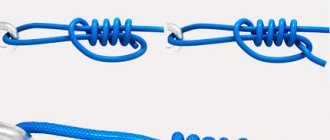
Palomar method
- First, the running end of the fishing line is inserted into the eyelet , pulled out for 5-8 cm, and the fishing line is passed back through the eyelet, leaving behind a part of the fishing line that is not completely pulled into the eyelet, in the form of a loop.
- The loop is held with your fingers.
- Next, a knot is made. In this case, you need to pay attention to the location of the eyelet in the central part of the knot.
- After this, the windbreak with a carabiner is threaded into the loop and tightened in the opposite direction. In this case, you need to wet the knot.
A similar method can be applied to the hook.
"Palomar" is the most common and practical method. It is quite simple in design, but provides high strength and reliability.
Features of braids
“Braided” is a fishing line that has clear advantages over monofilament. Its performance qualities are superior to ordinary fishing line in terms of withstanding loads. Anglers may be familiar with a variety of tying techniques, although there are many more out there. In most cases, fishermen try to limit themselves to ordinary braided connections, which, in fact, are not suitable here.
Braided cords have a completely different structure. It resembles an ordinary rope or shoelace. Such threads also differ in the number of turns, fibers and ways of weaving them. Monofilament consists of a continuous material. The corresponding difference involves the use of completely different adhesions. Some of the connections are suitable for tying two braided cords, and the other part of the nodes are suitable for attaching two different lines to each other (example: installing a monofilament leash to the main braid).
IMPORTANT! Few fishermen know that when manufacturers release a new model of complex thread, they also develop knitting methods! They test them: hang weights, check for jerks, pulls and lifts. Be sure to keep an eye out for such inventions from manufacturers.
There are two consequences of using ordinary knots to tie monofilament threads when installing braids:
- rapid wear of the connection and its dismantling during operation;
- damage to the structure of the cord itself.
The cross-sectional shapes of braided lines also vary. There are square, triangular, round and multi-faceted textures. Incorrect selection of a knot for a particular type causes cracks or unraveling.
Important! The more complex the knot, the higher the friction force of its turns.
Attaching the braid to the reel spool
When connecting braided fishing line to reel spools, it is necessary to take into account the peculiarity of the braided line, namely the presence of slipping, as a result of which the cord may jump out.
Therefore, the use of adhesive tapes is recommended.
An elementary type of fastening is the following option:
- The line should wrap around the spool.
- The running part of the fishing line is bent around its solid part.
- The section of fishing line going to the bending point of the spool is superimposed with the 7th reverse layer of the fishing line limb.
- It must be taken into account that most of the braid is inside the loop.
- Next, the main part of the fishing line should be threaded through a loop , taking into account the coverage of most of the fishing line and tightened tightly.
Arbor knot method
- First, you need to wrap the line around the reel. A section is left for tying a knot.
- After this, by wrapping the line going to the reel , you need to form a knot at the running end of the braid. This ensures that the nodal part of the line slides towards the reel.
- An additional knot is made on the free part of the braid , which will serve as a stopper. Through it, the first node will be securely attached.
- When tightening the knots using wetting , the remnants of the running and main ends must be cut off in order to prevent tangling during winding.
This method provides a powerful hold and self-tightening function.
How to Connect Fishing Line With Braid • ARTAFISH.RU
How to tie braided line with fishing line
On every fishing trip there is a need to tie the fishing line together. How to tie a braided line with a knot is perfect for this task - tie a fishing line with a braided line. It is often necessary to tie fishing lines made from different materials. The effectiveness of fishing directly depends on the strength of the knot.
Every experienced fisherman, in his arsenal of his own skills, has a couple or three favorite knots that he uses all the time. What is the best way to tie braid to a swivel, how to tie the fishing line and braid together? But for novice anglers, making the right knot is sometimes problematic due to lack of practice.
We will try to help understand this issue more deeply, and now we will talk about methods of tying “braid” with other types of fishing line.
The strongest knots for tying “braid” with fluorocarbon
The first knot we will look at is called the “Mahin leader knot”, or simply “carrot”. Let's consider the method of knitting it:
- We take the end of the fluorocarbon fishing line and tie an ordinary (edge) knot without tightening it.
- We insert the end of the “braid” twenty centimeters long into the resulting knot.
- With the inserted tip of the “braid” we wrap the fluorocarbon, making ten turns.
- The tip of the “braid” remaining after the completed revolutions is wrapped back around the resulting turns six times.
- After returning the wraps to the loose knot, insert the tip of the braid into the loose fluorocarbon knot.
- Wet the knot and tighten it by pulling the braid and fluorocarbon in different directions.
- We cut off the ends, leaving about one centimeter.
Method of tying a knot “Double uni knot”
The second knot we are looking at is called the Double Uni Knot and is most often used to tie a fluorocarbon leader to the main line - the braid. Let's consider the method of knitting it:
- We take the ends of the fishing lines and fold them with their tips towards each other.
- At the end of the “braid” we make a loop, in the opposite direction from the folded tip.
- We wrap the remaining tip between two fishing lines inside the loop for three or four turns.
- Pull the end, tightening the knot.
- We repeat a similar procedure with the other fluorocarbon tip.
- We tighten the resulting knots into a single knot, pulling the fluorocarbon and the “braid” in different directions.
- Trim off the excess ends.
How to properly tie a Carrot knot for a shock leader - practical instructions for use.
For a step-by-step fishing guide - fly fishing for beginners, see below.
Tying patterns and a detailed story about the conditions and fishing techniques using lead rigs are in the next article.
How to increase your fish catch?
Over 7 years of active fishing, I have found dozens of ways to improve the bite. Here are the most effective ones:
- Bite activator. This addition of their dry blood is the strongest lure for fish in cold and warm water. How to properly connect fishing line to braid. What line do you use for the trimmer? How to remove the coil from the trimmer? Threading spools with thread of different types of bobbins. Knots. Discussion of the bite activator “Hungry Fish”.
- Increased gear sensitivity. Read the appropriate manuals for your specific type of gear.
- Pheromone-based lures.
Knot for tying thick “braid” and thin “monoline”
It often happens that you need to tie fishing lines of different diameters. Now we will look at how to tie a thick braided line with a thin monofilament line. This knot is called "Albright Knot". Let's consider the method of knitting it:
- We take the end of a braid twenty centimeters long and make a loop.
- We thread the end of the monofilament, also twenty centimeters long, into the resulting loop.
- We wrap the end of the monofilament around the threaded part and the braided loop. How to tie a fishing line with braid The winding should begin from the tip of the “braid”, which forms the loop itself, towards its center.
- We make ten turns of the monofilament line. The remaining tip of the monofilament is threaded through the rest of the braided loop.
- We wet the knot and tighten it, pulling the “braid” and “monoline” in different directions.
- Trim off the excess ends.
We looked at the most popular knots for tying braided line with other types of fishing line. Try to learn how to knit all the knots, in the process you will definitely choose those that are suitable for you. Good catch and strong tackle.
Source
Attaching the bait to the braid
Tight loop method
- A loose, loose knot is formed , with a segment of no more than 15 cm from the ends of the braid, the running end of which is threaded into the bait ring.
- A free end is left with a segment of up to 10 cm , which will be drawn in the middle of the braided knot;
- A tight knot is pulled behind the main line. It should be pulled behind the working end, as a result of which a loop is formed.
- Next, by wrapping the working part of the braided main line , you need to form an additional knot.
- The additional knot must be tightened with the main braid to the primary knot. It is necessary to cut off the remains of the braid, leaving a 4 mm piece.
It is considered the most universal method of attaching almost all types of baits.
"RAPALA" method
- A knot is formed with an open part in the shape of a loop , located at a distance of up to 20 cm from the ends of the braided fishing line, and one of the running ends of the fishing line needs to make passes along the bait ring.
- Leaving the running part of the fishing line with a segment of at least 15 cm , you need to pass it along the central part of the knot.
- You need to wind the running end around the main part of the braid with 6-7 turns , pull the loop closer to the bait ring, pulling with the running end. The length of the remaining part must be at least 2 cm.
- After this, the running part of the fishing line returns back and is passed again through the central part of the knot.
- The final stage is to alternately and carefully tighten the main and working lines.
The remaining excess part of the fishing line is cut off, separating a 3 cm piece.
The priority of the knot is to ensure the correct position of the bait and its free play. By its nature it is non-slip. Easy to do. It is reliable with a strength level of more than 95%.
Kinds
As practice shows, the following types of knots are recognized as the best for braided fishing line.
"Palomar"
This simple and functional method of tying fishing equipment to a fishing line consists of simple manipulations. Initially, the braid is folded in half and threaded through the eye of the hook. Next, a standard knot that is not too tight is knitted. After this procedure, you should make sure that the eye of the hook is in the center of the loop. Pass the hook through the newly formed loop. On the knot, the fishing line is moistened, the excess part is cut off with scissors.
"Yuni"
This knot is used when it is not possible to thread a double line into the eye of the attribute. The reason for this may be the small size of the eyelet, as well as the large thickness of the fishing line. This node is more difficult than the previous one. To perform it, the following manipulations are carried out:
- pull the braid along the eye of the hook and form a loop;
- the end of the thread is repeatedly wrapped around the main line and a second loop is made;
- The end of the braid is passed through the loop, forming up to 7 turns around the double line;
- the thread is moistened, the knot is tightened, and the excess piece of fishing line is cut off.
"Wedge"
It is the most recommended knot for braiding. Thanks to its simplicity, even a novice angler can use it. To begin with, the master should stretch a 15-centimeter piece of fishing line into the eye. The end of the braid is used to wrap the main thread, including the hook shank. During this event, 6 revolutions are performed. The freed end of the braid is passed through small and large loops. The last step of the procedure is to wet the knot and tighten it, as well as remove excess thread.
"Bloody"
This knot is used if you need to connect 2 pieces of cord. Moreover, the latter can have different thicknesses. Thus, fishermen tie a monofilament line to the braid. The formation of a bloody node consists of the following stages:
- a pair of segments are located in close proximity to the opposite direction;
- one end is wrapped around the second braid 6 times;
- this same end is folded back, inserted between the turns in the opposite direction;
- perform similar activities with the second end of the thread;
- the knot with turns is wetted and carefully tightened, after which the excess fishing line is removed.
Blitz tips
- A well-tied knot should be smooth , without any places with slack or gaps.
- In the case of attaching a hook or swivel to a braided line , you need to determine their effect on the structure of the fishing line. It is worth remembering that they can cause a shift in the layers of fishing line threads, which reduces its strength.
- Considering the characteristics of the braid, when tying a knot, for example, using the Clinch method , to prevent slipping and untying, the tip of the braid must be melted over low heat.
- When attaching the braid to the reel, the line needs to be tensioned. Otherwise, in the process