As soon as I didn’t get tired of tying knots, I started mastering nozzle jigs. No matter how much the guys showed me (at that time I was still a boy of 10-12 years old), I would definitely miss something. In the end, I knitted as needed. After sitting on the ice and not catching a single fish, I simply hung up a simple jig and attached a worm or maggot and caught it. I couldn’t compare my failure to such a small thing as a properly tied bait. And this is one of the components of success. Tied correctly - the “chetrik” will not dangle haphazardly when moving the nod, which means the chance of a positive reaction from the fish increases.
Jigs for attaching to a winter fishing rod have fastening rings or through holes.
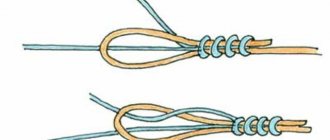
We tie the “devil” with a fastening ring
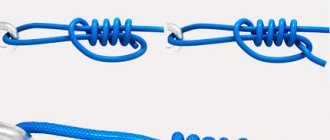
There is no point in splitting hairs here. The Clinch Knot is always ideal. For many years now, it has been used for installing “”, “bugs”, hooks to a float fishing rod.
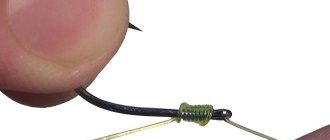
We thread the fishing line through the eye
We wrap a short piece around the main one 4-5 times
We pass the end of the fishing line into the formed loop near the ring. You can strengthen the knot if you insert the short end again at the exit in the upper part next to the main line
Wet and stretch
The first couple of times it may not work. But believe me, these are really the simplest ways to attach the “devil”.
Sometimes, when there is a danger of the knot rubbing on the edge of the ice (this happens when fishing in cold weather), before tying the jig, I put a small cambric on the fishing line, and then lower it onto the knot that has formed. In this condition, the mount lives longer, and the multi-colored bait additionally attracts fish.
There is also such a miracle as a “steam locomotive”. This is when 2-3 jigs are tied to the main thread. Following each other at a distance of 20 centimeters, they fish several layers of water at once. But, in my opinion, it somehow doesn’t look sporty.
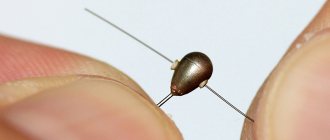
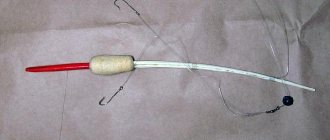
A jig with three or four hooks is called a “devil”. Cambric or beads (most often white, yellow, red, green) are used as bait, or they are caught without bait at all. The most common forms of the “devil” are long (column-shaped body) and short (thickened, barrel-shaped).
It has been noticed that when a slow and smooth game is used, for example when fishing for bream, it is better to use a long “devil”, as it hooks better. When fishing for roach, a short, plump “devil” is more suitable, since it will be more compact compared to a long “devil” with the same weight. As you already understood, the size and weight of the “devil”, like any other jig, is important to consider.
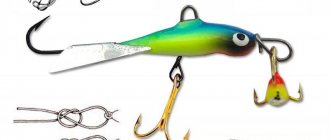
The “devil” on the fishing line can hang either vertically or at an angle. When it hangs on the fishing line at an angle, the condition must be met that two of the three hooks point upward. It’s clear why this is needed; hooking fish will be more effective. Which method of attaching the “devil” to the fishing line to choose is selected experimentally, taking into account the preferences of the “local” fish and the game of the jig.
1) Obliquely suspended
2) Vertically suspended
Why is the cambric put on the ear? - and this is to fix the knot. It happens that the jig does not hang strictly vertically, it turns to the side, and you have to “straighten” it with your hands all the time. To avoid problems with this, you need to pull the cambric over the ear and the knot will not “ride”. The cambric is not a prerequisite; you can fish without it, if you wish).
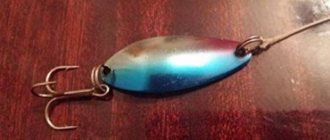
The fish often grabs not the hook, but the body of the baitless jig. Therefore, when purchasing or choosing a “devil”, you need to pay attention to the tee. It should be large enough compared to the body of the bait. Its grip depends on this. The imaginary line, which is a continuation of the point of the hook, should not intersect the body of the “devil”.
As always, we pay attention to the sharpness of the hooks; it is clear that there will be many more slips on dull hooks. If there are three hooks on the “line”, then all three should be sharp. Select a jig according to the expected size of the trophy. It is more difficult to catch a large fish with a small “devil”, since it is more difficult to hook a large fish with a small tee. Too large ones should also not be used, if there are no large fish in the reservoir; fish of medium and small size are unlikely to be tempted by a large “devil”.
How to bind Devil
You can tie the Devil to the line of a winter fishing rod in the same way as a regular jig with an eye or hole. For this, there are many different, simple and complex units, reliable and not very reliable. We will show you the simplest and most reliable knots for the Devil.
Devils can have two types of attachment to the fishing line of a winter fishing rod:
- Through a hole in the body of the jig;
- Behind the ear or ring at the top of the Devil.
Accordingly, you can tie the Devil in at least two ways:
- Using the hooks, pass the fishing line through the hole;
- Tie the devil's ear or ring with one of the suitable knots.
How to tie a Devil without an ear (through a hole)
Devil with a hole
Devils with a hole in the body can be hung at an angle and create a more attractive game when retrieved. But it is precisely this type of attachment of Chertik that raises the most questions. Tying such a Devil looks like this:
- We stretch the line of the winter fishing rod through the hole of the Devil;
- We form a loop and knit a knot as in the video below;
- Wet the knot and tighten it completely;
- We cut off the excess end of the fishing line.
This knot or its variations are used for tying regular jigs with a hole and for single hooks with a ring. In general, any knot for tying a jig through a hole is suitable for the Devil.
How to tie a Devil with an ear (by a ring)
Jigs Devil and Goat with a ring
There are a lot of knots for tying baits or hooks with a ring, most of which are suitable for our jig. The simplest and most reliable knots for tying baits with an eye are varieties of the Clinch knot.
Here, for example, is one way to tie a Devil with an ear:
A couple more knots suitable for the Devil with an Ear:
Knots for jigs with a ring
Several options for attaching the devil to the fishing line using different knots in the video:
Below, we will leave another video devoted to the issues of tying attachmentless and attachment jigs, and now we will focus on the installation of a combined equipment such as a “garland” or “locomotive” with a Devil or a Goat.
Garland of jigs - equipment for Steam Locomotive
Garland of jigs
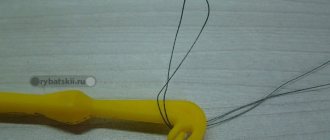
A garland of jigs is two or more jigs tied in series one after another on the main line of a winter fishing rod. That is, a garland or a locomotive is a combination of various jigs, the distance between which on the fishing line is 15 - 30 cm.
Installing such equipment is not particularly difficult, but some anglers have difficulties with the assembly of the upper jigs. If tied incorrectly, it becomes a weak link, and the reason for the loss of several jigs at once when it breaks.
See how to knit the Steam Locomotive or Garland rig correctly:
An example of fishing with a “devil” jig
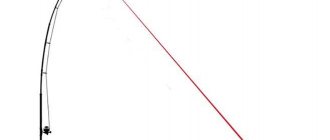
The recommended nod length is 7-10 cm, but for a slower game you can increase it, for example, up to 15 cm. Keep in mind that the shorter the nod length, the faster and sharper the hook. They increase the length just to get the desired “cool” game. If the nods are too long, you may not be able to keep up with the hook, in which case try making it shorter or training your hand.
The game of “devil” begins with tapping on the bottom. This is followed by a smooth swing of the tackle. You cannot make jerks or pushes. At the slightest change in the operation of the nod, you must immediately make a hook. Often a fish follows the “devil” and when the jig stops, it hangs over it, so at the end of the retrieve you also need to make a hook. Try different vibration frequencies and amplitudes.
When fishing with a cone-shaped “devil” or in the form of a drop 9-20 mm long and 3-5 mm in diameter, a leisurely, sweeping game with the bait is recommended. The number of vibrations per minute is from 20 to 150. This game attracts, for example, bream.
Barrel-shaped, other thickened and tungsten “devils” are used to obtain a more active game, the number of vibrations is 200-300 per minute. Such a game, for example, is more interesting for perch and roach.
There are probably as many tying options as there are fishermen who love to fish and as many types of baits as there are on the market. The video talks about one of these, which was shared with the author of the film by the famous sports fisherman, jig fishing champion Stanislav Poklacik.
The binding method is applicable to baits in which a hole for such a procedure is provided in their body and located across it. Following it, a fishing line is passed through this hole, doing this twice. As a result, a ring is formed. Then a ring is formed from the free end of the monofilament and applied to the previously formed one. The following binding operations are:
- grab the rings from the fishing line with the formed hand; in this case, the free segment is positioned towards the hooks and parallel to the axis of the body of the bait;
- fold the rest of the monofilament, hold the resulting loop motionless and wrap the shank of the hook with 8...10 turns of the free end of the monofilament;
- then, as when tying ordinary hooks, the free end is passed into the loop located at the hook;
- Next comes tightening the knot: first tighten the knot on the shank of the hook by pulling the fishing line from the loop formed earlier in the second stage; then they pull on the first ring, which was formed after passing it through the eye twice.
As the author assures, and even an inexperienced fisherman can see this from the process, tying the bait in this way is very reliable and almost completely eliminates its loss due to improper fastening. The author cites his statistics on this matter, according to which the number of bait losses has decreased by 5...6 times.
Tying up the devil
The easiest way to tie a devil jig is the Palomar knot. It knits quickly, can withstand the weight of even large fish, and the loop passes freely through a fairly wide ring of winter bait.
Now devils are also produced with a through hole in the body of the bait. In this case, tying it so that it stays strictly vertical is not much more difficult than a little devil with a ring. This is done like this:
- The line is passed through the hole;
- A loop is laid along one of the hooks of the tee;
- The forend and the line folded in a loop are wrapped around 5 - 7 times;
- The free end is pulled through the previously laid loop;
- The knot is tightened.
To make it clearer, we suggest watching the video:
With this method, the devil is in the desired position. It is attractive to fish because of its play, and if it is not tied according to the rules, it will not perform its function.
Video of a simple jig attachment option
Many people probably know the simplest option. But sometimes it is useful to test your knowledge. This video does just that. It shows this method; it will be useful for beginner fish who find it difficult to understand the process from articles written on the Internet, but it is easier to see everything with their own eyes. Moreover, you can also hear comments about nuances, such as, for example, the need to wet the knots before tightening them.
And the method itself is completely similar to the one that most fishermen use to tie hooks in floats and other gear. The whole technology is as follows:
- take the bait in one hand (right-handers - in the left, left-handers - in the right) so that its ear protrudes outward from the closed fingers; with the second hand they take the piece and pass it through the indicated eye; the length of the monofilament segment behind the latter is determined by experience - for example, 10 cm is enough;
- the rest of the monofilament is placed along the body of the jig, along the shank of its hook;
- fold this segment in half so that the resulting loop protrudes slightly beyond the hook;
- hold this loop, pressing it against the body of the hook, with one hand;
- at the same time, wrap the shank of the hook with the other hand at least 5…6 times;
- thread the free end through the loop;
- tighten the knot by pulling the main line and its free end;
- trim off excess.
The knot is very simple, suitable for beginner fishermen. However, in the future they need to learn how to tie the bait with other, more reliable knots.