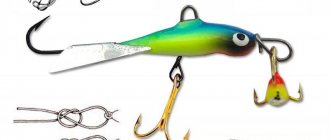
Modern fishermen have long been using a weighted hook or jig for winter fishing. Thanks to the attractive appearance of this tackle, you can catch fish of particularly large sizes. However, you definitely need to know the rules for tying a jig.
Very often, incorrectly tied tackle can cause a large trophy to fall off the hook. In order to avoid such situations, you should first study the methods of tying a jig.
How to tie jigs correctly
There are many ways to tie jigs. It is very important to tie this tackle correctly, since the further play of the fish and hooking depends on it. Also, when fishing with this tackle, it is worth considering the size and type of fish caught.
The main methods of tying a jig can be identified:
For beginners
Since this procedure does not cause any particular difficulties for experienced fishermen, for beginners, on the contrary, some questions may arise in this matter. Many novice fishermen do not know the rules for tying this gear, but in fact everything is simple.
Before you start tying the gear, you should follow these recommendations:
- It is important to choose the right bait. The bait is different for each fish. Therefore, it is advisable to purchase several types of bait;
- You need to choose good and durable gear;
- In addition, to drill a hole, you should use a good drill;
- Of course, the most important thing is to be able to tie the jig correctly so that it does not break off at the most inopportune moment.
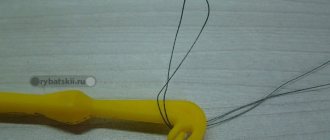
The sequence of actions for tying a jig for beginners:
- First you need to insert the end of the fishing line through the hole onto the jig;
- Then the line should be tied in a knot. It is very important to make three to five turns on the loop. This will make the knot stronger and stronger;
- The loop must be placed on the shank of the hook and moved to the end of the hook, and a sliding knot should be made;
- At the final stage of this procedure, you need to trim off the excess fishing line protruding from the hole.
Mormyshka with a ring
There are a large number of jigs that have a small eyelet in the upper part. For these jigs, the most optimal mounting option would be the most common noose. In addition, to ensure good fixation of the jig, you can put insulation from the used wire on the fishing line.
The process of tying a jig with a ring consists of the following steps:
- The fishing line is threaded through a hole located in the upper part of the tackle;
- Then you need to make a loop along the hook. Using a free line, it is wound onto the hook about 4-6 times;
- After this, a free line is threaded into the resulting ring and then it needs to be tightened in the form of a knot.
The process of attaching gear with a ring in the middle of the structure:
- The fishing line is passed through the hole in the tackle:
- After this, a loop is made, which is wound onto the base using the free end. It is advisable to wind it in 3-4 turns.
Jigs made of soft materials
These gears are secured using various methods. The most commonly used methods for tying jigs are:
- This method of tying is very similar to attaching jigs with rings at the top. The main difference is that the fishing line is not threaded through a ring, but through a hole located on the jig structure;
- The second type of attachment is much easier. The fishing line must be threaded into the hole on the jig and then a loop must be made. After this, you need to thread the free fishing line 4-5 times through this loop. Then the loop must be placed on the hook and at the end the knot from the fishing line should be very carefully tightened. The whole process of tying the jig is done. Before tying, it is imperative that the fishing line be moistened with water; wet tackle is not damaged when fastened and glides very well.
In order to extend the life of the fishing line, before making a loop, the fishing line needs to be wrapped a couple of times around the jig structure.
Of course, this will increase the reliability of the gear, but it will greatly spoil its appearance. It is very important that when tying, the fishing line is protected from contact with sharp edges. It is best to use jigs with rings that have processed edges. Also for these purposes, you can thread a cambric through the hole in the tackle, which will prevent the line from coming into contact with the structure of the tackle.
Jigs made of hard materials
Gear made from hard materials has a very heavy construction. They mainly use tungsten jigs. The process of tying this gear has some nuances that need to be carefully considered.
How to tie a tungsten jig
When tying jigs made of hard materials, problems may arise with the fishing line - it can be damaged, and it very often rubs against the structure of the tackle.
This problem can lead to the failure of the caught fish along with the jig itself. Of course, this problem can be solved quite simply - the fishing line needs to be isolated from the sharp edges of the tackle. A regular braided cord is perfect for this. The cord with fishing line must be threaded through the hole in the tackle in the form of a loop; it is advisable that it protrudes no more than 1 mm. The cord is then attached to the tackle. The fishing line is attached to the resulting loop in the form of a knot.
There are also tungsten jigs, which are designed with fluoroplastic inserts and large holes for fishing line.
They have one drawback - over time, the fluoroplastic inserts are damaged by fishing line, and therefore the product needs to be resoldered.
Jigs with a large hole are tied using cambric. It will increase the wear and strength of the fishing line for a long time.
How to tie a model with an eye
Such baits have two options, allowing you to find out how to tie a jig with an eye.
When going fishing with bloodworms, you will need to tie the jig to the fishing line like this:
- You should thread the fishing line into the ring.
- Then wrap the tip around the base several times (5-7 will be enough).
- It is recommended to thread the remaining part into the loop that is formed at the base of the ring.
- Tighten the end behind the main line.
Important! The jig should hang on the fishing line with the ring facing up.
Considering that it will not be possible to hang a jig on a reelless tackle, the scheme is a little different.
Namely:
- The line is threaded through the eye.
- The end folds in half.
- The resulting loop should be attached to the hook.
- Gently holding the jig with your finger, wrap the fishing line around the loop, as well as the shank of the hook, with several turns.
- Next, the tip is passed into the loop and tightened well.
The tied jig in this case will hang at a 45-degree angle.
If you tie the jig incorrectly
You definitely need to be able to tie knots correctly and fasten the jig so that it holds tightly and does not break off at the most unfortunate moment.
Very often, an incorrectly tied jig leads to unpleasant consequences. The knot may simply come undone, and the bait will fall off along with the caught fish. In addition, all fishing will be spoiled, and big problems will arise.
Tandems and pendants
In reelless fishing, various pendants, tandems of two jigs, and garlands are often used. To do this, one of the jigs (fly) is attached to the main line above the first bait. To tie a jig to the line of a winter fishing rod in tandem, the same palomar knot is used, only the end is not cut off - the lower jig is attached to it. As a result, after tightening, the tip of the hook should point upward. Tying two jigs is not limited to this method only - others can be used. The main thing is that the monofilament is not injured at the point of tightening.
Provocateur pendants
Blind suspension
Sliding suspension
Heavy suspension unit
A light phosphor eye or hook with beads, a fly, can also be tied in a sliding version. This suspension is more effective - when playing, the snag jumps up and down. During the descent, the light suspension sinks more slowly than the main load below, which further attracts fish. As stoppers, ordinary beads are used at the top and bottom, through which a fishing line is threaded in a loop. Working stroke length (distance between stoppers – from 2 to 10 cm.
Subscribe to the channel:
My YouTube channel RYBAFAN on fishing:
We're OK
Fishing tips
In order for fishing to be the most effective and bring a lot of catch, you should follow the following tips:
- You need to be very well prepared for fishing. You should purchase all the necessary gear - fishing line, jig and rod;
- The fishing line should be chosen strong and strong so that it can support large fish;
- You must be able to drill holes for fishing;
- It is very important to be able to properly fasten the jig, tie loops and knots.
Without these simple tips and tricks, fishing will become a painful pastime.
How to properly tie this tackle to a fishing line or leash
The main methods of tying jigs to a hole were discussed above. But this fishing tackle is very diverse.
There are quite a lot of their models. Some may have an eye attached to the outside, like a fishhook. In this case, it will be convenient to use the appropriate knots, which are usually used for tying fishing hooks.
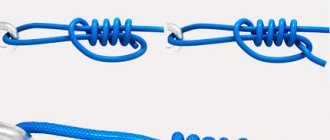
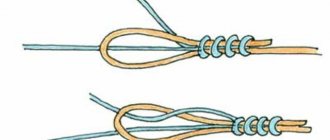
Here is one of them:
- We thread it through the eyelet and wrap it around several times.
- We pass it through the loop near the eye, then again into the large loop.
- Tighten the knot.
Here is a graphical description of this node:
Knots used to tie jigs
The process of knitting jigs follows the same principle as with hooks.
It is practically no different, since in both cases the hook itself is used as the basis for tying. In order for the knot to be strong and correctly tied, the following rules should be observed:
- In the knitting process, two types of knots are mainly used - with or without a ring;
- The jig should be tied so that the direction of the hook is upward. It is very important that the hook is at an angle of 145 degrees in relation to the fishing line. Thanks to this, chafing will be reduced and line wear will increase;
- If there is a hole in the jig, then you should insert a fishing line through it and tie a self-tightening knot in the shape of a figure eight;
- When tying, you cannot use regular knots, as they can quickly come undone and the jig will break.
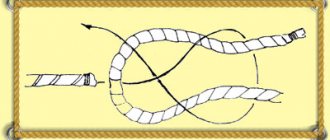
Basically, fishermen tie jigs in two ways:
1. This tying method involves attaching the tackle in the form of a loop using braided fishing line.
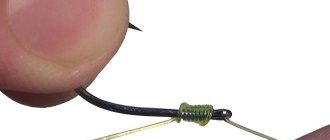
Step-by-step process for tying a knot:
- The braided fishing line, together with the regular one, is threaded through a 1-2 mm hole, which is located in the upper part of the jig;
- After this, a protruding braided line is wound around the shank of the hook. One end should be wound clockwise, the other counterclockwise;
- Regular fishing line should be tied in the form of a regular knot, which is tied on regular hooks.
2. This tying option is much more difficult than the first. Often this type of knitting tackle is used by experienced fishermen and those who take part in sport fishing. The entire tying process implies that the angler already knows and knows how to properly tie jigs and knots.
When tying, you must use a special soft cambric. It is threaded through a hole in the top of the jig. It should be remembered that the selection of cambric for each jig is individual. The smaller the jig, the smaller the hole size, therefore, the cambric for such jigs should be thin and elastic.
Due to this, a cambric with a suitable size and diameter is very difficult to find; it is usually dipped in boiling water and stretched to a more convenient size.
In order to fix the cambric on the jig, you need to pull its ends over the edges. In the future, they can be scorched in a fire. A fixed cambric in this way will protect the line from chafing and damage.
Knots for tying jigs
Nodes for attaching artificial baits:
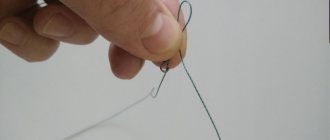
Figure Eight Knot
How to knit the Figure Eight knot:
- The hook is positioned so that the tip points upward, after which the fishing line is threaded through the eye.
- A loop is formed at the end of the fishing line.
- The loop is wrapped in one place several times.
- After this, a figure eight is formed from the loop. To do this, the end of the fishing line and its other part are pulled in different directions.
- Finally, the point of the hook (bait) is passed through each half of the figure eight and tightened.
Clinch Knot
“Clinch” is tied behind the eye of the jig:
- The end of the fishing line is threaded through the eye, after which two ends of the fishing line are obtained: one end is the end of the fishing line, and the other end is the main fishing line of the tackle.
- With the end of the fishing line, in the opposite direction, several turns are made around the shank of the hook and fishing line.
- After making 5-6 turns, the end of the fishing line returns and is threaded into the resulting loop.
- After threading the fishing line into the first loop, a second loop is formed, into which the same end of the fishing line is threaded.
- Finally, the knot is tightened.
Simple knot
How to knit a simple knot:
- The end of the main line is passed through a hole made in the body of the jig.
- After this, a regular fly fishing loop is formed.
- Inside the loop, with the second end of the fishing line, several turns are made.
- Then the knot is tightened, and the tackle moves along the line to the knot.
Double slip knot
To do this, you should perform the following operations:
- The line is passed through the hole in the nozzle.
- A spiral loop of several turns is formed from the fishing line.
- This spiral tightens a little.
- The bottom, largest loop is put on the hook.
- After this, they begin to tighten the knot.
We tie two jigs
Whether it is worth tying two jigs or not is a controversial issue. Many fishermen very often use this particular method of tying; many, on the contrary, believe that fish do not bite well on tackle fastened in this way. But this method of tying is still done, and therefore it would be nice to familiarize yourself with it in advance.
The process of tying two jigs:
- The top light bait must be tied using one of the above methods. You need to tie it so that the end of the fishing line remains about 35-40 cm;
- After this, you need to thread a fishing line through the hole in the jig and wrap the tackle;
- Then you need to attach the second jig using a knot. The knot can be chosen to your taste. Also, the distance between the jigs should be at least 20 cm. All two jigs are connected.
The figure below shows an approximate diagram of connecting two jigs.
In order for jig fishing to be a pleasure and for the catch to always be large, you should carefully study the methods of tying this tackle. Sometimes the entire catch depends on how this tackle is attached. If it is fastened weakly and incorrectly, this can lead to the catch of the trophy being torn off along with the bait.
How to tie two or more jigs?
To increase the chances of a bite, the fisherman increases the number of baits in his gear. And this is justified:
- Makes it possible to use several different baits at once.
- Different techniques for tying additional hooks give different bait play from each other.
- Increasing the attention of fish to several baits at once.
Requirements for tying several jigs:
- The lower rewinder should be heavier than the upper ones.
- The distance between baits is at least 25 cm.
- The first thing you need to do is knit the top jig.
You can knit with a train in various ways:
- With a leash. It is usually attached using a counter figure eight (Flemish) knot.
This design is usually used on bodies of water with current.
- Sliding. Fixed with stoppers. Typically, light pendants are used (phosphorus eye, fly, hook with beads).
Used as a provocative bait.
- With suspension. Knitting technique - palomar knot.
Mounting points
The methods of tying the bait affect its position in the water and animation.
Sometimes this influence can be insignificant, and other times it directly affects the outcome of fishing. Winter fishing often means a capricious bite, especially in the second half of the season. Sometimes the only thing that saves you from being without a bite in winter is the use of thin equipment, which must also be sufficiently strong and reliable.
The line almost always breaks at the knots. An incorrectly selected knot will injure the fishing line and can weaken it by 50% or more.
Thin tackle always forces you to pay more attention to the fastening. Fastening methods affect the equipment:
- The position of the bait in the water changes;
- Playing a jig while retrieving;
- Loss of fishing line strength at knots;
- Possibility of injury due to burrs in the hole of the jig;
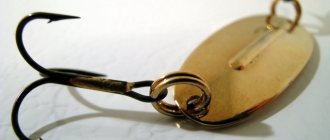
Considering jigs from an installation point of view, we can immediately distinguish two main types. These are jigs with a remote eye and a through hole in the body. By tying the jig in different ways, you can change the angle of its inclination. This can be important when fishing with a reelless fish, especially for passive fish during the dead winter season.
Common, inexpensive jigs are made of soft metals (tin, lead). They are less demanding on installation methods, like baits made of heavy and hard tungsten. Sharp edges in the body of a tungsten jig with a hole rub the fishing line, reducing its strength. The same can be said about lead baits made with the addition of copper or brass foil.
To protect against chafing, some manufacturers insert a piece of silicone cambric into the hole. Passing inside the soft tube, the fishing line is not injured and the breaking load is limited only by the knot.
How not to tie
Methods of tying knots have been invented a long time ago. People could not even dream of the existence of thin, strong monofilaments. Fishermen used homemade rough gear, where the line was replaced by rough thread or rope. There was simply no need to knit complex knots.
Some fishermen still use simple knots today, eliminating this disadvantage by simply increasing the diameter of the fishing line. If in ancient times the fish really pecked, not paying attention to the precision of the tackle, today the situation has changed.
Common Mistakes
Beginner fishermen often make the same mistakes:
- An ordinary “grandmother’s” knot on a ring or hook. In addition, beginners sometimes tie a jig to the fore-end. This also positions it incorrectly in the water. Without exaggeration, such a knot on a monofilament reduces the tensile strength by more than half.
- Hook method. The fishing line wraps around the fore-end and ties itself. The obvious disadvantage of this method is constant friction and, as a result, damage to the unit.
- By means of a locking knot. The line is passed through the body of the jig and secured with any knot. The method is very simple, the bait is attached in just a couple of seconds. Again, moving freely, the jig deforms the fishing line over time, noticeably reducing its strength. This method also does not have the best effect on the quality of the bait.
To be fair, I note that such methods are still actively used in sparsely populated areas. For example, people still fish the old fashioned way, especially in the Far North and Siberia. There is a lot of fish there, and the fishing methods of local fishermen simply do not need to change.
Useful tips
Experienced fishermen, who have long been familiar with the peculiarities of jig fishing, give a number of tips on attaching this bait:
- You should always tie a jig so that the hook is always pointing upward. The hook itself should be in a position of 145° in relation to the monofilament. This will reduce cord chafing and wear.
- When fixing the knot, it is imperative to wet the fishing line with saliva or water. When it gets into water, the monofilament cord stretches, so the knot weakens. To avoid this, you need to create similar conditions for it when tying.
- The fixed knot should not only be strong, but also, if possible, small. A massive one will impair the performance and effectiveness of the bait, and may also scare away the fish.
- Some fishermen apply a tiny drop of superglue to the knot, which can make it stronger. This should be a miniature dose and only after the line is completely dry.
- The treatment of the ends of the fishing line is important. They should be as short as possible and melted until softened. The small ball that appears will secure the knot and prevent the fish from pricking itself when biting.
- Do not unnecessarily pull the monofilament through the jig hole two or three times. To some extent, this allows you to fix the bait in the desired position, but the same result can be achieved using a “spindle” knot or a cambric adjusted to size. At the same time, a large amount of fishing line negatively affects the play of the jig in the water and reduces its effectiveness.
- It is better to take several equipped fishing rods with you. Tying knots in the cold is not the most pleasant experience. In addition, during the time spent attaching the jig, you may miss the fish.
Before you go fishing, it is recommended to learn how to knit fishing knots for jigs at home. This will allow you not to waste time during winter fishing, trying to attach the bait with frozen, unruly hands.
Winter jig fishing is very popular among fishermen. For it to bring good results, you need to be able to correctly tie this type of bait to the fishing line. Weak and unreliable knots quickly unravel and cause the jig to be lost, while large and bulky ones reduce its mobility and scare away fish.
Before going to the pond, it is recommended to learn how to tie basic knots at home. Experienced fishermen recommend taking several fishing rods with different baits at once, so as not to waste time tying them in the cold.
Eyelet knots
Jigs with an eye are usually made of tungsten. To knit them, loop knots (for example, Non Slip Loop Knot) or rigid tightening knots (Palomar, Improved Clinch) are used. The former are more often knitted on rewinders. Hard ones are ideal for thin lines.
Non Slip Loop Knot
A non-tightening loop (as the name is translated) improves the performance of the bait and is considered a universal knot. It is used for fixing wobblers, flies, and spinners. Impeccable animation of the bait is the main advantage of this unit.