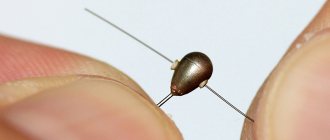
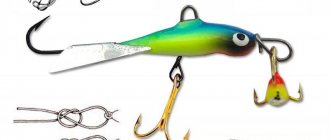
Rules for reliable connection of windbreak and fishing line
When connecting a fishing line to a swivel, you should adhere to the following basic rules:
- You should not use swivels that have various defects on their rings in the form of burrs , sharp spikes or splits. They will interfere with the integrity of the line and its rate of passage through the swivel, eventually causing the line to break.
- The cross-sectional shape of the fishing line should be round and not flat, since when tying a knot, fishing lines with a flat cross-section twist more, which leads to a deterioration in the strength of the future knot.
- Before tightening the knot, you need to moisten the line with water. If you tighten a fishing line that has not been previously wetted with water, the fishing line will overheat and greatly lose its elastic and strong properties, which should hold the entire knot.
- The thickness of the fishing line used (its diameter) . When selecting fishing lines for tying knots, you need to know that the larger the diameter of the fishing line, the stronger and more reliable the future knot will be, since they are not as susceptible to ruptures, stretching and various deformations, unlike thin fishing lines.
- The more complex the knot, the greater the impact it has on the structure of the fishing line. Therefore, for fishing lines with a medium or thin diameter, simple types of knots should be selected.
Methods for attaching swivels to fishing line
Among the many methods, you can find difficult to remember, inconvenient and unreliable ones that are of no interest to anyone. But among them there are options that are worth paying attention to. They are not only simple and reliable, but also easy to remember. To make it easier to master this or that node, most of the information is contained in videos, which are a useful addition to this article.
Method No. 1
This is one of the simplest and easiest to learn options for attaching a swivel to a fishing line. Starting to master this knot, it may seem that this is not so and that it is not very convenient. After a few trainings, all fears will fade into the background. To make sure of this, it’s better to watch the video, which shows and explains step by step how to quickly and easily tie a swivel.
The resulting free end of the braid is cut off. All. The Palomar node is ready. This versatile option works for cord, nylon and fluorocarbon. It is very simple, reliable, suitable for any beginner.
Knots for attaching the swivel to monofilament fishing line
The first knot, which is most often used to attach a swivel to a monofilament line, is the Grinner .
Its strength in practice is eighty-five percent, which is a good result. In addition, this unit has the following advantages of its use:
- has very good load capacity;
- in addition to the swivel, they can be used to tie hooks and sinkers (carp);
- shows long-term service;
- easy to perform;
- Doesn't take long to tie.
The Grinner knot is tied in this way:
- First you need to thread the tip of the monofilament line into the swivel ring. The total length of the fishing line used must be at least eighteen centimeters.
- Take the other end of the fishing line and fold it in half to make a loop.
- Pinch the area where the two ends of the lines intersect with your fingers and wrap the line folded in half with several turns. There must be at least six windings. If there are fewer turns, the knot will be too weak.
- Pull the other end of the fishing line into a larger loop and begin to slowly tighten the knot. Before doing this, you need to moisten it with a small amount of water.
- When pulling the line through the main loop, move the knot towards the swivel loop.
- After stepping back two millimeters, carefully cut off the excess fishing line at its tip.
The second knot, which is used to tie the swivel to the monofilament line, is called "Homer" . Its advantage is that its strength in practice is ninety-eight percent, which indicates its incredible reliability when tied correctly. For this reason, this knot is very popular among many fishermen.
The Homer knot is knitted in the following sequence:
- Measure out fifteen centimeters of fishing line.
- Pull one end of the line into the eye of the swivel.
- Wrap the working tip of the fishing line twice along the main fishing line and pull it into the resulting loop.
- Do not tighten the resulting knot, but hold it with your hand, while winding the other end of the fishing line around the main fishing line six to eight times.
- Pull the other end of the fishing line into this loose loop.
- Tighten the main and working lines at the same time, after wetting them.
- Push the resulting knot towards the swivel ring so that it rests directly on the eye of the fastener.
- After retreating two millimeters, cut off the excess fishing line.
Learning to tie a swivel to a monofilament line
The swivel is attached to the monofilament in several ways. The first version of the knot is called "Grinner" . This knot can also be used on other types of fishing line.
Node execution technology:
- insert the fishing line into the eye of the swivel so that the length of the passed fishing line is 15 cm;
- lay the free end on top of the fishing line, resulting in a loop;
- wrap the working end around the fishing line 5 times and insert it into the first loop;
- pull the end through the large loop formed;
- moisten the fishing line and tighten the knot;
- the length of the free end should not be more than 1.5 mm.
Homer knot is often used . The unit has high load capacity and strength. The node execution process looks like this:
- take the fishing line and thread it through the swivel (the length of the working end is 15 cm);
- wrap the end around the main fishing line;
- thread the end into the loop formed;
- wrap the working line around the main tackle several times;
- thread it through the loop and tighten the knot.
When tightening, you need to pull two lines at the same time. The knot should be placed close to the swivel.
With the help of such knots, the swivel is secured to the monofilament. The fastening is strong and reliable.
Knots for attaching a swivel to a braided line
To tie a swivel to a braided line, the following types of knots are used:
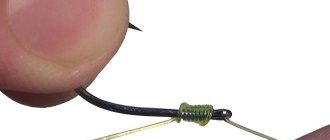
Knot "Palomar". It is considered the simplest fishing knot and can also be used on monofilament fishing line. The “Palomar” is tied in this way:
- The tip of the fishing line must be folded in half so that the length of the resulting folded segment is at least ten centimeters.
- Pull the folded end of the fishing line through the ring of the swivel.
- Make a regular knot over the swivel. There is no need to tighten it. The swivel should appear to be inside the loop.
- If done correctly, you should have a loop coming out, with another loop coming out on one side, and the swivel located under the first large loop.
- Throw a smaller loop onto the swivel.
- Pull the swivel through the large loop.
- Moisten the knot and tighten it.
- Trim off excess line.
The “Clinch Reinforced” knot has a strength of more than seventy-eight percent. You should know that it should not be used for tying hooks with a small eye. The main advantage of such a unit is its simplicity of execution and reliability.
It fits like this:
- Fold the fishing line in half so that the resulting folded segment is at least fifteen centimeters long.
- Pull the resulting loop into the eye of the swivel.
- Pull this line so that the unused end of the loop is nine centimeters long.
- Make five turns of this loop tip around the main line.
- Pull the tip of the fishing line into the loop formed and pull it slightly.
- Next you need to pull the main line so that the working tip of the line does not fall out of the loop.
- Pull the main line, and at the same time pull the other end of the line from time to time. Moisten it with water and tighten completely.
- Trim the excess line, leaving only two millimeters near the knot.
How to attach a leash to a swivel
The process of attaching a fishing leash to a swivel should be considered based on the leash material. For example, the most common fluorocarbon leader can be tied to a swivel as in the case of fluorocarbon fishing line using the “Palomar”, “Reinforced Clinch”, “Double Clinch” knot method. Also, when preparing both feeder gear and bottom mounting, you can tie the leash to the swivel with the above knots. A good option for attaching a leash to a swivel would be the “Loop to Loop” method.
The process of attaching the leader to the swivel should be considered based on the leader material. For example, the most common fluorocarbon leash can be tied to a swivel in the same way as in the case of fluorocarbon fishing line, knots: “Palomar”, “Reinforced Clinch”, “Double Clinch”.
When preparing feeder gear and donkeys, leashes can also be tied to the swivel with the above knots. And you can supplement your collection with a very simple and effective “Loop to Loop” technique.
In order to know how to correctly and securely tie a leash to a swivel, you need to understand what this part of the equipment is. General information about fishing leashes, the material they are made of, types, pros and cons of use, useful tips, storage methods and places - read here.
If you need to mount two leashes on a swivel, then the following video will help you with this
Knots for attaching the swivel to fluorocarbon fishing line
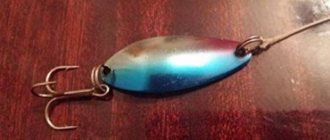
A Rapala knot is used to tie the swivel to fluorocarbon fishing line. It is very similar to the Homer knot, but the tying process is a little more difficult. The Rapala knot is the best solution when you need to make a loose loop. In addition, it can be used to tie oscillating spinners, which have a bad “game” at other nodes.
The Rapala knot is tied in the following sequence:
- Make a regular knot on the fishing line without tightening it.
- Pull one end of the fishing line into the eye of the swivel and pass it into the first knot.
- Wrap six turns around the main line.
- Turn the tip of the fishing line again and thread it through the knot so that a loop is made.
- Unfold the tip of the fishing line and insert it into the last loop.
- Moisten the knot and tighten it tightly.
- Trim off excess line.
How to tie an elastic band to a swivel
The best option for tying an elastic band to a swivel would be this:
In this case, we threaded the elastic through the eye of the swivel, and wrapped the tails with thread. This method of installing an elastic band to a swivel is the most reliable, since the nodal connection with the elastic band can fail. For lovers of fishing knots, we can recommend tying several simple knots in a row. The knots must be wetted and carefully tightened.
And here is a visual video about attaching an elastic band to a swivel
Universal knots for attaching a swivel
The most well-known and universal units for attaching swivels are:
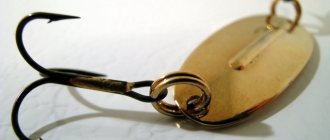
Clinch knot . It must be used on monofilament fishing line, the diameter of which will not be larger than 0.5 millimeters.
If you use thicker fishing line, it will be difficult to tighten the knot tightly. This type of node has the following advantages of its application:
- easy to knit;
- has good load capacity;
- When done correctly it lasts a long time.
The “Clinch” is knitted this way:
- Measure a piece of monofilament fishing line with a length of twenty-five to thirty centimeters.
- Thread the line into the eye of the swivel.
- Turn the eye of the swivel toward your hand eight times so that there are twists on the main line.
- Pull the other end of the fishing line into the first loop near the eye of the swivel.
- Moisten the knot with water and tighten tightly.
- Cut off excess line from the knot.
In addition, such a knot can be made even stronger if, after the fourth turn, you once again pull the fishing line into the resulting loop.
The second universal knot for tying a swivel is called “ Figure Eight”. It has the following features of its use:
- the fishing line for this knot does not bend or deform, so it can be reused;
- "eight" is easily untied if necessary;
- the principle of tying is very simple and even a novice fisherman can handle such a knot;
- the knot has good strength.
The Figure Eight is tied in this way:
- First you need to measure twenty centimeters of fishing line.
- Fold the fishing line in half and make a simple loop.
- Place both ends of the fishing line on its middle so that they go under one another, forming a figure eight.
- Moisten the knot and tighten tightly.
- Trim off excess line.
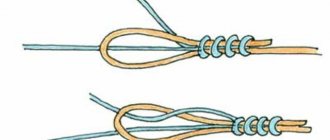
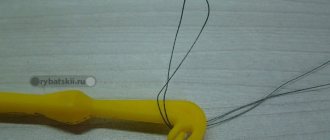
Clinch knot
Like all knots are tied simply, let’s get started for clarity, I will use a thick rope and a fairly large swivel. So let's start threading the fishing line or cord that you have a swivel spoon, then wrap the free tip around the fishing line or cord and make 5-6 turns. In principle, this free tip is sufficiently returned to the previously formed loop next to the eye of the swivel, and in general, in this form, the knot can already be tightened.
But for a more reliable fastening, we simply take and return this free end to the beginning, that is, this is a loop, now we have a knot, don’t forget to wet it, I naturally won’t do this on a thread, and carefully tighten the knot, this reliable one will never come undone, and besides In addition, it holds the tensile load well.
Blitz tips
- Be sure to wet the line before each time you tighten the knot, as this is very important.
- Those fishermen who do not yet have residual experience in tying fishing knots are recommended to first practice on twine or textile cord. With such materials it will be much easier to follow and remember the algorithm for tying one or another type of knot.
- There is no need to rush when tying knots, since quick and sharp jerks of the fishing line significantly impair the reliability of the future knot.
- Small tweezers (for manicure) are considered the best device for safe and convenient cutting of fishing line. The use of a knife in this matter is extremely undesirable, since it can damage the assembly.
- If you are unsure of the reliability of the knot you have tied, then you should not take risks and use it in practice. It's better to re-tie the knot.
- Reliable knots require a lot of training and perseverance from the angler, so the latter must practice often, and only then will the knot be obtained according to all the rules.
Recommendations
When attaching a swivel to different types of fishing line, it is worth remembering simple rules:
- it is necessary to use a high-quality swivel;
- the eye should be treated with sandpaper, since the presence of roughness and burrs will lead to rapid wear of the gear;
- before each tightening of the knot, the fishing line is well moistened;
- the reliability of the unit largely depends on the number of revolutions;
- you need to tie a knot slowly, as sudden and careless movements will lead to a decrease in its strength;
- It is better to use nail clippers to trim the free end;
- strict adherence to the sequence allows you to produce a high-quality unit;
- If during the execution of a node doubts arise about its correctness, then it is better to start over.
Having knowledge of the design of knots and following the recommendations of professionals, you can securely fix the swivel to the tackle.
Types of binding
It would be useful for every fisherman to have in his arsenal several ways of tying a swivel for a particular gear.
When should you use this type of mating like palomar?
This method is most used for monofilament fishing line and braided line. How to tie a swivel to a fishing line in this way?
- an indentation is made 50 cm from the end of the thread and bent;
- the thread is threaded through the swivel, and it should be at a bend of 50 cm;
- then a simple knot is made, but with a double line and is not tightened to the end, forming a loop lower to the swivel, and the edge and the main part of the thread should remain above;
- the swivel passes into the loop from the side of the bent line and is tightened.
This type of unit is designed for heavy loads and is designed for catches of overall dimensions. Suitable for all types of thread.
The figure eight is one of the simplest knots
It is considered a universal knot; its great advantage is the fact that the fishing line does not break during its formation. To get an eight you need:
- fold the fishing line in half at a distance of 20 cm;
- thread the swivel;
- lay the fishing line on top of each other in the form of a figure eight;
- do not forget to moisten;
- tighten.
We recommend reading: Basic rules for choosing braid for spinning rods
Wetting is important with any knot tying, but for the figure eight it is necessary because the knot will not tighten properly.
Rapala for loops that don't require tightening
Anglers mainly use this type of knot for wobblers or spoons. It allows the tackle to move freely. To get it you need:
- tie an ordinary knot that is not fully tightened on the thread;
- pull one end of the thread into the hole of the swivel into the original non-tightening knot;
- wrap the first end around the main thread 5 times;
- for a loop to appear, you need to thread the first end of the thread into the knot;
- then unfold the same tip of the thread into a new loop that appears from above;
- moisten with water and tighten;
- cut off excess.
As a result, the swivel should run along the line in a loop, and the loop itself should be securely tightened.
Grinner for any threads and fishing lines
This type of fastening can be applied to anything, and it is designed for heavy loads, thanks to a special knitting method:
- pull the end of the thread into the hole of the swivel at a distance of no more than 15 cm;
- the rest of the thread must be placed on the main thread to form a loop;
- holding the top loop, wrap the edge of the thread 3-4 times around the main one;
- pull it through the loop at the top again;
- wet and tighten.
This type of binding is the most common because it is simple and can be used on any gear.
Homer for monofilament lines
An unusual and strong enough knot for its purpose, it holds in 90% of cases. To begin with:
- pull the thread into the swivel hole;
- then turn part of the thread, which should be about 20 cm, once around the main thread and tighten it into the loop below;
- a knot that has turned out cannot be tightened;
- wrap the edge of the thread 6 times around the main part;
- pass the edge into the top loop, which is above the knot;
- wet and tighten.
Such a knot is similar to a grinder, but here, in the end, there will be a loop between the knot and the swivel, just as an angler uses monofilament fishing line.
Clinch and its features
This fastening method is only suitable for monofilament types of fishing line with a diameter of 0.4 mm, but no more. For this node you need to do the following:
- the end is inserted through the ear at a distance of 15–20 cm;
- the thread bends after threading and is pinched with your fingers;
- 7 turns are made and the edge of the thread passes through this loop, and then through the first;
- after 2 threadings through 2 loops, a third pass occurs where winding occurred 7 times;
- The edge of the thread is passed between them (turns) and tightened, after wetting it.
Recommended reading: Using fluorocarbon line for leashes when fishing for various types of fish
This is a very complex type of knitting, but it is considered the most reliable application for this thread.