To increase the chances of catching a trophy and the ability to determine the food preferences of the fish caught during fishing, the fisherman has to solve a number of important tasks that contribute to the achievement of his goals. Practical experience, observation and ingenuity of the fishing community have found many effective ways to increase the quality and quantity of fishing. Two hooks on a float rod is one of these measures that gives a tangible advantage when fishing.
But, as you know, any event requires the scrupulous implementation of certain actions and technological operations that guarantee the success of the entire undertaking. It is not difficult to properly equip a float fishing rod with two hooks, and even a novice angler can perform these manipulations, having become familiar with the basics of tying knots. It is much more difficult to determine one or another method of equipment based on the fishing conditions and the set goal, the achievement of which the modification of the equipment will lead to.
This article will clarify some points when using a fishing rod with two hooks, suggest methods of tying in which the hooks do not get tangled, and analyze the facts that reveal the advantages and disadvantages of these types of equipment.
Options for placement on a float rod
You can equip a float fishing rod with two hooks in different patterns, using all kinds of shipping options that allow the tandem of hooks to perform the required functions.
As a rule, installation begins with an ordinary connection of the hook according to a single equipment scheme, when it is attached to the end of the leash, carrying out the main shipment along the main line and thinning the installation by adding a small sub-hook to the leash. The second hook can be placed either in front of the main sinker or behind it. Its placement can be done directly on the main line or by arranging a side leash, which in its qualities can be either soft or hard. If necessary, soft additional leashes are also loaded with a paddock. A soft leash is made from single lines, similar in diameter to the first leash. The hard version is most conveniently made from fluorocarbon of small thickness. You can also make two hooks on the fishing rod by attaching them to the main cord at a single attachment point. The leashes are arranged to be proportional to each other, regulating only the additional loading of the under-grazing weights, which are different in weight. This difference successfully prevents tangling of the leader material and presents the bait to the fish in a variety of ways.
The main sinker, as in the first placement options, is placed before mounting the leashes on the main fishing line. Making 2 hooks on a float rod quickly and reliably, attaching leashes and changing their lengths and diameters if necessary, helps with the use of swivels with carabiners and small fishing fasteners that are in harmony with the dimensions of the installation.
How to knit, installation methods
You can tie two hooks to a fishing line in different ways: each angler chooses the more suitable one. There are only four main installation methods, we’ll call them this:
- Zhivtsova,
- basic,
- accelerated,
- stopper.
They are all somewhat similar to each other, but each of them has certain characteristics. Next we will look at another interesting method, few people know about it. He doesn't even look like everyone else.
Zhivtsova
This method was nicknamed “Zhivtsov” because of its original purpose. It is also called no knot because no knots are used to install hooks. Fishermen noted that this method is the most effective when catching predators with live bait (fry). But later people realized: it is also suitable for other fishing conditions. Here both hooks are tied to one leash.
All hooks are on the same line and go one after another. No Knot is well suited for fishing in strong currents.
This is done very simply:
- Let's take the fishing line. We thread it through the eye of the hook.
- We make nine turns around its forearm.
- The other end is also threaded through the ear hook, and the structure is tightened. Similarly, you should tie the second hook to the fishing line. Not a single node! Then we tie the resulting leash to the main cord.
The distance between them depends on the size of the bait and the preferences of the fish being caught. For example, for catfish you can make 10–15 cm, for silver carp or chub - 20 or more centimeters.
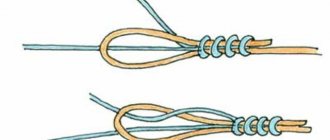
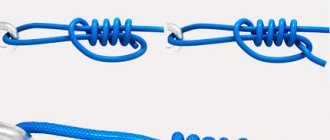
Basic
It is considered one of the most reliable. Here, each hook is tied to a separate leash. Why we called it “main”, you will see for yourself. So let's get started:
- We take a thin leader line and one hook.
- We fold the fishing line so that we get a circle with a diameter of 9–10 centimeters. We attach it to the hook and hold it.
- Insert two fingers into the resulting loop: index and middle. With one we will pull the cord along the base of the hook, and with the other we will wrap it 10-12 times.
- We grab the end of the fishing line with our teeth and pull (we try to hold the main end) until the knot is reduced to the maximum.
- After this, dip your fingers in water, and then lubricate the resulting knot with it. You won't be able to tear off or untie the hook! The second hook is attached in exactly the same way, only its leash must be tied at a certain distance from the first one so that there is no overlap.
Read: Preparing porridge for crucian carp fishing
Why "main". This instruction does not say anything about the eyelet; it does not play any role here. Only the base of the hook is used. This method saves fishing line of any quality from chafing.
The method is very suitable for mounting two hooks on a float rod, since in this case reliability is most important. This gear is often used to catch two large fish at a time, but in this case there is a high probability of the hook coming off, especially if the line frays.
Knitting pattern. The connection must be moistened with water to reduce deformation of the fishing line.
Accelerated
During active fishing, you can observe constant hooks and breaks. Hooks and leashes constantly have to be changed, and this needs to be done as quickly as possible. This method involves not only the simple installation of two hooks, but also the quick replacement of components. That's why we called this method “accelerated”.
To knit the second hook we will use the Canadian figure eight. Like this:
- We thread the end of the fishing line through the ear hook.
- We make a loop around the fore-end, and then insert the tip into the loop.
- We try to tie the knot as tightly as possible. We get a leash with a hook.
- Exactly the same for the second hook.
You can also use a “blind” or “bayonet” knot.
The diagram shows the fastest and easiest methods of tying.
The “accelerated” method allows you to attach two hooks to a float rod in a matter of seconds, even in active fishing conditions. You just need to always take spare parts with you!
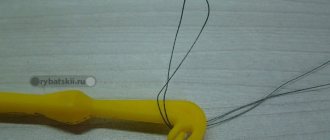
Stopper
To install the second hook, it is best to use the knot described above, which is knitted without using an eye. But we attach the leash differently:
- At the empty end of the leash with a hook, we make two figure eights so that we get one massive knot.
- The main cord has a tightening loop, as in the picture.
- We insert our “double” knot into it.
- We take the main line with both hands and pull in different directions.
The knot at the end of the leash acts as a stopper. It prevents the main cord from jumping out of the loop.
How to tie two hooks on a float rod
Rigs with double hooks are designed in many ways and each angler, based on the strategy of his fishing, can successfully choose the option that suits his conditions.
Important! The main thing is that the installation does not get tangled during casting and wiring, and that the completed connections do not critically reduce the level of reliability of the equipment of the main lines and leads.
Continuing the material, we will consider the most popular and easy-to-follow methods that give an idea of how to properly tie hooks without reducing the efficiency and comfort of fishing. Having familiarized yourself with these methods and recommendations for the use of installation methods, you can retrofit a float rod for various fishing conditions directly on the reservoir, without spending significant time on operations.
Method 1
You can tie two hooks to a fishing rod so as not to get tangled by using the loop-to-loop method known to every average person. On the main cord, in the place chosen for fastening the additional hook, make a loop, tying it using the figure eight method. The leash at the end of the line cut is also equipped with a loop. Next, the above-mentioned fastening of the two components of the installation is carried out. Before tightening the loops, the joint is wetted to prevent burning of the material.
Important! An additional hook is always knitted onto a line outlet, which is shorter in size than the main leader material.
An additional accessory can be attached both in front of the main sinker and behind it. You can also tie a second hook to the main line using a rigid fluorocarbon base. In this case, the angler achieves a more stable fixation of the outlet, which gives advantages when choosing certain parameters and maintaining the level of bait supply. The first, main hook, is knitted according to the standard method of equipping a float fishing rod.
Method 2
This knitting option involves placing two accessories on one piece of the leash material, without resorting to a side tap. The hooks are tied onto the elongated main leash sequentially, through the distance required for the fishing conditions. First of all, an additional hook is knitted, taking into account that the free end of the fishing line should allow the main hook to be attached at its end. As a result, the leash is equipped with holders of the required weights, which can be placed in front of the first and in front of the second accessory, making the equipment resistant to currents and convenient for casting.
If necessary, more hooks can be introduced into this method, just by adjusting the length of the leader cut. Often, in this method of equipment, hooks combined with a load are used, or, more simply, jigs, which makes the equipment thinner and more sensitive. In this case, the floats on the rod are replaced with nods, which makes it much better to control the tackle and see even the most subtle bites.
Important! To equip it with an additional hook, use an accessory with an extended fore-end.
Such hooks are easier to tie, and their length allows you to take the bait further away from the main line, thereby making it more interesting for the fish.
Method 3
The fastening method according to this scheme implies fishing in reservoirs with no current, otherwise the equipment will become very tangled, preventing comfortable fishing. Leashes can be used of the same or different lengths. The nuance of the equipment is that the leash is equipped with a pod of different weights. A loop is knitted at the end of the main cord or, for convenience, a triple swivel is installed, which has three loops for fastening. In the fishing line fastening loop or in the winding rings of the swivel, pre-prepared leash samples are mounted, retrofitted with a padding that is different from each other. The leader material is connected to the main line or swivel using a loop-to-loop connection, which minimally reduces the initial breaking loads of the line and makes it possible to quickly re-equip.
Important! It is worth noting that the swivel helps tie the hooks to the fishing line more effectively.
Other nodes
Hooks are also tied to the bases when using other knots that have little effect on the structure of the cord. These include a leader knot, the essence of which is to create a loop on the main fishing line and compress the leader with a fixed knot formed at the end. This type of tying is suitable for catching small fish. Also, leashes can be placed on the main line by creating a sliding loop. With this equipment, you can change the distance between the hooks without resorting to re-tying the equipment, only by loosening the clamping force of the loop and moving the additional accessory along the length of the line.
Additional hook with eye
Rib
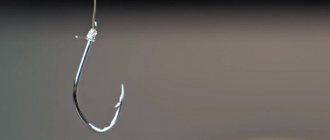
The most common and easiest way to tie a hanging hook, both with and without an eye:
- the fishing line is folded in half and applied to the fore-end;
- wrap the end around the hook pin and the thread itself several times;
- on the last turn, the end of the fishing line is threaded into the loop formed by bending the fishing line in half and tightened.
Grinner Knot
One of the most famous knots for attaching a hook. Used for hooks with a small eye, when it is difficult to pull two threads through it.
The knitting looks like this:
- the leash line is threaded into the eye of the hook with a certain margin;
- from this reserve (tail) a loop with a residual end is formed;
- this remaining part is wrapped several times (up to 7-8) around the two formed parts of the fishing line;
- the remaining end is passed through the loop;
- the knot is wetted and tightened;
- the excess end is carefully cut off.
Suitable for both monofilament lines and braids. If the leader for the second hook is attached to a swivel, it can be tied in the same way.
Shark's
Grinner practically repeats the knitting tactics, only the loop is made not at the free end, but near the eye - where the fishing line breaks.
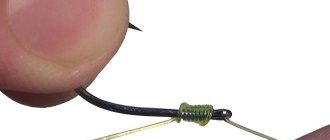
Spindle
This is also a very common fishing method of tying a hook. Also great for hooks without eyes:
- we pass the end of the fishing line into the eye of the hook and drag it lightly along the fore-end;
- make a bend and return the line to the eye;
- wrap the remaining edge of the thread around the shank of the hook and loop;
- we make 5-7 turns and send the edge of the fishing line into the loop;
- Wet the knot and tighten it.
Deaf tag
Simple but strong:
- make a loop from the fishing line and pass it through the eye of the hook;
- lower it down and pass the hook through it;
- tighten it.
Expert opinion Knipovich Nikolai Mikhailovich Zoologist, hydrobiologist. I am interested in fishing at a professional level.
Ideal for knitting a second hook on a higher thread. Knits quickly and unties just as quickly.
Homer
A very strong knot - its coefficient reaches 98%. It’s a little difficult to write about knitting, but if you look at it, knitting itself is not very difficult:
- pull the end of the fishing line into the eye of the hook or swivel, if it is additionally attached to the main fishing line;
- wrap the free end of the fishing line, 15-20 cm long, twice around its main part;
- thread it through the resulting loop, but do not tighten the knot;
- wrap the end of the fishing line around the main line another 6-8 times;
- thread it through the resulting loop, moisten it and tighten it.
Turtle
They say that it was invented by sailors when they were catching sea turtles.
Expert opinion Nikolay Mikhailovich Knipovich Zoologist, hydrobiologist
I am interested in fishing at a professional level.
Important! This knot is used for serious fishing gear for catching large fish. This means that the hooks should be larger and the fishing line should be thicker. Suitable for braided line, monofilament line quickly stretches and unties when knitting in this way
Suitable for braided line, monofilament line with this type of knitting quickly stretches and unties.
The process is incredibly simple:
- the fishing line is threaded through the eye of the hook;
- a loop is formed;
- a simple knot is tightened;
- the hook is inserted into the loop;
- the knot is tightened.
All. It's not difficult, but it can withstand a lot of weight.
cat's paw
It is usually knitted from a braided leash without using extra knots:
- the end of the fishing line is folded in half;
- extends through the ear;
- the loop is thrown onto the hook;
- the hook is rotated several times inside the loop, and the fishing line is pulled into a knot from the ends.
Canoe Man
Particular attention here needs to be paid to uniformly tightening the knot:
- 2 unfinished loops are made on the fishing line;
- the upper loop is threaded into the lower one;
- The free end of the fishing line is threaded through the eye of the hook, then through the loops.
Expert opinion Knipovich Nikolai Mikhailovich Zoologist, hydrobiologist. I am interested in fishing at a professional level.
This knot is strong. But it is not recommended to knit it on the shore because of the laboriousness of tightening it. It must be very careful.
Snell fishing knot
Considered reliable and relatively simple:
- the fishing line is pulled into the eye of the hook;
- then one more time, forming a loop;
- the loop is wrapped around the fore-end several times, the knot is tightened.
Orvis knot
Also not a very complicated way of knitting:
- insert the fishing line into the eye of the hook;
- place the end under the main line;
- a loop is formed near the eye, and we thread the end of the fishing line there;
- wrap it three turns around the loop;
- tighten it.
Pitzen
It is considered one of the most uncomplicated universal knots for hooks, swivels, and sinkers:
- we pull the fishing line through the eye of the hook and unfold it back, folding it next to the main one;
- with the end we wrap the resulting loop of two lines towards the hook, forming 3 loops;
- we pull the free end through the farthest turn from the hook;
- tighten it.
Advantages and disadvantages of using two hooks
The advantages of the method include the possibility of simultaneous use of several bait options, which at the initial stage of fishing allows you to more subtly experience the tastes of the fish. You can also tie a second hook to the main fishing line in cases where you need to clearly determine the optimal level of the fishing horizon by choosing different bait supply depths. Also, in a school of important fish, this method clearly increases the fishing speed. Another advantage is the high degree of bait penetration.
The disadvantages of the technique include the high probability of tangling of equipment. The negative point is that the gear becomes more clingy, which significantly reduces the effectiveness of fishing in thickets and snags. Also deteriorating fishing comfort also includes a reduction in the breaking loads of the main line, because knots reduce this parameter by an order of magnitude.