While fishing, anglers often encounter line breaks and lost hooks. And if any angler is not insured against cliffs, then only beginners can untie their knots.
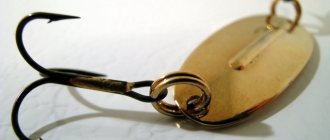
The ability to properly tie a hook is necessary for every fisherman. Particular problems arise for inexperienced fishermen when tying hooks with a spatula, since the simplest “loop” knots are not suitable in this case. But if you know the special knots, a hook with a spade can be tied even more securely than with an eye, and this knot will look neater and more compact than on a hook with a hole for fishing line.
Compact knot on hook with shovel
What is the strength of the blade in the design?
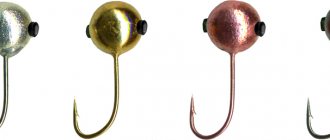
Forged hooks with a spatula are popular among fishermen for good reason. This is due to the fact that they are considered more durable and reliable. Usually the knot is less noticeable on them. When a fisherman uses small hooks, it is easier for him to use this design than to pull the line into a small eye.
When tying such hooks, the knot should not have many kinks, as this reduces its strength. However, it cannot be too simple so as not to come untied and slip off. With knots for eyeless hooks, the use of friction is important. The knots should be tied tightly and not allow them to slip.
When tying hooks without an eye, it is especially important to carefully follow certain rules. Usually, complex units are used for this, the technique of which must not only be understood, but also achieved automatically. Only well-mastered nodes will ensure high reliability of the connection.
Knots for hooks with a spatula
Spade hooks are used to catch wary fish. The beauty of these hooks is that you can use bait to completely camouflage the hook. It should be remembered that when fishing for large fish, the knot may slip off such a hook.
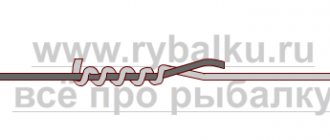
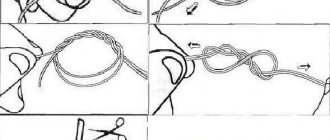
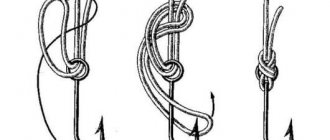
"Step Knot"
Let's start with the best knot for spatula hooks, the step knot. This knot does little to weaken the line, so it's definitely something you need to learn how to tie.
Knitting technique:
- First, fold the fishing line in half and attach it to the hook.
- Now we grab the loop and hook with one hand, and with the other we make 3-4 turns with the short end of the fishing line around the main fishing line and hook
- Next, you need to fold the main line and make another 3-4 turns, wrapping the main line as well.
- Now insert the short end of the fishing line into the resulting loop, and you can tighten the knot. Pull both ends of the line first, and then just the main line, and the knot will tighten
Don’t be afraid that everything seems difficult, you just need to sit down in front of the knot knitting pattern and try it. You'll soon be tying this knot with your eyes closed; it's actually very simple.
Characteristics
- Application: hooks.
- Reduced line strength: 5%.
- Line thickness: From 0.1 to 0.3mm.
- Lines used: Monofilament.
Spindle knot
A very simple knot for tying a hook with a spatula. It is very similar to a gripping unit.
Knitting technique:
- First, fold the fishing line in half and apply it to the hook.
- We need to wrap the short end of the fishing line around the fishing line and hook 5-6 times
- We insert the short end of the fishing line into the formed loop.
- Tighten the knot
At this point, the knot is ready, all that remains is to move it to the blade of the hook, and you can fish. Remember that this knot is weaker than the previous one, so it is not recommended to catch large fish with this knot.
Characteristics
- Application: hooks.
- Reduced line strength: 15%.
- Line thickness: From 0.1 to 0.2mm.
- Lines used: Monofilament, braided.
Loop knot
The most common method of tying a hook with a spatula. This is a simplified version of knitting a step knot. This knot is often used in competitions due to the speed of knitting.
Knitting technique:
- Fold the fishing line in half and attach it in a loop to the fore-end
- With the short end of the fishing line we make 6-8 turns towards the forend, wrapping the hook and loop
- Thread the short end of the fishing line into the loop
- Pinch the short end of the line and the hook with your fingers, then pull the main line and the knot is complete.
The undoubted advantage of this knot is the ease of knitting, but there are also disadvantages. When biting a large fish, there is a risk of the knot slipping off the hook.
Characteristics
- Application: hooks.
- Reduction in fishing line strength: 5-10% (depending on the number of turns, the more, the more reliable and noticeable).
- Line thickness: From 0.1 to 0.3mm.
- Lines used: Monofilament.
Leash knot
Another simple option for hooks without a ring. Although it is harder to knit than the previous one, it deserves your attention.
Knitting technique:
- Fold the fishing line in half and attach it in a loop to the fore-end
- With the short end we make 8-12 turns inside the loop
- We tighten the main line so that the loop tightens
- Now we take the short end of the fishing line and the main fishing line and finally tighten the knot
This is where I will end this article, the main thing is not to forget to wet all the nodes, then you will achieve their maximum strength. See you again, dear readers!
How to tie a hook with a spatula
There are units whose reliability has been confirmed by many years of practice. To be sure of their strength, you need to tie them carefully, without deviating from the rules. The following are options that are suitable for use with different types of fishing line.
When fishing in cold weather, you need to take into account that braided line sometimes absorbs water and can freeze. Therefore, it is preferable to use it with a tight weave or take nylon fishing line instead. You can use special anti-freeze sprays. Instead, you can use petroleum jelly or a similar material.
Knots for small hook numbers
In this case, using a node, the so-called “python”, is suitable. To do this, do the following:
- Around the forend, make 2 loops in a figure eight, so that the center is on one side and the edges on the other.
- The tip is passed through both loops again and tightened.
In the figure you can see the details of creating a node:
Figure 8 knot
We tie a hook with a spatula to a monofilament fishing line
A universal knot is often used. To use it, you need to do the following:
- The tip of the fishing line is placed vertically along the fore-end from bottom to top with a significant margin.
- Make a small loop on the fold at the bottom.
- The tip of the line is wrapped around the shank of the hook and the tip of the line. In this case, it is enough to make 4-5 revolutions, moving upward. The loops should be parallel to each other and located closely.
- The tip of the fishing line, which should look up, is threaded into the loop located below. The knot is moistened and tightened.
The diagram below shows in detail each stage of tying a knot:
How to tie a spatula hook to fluorocarbon line
For fluorocarbon, a Snell knot is often used. It is known for its high strength. To apply it you need to do the following:
- The fishing line is placed along the shank of the hook with a significant margin. Make a big loop. It should be of such a size that the hook can pass through it freely.
- The tip makes turns, capturing the inside of the loop and the fore-end. The coils start at the top and continue down.
- After the last turn, the tip of the fluor is threaded into the loop.
- The knot must be wetted and then tightened.
This image shows details of the knot tying process. It is used for both hooks with a blade and those with an eye.
Knots for very thin and very thick fishing line
For thin fishing line, you can use a blood knot. It has such an unusual name because it is rumored to have been used on whips to punish sailors hundreds of years ago.
To tie a hook to such a knot, perform the following steps:
- The end of the fishing line is placed along the shank of the hook.
- Make a wide turn around it and the fishing line.
- Perform one more such rotation.
- The running end is passed from top to bottom inside the second loop.
- Tighten the knot.
This option has wide application. It is suitable for hooks with a blade, with an eye, and also for creating multi-hook tackle. Details of how to properly tie a knot can be seen in the diagram.
Bloody Knot
To increase the strength of the bloody knot, you can make not one additional loop, but several. In this case, the tip must be threaded through the inside of each of them.
For thick fishing line, using a “deflection” knot is suitable. It is done this way:
- The tip is folded in half.
- Leaving a loop at the bottom, it is wrapped around the fishing line and fore-end, leaving the loops free. You need to make 5-6 turns.
- The tip is passed inside the turns from top to bottom and threaded into the bottom loop left in advance.
- The knot is tightened.
This node also has a second name: shell node. It is considered one of the most durable. It is considered relatively complex, so you need to be especially careful when tying it. How to tie it correctly can be found in the following photo diagram:
Tying a hook with a spatula - step-by-step video:
Attaching to braid
The best knot for a spatula hook is the so-called step knot. It has high reliability, but is relatively complex. It is done this way:
- The tip of the fishing line is folded in half with a significant margin and placed along the shank of the hook.
- It is wound around the fore-end and one fishing line several times, gradually lowering down.
- Then they continue reeling, but this time wrap around both parts of the fishing line. This is also done several times. It is necessary that there is a loop at the bottom.
- The tip is threaded into it. It is recommended to wet the knot before tightening.
If you need to clarify how to tie it, just look at the following photo:
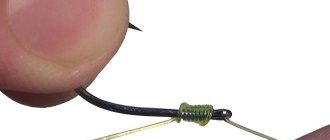
Cord knot
Connecting fishing line and hook with spatula
As a rule, hooks with a spatula are not too large in size and attaching them to a fishing line requires skill and experience.
It is important to ensure that the fishing line lies flat against the rod, and that the winding layers are pressed tightly against each other. Experts recommend applying an additional drop of quick-drying glue after tying a knot. We strongly do not recommend the Palomar knot when attaching a hook without an eye, as it can come undone and you will be left without any catch. We suggest choosing one of the following methods.
Trombone loop
An excellent tight knot that can work with both braided and monofilament lines. The knitting is also suitable for hooks with eyes. The knot has another name - “Spindle”. Over a long period of existence, the knot has become a classic method of fastening, capable of withstanding severe loads.
1. Take a fishing line and a hook without an eye
2. Fold the fishing line in half, forming an open loop
3. Move the hook to the line, making sure that the rod is in a parallel position with respect to the root line
4. Make 10 turns around the rod
5. Thread the chassis through the loop
6. Tighten and the knot is ready
Eyelet knot
Need to tie a hook to a fishing line? The Eyelet knot will come to the rescue. Simple and easy to use.
1. Step back 15 cm, make an open loop
2. Place the loop parallel to the hook and make several skeins around the axis of the hook, leaving a small loop on top
3. Having circled the rod 5-7 times, insert the running end into the loop
4. We recommend tying a knot after wetting
Knot Snood
The knot appears in ancient times. Experts say that this is the most ideal option for hooks without an eye. Has excellent strength – up to 95%. The peculiarity of weaving is the ability to attach several hooks to the fishing line at once. Suitable for both thick and medium fishing line. It is important to know that when working with thick fishing line, there should be fewer turns.
1. Form an open loop with the running end and place the loop parallel to the stem
2. Starting from the bottom (from the shoulder blade), make several turns around the axis of the hook
3. After that, pass the running end through the formed loop
4. Pull the chassis and tail. Cut off the excess and the knot is ready
Dumhof knot
The most popular knot used for blades. It is important when creating turns to avoid overlap, otherwise the knot will not be strong. The knot is mainly used for large hooks, since tying a knot on short shanks will be quite problematic even for a professional fisherman. The strength of the knot is not the greatest - up to 80%.
1. Form an open loop and use the running ring to make several turns around the shank of the hook.
2. The coils should come from the blade
3. After making 5-6 turns, bring the end into the formed loop
4.Tighten properly
Pitzen node
Not a complicated knot and easy to weave. Works effectively with fishing line of any diameter.
1. Thread the line through the ring, forming an open loop
2. Wrap the main line around the running end. Make 3 - 6 turns towards the hook
3. Pass the running end into the loop formed at the end
4. Pull tightly and trim off any excess running thread.
Palomar Knot
Due to its high strength (up to 80%), this connection is suitable for large specimens. Given its reliability, the knot is considered simple. The versatility of the fastening allows you to work with both braided and monofilament lines.
Both beginners and experienced fishermen love Palomar for its versatility, reliability and ability to be used with spinning rods. But, remember that this knitting is not suitable for hooks with a spatula and a small eye.
1. Take the end of a fishing line no longer than 30 cm and make an open loop. Pass the loop through the eye
2. Go around the eye and make a knot.
3. Thread a hook into the loop (from the knot).
4. Once threaded, begin tightening.
5. The node is ready.
Clinch Knot
The clinch is a very simple knot that does not take much time. The knot is popular due to its strength (suitable for boat anchors) and versatility. The knitting is ideal for attaching spinners, hooks, wobblers, flies and carabiners. With a properly selected fishing line, such a connection can withstand up to 10 kg. But it is worth considering that the knot loses its properties with a line with a width of more than 0.4 mm.
Before tightening, wet the knot, otherwise you risk deforming the line. Do not use a clinch with wide ears.
There are several types of knot, but we will tell you about the universal one. We tell you how to tie a hook to a fishing line. The diagram will clearly explain all the stages.
1. Pass the running end of the fishing line through the eyelet
2. Wrap the chassis around the eyelet and make a loose knot
3. Use the running end to make several turns around the main line.
4. Pull the end into the loop formed at the eye
5. After wetting the knot, carefully tighten
Shark knot
A complex, durable knot capable of holding serious prey. Designed exclusively for synthetic fishing lines, but the narrow specificity is compensated by high strength. The method was invented not so long ago. Today the Shark Knot is used by professionals, athletes and fishing boat crews.
1. Thread the running part of the fishing line into the eyelet
2. Start wrapping the main part of the fishing line with the running end
3. Make a few turns
4. Pull the running part of the fishing line back and pull it through the loop
5. Gently pull both ends. The node is ready
Deaf node
A quick way to attach hooks, spinners, and sinkers. Best suited for lines made of cotton or polyamide. The knot is self-tightening and does not come undone depending on the tension. The blind knot has a wide range of applications. Initially used by fishermen, then it began to be used on ships and even in everyday life.
1. Fold the fishing line in half to form a loop
2. Tie a knot
3. Tighten it
4. Thread the loop through the eye of the hook
5. Thread the hook through the loop
7. Tighten. The node is ready
Bloody Knot
The knot was used in Peru for counting, and then became widespread in the navy. Knots were tied on the whip (from 3 to 12 knots) and the guilty were punished. Today, in addition to fishing, this joining method is used in tailoring.
1. Thread the line through the eye
2. Use the running end to make several turns around the main line. The turns should not overlap each other
3. Pass the end through the loop formed at the eye and tighten
4. Start tightening
5. The node is ready
Orvis node
Orvis is suitable for all types of fishing lines. Despite its compact size, it can withstand high voltage.
1. Pass the running end of the fishing line through the eyelet. Pull the running end 10 - 15 cm and make a loop around the main line
2. Make a few turns around the loop.
3. Start tightening
4. The node is ready
Uni node
The name of the node comes from the English word - universal. The knitting method appears recently. In a short time, the knot managed to fall in love with many fishermen. The reliability of the fastening reduces the possibility of self-untying to zero. Applicable to different fishing lines.
1. Place the running part of the fishing line into the eye and form a loop
2. Using the running end, form another loop over the main line
3. Make a few turns that will allow you to attach the second loop to the fishing line. It is enough to make 4-6 revolutions
4. Pull the running end through the loop at the hook eye and tighten
5. The node is ready
Californian Knot
The name of the knot was inherited from the American state, where it was invented in the 80s of the last century by amateur fishermen. Due to the ease of tying and reliability, the knot is widely used not only in fishing.
1. Step back 5 cm from the edge of the fishing line. Fold the fishing line in half and pass it through the eyelet
2. Loop the threaded part around the main line.
3. Thread the double end of the fishing line into the resulting loop. Pass the hook between the double end lines and tighten
Canadian eight
The good thing about the figure eight is that it can be easily untied if necessary. The knot is easy to tie, serves different purposes, does not move or loosen. The knot does not come undone even when working with synthetic fishing line. Moreover, if necessary, it is quite easy to untie it.
1. Make a loop without tying
2. Wrap the loop around its axis and make another turn
3. Two loops are formed in the form of the number 8
4. Pass the eye of the hook into the loops
5.Tighten
Secrets and tips
In such nodes it is necessary to perform a large number of turns. They should be parallel and in close contact with each other. Overlaps are not allowed. If the tip of the line remains too large, it needs to be cut off. It is enough to leave no more than 2-4 mm.
Tightening should occur in such a way that their shape is not disturbed. If this does happen, it is better not to leave the knot, but to bandage it. It is recommended to wet it before tightening. It allows you to tighten the knot more tightly and thereby make it stronger. This procedure reduces friction when tightening. In some cases it can seriously damage the fishing line.
In order to use hooks with a spatula, there is no need to study a large number of knots; just learn 3-4, but practice their use until it becomes automatic.