Everything else on the Internet on this topic is information slag. These 4 fundamental methods completely cover the fishing needs of tying hooks to a fishing line, main line or leash. Let's look at what should be used and in what situations.
Mounting the hook to the fishing line is the basis of fishing tackle. A fishing line with a hook attached to it is already a tackle with which you can catch fish. Any installation at the binding site weakens the monofilament. Therefore, the angler pays increased attention to the point of attachment - this is where it usually breaks. However, if you approach tying fish hooks correctly and carefully, there is almost no loosening of the equipment at the attachment point.
Some sites simply list knots for a fishing rod for a hook. But without explanation of the suitability of a particular method and method of tying a fishing hook to a fishing line made of nylon, fluorocarbon or braid. Hooks come with a ring or a spatula. Tying a hook to a 0.1 mm leash is one thing, but a tee to a 0.7 mm fly is quite another. Let's look at these features.
Often, beginners use easy methods, which, in fact, cannot be tied on fishing gear at all, since they either significantly reduce the strength of the fishing line, or weaken and unravel during fishing. Sometimes novice anglers tie them spontaneously because they don’t know the correct ones.
Installations that cannot be used on monofilament fishing line in any form - neither on fishing rods, nor in donks, or anywhere in fishing in general:
In this article we will look in detail at the methods of tying hooks. Other points of equipment are in the articles on our website. Article on how to tie a leash correctly
Cloudflare Ray ID: 63a871669d4df146 • Your IP: 195.64.208.251 • Performance & security by Cloudflare
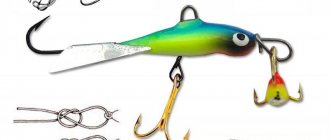
Lure hook: gripping and double stevedoring method
When going fishing for various fish that differ in weight and size, you need to more carefully select the type of fishing line and the size of the fishing hook. Fishermen select the type of knot depending on the type of fish to be caught .
Universal knot:
From the name it follows that such a knot can be used by any fisherman, both professional and beginner. This type can fit a hook with or without an eye, so once you learn how to tie it, it can be used on any hook, but with different instructions.
Hook with eye. If the hook has an eye, then the thread of the knot is threaded into it and placed parallel to the shank. The fishing line is wrapped 6 times around the fore-end. Each circle should be placed close to each other, but make sure that they do not overlap in one place .
When wrapping the main line, you should make sure that it is tightly stretched. After this process, the free end is pulled through the loop and fastened well. In this case, the knot will be located in the middle of the forend, so you need to move it to the eye and see if the fishing line breaks when you pull the hook.
Palomar knot
Palomar is a knot that is very simple to knit , so absolutely anyone can use it. The main disadvantage of this knot is that it cannot be tied to a hook that does not have an eye. Steps to take when tying: align the ends of the fishing line so that it folds in half. Next, pass its end through the ear and tie a regular knot, but the knot does not need to be tightened. First pass it through the hook and then tie it tightly.
The types of fishing line that are suitable for this knot are thin and medium, and the guarantee that the knot will not break is 80%.
Steps to help tie a knot:
- To better tie this knot, you should wet the line before tightening it.
- For such a knot, hooks with a large diameter ring are mainly used, into which a fishing line folded in half can freely pass .
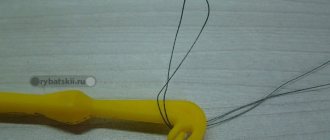
Sliding Snood Knot
This knot is distinguished by its knitting method, since it is knitted with a loose line onto the main line, without affecting its strength in any way. Therefore, such a knot can be used with any type of fishing line.
This type of knot is also made when you need to make a second hook on top of the first without using a leash .
Turtle knot
This knot is popular when fishing for big fish . This name for the node came from Australia. According to stories, fishermen caught large fish, and sometimes even turtles weighing about 30 kg, and they did not even jump off the hook. It is used when fishing with a thick rope or twine, since it can easily come undone on other types of fishing line. Another feature is that this design of the knot prevents breakage of the hook itself.
Narrow-profile shark knot
The property of the shark knot is that it has an automatically tightening loop . The knot appeared not so long ago and is widespread in a relatively narrow area, but experienced fishermen and fishing organizations have already fallen in love with it, as it is characterized by good strength and durability.
The area of application of the knot is fishing and fish catching vessels. The knot is tied on twine made from synthetic fibers, and such synthetic threads are very popular in fish catching organizations. That is why this knot is so loved by fishermen.
Grab knot - easy to tie
The gripping knot is another type of simple knot. In addition to the fact that you can tie a variety of gear on it, you don’t need to worry about selecting fishing line with it, since it is universal, and is even compatible with nylon fabric fishing line .
The most effective ways to catch more fish:
- Bite activator. This product contains pheromones that attract fish in the water, causing an increased feeling of hunger. But Rosprirodnadzor wants to ban such a thing.
- The use of various gear to help in fishing.
- Lures used with pheromone additives.
Tuna knot
This knot is strong and durable for fishing . To make such a knot you need to: thread the fishing line through the eye, and wrap it four times around the fore-end, pull the rope back into the eye and tie it tightly.
With such knots, synthetic fishing lines are used, namely nylon fabric. To increase the strength of the knot, it is recommended to wet the fishing line with water.
Stepped nodes
The step knot is applicable to hooks that do not have an eye. Increased attention to eyeless hooks is due to the fact that forged hooks break much less often. They also use a knot if the eye in the hook is broken. This type of knot can be used in everyday life to hang a coke or an object.
Lure hook: gripping and double stevedoring method
There are several ways to tie such a knot: gripping and double stevedoring .
The double stevedore knot is quite strong, unlike the gripping knot, since its strength is 98%. But making such a knot will be more difficult.
Stevedoring in terms of mating actions coincides with gripping, but still has differences. When tying, the rope should be passed through the eyelet twice and wrapped around the fishing line 5 times. And then pass it through the loop located next to the eye and tie it firmly.
Bayonet knot for obsolete fishing lines
Bayonet - this knot is common among fishermen and has a simple design. It is used on fishing lines that are quite old in production, and that’s all because it glides on new types of fishing lines .
You can get rid of this disadvantage if you leave the rest of the free string untouched. In everyday life, seamstresses use such a knot when threading a needle. Such a knot will allow you to simply sew things of rough and hard fabric , shoes. To tie it, you just need to thread the rope through the ring of the hook and make a few turns around it.
Canadian figure eight knot
Canadian figure eight is suitable for twine with a synthetic composition . It is famous in Russia, since fishermen use mainly synthetic fishing lines, because a knot tied on a hook will not come undone when the string is pulled.
It is widely used in sports fishing , since, despite its strength, it is very easy to remove to change the hook.
To tie a knot you need to: thread the rope through the eye and make one turn around the hook in order to subsequently insert the free end of the fishing line into the space between it and the hook. Then we thread the end of the fishing line into the loop formed at the bottom of the hook and, tying it, we get the knot we need.
Fisherman's figure eight knot
Even from the name you can understand that this is how a classic fisherman’s knot is formed. From the first attempts, it seems that it is quite difficult to use, but this is its strength, for which fishermen like it so much.
This design removes the lump on the knot that is visible to the fish and is visible with other knitting methods. To tie, you need to fold the fishing line in half so that the fishing line itself remains above the hook, the free end is wrapped twice around the fishing line, above the eye. And then the free end of the fishing line is inserted into a loop lowered into the eye and pulled tightly.
California knot
Some fishing tips:
Line begins to lose its strength over time, so choosing the right knot for the right type of fishing is important. But at the same time, there are some tricks that help the fisherman make fishing more comfortable:
There are a huge number of them, let’s look at the main ones.
Equipment characteristics
The hook can be lost at any moment - the line is broken, caught on obstacles on the bottom, the line is bitten off by a predator that it is not designed to catch. There are many reasons. If the hook is not secured carefully, small fish may simply be afraid of such a “pile up” of fishing line.
In order for the leash to have the necessary qualities, you should pay attention to several nuances:
- Thickness and elasticity of the fishing line (not every thick fishing line can be used for certain knots, and strong stretchability can lead to untying of the structure);
- Does the knot match the hook number and its design;
- What kind of fish do you plan to catch? Larger and more predatory fish require knots with a greater degree of tensile strength.
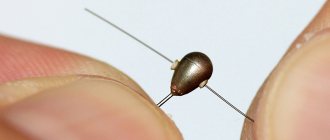
Method of tying fishing line on a hook using a step knot
It is mainly suitable for use in hooks that are used to catch predatory fish. Most often, they are not equipped with an eye, and the tip is a thickened spatula. That is why other options for fastening the fishing line are not suitable.
Method for tying fishing line on a hook with a step knot:
- The stepped knot allows you to very tightly and reliably fix the fishing line on the hook so that it does not slip through the thickening. Most often, this option is used when fishing for catfish and pike, which are large in size and often break off during fishing.
- Such a node will not allow this to happen. Knitting is quite simple, despite the complex description. It is necessary to fold the thread in half and lay it along the hook, in the direction of the head.
- Next, you need to wind the short tip around the blade, and then fold it up and wrap the turns. Next, the tip of the thread must be drawn upward on the lower turn. It is necessary to tighten the resulting knot and cut off the excess.
Scheme
Important features of tying knots
Before attaching the hook, the fishing line or cord should be wet. Wet thread is less prone to kinks, and when tightened, the twisted elements fit more tightly to each other.
It is advisable to secure the knot either by melting the protruding tip of the fishing line over an open fire (you can use a regular lighter), or with a special glue. Ordinary glue has a pungent odor - this will scare away fish and will not provide a strong hold with constant contact with water.
You shouldn’t try to learn how to tie all the knots right away, just choose one of the simple ones and practice tying it in comfortable conditions so that the skill can be practiced until it becomes automatic.
If you plan to go fishing in an unfamiliar place, it makes sense to have several leashes with different hooks “in reserve” so that you can change gear while fishing.
Tightening of knots should always be done slowly, with the same force, to avoid ruptures and twists.
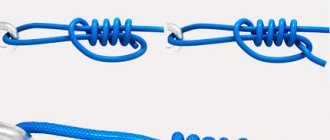
How to tie a fishing line on a hook with a bloody knot?
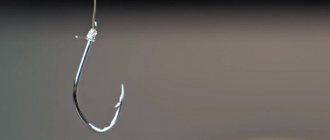
One of the universal options is the bloody knot. Based on this method, other options have been developed that can be used with both thin threads and braids. This knot is not suitable for use on braid, but is ideal for using thick and thin threads. It can be called universal, the strength is quite good and is 70% tensile strength.
How to properly tie a fishing line on a hook with a bloody knot:
- In order to make such a fastening, you need to pull the short tip of the fishing line into the eye of the hook.
- Next, you need to rotate the metal product around its axis until you get turns.
- It is necessary to get about five to six turns.
- Now you need to lower the fishing line down, and then pull it out at the very top, through the loop formed after bending the fishing line.
- Next, the knot is tightened and the excess line is cut off.
Bloody Knot
Popular hook knots
There are many descriptions of how to tie a fishing hook to a fishing line. Both in the literature and on the Internet there are a huge number of drawings and videos describing the sequence of actions. The simplest ones show how to tie a hook to the main line.
The simplest and most popular among fishing enthusiasts are: “grinner”, “spindle”, “blind knot”, “bayonet knot”. The names may vary, but the pattern for tying the hook to the line is basically the same.
Grinner
One of the most popular knots, by the way, it is used not only by fishermen, but also by sailors, and even climbers. Tying such a fastening can only be difficult for fishermen with fairly full fingers.
- Grinner or “uni” is used for attaching hooks, swivels, carbines, baits (in carp fishing), and less often when tying two threads. This type of knot is suitable for both monofilament line and flucarbonate and captive threads.
- When knitting this fastener, the tip of the thread is passed twice into the loop of the hook and pulled through, leaving a margin of 10-12 cm. The main thread is folded with the end released and bent towards the loop, then 5-6 turns are made, and the resulting knot is secured by pushing the remaining release into the resulting one. loop.
Bayonet knot
To attach a hook to synthetic fishing lines, it is irrational to use such a knot; when the thread is stretched too much, it begins to slide.
- For such fastening, the end of the thread is threaded into the loop of the hook, wrapped around the rod and threaded into the resulting loop, the thread is again turned around the base and the tail is threaded into the resulting loop again. Then the end of the thread is carefully tightened.
This knot is suitable for both cotton cord and flucarbon fishing line.
Clinch Knot
In many ways it is similar to the universal one, but it requires fewer actions to form. Limitation: Suitable for ring hooks only. Characterized by ease of formation and reliability. Difficult to use for lines with a high roughness coefficient.
Technique for forming a Clinch knot:
- The working end of the fishing line is threaded into the ring.
- Clamping both ends, make up to 7 turns to form a twist.
- The ring should have a small loop through which the free end of the fishing line is threaded.
- Moisturizing and tightening.
The average strength is up to 75%. For this type of knot it is preferable to use monofilament. In addition to the hook, you can use it to tie feeders or similar fishing gear.
For the ring hook, only thin fishing thread is used. Otherwise, it is impossible to make a truly reliable unit.
Features of attaching hooks to fluorocarbon fishing line
The undoubted advantage of fluorocarbon thread is its almost complete transparency in water.
But there are also a number of disadvantages inherent in this fishing line.
- High level of rigidity. This quality is good for a leash with a retraction, but when tying knots it makes it extremely difficult to fix them. Because of this quality, fluorocarbon fishing line is not fully tightened and may come undone.
- Reduced strength. On average, fluorocarbon thread is 40% weaker than monofilament thread, so it is recommended to use a larger diameter line.
Considering these disadvantages - high rigidity and large thickness of fluorocarbon thread, for beginners in fishing it will be difficult to make a classic knot strong enough. We tie the hook to the fluorocarbon fishing line with a Rapala knot.
You need to double the end of the thread and make a large (about 10 cm) loop with a simple knot, as when tying shoelaces. Then the end of the thread is threaded into the loop of the hook and returned to the side of the rig, the thread is threaded through a large loop to make two loops - a larger one and a smaller one, and then the end is passed through the large loop again.
Even a stiff thread tightens well on such a knot and firmly holds the hook or carabiner.
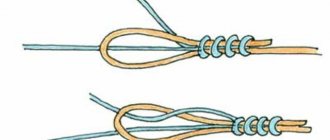
How to tie a fishing line on a hook: Palomar knot diagram
Indeed, the outcome of the fishing depends on the correct choice of option and method of tying the fishing line on the hook. When choosing the wrong knot, very often the fish can break off or this leads to the loss of the hook itself. Therefore, a correctly chosen knot is the key to a large amount of catch. In order to choose the right knot, it is necessary to characterize the fish being hunted, the thickness of the fishing line, and the width of the eye. All these components must be taken into account when choosing a node. There are options that are absolutely not suitable for thin fishing line, but are ideal for thick braid.
The simplest option is the Palomar knot. This is an option that is often recommended by manufacturers of thin monofilament lines. That is, it is made with individual hairs, without the use of weaving. The main advantage is that even an inexperienced fisherman who has just begun to advance in this matter can tie this kind of knot. Disadvantage - absolutely not suitable for braided and thick thread. But this is an ideal option for catching small inhabitants of lakes and rivers that a thin fishing line can support.
Scheme
How to tie a fishing line on a hook, Palomar knot diagram:
- In order to make such a knot, you need to fold regular sewing thread in half so that you get a small loop.
- Now this thread, folded in half, must be passed through the hole in the hook and tied with a regular knot on the fishing line, just like laces are tied.
- After this, the edge with the fishing line, which resembles a loop, is threaded through the arc of the hook itself and tightened. Now you need to cut off the excess end of the fishing line.
Simple Palomar
Knots for attaching multiple hooks
Quite often, both when fishing with a float rig and for bottom fishing, several hooks are used. To ensure that the leashes do not get confused with each other and the hooks work effectively in tandem, various fastening options are used.
Quite a lot of ways have been invented to tie two hooks to a fishing line. The most popular of them:
- "Loop in loop." I tie a figure eight loop on the main thread; at the end of the second piece of thread, they also form a loop, thread the loop into the loop and tighten.
- We tie the second hook to the fishing line without installing an additional leash. In this case, all hooks are attached to the main cord, without using additional pieces of thread. Simply one hook is tied closer to the rod, and the released end of the fishing line, which is left more than when attaching one hook, makes it possible to attach another hook.
- When fishing with an elastic band, in reservoirs with a small current, the second and subsequent hooks are secured on small leashes on the main cord.
There are many options for attaching hooks, spinners, and feeders to a fishing line; you can learn how to tie knots yourself, you can buy ready-made equipment in a store, or ask a more experienced fisherman to show in practice the basic principles of tying a fishing line.
In any case, only practical training will help you quickly and efficiently replace the hook during fishing.
Learning to crochet
HOOKS AND YARN
Crochet hooks vary in size and the materials from which they are made. If you use different types of threads in one work, then for each type you need a separate hook. There is a rule: the thicker the thread, the larger the hook should be.
Hooks
Usually the hook size is indicated in millimeters or as a letter designation. In stores you can find good quality steel hooks, the largest ones are often made of aluminum or plastic, there are also wooden ones, which are also quite popular. But still, steel and aluminum differ in the maximum variety of sizes. Avoid cheap plastic alternatives, which often have a rough surface. The Tunisian knitting technique requires very long hooks with caps at the ends. Sometimes the required hook size is indicated on the yarn label. I advise you, especially at the beginning of your practice, to adhere to these recommendations.
Yarn
Threads vary in thickness and density. There are generally accepted designations for thread thickness. Yarn can also be twisted from several, usually two, three or four, threads. For beginners, I would advise using soft and dense threads that will not unravel while working. A thin single or double thread is usually used to knit lace or decorate the edge of a product. It is approximately twice as thin as a triple one. Triple thread is recommended for knitting children's items and thin summer clothes. A thread consisting of four single threads is used for light sweaters, cardigans and shawls - this is a thread of medium thickness. If you want to knit a warm sweater or jacket, then you need a thread folded in half. Thread folded in three is suitable for jackets and woolen scarves. Clothing that you are going to wear outside in cold weather should be knitted from thick yarn. It can be imagined as consisting of four parts, each of which is the original thread folded four times.
LET'S START KNITTING
You start with a loose starting stitch and continue to knit one after the other. You will get a chain. This will be the first row of your product. I recommend that you first practice holding a hook and thread in your hands a little. It is important that you are comfortable. In general, there are no strict rules on this matter. The hook should move freely. The following are the two most popular ways to hold a hook, but you can create your own unique method. There are also several ways to hold the thread. This is very important, because its tension, and therefore the quality of work, depends on it. Over time, you will be able to constantly maintain the desired tension, make the same loops and even rows, without thinking about it at all. Try different methods to find the one that works best for you.
HOW TO HOLD THE HOOK
Both methods are convenient - use the one you like best.
Method 1: Hold the hook between your thumb and index finger as if you were holding a pen or pencil.
Method 2: Grasp the hook on one side with your thumb and on the other with your other fingers, so that its long part is in contact with your palm the way you usually hold a knife.
Making a knot
You have started knitting. First you need to make a knot. Step back about 15 cm from the end of the thread and make a loop. Hook the thread through it and pull it through the loop. Pull the ends of the thread, thus tightening the knot. The hook will be inside it.
Hold the thread
The working thread must have a certain tension and at the same time be in a sufficiently free state. This can be done in two ways. You can wrap the thread around your little finger, stretch it in front of your ring and middle fingers and pinch it with your index finger, then the tension will be created by the middle finger. Or wrap the thread around the little finger and pull it behind the next three fingers, and then the index will provide tension. If the thread is thin, then you can hold it with your ring finger and little finger. In general, choose the method that is most convenient for you.
Method 1: Wrap the thread around your little finger, extend it in front of your middle and ring fingers and behind your index finger. Keeping your hook threaded through the starting loop and pinching the first knot between your thumb and middle finger, prepare to make a loop by lifting your index finger slightly.
Method 2: Wrap the thread around your little finger and pull it behind your middle and ring fingers. Keeping your hook threaded through the starting loop and pinching the first knot between your thumb and forefinger, prepare to make a loop by lifting your middle finger.
FIRST LOOPS
The first connected row is called the main chain, and the loops of this chain are called air loops. The chain can be short - two or three loops, or it can be long. The chain is the basis of the product, so it must be done carefully. So, you have already learned how to hold the thread and hook correctly, perform the first knot and are ready to knit your first chain of air loops. To do this, you simply need to thread the thread through the initial loop, then pull a new one from the resulting loop, and so on. Air loops are also used as a separate knitting element, for example, in lace and openwork products. The size of the main chain is usually indicated in the knitting instructions for each item. A simple loop, or the so-called half-column, is the simplest type of loop. The first crocheted products consisted only of them. Nowadays, the half-column is used mainly for connecting a chain into a circle, and also if you need to reduce the number of loops in a row or tie two parts of a product together, you will come across this type of loop more than once.
Counting loops
To count the number of stitches correctly, make sure that the chain is not twisted and that the front side is facing you. The loop through which the hook is threaded (the so-called “working loop”) does not count. The first knot at the beginning of the chain is also not considered a loop.
Making air loops
1. Take the hook in your right hand. While holding the thread, pinch the first knot between the thumb and middle finger of your left hand. Pass the hook through the starting loop and hook the thread with it, as if turning it counterclockwise. Now the thread seems to wrap around the hook. 2. Thread the hook and thread back into the starting loop. You have completed your first air loop. 3. Repeat the previous two steps. Having made several air loops in this way, raise your left hand a little so that the hook is perpendicular to the chain - this will be more convenient, and continue.
We knit a half-column
1. Tie the main chain. 2. Pull the hook out of the last loop in this row and insert it back, but on the other side. Then insert it into the second loop from the end (not counting the loop on the hook). Next, hook the working thread so that it wraps around it, throw the thread over the hook. 3. Pass the hook with the thread through two loops at once. You now have your first half-column. Keep knitting. Insert the hook into the next loop and repeat the steps described in the previous two steps.
Single crochet
1. Tie a chain. Turn the hook and insert it into the third loop from the end. 2. Hook the working yarn with the head of the hook and pull it back through only one loop. 3. You now have two loops on your hook. Hook the thread again and pull it through both loops. So you have knitted your first single crochet. 4. Knit the row to the end in this way. 5. To move to the next row, turn your product to the opposite side and knit one air loop. This stitch counts as the first stitch of the next row. Then make a single crochet by inserting the hook into the second stitch of the previous row. Knit further in the same way.
Half double crochet
1. Tie a chain. Turn the hook. Yarn over and insert the hook into the third loop from the end. Hook the thread. 2. You now have 3 loops on your hook, counting the yarn over. Pull the working thread through one of them. Hook the thread again. 3. Next, pull the hook and thread through all 3 loops. You have just worked a half double crochet stitch. Continue knitting until the end of the row. 4. To move to the next row, turn your product with the opposite side facing you and knit two air loops. They count as the first half double crochet of the next row. Then work a half double crochet by inserting the hook into the second stitch of the previous row. Continue in the same way.
Double crochet
1. Tie a chain. Turn the hook. Then throw the working yarn over the hook and insert it into the 4th loop from the end. That is, you need to skip 3 loops of the first row. Hook the thread. 2. You have 3 loops on your hook. Pull the crochet thread through only one of them. Hook the thread again. 3. Now pull the yarn through the 2 loops on the hook. Hook the thread again. Pull the working yarn through the 2 remaining loops. You have knitted your first double crochet. Continue to double crochet until the end of the row. To move to the next row, turn your project over and work 3 chain stitches. The loop you currently have on your hook is the first stitch of the next row. Make 1 double crochet by inserting the hook into the 2nd stitch of the previous row. Continue knitting longer in the same way.
Double crochet stitch
1. Tie a chain. Yarn over 2 times and, skipping 4 loops of the previous row, insert the hook into the 5th row. Hook the thread and pull through 1 loop on the hook, 2. Pull the hook and thread through 2 of the 3 loops and hook the thread. Pull it through 2 loops. Hook the thread and pull through the remaining loops. When you reach the end, turn the product and make 4 air loops. You will receive the first stitch of the new row. Tie a double stitch to the idas and, inserting the hook into the second stitch of the previous row, continue in the same way.
Double crochet stitch
1. Tie a chain. Turn the hook, make 3 yarn overs and, skipping 5 loops of the previous row, insert the hook into the 6th. Hook yarn and pull through 1 loop on hook. 2. Hook the thread and pull through 2 loops - these steps must be repeated 3 times. Knit a row in this way, turn the product and make 5 chain stitches. Work a double crochet stitch by inserting the hook into the second stitch of the previous row.
Susie Jones
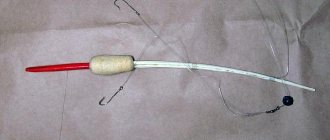
Photo of how to tie a hook to a fishing line
How to properly tie a fishing line on a salmon hook?
This option is ideal for sturgeon fishing. The main advantage is that it has high tensile strength as well as versatility.
How to properly tie a fishing line on a salmon hook:
- This option can be used both on thin threads and thick, braided ones. Ideal for synthetic thread.
- In order to secure the thread to the hook, you must follow the diagram presented below.
- Mainly used on hooks where there is no eye, but only a blade.
- Using this option, you can catch even a fairly large individual, and it will not fall off.
Node diagrams