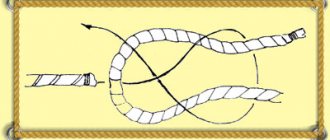
"Bloody" fishing knot
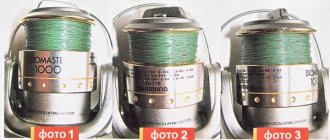
The “bloody” knot was first invented in the era of the navigator Columbus. It got its name from the method of punishing guilty sailors. A knob was tied with such a knot, which left bloody marks on the body during lashing. The bloody knot is also sometimes called the “snake knot.”
Characteristics
- Line: monofilament, braided. The diameters of the lines should not differ by more than two times.
- Specific knot strength at break (load capacity): 70-75% of the strength of the fishing line itself.
- Application: tying fishing line on a spinning rod (the knot passes well through the rings of the rod), tying leashes to the bottom fishing rod.
- Features of the knot: small size and neat elongated shape.
Learning to knit
By following our step-by-step instructions, you will easily master the technique of knitting this knot.
- Place two fishing lines parallel to each other.
- Wrap the end of the first line around the second line. The number of turns depends on the diameter of the fishing thread:
- fishing line up to 0.15 mm – 6 turns;
- up to 0.27 mm – 5;
- up to 0.3 mm or more – 4;
- for braided fishing line – 3.
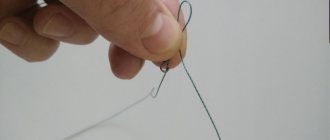
- The end of the wrapping line must be folded back and threaded from below between two threads until the turns begin.
- With the second end, perform the operations described in points 1 and 2. The only difference is that the end must be threaded from above (towards the first).
- Make sure that the ends of the two lines point in different directions.
- Wet the lines with water and pull. You need to pull on the long ends of the fishing line.
- Trim off the excess length of the ends. The node is ready.
It is not allowed to tighten the “bloody” knot by the short ends of the fishing line!
Water (water) node
This is a quick and easy way to connect fishing lines. If you are wondering what kind of knot to reliably tie two fishing lines in an emergency situation, then the best choice may be a water knot.
- Lay the lines parallel.
- The tip of the first line and the root of the second make a loop with four turns.
- The knot is tightened.
Improved fishing knot
An improved fishing knot is an improved version of a regular fishing knot. This knot is tied in two stages and is a simple and convenient way to tie two fishing lines.
The improved fishing knot is not suitable for tying monofilament; it is used to tie two braids together.
Characteristics
- Line type: braided. The difference in line diameters should not be more than twice.
- Specific knot strength at break (load capacity): 65-70% of the strength of the fishing line itself.
- Application: tying two ends of a braided fishing line.
- Features of the knot: small size and neat round shape.
Learning to knit
A detailed description of the technique of tying a knot will help you quickly master this knot.
- Place two lines parallel to each other.
- Wrap one line around another, forming a loop.
- Take the resulting loop in one hand, take the end of the fishing line in the other and pass it through the loop, pulling it behind the other fishing line. Do this action twice.
- Tighten the resulting knot, after wetting the fishing line.
- Take the second fishing line and do all the manipulations described in paragraphs 1-4 with it.
- Take the main ends of the fishing lines in your hands and carefully pull the knots together. The node is ready.
The best knots for tying two fishing lines together
Many units have been invented for the installation of fishing equipment. Let's look at several popular options for tying two fishing lines together.
"Eight"
This is a reliable method for constructing non-tightening loops, used in navigation, mountaineering, and caving. This knitting does not slip and can withstand significant loads. There are different types of “Eight”: regular, double, fishing, Canadian and others.
"Eight"
We offer an algorithm for how to tie a simple loop on a fishing line:
- Take the free end of the thread in your hand and attach it to the base, forming a loop.
- Make another loop from the double thread and turn it 180 degrees.
- Insert the first loop from below into the second, wet the knot and pull tightly.
The undoubted advantages of such a bundle are strength, ease and speed of execution. It also has a drawback - the “Eight” fishing knot is intended exclusively for thick threads.
"Carrot"
The compound is cone-shaped, similar to a carrot, hence the name. The main purpose is for mounting two braids or a braided cord with fluorocarbon.
"Carrot"
Let's look at knitting step by step using braid and monofilament as an example:
- First you need to put the threads side by side and form a small single loop on the braid. Insert the end of the monofilament, its length should be about 20 cm.
- Wind the end of the monofilament into a spiral onto the braid, you need to make 9-10 rotations in one direction and 8-7 turns in the other.
- Insert the tip into the loop hole and carefully secure the knot by pulling the cords in different directions. Trim unnecessary threads. Don't forget about the need for wetting.
The disadvantages of the technology are:
- complexity of manipulation;
- fragility;
- instability to vigorous mechanical influences.
The weave will need to be inspected and checked periodically. In case of the slightest doubt, you will have to untie and redo it.
Your question to an expert
Luka Strelnikov
Professional fisherman with extensive experience
Ask a Question
"Grinner"
We offer an algorithm for how to tie two fishing lines together using how to tie two fishing lines together using “Grinner”:
- Combine the threads and make a loop on one.
- Using the end of the monofilament on which the eye is formed, make a spiral winding: 5-7 turns around a pair of threads will be quite enough.
- Make a knot.
- Repeat with the adjacent fishing line.
- Gently pull the ends until the knots come together.
- Remove the excess.
"Grinner"
The resulting knot is stable when tying two lines. It is used to attach hooks to all types of threads. There is only one drawback to weaving: fishermen who do not have graceful fingers may experience difficulty in working.
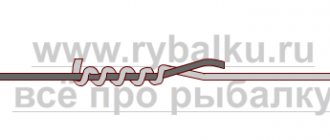
"Bloody"
This is the oldest method, which appeared more than four centuries ago. Let's look at how to tie 2 fishing lines together using a "Bloody Knot" step by step:
- Take 2 threads and cross them, leaving small ends of about 20 cm.
- With the first end, tie the adjacent fishing line 8-10 times.
- In the middle of the winding, move the twisted threads apart and thread the ends in opposite directions into the hole that appears.
- Holding the edges with your fingers, gather the threads into a knot.
- Wet the twist.
- Tighten the knot and remove unnecessary tails, leaving approximately 1.5 mm.
Fishing knot “Bloody”
The knot is suitable for repairing broken tackle and fastening elements to the main thread.
To finally understand how to tie two fishing lines together, watch the video that clearly demonstrates the sequence of work. It may not be possible to make a quality connection right away; this requires practice. Practice at home, starting with the simplest ligaments.
Fishing knot "Centaurus"
The Centaurus fishing knot is used to tie two fishing lines of the same or different diameters and types.
The Centaurus knot is universal and allows you to tie two fishing lines together or tie a fishing line to a braided line.
Characteristics
- Line type: any (monofilament, braided, fluorcarbon, etc.). The diameter of the lines may vary several times.
- Specific knot strength at break (load capacity): 90-95% of the strength of the fishing line itself.
- Application: tying any fishing gear.
- Knot type: compact size and neat straight shape.
Learning to knit
To acquire practical knot tying skills, follow these steps:
- Place the lines to be tied in parallel.
- Wrap the end of one fishing line around the second 5-6 times.
- Take the remaining end of the fishing line to the beginning of the turns and insert it inside these turns.
- Tighten the wrapping line by pulling the short and long ends.
- Perform all the manipulations from points 2-4 with the second line.
- Pull the long ends of the two lines, pulling the knots towards each other.
- Trim the excess length of the ends of the fishing lines. The node is ready.
Single and double clew knot
Another one, quite reliable and easy to repeat, is the clew knot, which can be either single or double. It can also be used to tie fishing lines of different diameters without compromising the strength of the connection. It can be used for various knitting options: you can tie a fishing line to a fishing line, tie a leash to the main fishing line, etc. The knitting method is so simple that after repeating the knot once, the knitting technique is completely mastered.
Video tutorial: Clew knot
Surgical knot
The "surgeon's knot" can be easily mastered by beginning anglers.
A surgical knot is used to tie two fishing lines of the same diameter.
Characteristics
- Line type: any. Line diameters may vary slightly.
- Specific knot strength at break (load capacity): 65-70% of the strength of the fishing line itself.
- Purpose: for tying two ends of a fishing line of the same type or different types of fishing line.
- Application: connecting fishing line on bottom fishing rods of different types.
- Knot type: large size and rough shape.
Learning to knit
- Place two fishing lines parallel.
- Make one loop out of them.
- Pull the long ends of the lines into a loop and make a double half-knot.
- Pass the short ends through the loop and make a half knot.
- Moisten the resulting knot and gently pull all four ends of the fishing line. The node is ready.
How to tie two fishing lines of different diameters
Fishing rigs involve the use of monofilaments of various diameters in the equipment, the problem of articulation of which can be solved by a number of specific knots specially designed for this nuance of knitting. One such effective option is the centaurus knot.
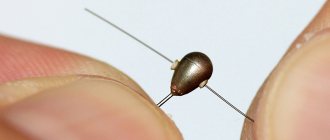
The knitting is distinguished by its miniature and compact size, as well as special strength properties that reach 90% of the initial breaking loads of the base material. The fisherman's knot, the nail, is inferior in its strength characteristics to the centaurus, but benefits from a more streamlined shape of the final result, which is especially appreciated by spinning anglers. To form the connection, additional devices in the form of a small tube are used; the core of a ballpoint pen, or an ordinary nail of small size and diameter, is ideal.
Important! For greater reliability, the resulting connections are impregnated with superglue, before cutting off the ends of the segments to the very body of the formed knot.
Blitz tips
- There is no universal node. Each node is suitable for a specific purpose.
- When choosing a knot, consider the type and diameter of the fishing line.
- When tightening the knot, moisten the line to prevent it from breaking.
- Tighten the knots slowly and carefully to prevent them from unraveling.
All of the above knots are well suited for tying two lines or tying braid and line for tying hooks, feeders, swivels and other fishing gear. Having studied the purpose and mastered the technique of knitting these knots, if situations arise with a line break, you can easily continue fishing.
How to knit two braids
Fishing
The knot itself forms a simple bend; there is little friction between the turns of the lines. As a result, the monofilament line slips out of the knot.
In braid, the tensile strength gives 60–70%:
- The two threads are folded parallel.
- Make a loop with one line around the other.
- Pull this end up from the outside of both braids.
- Once again insert the end into this loop.
- Take the end and extension of one fishing line and tighten.
- Similar actions are performed on the other line.
- Pull both ends together and trim off the excess.
Clinch
The strength of the knot is 87%:
- Wrap the braid around the monofilament 6–8 times.
- Return the end to the beginning of wrapping , and holding the end, repeat the steps, but with a different line.
- Pass both ends through the gap between turns.
- Tighten the knot. The ends are trimmed, leaving 1–2 mm.
Tips for tying line to fishing line
To properly fasten two threads together, you need to follow fairly simple rules when finishing the work.
- Rule #1. Before tightening the knot, you need to take the time to moisten the thread with saliva so that the sliding is sufficient and then the line will not deform.
- Rule No. 2. After the knot has already been formed, do not forget to trim the edges of the fishing line. By neglecting this procedure, there is a risk of getting a bad bite, since future prey will begin to avoid suspicious thread tails in the water.
Having fulfilled these requirements, the key to success can be found in the fishing bag.