Rods for float fishing
Depending on what type of reservoir and under what conditions the fishing takes place, the angler uses different types of float rods. Fishing rods for float fishing are divided into 4 categories:
- flight feathers;
- Bolognese;
- match;
- plug-in
Flight feathers are the most common group, used for fishing in stagnant bodies of water or on rivers with moderate currents. The casting range when fishing with fly tackle is determined by the length of the rod, which can range from 3 to 12 m. Due to the limited casting range, fly rods are used to fish in small bodies of water or in places where the channel edge or hole is located in close proximity to the shore.
The Bolognese float rod is used for fishing on rivers with weak and medium currents. This tackle is equipped with a spinning reel and rings, which allows you to fish at some distance from the shore. The length of Bolognese fishing rods ranges from 4 to 8 meters.
Match float tackle is used for long-distance fishing. The match fishing rod is equipped with an inertia-free reel and a heavy float with its own weight, which allows you to cast the equipment 30–60 m from the shore. The length of fly rods rarely exceeds 6 m.
A plug rod for float fishing can be used in both standing and flowing reservoirs. It is more often used by sports fishermen, since it requires certain handling skills. Plug fishing rods are equipped with a rubber shock absorber located inside the working part of the rod, which is called the “whale”. The length of such fishing rods reaches 15 m.
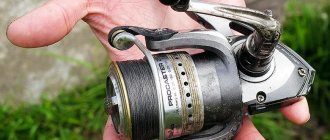
How to use a spinning reel
Before casting, press the line with your finger and tilt the line guide
There is nothing complicated in handling a spinning reel with a spinning reel:
- Before casting, make sure the bait is tied tightly to the end of the line or to the swivel that connects the line to the bait. It allows the line not to twist, thus the bait behaves more naturally when retrieving.
- By releasing the line from the spool or winding the reel by rotating the handle, ensure that the bait is approximately 1-1.5 meters from the tip of the spinning rod.
- Now, with your index finger, press the line that goes from the reel to the first ring and fold back the line handle. Now the spool is in a free state; if you let go of your finger, the line will begin to unwind.
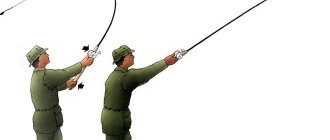
- Make a swing, not necessarily strong, just move the tip of the rod behind your back or to the side. Now swing the rod forward with a whip (not necessarily hard at first), pointing with the tip where the bait needs to fly and at the very last moment release the finger that holds the fishing line.
- The line will begin to come off the spool, and the bait will fly to the place where you cast.
- Immediately after the bait lands in the water, tilt the line guide to the standard position so that the line does not continue to come off the spool and a “beard” does not form.
You need to reel in the fishing line by rotating the reel depending on the type of your wiring. If you want to fish along the bottom, wait for the bait to fall to the bottom, holding the line in tension; after it falls to the bottom, the line will sag a little, at this moment you need to start retrieving.
If you want to fish from above, you need to start retrieving immediately after the bait falls into the water and quickly reeling it in.
When casting, be sure to pay attention to where your bait is before the final swing, so as not to inadvertently hook your fishing buddies, for example in a boat, where there is not much room for a swing.
Necessary elements for float tackle
The presence of certain elements in the equipment depends on the type of float rod. The blind equipment of a float rod for fly fishing includes:
- connector;
- main line;
- float;
- set of weights;
- leash;
- hook.
The connector is used to attach the main line to the rod and can be made in various versions. The main equipment is concentrated on the main line, which includes a float and a set of sinkers. Floats for fly fishing can have a body of various shapes, equipped with a keel, antenna, and also a ring for passing the fishing line. Their load capacity can range from 0.1 to 10 g. A set of sinkers consists of lead pellets of various weights, which are necessary to load the float.
Connectors
A leash is a necessary element that protects the entire equipment from breaking if the hook gets caught. Its diameter is usually 0.02 less than the diameter of the main line. The hook is used to attach bait and ensure reliable hooking. Its size is selected taking into account the type and size of the nozzle.
The equipment of a Bolognese fishing rod differs from that used for fly fishing gear. The equipment of a float rod for fishing in currents consists of the following elements:
- rods with rings;
- inertia-free or inertial coil;
- main line;
- Bolognese float;
- olive sinkers;
- swivel;
- leash;
- hook.
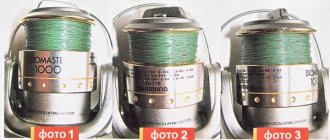
The inertial reel is also suitable for float tackle
The Bologna rig includes a spinning reel of size 3000–3500, on the spool of which a monofilament line with a diameter of 0.15–0.18 mm is wound. It would be good if the reel had a large additional number of bearings, which would allow you to quickly reel out the line after a single hookup. The Bolognese float differs from the fly float in having a greater load capacity and a through hole for passing fishing line. The swivel is necessary to prevent the leash from twisting in the stream. The size of the hook for fishing with Bolognese tackle is usually slightly larger than that used for fishing in still water. This is due to the fact that fish in the current take the bait more boldly and resist more desperately.
Elements for equipping float tackle
The equipment of the plug tackle differs from the fly version by using thinner lines and light floats, which makes it possible to catch capricious fish. The match gear is characterized by the presence of an inertia-free reel and a heavy float, which has its own carrying capacity and ensures long-distance casting of the nozzle.
Attaching the fishing line to the float rod
The reliability of the tackle, as well as the speed and convenience of replacing the equipment, depend on the method of attaching the fishing line. When assembling the fishing rod, the main fishing line can be attached via a connector or via a reel.
Attaching to a fly rod
Any fly rig must have a loop at the end, through which it will be attached to the tip of the rod. A connector is used to attach the equipment to a fly fishing rod with a float. There are three types of similar connectors:
- plastic design with lock;
- rope loop;
- a piece of rubber shock absorber.
To attach a fishing line to the tip of a fishing rod without rings, it is most convenient to use a commercial plastic connector. This element has a small clasp that closes after inserting a loop into it. There is a small hole in the connector for attaching to the tip of the fishing rod. The diameter of this hole must correspond to the diameter of the tip of the whip, so the connecting element should be selected when purchasing a fishing rod. A correctly selected connector should be pulled onto the tip of the whip with little effort. To securely fix the plastic element, the fisherman will have to use superglue.
When equipping a float rod with a blind rig, a connector made from a rope loop can be used. To make it you will need:
- take a piece of synthetic rope 5 cm long and 1–2 mm in diameter;
- take a braided cord with a diameter of 0.1–0.12 mm, which will be needed to secure the rope;
- fold the rope in half;
- wind the folded rope to the tip of the whip so that you get a loop with a diameter of 0.5 cm;
- saturate the winding with superglue.
Such a connector is easy to manufacture and will allow for quick replacement of equipment. This design uses a loop-to-loop fastening method.
The third type of connector is a piece of rubber shock absorber, which can be used as bottom or plug rubber. To make it, you will need a piece of elastic 7–10 cm long, one side of which is wound to the tip of the whip with a braided cord, and at the other end a loop is formed for attaching the fishing line. This connector increases the shock-absorbing properties of the rod, which allows you to use thinner fishing line and smaller hooks.
Attaching to a Bolognese fishing rod
An inertial reel attached to a Bolognese fishing rod.
In a Bolognese tackle, the equipment is attached not to the rod itself, but to the reel that is installed on it. Most Bolognese fishing rods are equipped with a special reel seat designed for installing the reel on the tackle. If the purchased model does not have a reel seat, then you can put the reel on the fishing rod in another way. To assemble a fishing rod and reel you will need:
- drop a little superglue on the part of the reel foot that will be adjacent to the rod;
- install the reel in the center of the butt so that its spool is in line with the first wiring ring;
- fix the coil for 1–2 minutes until the glue dries;
- attach the reel foot to the butt of the rod with a braided cord;
- saturate the winding with superglue.
The tackle can be used after the glue has completely dried. A self-tightening loop can be used to attach the main line to the reel spool.
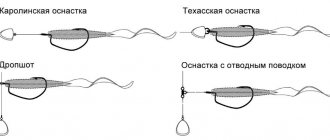
Types of equipment
If you know all types of equipment , then even a novice angler will be able to correctly assemble a spinning rod for fishing.
- Basic equipment can be used to hunt any fish in various fishing conditions. In this type of rig, the bait is attached to a leash attached to a fishing line. Often, with such equipment, a wobbler and a spinner are used as bait.
- Rigging with a jig head means that the bait is placed on a weight attached to a leash.
With Cheburashka. This equipment is produced in this way: the hook (double or offset) should be threaded through the winding ring, and the load itself is secured to the leash.- Texas rig. A bullet sinker must be attached to the fishing line, then a stop bead is installed in front of the leash. An offset ring is attached to the leash. With this type of equipment, twisters, ejector tails and silicone worms are used.
- Russian equipment. A leash no more than a meter long is attached to the fishing line using a Cheburashka, to the end of which a hook is attached.
- In a rig called a drop shot, a weight is attached to the end of the line, and the bait and hook are attached a little higher. This type of equipment is often used for pike fishing, but a metal leash is used.
- The Moscow rig, or, as it is also called, a “retractable leash,” consists of attaching a weight to the end of the fishing line, and thirty centimeters higher - a soft leash up to half a meter long, and then putting the bait on it.
- For fishing with light baits, use a rig called a cut-down, or bombard. This equipment consists of attaching a heavy float to the fishing line, which will help to cast the bait further.
All these types of equipment are used for catching predatory fish. At the same time, a different type of spinning rod, equipment and bait is used for each fish. Knowing all these nuances, even a beginner in spinning fishing will be able to properly equip a spinning rod.
How to properly equip a float fishing rod with a float
The float is the main element in the float tackle, responsible not only for timely registration of bites, but also involved in delivering the bait to the fishing point. Its performance characteristics largely depend on the method of fastening the float.
Float selection
Professionals often prefer a float weighing up to 2 grams
The fly tackle is equipped with a small float made of balsa or other materials with a high degree of buoyancy. The carrying capacity of a float for a fishing rod with blind equipment rarely exceeds 8 g. This bite alarm consists of the following elements:
- bodies;
- keel;
- antennas;
- ring for passing fishing line.
For standing water, oblong-shaped floats are used. When fishing in the current, preference should be given to spherical signaling devices. In fly fishing, the float serves only as a bite alarm and does not take part in casting the equipment.
All Bolognese floats have a drop-shaped or spherical shape, more suitable for fishing with a float rod in moderate current conditions. Bolognese signaling devices differ from flywheel signaling devices in having a greater load capacity. In addition, in the Bolognese version, the line is passed not through a wire ring, but through a hole located in the body of the float, which avoids damage to the alarm during casting and vigorous hooking.
Attaching the float to the fishing line using cambrics
For match fishing, floats 20–40 cm long are used, which have their own weight and lower attachment point. This design gives the alarms good aerodynamics, which allows fishing at a distance of 40–60 m from the shore. The load capacity of match floats ranges from 2 to 25 g.
The plug-in equipment of a fishing rod for fishing in still water requires the use of light floats with a carrying capacity of no more than 1 g. For pole fishing in strong currents, flat floats are used that have excellent hydrodynamics and can withstand the directional flow of water. The load capacity of flat floats can vary from 3 to 15 g.
Attaching the float to the fishing line
The flywheel indicator is attached to the fishing line using 2-3 cambrics, which are first put on the main fishing line and then pulled onto the keel of the float. The plug and Bolognese versions are attached to the main line according to the same principle. Fastening through cambrics makes it possible to quickly change the working depth while fishing.
The match signaling device can have a stationary or sliding mount. In the stationary version, the float is attached using a special connector, which is a piece of wire with a diameter of 0.5–1 mm, with cambrics stretched over it. The signaling device is connected to the connector using a carabiner with a swivel. To assemble the sliding rig, the fisherman will need:
- tie a stop knot on the main monofilament thread;
- put a bead with a diameter of 2–3 mm on a monofilament thread;
- attach a swivel with a carabiner to the monofilament;
- attach the float to the carabiner.
With such equipment, the lower limiter, which will prevent the swivel from flying off, will be a sinker installed a meter from the hook. The working depth of fishing changes due to the movement of the stopper unit along the monofilament.
How to spool fishing line correctly
Let's look step by step how to wind the existing fishing line onto the reel spool. First you need to ensure that the line comes off the reel freely. To do this, you can use a screwdriver, a piece of thick wire or a regular pencil. It will be better if you do this work with an assistant. He will hold an improvised axle with a reel, and you will wind the fishing line onto the reel. The winding diagram looks like this.
You need to thread the fishing line through the spinning rings. You need to start winding the line from the top ring. Then the line must be tied on the spool. You can secure the tip of the fishing line with a regular noose loop, or wrap it with adhesive tape or tape. Reliable fastening is especially characteristic of braided cord, since it tends to “slip” at the beginning of winding. After this, you can wind the line onto the spool by lowering the line guide.
During the winding process, it is necessary to ensure that the fishing line lies with slight tension. This will prevent loops from forming.
At the final stage, all the gear should be adjusted. You need to attach a leash to the main fishing line, which will be used for fishing. You can attach the leash to the main line in different ways. Most often, anglers do this using a winding ring and a carabiner. The ring is attached to the main line, and the carabiner is tied to the leash. The leash with bait can be replaced at any time.
The process of winding fishing line onto a reel
Proper float loading
A properly loaded float allows you to register the most careful bites. To properly load the float, the fisherman needs to have a weighted set of weights and small pliers.
How to load a float on a pond
Loaded float with two pellets and a pad
Having a set of lead pellets with him, an angler can quickly equip a fishing rod right on the shore of a reservoir. To load the bite alarm you will need:
- fasten the sinker at the junction of the leash and the main fishing line;
- clamp the main part of the sinkers, whose mass is equal to 2/3 of the load-carrying capacity of the float, one meter above the feeder;
- the rest of the pellets are secured between the sub-frame and the main set of sinkers until only half of the antenna is visible above the water.
If you plan to fish with large baits that have a significant own mass, then the float can be slightly underloaded.
How to load a float at home
At home, a bite alarm is placed in a high container, with a piece of fishing line about 10 cm long attached to its keel. The fisherman sequentially clamps weights of varying weights on a piece of monofilament until the desired position of the float in the water is achieved.
Having loaded the alarm with half of the antenna, the fisherman removes the pellets and installs them on the working equipment. The density of water in a pond may differ from that at home, so you should always have at least 1-2 pellets with you to reload the float.
Leash attachment
It is impossible to assemble a fishing rod correctly if you do not think about such an element of equipment as a leash. This part is very important because it has direct contact with the fish during fishing.
What should a leash be like?
This element of the float rod equipment should be 0.02 mm thinner than the main fishing line, which will ensure the safety of the equipment when the hook is caught. The leash is knitted from high-quality monofilament with a diameter of 0.06–0.16 mm. The length of the leash for fishing in a still water body is from 12 to 30 cm. When fishing in a current, the length can increase to one and a half meters.
Leash with hook attached using a small swivel
When fishing, you must ensure that the leash does not twist. If a fisherman notices any damage to the leader line, the leader must be replaced immediately.
How to connect a leash to a fishing line
If fishing takes place on a lake or reservoir, in the complete absence of current, then the leash is connected to the main monofilament using the “loop to loop” method. When it comes to fishing in flowing waters, the leash should be attached to the main line using a small swivel, which will prevent it from twisting during fishing.
Main characteristics
High-quality equipment for a spinning rod and, accordingly, fishing depends on the following characteristics: test load, length and action (or reaction to load). Also not a key, but an important role is played by the material from which the fishing rod is made and the design of the handle.
Test load
This characteristic is used to determine the weight range of lures that is recommended for a particular fishing rod . According to this characteristic, spinning rods are divided into several types:
- Light, or light class - permissible load from 5 to 15 grams.
- Medium, middle class - the weight of bait in this class varies from 10 to 30 grams.
- Heavy, heavy - you can install a bait weighing 20 - 50 grams.
- Extra Heavy, super-heavy class - the minimum load for this type of rod is 50 grams.
There are also several less common types of rods based on test load:
- Ultra Light, or ultra-light class, allows a load of no more than 10 grams.
- Medium Light (medium light class) - load level ranges from 5 to 25 grams.
- Medium Heavy, or medium-heavy class - the permissible weight of artificial bait is from 15 to 40 grams.
Professionals recommend choosing a rod whose test load is from 12 to 15 grams; if you use light bait, then the test load of the rod can be 8 - 10 grams. In this case, you should not go beyond the test load. If you use a heavier bait, the rod may break, and it will be much more difficult to maneuver such a bait. If the bait is too light, it will be difficult to cast it over a significant distance.
Rod length
This is also an important characteristic on which fishing results depend. Mostly measured in meters, you can also find inches or feet. The length is calculated depending on the fishing conditions, the required casting distance and other factors. At the same time several types of spinning are distinguished , based on this characteristic:
- short rods, up to 2.1 meters long, are recommended for fishing from a boat or from the shore of small bodies of water;
- the average ones have a length ranging from 2.4 to 2.7 meters, used for river fishing and on large lakes;
- spinning rods with a long rod (length more than 3 meters) are used on large deep rivers, large reservoirs and lakes.
How to properly tie a hook to a fishing line
When installing a float rod, you should pay special attention to the selection and tying of the hook. The degree of realization of bites largely depends on this element of equipment.
Hook selection
When fishing with a worm, barley or corn, hooks of the classic shape No. 12–4 (according to the international classification) are used. To fish for maggots or caddis flies, use hooks No. 16–12. If the angler uses bloodworms as bait, then the hooks should be made of thin wire and correspond to the number 24–18. When fishing with dough or other soft baits, it is better to use hooks with a spring coil. A small spiral will reliably hold the soft bait during the fishing process.
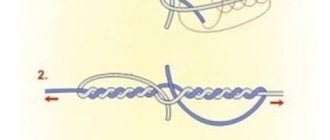
How to knit
If the hook is tied correctly, the monofilament practically does not lose its breaking load at the knot. To properly attach the hook you need:
- turn the hook with the back side facing you;
- pass the end of the monofilament through the eye and attach it to the fore-end;
- point the end of the fishing line towards the eye;
- wrap the monofilament around the shank 5–6 times and pass its tip into the loop formed at the bend of the hook;
- moisten with saliva and tighten.
Wetting the assembly when tightening will prevent it from burning out. The tip remaining after tying must be cut off.