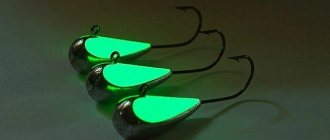
The technology for making a cone-shaped devil with your own hands from a lead rod and then painting the jig was invented in the mid-70s. Since then, I have only modernized the swivel mount of the tee and the suspension loop to the fishing line.
Then, for fishermen who do not have a soldering iron, I came up with a way to make a fishing devil from a lead blank of short length and thickness without soldering. The jig assembly method is suggested on the next page.
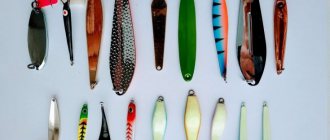
Here we also reveal a very simple technology for making with your own hands a set of lead jigs - little devils of different lengths, thicknesses and shapes, used for catching fish without bloodworms in various winter fishing conditions.
And, apparently, the method proposed to you for making a devil from a rolled lead rod is quite popular, since it is repeatedly stolen word for word by creatures who either are not fishermen or, due to mental impairment, cannot connect several words into a single whole sentence. And I really want to earn a penny by showing garbage advertising on my Internet page.
Making a fishing devil from lead
I propose the first method of making fishing devils from lead with your own hands, as a result of which we will get lead jigs of different sizes with hinged tees.
During the work we will need a soldering iron. For fishermen who do not yet have a soldering iron, I suggest using the link at the bottom of the page to go to the training material, after reading which you can make a fishing devil out of lead with your own hands without soldering the suspension loop to the fishing line and the tee.
A set of cone-shaped devil jigs can be made from a voluminous piece of soft lead or a thick lead sheet (see photo), by rolling out the workpiece to a certain length and thickness.
Fishermen who have been making various lead baits with their own hands for a long time may accumulate lead scraps over time. They are also suitable for making fishing devils of various shapes, thicknesses, lengths and weights.
Small lead scrap is pre-melted in a suitable container. Then a set of fishing devils (and other homemade jigs) can be made from the lead pancake shown in the picture under the title of the article.
In both cases, it is advisable to use lead minimally diluted with impurities to make lead fishing devils.
In its pure form, lead metal is best forged on a slab. At the same time, no cracks appear on the surface of the lead during the process of making devils and other homemade jigs with your own hands.
"Lazy" homemade devils
Such nozzles are distinguished by the fact that they are much easier to make, since you do not have to resort to soldering; accordingly, there is no need to remove rosin and other substances from the surface of the finished product, which in one way or another can reduce the catchability of the product.
The easiest way to make such devils is from parts from lighters, since even the cheapest design has several elements that can be useful:
- Small springs , with which you can protect rubber elements from being cut by fishing line during fishing;
- Felt mugs , which are put on the forend of the nozzle, act as a wing, providing natural guidance in the water column;
- Cylinders made of yellow alloys - they are just suitable for the production of the nozzle body;
- Metal rods , made of yellow alloys, have a longitudinal hole. They are also suitable for getting the base of the devil's body;
- Soft aluminum tubes.
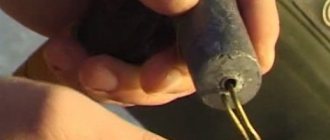
The hardest thing here is to carefully break the lighter. To do this, wrap it in a rag and gently hit the plastic part with a hammer. The cylinder is removed, into which the compressed lead pellet is inserted. A hole is pressed into it with a hot needle.
A small piece of a rather soft tube is put on it, through which the hook will be threaded. In principle, the nozzle is ready for immediate use. To make it as visible as possible, it is wrapped with copper wire.
Lead blank of fishing devil
To make cone-shaped lead fishing devils with your own hands, you will need a blank, which can be cut off from a long round rod of lead, which we don’t have yet. Therefore, we give the rod a round shape with our own hands. For what:
From the monolith of the lead plate we separate a strip of metal with a width equal to the thickness of the sheet or casting obtained by melting lead in a frying pan (1).
We hammer in the protruding side edges with a hammer, giving all the lead fishing devil blanks a rounded shape at once. Position 2 on the drawing.
Making “Devil” by pouring
To make a “Devil” jig using the pouring method, you will need to make a special mold, which is made using available materials. You can make such forms from aluminum or using plaster from two halves, and you need to make grooves for the hook.
You can use a very simple casting method - twist a tube out of foil or thick paper, insert a tee into one end, and pour molten lead into the other end. Initially, such a structure should be placed in sand.
Thickness of the devil's blank rod
Next, we roll out the lead blank of the devil with an uneven side surface on a horizontal metal plate (frying pan) under a wide steel plate. As a result, we obtain a long lead rod with a perfectly round jig cross-section about 8-9 mm thick, shown in the picture in position 3.
To make cone-shaped bodies of fishing devils with your own hands, use a hammer and knife to chop a long lead rod into several pieces of the required length.
If for the devil's jig you need to make a lead blank with other dimensions of length and thickness with your own hands, roll out a short stump of lead rod separately.
But, perhaps, some fishermen will not be satisfied with the too small cross-sectional diameter of the jig blanks from the resulting lead rod, or they will want to give the jigs a more complete, say, conical shape.
Read below about ways to change the shape of a lead fishing devil blank, the thickness and length of each jig with your own hands.
Fishing devil's game
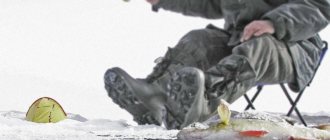
About winter fishing
Fishing for devils in winter will be especially effective during certain periods. When the first ice breaks and most fish rush to everything that moves, fishing with this type of bait will not be anything remarkable.
However, when real frosts come and the thickness of the ice on the reservoir increases, and most of the fish fall into a passive state, this type of fishing can be very successful.
For example, the perch will no longer chase the spoon, but it will be quite possible to “stir up” it with the play of a small devil.
Successful winter fishing with devils is compared in terms of catch with fishing with other baits at the beginning of spring, when the ice begins to melt and the fish become active.
Shape of the devil's jig blank
In order to change the length, thickness or shape of any devil workpiece, we will again use a hammer, a massive plate with a smooth surface and a steel plate.
I will give several examples of how you can change the dimensions of blanks when making with your own hands not only devils, but also any lead jigs. Let's say we needed to expand a lead stump while maintaining the round shape of the cross-section of the workpiece.
What to make a devil out of?
Making such a nozzle with your own hands is not too difficult, and it is made from scrap materials. To do this, you will have to take three identical hooks, saw off or bite off the eye of two of them, press them tightly together and twist them securely using thin copper wire.
After this, take an ordinary drill, the chuck of which is equipped with a three-jaw mechanism, clamp the hooks between the jaws, after which they are carefully soldered with tin or lead. This completes the production of the tee.
Two strips of the required size are cut from sheet lead, cuts are made in them for hooks and a tee is soldered to them. First you need to solder only one strip , make sure that the hooks hold on to it quite firmly, after which they are connected to another plate.
All excess is cleaned off with a file or needle file, and sanded thoroughly to make the product shiny. Now all that remains is to paint and dry the product, after which the product can be considered completely finished.
Length of the jig blank
To reduce the length while simultaneously increasing the thickness of the workpiece, place the lead stump on the “butt” (2) and flatten the lead workpiece with a hammer along the longitudinal axis (3). After that, we level the side plane of the body of a homemade devil or any other round-shaped jig (for example, a bulldozer) on a plate under a flat metal plate.
As a result, the length of the round devil blank will decrease, but the thickness (diameter) of the body of the jig will increase. See position 4. Next, any round devil blank can be given a conical shape (5).
Features of making jig "Devil"
To make your own “Devil” jig at home, you can use several different methods, among which are the following:
- – the process of manufacturing “Devil” without soldering or casting;
- – “Devil” using soldering;
- – manufacturing by casting method.
At the same time, the first method is the simplest and easiest, but it still allows you to get a very effective homemade “Devil” jig as a result; the other methods are somewhat more complicated.
Preparing a cone-shaped devil
If you need to make several jigs of different lengths and thicknesses with your own hands, you can first roll out a round lead rod in its entirety, giving it the shape of a cone.
Then we chop the cone-shaped lead into blanks for fishing devils of different lengths and thicknesses. Bringing each chopped lead billet to the desired conical shape is not difficult using the technology proposed above.
Nod for the devil
You can also make the devil's nod with your own hands from lavsan or a clock spring. The nod is made double-conical, that is, it should evenly taper in width and thickness from beginning to end. It is this design that allows the bait to play correctly and the angler to notice the bite in time. The fine-tuning of the rod is done for a specific weight of the devil, so the angler needs to have several already tuned fishing rods. The correct nod body kit for a devil is just below the horizon with a load, 15-20 degrees up without it. The reverse convexity of the lavsan nod is made by passing it between the finger and the nail.
Subscribe to the channel:
My YouTube channel RYBAFAN on fishing:
We're OK
How to make a lead devil body
Let's start making our own devil jigs with the cone-shaped lead blanks shown in the photo, which can be made by rolling out stumps of a round lead rod.
The method of giving a lead strip a round cross-sectional shape was discussed in the previous article. Next, let's try to figure out how to make cone-shaped devils with hinged and soldered tees.
Devils with movably fixed tees belong to the class of double-circuit jigs. Lead baits become multi-circuited after the appearance of artificial baits on tee hooks, which you can also make with your own hands.
Conical bodies allow you to make lead devils with your own hands in four different designs, which differ noticeably in how they play in the space of water.
If the lead blanks are rolled out to the desired shape, then to completely make the devils, all that remains is to solder the loops for tying to the fishing line and tees into the jigs.
The material in the article Making your own little ural jigs will help you make a cone-shaped devil with your own hands.
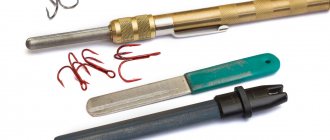
Necessary tools and materials for fishing bait devil
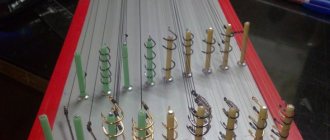
We will need three hooks No. 10 with a long shank, lead - 3-4 grams, a paper mold in the form of a bag, a large needle, a soldering iron with tin, a box of sand and a gas burner or stove. We will melt lead in a teaspoon. It is better to use hooks with shovels, as it is better to combine them together. If only models with an ear are available, then they should be bitten off with wire cutters.
We will also need a wooden cube in which we will make slits in which we will place hooks. It looks like this:
Making a devil with your own hands
To make a devil with your own hands, we cut off the ends of the jig blank, roll out the lead blanks again until they are white, giving them a round or conical shape (see photo). To do this, use a wide file with a well-ground notch.
Next, at both ends of the finished devil bodies we pierce blind holes about 5 mm deep for soldering the fishing line suspension loops and tees into homemade unwinding jigs.
You can also make a loop for tying the devil to the fishing line and hinge the tee jig with your own hands by bending a 0.8-1 mm thick tinned copper wire around a nail of a suitable diameter. Then the antennae of the loop are bitten off to a length of 4-5 mm and twisted.
To make a hinged mount for the tee in the body of the jig, insert the tee into the piece of wire before twisting the loop. See the photo and choose any loop design.
After soldering the loops into their blind holes and painting the bodies, we will make our own little devils, shown in the photo in the top row, where each tee with the cone of the body of the jig is hinged.
DIY devils
2015 has recently arrived, the reservoirs are covered with ice, in some places it is solid, in others it is very thin, and going out on it is life-threatening, and in others there is no ice at all and the spinning festival continues. By my nature, I more and more often strive to visit open rivers in order to fish on them with a spinning rod, but sometimes I don’t want to feel the smells of a universal scale from the eternally stinking Moscow River, and then on such days I take a drill, get into the car and go to the some pond or lake, or on the solid icy edges of the Oka. I won’t say that the fish caught are really trophy size, but from time to time you come across good specimens. For the most part, I fish with a balance beam or a vertical line, but when there is no fish in the hole, I collect the rest with a reelless reel. I really like to catch devils in such cases.
The choice of devils and witches in our stores today is huge - these include homemade options made from lead and tungsten, and the famous Tula baits. Today they are considered the best option among mass-produced ones. Most of the assortment of fishing stores is represented by medium-priced baits made of pressed powder tungsten, and the vast majority of these baits are painted. And everything would be fine, but often the quality of manufacture of these same “tungsten” devils (the witch differs in the number of hooks - she has 4 of them instead of 3 for the devil) leaves nothing to be desired. And it’s not a matter of neat assembly or painting; it’s the quality of attaching the hooks to the devil’s body. When you hold the bait in your fingers, it’s all so neat and even, the hooks are very sharp, and just like that, they’ll fit into your fingers. But as soon as you catch a dozen perches or roaches with it, the paint peels off, and the whole essence of mass production begins to appear through it - a copper-coated tungsten body with a slot into which the hooks are soldered. The soldering looks excellent, smooth, without holes or cracks (visible under a magnifying glass), but as soon as you pick out such a devil from the mouth of a greedy perch or roach, only one body remains in the medical clamp, and it’s good if it has one bent hook. It is not uncommon for the bait to fall apart during hooking or retrieving. All this does not add joy when you pay money for the bait, sometimes quite a lot, and in the cold there is not the slightest desire to tie up a useless bait. There are samples in which the hooks are held on the body only by covering the latter with paint. Such hooks bounce off along with the paint on the first or second bite. As a result of such poor-quality devils, I lost a couple of good trophy bream with a weak bite. And I decided to start analyzing and making homemade devils with my own hands at home and please the “penguins” with the development. Look what happened.
First of all, we need to decide what size and weight of devils we use most often. I love thin, runaway devils, with a ring at the top, with or without a bead - depending on your taste. I fish more often at depths of up to 3 m, so I no longer see the point in using heavy tungsten devils - they play very aggressively, and this does not improve fishing performance. Lead or an alloy of lead and tin plays much more interestingly and softer in such conditions. There are dozens of options for making such devils from lead, starting from casting in a mold (the repeatability is simply amazing) and ending with simply clamping a float pellet onto the fore-end of a tee or even a single hook. And if the first option allows you to make high-quality baits with hooks that fit tightly in the body, then the second is most often disposable “devils” for fishing. What should we do?
Making a mold is difficult, time-consuming, and often makes no sense.
And you can find the way out yourself - just run for five minutes to a radio store with two hundred rubles in your pocket and buy what you need.
Namely, solder in the form of lead-tin wire with a diameter of 1 mm with rosin (this particular reel is the most expensive investment), a set or bundle of heat-shrinkable tubes. Along the way, you can stop by to buy a couple of packages of the necessary hooks and beads in the handicraft department. I hope most people have a thin medical clamp with straight jaws, thin copper wire too, super glue is the cheapest, a 3 g tube is enough for hundreds of baits. From banal tools - scissors, a lighter, definitely a simple gas lighter, argon versions are suitable for me, a backing for the table, a couple of small needle files and a bottle of black nitro paint (for those who like to experiment - a set).
So let's get started. We take the hooks we need, they are very ideal for us with a spatula, in the amount of 3 pieces, and one hook with a ring (you can take an unimportant quality, we only need the upper part of it), we bite off/break off at the hook, pry it off, throw it away, and the resulting rod with With the ring at the top, we clamp it into the medical clamp by the ring.
If 3 hooks also have rings, then we break them off, leaving only part of the fore-end and hooking it with the sting. Apply a little superglue to the rod clamped in the clamp and glue one of the three hooks, trying to do this very carefully.
All other stages and, ultimately, the bait itself will depend on the quality of this work. Consistently, keeping all 3 hooks neat and symmetrical relative to each other, glue them onto the rod. While this whole thing is drying, we work with solder - tear off a piece of wire about 7 cm long, and prepare thin copper wire. You can take it from old TVs, we need it like a hair - with a diameter that looks like 0.05 or even thinner.
Carefully, trying not to touch the glued hooks, we wrap our workpiece with double-folded copper wire, increasing the pressure with each subsequent turn. We remove unnecessary ends, apply solder and begin winding over the copper base.
It should look something like this.
If it is necessary to make a thicker body, or a heavier one, then you can add a piece of tungsten, steel, or copper wire under the copper winding. If you need to maintain a small mass, but sharply increase the cross-section of the body, then the solder is wound in two layers, and for large devils, in three. For appearance, before winding the solder, you can put on a bead of the desired color; if it is needed at the hooks, then before wrapping it with copper wire, it is first placed on the structure. Instead of beads, I often use small brass balls, they add a little weight and look beautiful. We cut off a piece from the heat-shrink tube, 4-5 mm larger than our body of the future devil, and stretch it onto the workpiece.
If you don’t have the required diameter, then stretching the whole thing with a clamp is not difficult - but keep in mind that the tube should sit with a slight effort, and not dangle around the body like an onion ring on a skewer). We clamp the workpiece by the top ring, adjust the heat shrink, and begin to carefully heat it directly over the heat shrink with a lighter.
When the heat shrink takes the form of a solder winding, we turn our workpiece into a vertical position with the hooks up and carefully continue to heat it from all sides. An indicator that the solder has melted and filled all the voids under the heat shrink is the appearance of rosin at the exit point of the hooks. (see photo below)
If you continue to heat, the solder will appear, neatly filling the gap between the hooks and soldering them tightly, and the heat shrink on the body will become smooth and form the future body. It will never burn, it will simply harden, which is why it is ideal for these purposes. But don’t overdo it - if you overheat the workpiece, you can lose the solder, it will simply leak out from under the mold. While the alloy has not hardened, carefully adjust the position of the hooks with your fingers, maintaining symmetry. Let the workpiece cool and use a utility knife to cut off the burnt heat shrink from the devil’s body. Usually this is possible immediately. But there may be problems - the rosin grabs the rubber quite firmly, and then you have to cut the heat shrink or remove it with a stocking. Having removed what is unnecessary, we see an almost finished devil - and immediately evaluate the quality of fastening the hooks and the quality of the body. We carefully press on the hooks, trying to turn them towards each other; if they are caught and there are no voids inside, then this will not be possible without bending or breaking them - the hooks will spring back. If excess solder appears, we remove it from the devil’s ring with the same knife, and bring it to the desired shape with a needle file. To paint or not is your choice, I do it 50/50.
Such devils have been serving me for 2 years now, and not once have the hooks fallen off or turned, whereas with serial devils everything has fallen off a long time ago. The cost of a homemade devil is low, and up to two dozen similar models can be made in an evening.
And even though they weigh less than tungsten ones, we talked about the method of weighting above, but under load, these simplest little devils show amazing durability - there is no thought that the hooks are about to fly off or the ring will fly out. Feel free to tear them off if there is no way to unhook them. If you set a goal, then you can make other winter jigs in the same way, if you wish.
Dmitry Pankratov, January 5, 2015
Aligning the devil's jig vertically
Aligning the devil along a vertical plumb line is balancing a hand-made cone-shaped lead jig in the space of water. This operation can be carried out before painting the bait.
By bending the top loop away from the center, the devil suspended on a fishing line can be given a slightly different position in space. That is, align it vertically, or give the fishing devil a slightly inclined position.
A word of caution. In order to save time spent making vertical jigs with your own hands, I do not recommend soldering tees for devils from single hooks.
In addition, when buying tees, make sure that they are soldered together with copper, otherwise I have come across treble hooks that were soldered with who knows what, and which, when heated with a soldering iron during the process of making the wicks, fell apart.
Making devils for fishing with your own hands
On the eve of the season, I want to share with readers my method of making such a catchy bait for baitless fishing as the “devil”.
Despite the wide variety of baits in fishing stores, choosing the “right” one is not always possible. There are, of course, very good models, but their prices are unreasonably high. In my understanding, the “devil” should be elongated, teardrop-shaped, with a longitudinal hole for passing the fishing line, and not with a ring. Only in this case is the correct orientation of the bait possible - vertical, but with the ring there may be distortions.
The hooks on the bait should be large, “round” in shape, and their spread should be slightly less than the length of the body of the bait. Many people can object to me that they successfully catch with “devils” of a different shape. I like this one, and confidence in the gear largely determines the success of fishing. If you manage to acquire good “devils”, this does not mean that you will be lucky next time, and breakages are a fairly common occurrence. You can find a simple way out of this situation - make the “right” “devils” yourself.
There is a technology where the body of the bait is made from an olive sinker turned to the required diameter. The hole in it is drilled out on one side so that hooks can be inserted, which are then soldered. Next, using a file and sandpaper, the devil is given the desired shape.
This technology is simple, but quite labor-intensive. For the new season, several fishermen I know wanted to learn how to “draw”, so I decided to master their more mass production.
A friend advised me to try casting baits. I spent a couple of days thinking about how best to do this. The main problem is fixing the hooks to ensure their correct position. The hooks fit well in a regular office eraser, but it doesn't like heat. It’s easy to make castings in a plaster mold, but you can’t fix the hooks. The idea came naturally - to make a combined form. I tried to implement it in practice - everything worked out the first time.
To make the mold you will need: a small amount of alabaster, two office erasers, a small piece of wax (optionally from a candle), a tube of cyanoacrylate (superglue), a razor blade or a sharp knife.
First of all, markings are made on one of the sides of the eraser - three straight lines intersecting at one point at an angle of 120°.
My baits have three hooks soldered together, the angle between which should be 120°. If you install four hooks, then two straight lines are drawn at an angle of 90°. Next, the eraser is cut through the blade to half its thickness.
Hooks will be inserted into the resulting cuts. I use ready-made tees from companies such as Owner, VMC, Gamakatsu, which have the desired shape, strength and sharpness. The curved parts of the tee hooks are inserted into the eraser, and the fore-end and stings with barbs should stick out. We make marks at the points where the stings come out, after which we take out the hook, and on the marked places we attach pyramids of eraser with small drops of glue, slightly larger in height than the stings protrude.
The next stage is making the body of the bait from wax. It all depends on personal preferences. Mine are in the form of an elongated drop, 10 and 15 mm long, with a diameter of 2.5 and 3 mm at the widest part. The wax heats up in your hands and becomes plastic, easily rolling between your fingers. The pointed tip needs to be cut off slightly to create a flat surface. Next, we glue the body onto the prepared eraser, strictly vertically, placing the pad at the intersection of the lines on the eraser (as it turned out, superglue glues wax well - a big plus).
The next stage is making a mold from alabaster. It can be disposable and break after casting the devil, but it is better to make it reusable - detachable, from two halves. Alabaster hardens very quickly, which allows you to speed up the process. To start, you will need a small container. I use plastic boxes from small wobblers. In the box you need to mix alabaster with water until the thickness of sour cream, about half the volume. Then, quickly, until the material begins to harden, but carefully lower our eraser with the body of the bait into it strictly until halfway and leave it until it hardens completely.
It is advisable that one side of the eraser touches the wall of the container. After this, if necessary, level the surface, being careful not to damage the wax. Next, melt a piece of butter in your hand and apply it with a brush in a thin layer on the surface of the alabaster. Then we prepare a new portion of the gypsum mixture, completely fill the container and wait for it to harden. The result should be two layers of alabaster, separated by a thin layer of oil, with the body of the “devil” between them. If you do not use an oil layer, the alabaster halves will be firmly attached to each other, and it will be impossible to separate them without damage.
Carefully clean the alabaster around the eraser so that it can be removed without damaging the form, and separate the halves. We remove the wax body of the bait and lightly sand the walls of the resulting recesses at the joint site with fine sandpaper to ensure easy removal of the casting from the mold. Using a file, we make a recess in each of the halves so that when they are connected, we get a conical funnel for pouring metal.
We cut off the pyramids from the eraser, update and clean the cuts according to the markings, and use a drill to make a small indentation at the point where the lines intersect. In the alabaster half-forms, in place of the removed pyramids, there will be recesses into which the tee tips will fit. Thanks to this, they will not come into contact with the mold material and will maintain the level of sharpening. During the process of making baits, the eraser may become unusable, melting from repeated contact with molten metal. It can be easily replaced if you have exactly the same one. It is enough to attach it to the half of the mold, mark the place from which the hook should come out, and make the markings and cuts. Although practice has shown that the eraser is very durable - it can easily withstand the casting of several dozen baits.
That's all, the form is ready. It consists of an eraser that serves as the bottom and two alabaster halves that are tightly connected to each other.
You can start casting!
To cast baits you will need: hooks No. 18–16, sanding paper, soldering acid and a brush, sewing pins with a ring, small quantities of lead and tin, a spoon or a small ceramic crucible-thimble for melting them, pliers, wire cutters, a clothespin or a piece of thread.
First, we prepare the hooks: you need to remove the ring with pliers, then use sandpaper to remove the coating on the forend to the bend and treat the cleaned area with soldering acid. We insert the prepared hook into the slits on the eraser. We stick a pin lightly smoked over a candle flame close to the fore-end.
After it is removed from the casting, a longitudinal hole will remain in the body of the devil for passing the fishing line. The exit of the hole will be at the base of the hooks. It can also be done on the side of the devil, if the point of a pin is pressed between the halves of the mold, in the grooves scratched in advance.
Next, we assemble the form, fasten the halves with clothespins or wrap them with thread. All that remains is to center the pin inside the funnel sprue so that the hole is in the center of the devil.
Next, in a crucible or spoon, melt lead and tin in equal proportions so that the entire body and funnel can be filled. You can only use lead, but the alloy with tin is more durable and hard.
The melt needs to be thoroughly heated so that it flows easily and does not harden too quickly. Metal pressure in the sprue helps fill all mold cavities and improves the quality of the product.
Let the mold cool for a while, carefully separate it and remove the casting. Using wire cutters we disconnect the sprue-cone from the body, and then using pliers we remove the pin from the body and the cone, which will be used for melting down and making the next bait. We cut off the deposits of metal from the resulting workpiece with a sharp knife, process it with a needle file and fine sandpaper. We clean the hole with a pin or a special drill for jigs. If necessary, slightly adjust the hooks using pliers.
Now let's start painting. We take the bait out of the solution, place it through the hole for passing the fishing line onto a pin or wire and wait for the acetone to dry. After this, we apply nitro enamel to the body of the bait with a brush for painting models of military equipment. I prefer black, but you can use green, red, or create fancy colors. We move the devil back and forth along the wire so that the hole does not get stuck with paint, remove it and place it vertically on hooks to dry, for about a day until it is completely dry. It is more expedient to produce 5–10 baits at once using this technology, sequentially going through stages with the entire series.
If desired, the hooks of the bait can be decorated with beads, cambrics, foam or other artificial bait, but I prefer “naked”. Such “devils” fully correspond to the concept of a “baitless jig”; they proved themselves well last season, helping to catch a wide variety of fish: from match ruff to kilogram bream.
I hope that my small but quite successful experience will be useful to other fans of winter fishing who have decided to master such an interesting type of fishing as devil.
Using the presented technology, at home you can make not only “devils”, but also other types of jigs of arbitrary shape and size, as well as spinners. Have fun fishing!
How to do it?
We take three hooks of the same size and bite off pieces in the middle of the fore-end eye, keeping all three hooks the same size. We use a file to remove varnish and paint from the surface of the hooks.
We take one hook 2, 3 sizes larger than the previous hooks with a long shank and bite off the shank of the size we need, because its main part will be the length of the “devil”.
We also remove varnish and paint. After adjustment and cleaning, we take three hooks of the same size and insert them into the insulating coating with the shank.
We wind them together with copper thread, keeping them to the same length. Then we insert the wound hooks into the three-jaw chuck, correct and tighten again (fix). What is a three-jaw chuck used for?
There is an equal degree of 120° × 3 = 360° between the fists in the grooves. That is, uniform distribution and fixation of hooks, both in the horizontal-radial direction and vertical.
After fixing the hooks in the cartridge, we attach part of the fore-end with the eye to the rest of the hooks, fasten it with copper thread and solder it. When soldering, we monitor the end so that it does not deviate from the axis.
Next, after completing the first winding, we once again check for evenness, and wind the thread to the end. After each layer of wound thread we solder it, and thus, by winding it one by one, we set the shape we need for our future jig.
After we have soldered and our workpiece has cooled, we process it with a file and sandpaper, removing all unnecessary irregularities. We degrease it with a solvent and paint it with the desired color of varnish. After the varnish has dried, we begin to equip the jig using cambrics, homemade sequin washers, beads, and chains.