Knitting fishing knots and loops is an integral and one of the important parts in fishing science.
Probably, every fisherman has had this experience when the bite is interrupted due to poor-quality connection of the equipment elements and not only the long-awaited catch is missed, but also expensive fishing accessories. Such a failure will unsettle even the most “experienced” hunter. It is at such moments that you understand that everything requires quality, accuracy and skill. In this article, we have selected for you the highest quality and most reliable fishing knots, the technique and knitting of which we will consider in detail.
Content
- 1. How to tie stopper knots
- Single knot
- Knot “Double” or “kremkus”
- Knot “Stop Clinch” or “clinch knot”
- Knot "Bud" or "button knot"
- Knot “Triple” or “three – water knot”
- Knot “Loop to Loop” or “double loop junction”
- Knot “Blood Ties” or “blood knot”
- Double Sliding Knot
- Shock Leader knot
- Knot "Mahin leader knot" or "carrot"
- Altbright or Shock Leader knot
- Knot "Universal"
- Knot "Ailite" or "eyelet knot"
- Trombone Loop Knot
- Knot “Outer loop winding” or “trombone loop”
- Knot "Palomar" or "palomar"
- Knot “Clinch” or “improved clinch knot”
- Homer knot or homer knot
- Grinner knot or universal Uni knot
- Figure Eight Knot
- Knot "Tight loop" or "homer-rhode loop knot"
- Knot "Rapala" or "rapala knot"
- Knot “With a blind loop” or “compound knot”
For fluorocarbon
Thin and flexible fluorocarbon tackle requires special handling. Otherwise, the plexus may simply come apart under insufficient loads or, on the contrary, burst.
Double: loop to loop
At first, lovers of active fishing and big catches always wonder how to insert a feeder loop into a fishing loop of a leash using a knotless method? A knotless connection saves a lot of time because you don't have to re-weave all the gear.
How to tie stopper knots
Material for making locking units:
- monofilament line;
- wool thread.
The purpose of the stopper assembly is to set the bait or equipment elements to the required depth.
Area of application : float fishing using a sliding float when fishing over long distances.
Requirements for a sliding float stopper:
- must determine the required depth of descent of the float for fishing, and securely fixing it on the fishing line;
- the fastening of the locking unit must be movable, but without independent movement;
- the knot must pass freely through the gear rings;
- should not deform the main fishing line.
Stopping units are prepared immediately before the fishing process on site. Before you start tying a knot, you need to first moisten the fishing line (with water or saliva) so that it does not heat up during the process and thereby weaken the knot itself.
A detailed article about monofilament fishing line, its characteristics, features, and advantages is here
“Single knot” For knitting you will need a 15 or 20 centimeter piece of monofilament (wool thread)
Node linking scheme
Knot “Double” or “kremkus” For this knot design, you need to fold the fishing line in half
Knot “Stop Clinch” or “clinch knot”
Knot “Bud” or “button knot” In order to learn how to correctly knit this type of locking knot, we suggest watching this video
Important! The diameter of the monofilament line should be slightly larger than or equal to the diameter of the main line.
Advice:
- In order not to waste precious time on tying knots when fishing, you can prepare several stoppers in advance by taking a plastic tube (for example, a cocktail tube) no more than 10 cm, put it on the main fishing line and tie several of your favorite stoppers onto the tube. Then pull the tube and tighten the knots on the fishing line.
- It is better to knit two knots at once, one of which is well tightened, this will help fix each other when landing fish.
- When tying a knot, you need to control the tension of the thread, since when it relaxes, it can become deformed, which will affect the quality of the structure.
- The remaining tips do not need to be cut too short, as they help the knot pass easily through the guides of the rod blank.
- We do not recommend hanging beads between the knot and the float.
Basic sliding knots and loops
The main sliding types include the following knots:
| A simple runner. This is one of the simplest ways to make a tightening loop. Knits on any part of the rope. | |
| Running Eight. Quite a reliable, strong option. It tightens evenly when force is applied to the root part of the cable. | |
| Running Bowline. It works reliably, according to the lasso principle. | |
| Scaffold knot or Lynch loop. | |
| Silk loop. |
Using basic tying skills, you can easily move on to creating more complex knot and loop designs.
How to tie two fishing lines together
The area of application of knots for fishing lines is mainly float, bottom and fly fishing. As a rule, the main fishing line and leader are tied with such knots, and in fly fishing - undergrowth.
What is connected:
- lines of different diameters between each other;
- fishing lines made of different materials (for example, monofilament and braid);
- in case of a break during fishing - the main line of 2 pieces;
- main line and shock leader (a thicker piece of line and 2 times longer than the rod, which takes on the entire load when casting).
Important! When tying two lines, you need to make sure that the strength of the lines at the knot is not affected. When tying pieces of fishing thread or shock leader, you need to ensure that the resulting knot passes freely through the rings of the tackle blank.
Knot “Triple” or “three - water knot” It is important to remember that when tying this type of knot you need to take monofilament fishing lines that differ in diameter by no more than 0.05 mm. It is by following this rule that the fishing line will retain about 90% of its load.
This knot will not fit through the guides of your rod, so it is best used in rigs where this is not required.
And here is the training video
Knot “Loop to Loop” or “double loop junction” A connection called “loop to loop” is a good alternative to a swivel. A fairly strong and reliable connection used for attaching the main line and leash.
How to make loops correctly, see the diagram
The blanks for forming the connection are nodes called “surgical”.
Training video for beginner fishermen from the channel “FishingVideoUkraine”
Look at the diagram and don’t make mistakes!
Knot “Blood Ties” or “blood knot” Other English names for this knot:
- attach knot;
- fisherman's bend knot.
To tie this type of knot, fishing lines with a difference in diameter of no more than 30% are used.
The advantage of this unit is not only its strength, but also its compactness, so that it can easily pass through the rod's guides. The disadvantage is that it is labor intensive and requires skill to perform.
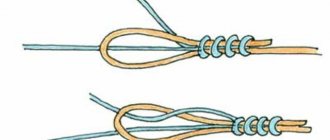
We align the free ends of the two threads with each other. Then we make 5 revolutions relative to each other. We pull one end of the thread back and drag it under the first turn. We perform a similar manipulation with the second end.
“Double Sliding” Knot This knot can be made as a connecting element of two monofilament lines, or a monofilament with a braided cord. However, the diameters of the material used should not differ by more than 50%. A fairly strong knot, it has an advantage over a blood knot.
And here is the execution diagram of this node
Instructions: how to tie a slip knot step by step
To learn how to properly tie a slip knot, we suggest using the following step-by-step diagram:
- Fold the free end of the rope into a coil;
- By passing the running end of the cord over the main one, create a loop;
- Place the running end of the rope around the main one, passing it under the loop and bypassing both ropes from below;
- Complete a simple connection by wrapping the running end around the cord and passing it into a small loop;
- Tighten the simple knot by pulling on the running end;
- Adjust the position of the simple joint at the main end, which will allow you to control the length of the sliding loop.
Figure 5. Step-by-step instructions for tying a slip knot
To avoid stretching a simple knot on the rope when the tension changes, it is recommended to tie the same one on the rest of the running end (Figure 5). The latter will act as a brake and will not allow the running end to crawl through the downtime.
How to tie knots to connect monofilament line and braid
Conditions affecting the strength of the braid:
- fishing line structure;
- diameter;
- wetting the cord.
It is known that one of the disadvantages of braided fishing line is its ability to become flat after several times of use. Therefore, when forming a node, you need to take this into account. You should also know that the strength of the knot is also affected by the thickness of the cord; the thicker it is, the weaker the knot is.
Read a detailed article about braided fishing line, its characteristics, features, advantages here
“Shock Leader knot” The knot is not large and can freely slide through the rings of the rod, which gives it an advantage in use in many types of fishing.
This video clearly shows the order of execution of the node
Knot “Mahin leader knot” or “carrot” This is a reliable and compact knot, suitable for spinning rods, feeders and carp rods. Excellent connection between braid and monofilament or fluorocarbon leash. When fishing for carp, it is perfect for tying on a shock leader.
If vases have difficulty tying this knot, watch this video from V. Nikolaev
Albright knot When it comes to quality, we mean a universal knot for fishing with various gear. If you are exclusively engaged in spinning fishing and you need to tie a thin fishing line and braided cord or fasten a leash, then by all means use this tying method. But do not neglect the main rule of tying fishing lines - the fishing lines should not have a strong difference in diameter!
For float fishing, the knot is used instead of a swivel, when its presence is not appropriate, since particularly delicate elements of equipment are used and the swivel spoils everything with its bulkiness.
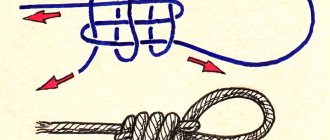
Gallows or scaffold noose
In appearance, the hanging noose, or as it is also called the scaffold noose, is similar to an ordinary noose. But, if you examine its manufacturing technology in detail, you can identify several significant differences.
It is worth recalling that this particular connection is one of the strongest.
It has long been known that the scaffold noose is a cause of rapid death, since it can easily break the cervical vertebrae.
Despite all the positive qualities and complexity of the device, such a noose can be created in a short time and absolutely effortlessly:
- that can withstand heavy loads are also chosen as the main material
- They need to be connected into one whole and folded in half;
- The result should be two open ends: long and short;
- From the long end, create a loop of any desired size and secure it with a weak knot. If you have problems with this step, you can simply tie a rope around the object. After which it is removed and a free loop is obtained;
- The short end should be used to secure the connection.
The noose is ready. Before taking it with you fishing, you need to test it for strength at home. To do this, you can simply try to pull the object towards you from the floor using this knot.
If necessary, you need to make the loop even stronger by tying it with the short end several times. But, you need to prepare for the fact that it will be almost impossible to untie the knot later.
How to tie knots for a hook without an eye (with a spatula)
In this section we will introduce you to simple and complex installations of knots for hooks with a spatula. These hooks are available in small sizes.
It is difficult to make a knot on hooks of this type, since the execution process requires a certain skill and accuracy. The line should lie tightly and evenly on the fore-end, without layers layering on top of each other. It is very important after the process is completed that the fishing line is on the side of the hook and is thus a continuation of its shank. We also recommend applying a little glue to the assembly to maintain the reliability of the structure.
Knot “Universal” Line material used:
- monofil;
- fluorocarbon;
- braided fishing line.
Suitable for crocheting both with and without eye hooks.
The “Ailit” or “eyelet knot” knot V. Nikolaev in his next video will continue to introduce you to the rules of tying knots. We present to your attention a mount called “Ailit”
Trombone Loop Knot Other knot names:
- trombone loop;
- spade end knot;
- sliding bait loop.
This knot fits well from monofilament and braid. Can be used on various types of hooks.
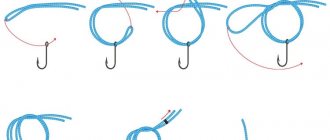
Instructions for implementation:
- We take the fishing line and fold it in half, so that the tails of the fishing line are parallel to the blade of the hook.
- We make a small loop, leaving the tip of the fishing line about 15 cm long.
- We attach a hook to the end of the fishing line, so that its tip is parallel to the shank of the hook, and press it with our fingers.
- Next, we begin to wrap the hook shank several times with the working end of the fishing line.
- We carefully thread the end of the fishing line into the resulting loop, moisten it with saliva or water and cut off all excess.
An example of making a “trombone loop” from V. Nikolaev
Knot “Outer loop winding” or “trombone loop” The only rule when making this type of knot is that the tighter you pull the line, the stronger the knot.
Knots for hooks, swivels, etc.
It's probably worth starting with knots that can be used to tie hooks (with an eye), swivels, etc., since they are the most common and most often used.
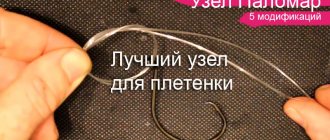
Palomar Knot
"Palomar" is probably the simplest and most universal knot. We can talk about its versatility forever, because it is suitable for swivels, eye hooks, spinners and wobblers, etc. It also feels good with fishing lines and braids of any type. The best knot in terms of ease of knitting/strength/reliability.
Grinner Knot
“Grinner” is another fairly popular knot that is used in the same vein. But most often for tying sinkers. For some anglers, the load-carrying capacity and strength of this knot have made it exclusively a sinker knot. Also, do not forget that due to the versatility of this knot, you can use it to tie the braid to the spool of the reel or even tie the fishing line together. It is perfect for all types of fishing line, but best for braid.
Snell knot or Snelling a Hook
"Snell" is an excellent and rather unique sea knot. It is unique, probably due to the fact that it is tied on the shank of the hook, just like knots for hooks with a spatula. And probably because it is not distinguished by its versatility like the previous ones, a purely knot for hooks. Yes, yes, it is also suitable for a hook with a spatula, but this is pointless, because... There are specialized units for these purposes.
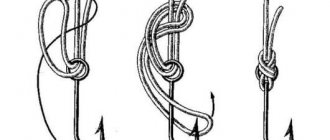
Regarding the knitting technique, I would like to add that we recommend making a minimum of 5 turns, and not as in diagram 3. You can go up to 10, it won’t make it any worse.
Figure Eight Knot
The “Figure Eight” is a well-known knot that is simply irreplaceable in mountaineering. But it also found its application in fishing. It’s easy to remember and quite memorable, a couple of repetitions and you’ll definitely remember it. Suitable for any type of fishing line. It contracts under tension. It was invented by the ancient Incas, but is still used today.
“Knotless Knot” or “Hair rig” for boilies (Knotless Knot)
A “knotless knot” is exactly what carp anglers can tie with their eyes closed under water and with just their little finger in a couple of seconds. The hair rig is truly popular and almost every fisherman knows it.
Since this is not such a simple knot in its execution, the rules for it are more serious. For example, it is not advisable to use fluorocab or only use it in conjunction with eye hooks. While knitting, it is better to moisten it with water so as not to damage the knot. You can also strengthen it with special glue for fishing line. And remember that such knots with turns around the shank of the hook should be smooth and without crosses or overlaps.
The best knots for connecting the hook and swivels
Before considering the most reliable fishing knots in this category, we note that we do not recommend tying fishing line to hooks, swivels or rings made of thinner material (wire) than the fishing line itself; this will negatively affect the quality and reliability of the knot.
Knot "Palomar" or "palomar" Area of application:
- a bunch of main fishing thread with a swivel;
- for tying fishing line and hook;
- for attaching a weight, swivel, carabiner, etc.;
- for attaching silicone baits to a leash or fishing line.
The disadvantage is that you need to fold the line in half, which increases the volume of the knot and shortens the leash.
Node advantage:
- a bunch of not only monofilament fishing lines, but also braided cord and baits used both in spinning fishing and fishing with feeder gear;
- the ability to attach many equipment elements (swivels, hooks, flies, etc.);
- easy to knit.
Take advantage of our detailed recommendations for choosing braided line for jig fishing - here
Classic Palomar
“Double Palomar” is knitted like this
The “Triple Palomar” knot provides for the installation of fishing accessories and lures with a large eyelet to a braided fishing line. This is how the knot is tied
Palomar drop shot knot
Knot “Clinch” or “improved clinch knot” Let’s consider two types of this knot:
- normal clinch;
- clinch reinforced.
This knot is widely used, but has proven itself especially well in spinning fishing. The first version of the knot is used mainly for mounting sinkers, since it is inferior in strength to the “reinforced” knot, which cannot handle even the most complex hooks.
Scope of application: artificial baits, jig heads, weights, hooks, swivels, sinkers, feeders, carbines.
Where such a node is not used:
- for mounting sinkers with a transverse or longitudinal hole;
- for mounting tubes and factory rings.
Important! The size of the ear of the above accessories should not be more than 1.2 mm, since at diameters above the specified indicator the knot does not hold securely.
Learning to knit an improved knot model
Homer knot or homer knot
The knot tying pattern is shown in detail in this video.
Grinner knot or universal Uni knot This knot is also known as the Uni knot or ukni not. Uni means universal.
What is knitted with a universal knot:
- hooks (for example, offset), fasteners, baits;
- braided line to the spool;
- lines between each other.
For which lines is it applicable:
- monofilament;
- network.
This is how the universal Uni knot, aka Grinner, is knitted
The double universal Uni knot is knitted like this
Figure Eight Knot This fishing knot is designed for attaching both hooks with and without an eye. It is also suitable for making mobile loops, tying feeders, sinkers, and leashes. In a word, it has wide application and can be used anywhere.
It is not complicated in execution and is suitable for beginner fishermen.
This knot can have several weaving options, for example, by folding the fishing line in two you will get a double figure eight.
Knots for tying a hook
The Palomar knot is familiar to almost all beginners. It is used when tying the swivel to the main line. It is used to connect the twister heads with hooks and eyes. But due to the fact that it is knitted on a fishing line, which is folded in two rows, it is larger in size than other connections and also makes the leash shorter.
The Crawford knot is a basic classic crochet knot. Its purpose is to tie hooks with an eye. It is simple and reliable, the load capacity is 93%, it is used for both braid and monofilament.
A bayonet knot is used to connect a hook to a monofilament line, but it is untied on a braided line.
“Fisherman’s Eight” and “Canadian Eight” - show a sufficient guarantee when attaching a hook with an eye to a fishing line. These knots can be easily untied.
The Claw Knot (aka Clinch) is ideal for tying a hook with thin braided wire. But it does not hold well on hooks and lures with thick wire. Not recommended for winding rings.
The “Step” knot is often used when connecting hooks to a “scapula”. These hooks are durable due to the fact that they are made using forging. The strength of this unit is close to 100%.
The Twisted Dropper Loop knot allows you to tie a hook into a loop in the middle of the fishing line. Often used in sea fishing. It is easy to change one hook for another, or bait for bait.
How to tie knots for wobblers
Before you start attaching the wobbler to the fishing line, you need to keep in mind that some of the small wobblers are very delicately balanced and any extra fishing accessory (leash, clasp) can significantly affect the performance of the bait. Therefore, for each type of wobbler you need to choose your own method of attaching to the fishing line.
Knot "Tight loop" or "homer-rhode loop knot"
Tying this knot can be applied not only to attaching wobblers.
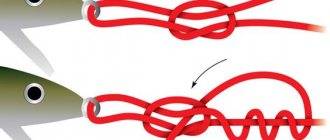
Knot “Rapala” or “rapala knot” A knot recommended by the bait manufacturer itself.
Knot “With a blind loop” or “compound knot” This method of knitting is not suitable for fishing lines with a small diameter. It is better to use braided, Kevlar or fluorocarbon leashes.
how to tie fishing line to fishing line - “Fisherman’s” knot
fishing video "Fishing"
"Fisherman" knot - an improved "Fisherman" knot is shown here. This fisherman's knot is worked twice, once at each end of the line.
The “fisherman’s” knot forms a simple bend, which has a slight friction of the turns against each other. Therefore, the “Fisherman’s” knot is more suitable for a “braided” knot. The monofilament will slip out of this fishing knot. A variant of the “Fisherman’s” knot with three or four turns is possible, which can be used to tie monofilament.
This simple fisherman's knot is suitable for the beginning fisherman - it is easier to tie than the stronger fisherman's braided knots.
| Knot "Fisherman" - characteristics | |
| With this fisherman's knot you can quickly tie up a torn braid while fishing. | |
| Types of fishing line | "network" |
| Knot tensile strength | 60-70% |
| Node purpose | Tie a braided line. |
how to tie a fishing line to a fishing line - “Fisherman’s” knot, picture 1.
Place the lines parallel. Make a loop of one line around the other.
how to tie a fishing line to a fishing line - “Fisherman’s” knot, picture 2.
Take this loop with your fingers. Pull the end up from the outside of both lines.
how to tie a fishing line to a fishing line - “Fisherman’s” knot, picture 3.
Pass the end behind the second line into the first loop.
how to tie a fishing line to a fishing line - “Fisherman’s” knot, picture 4.
Pass the end into the same loop again.
how to tie a fishing line to a fishing line - “Fisherman’s” knot, picture 5.
Release the loop, grab the ends of the fishing line on which the knot is tied. Moisten it with saliva and tighten it.
how to tie a fishing line to a fishing line - “Fisherman’s” knot, picture 6.
Do the same with the second line.
how to tie a fishing line to a fishing line - “Fisherman’s” knot, picture 7.
Pull the long ends of the lines and pull the two knots together. The "fisherman's" knot is ready.
Useful tips
- The knot does not like strong (excessive) tightening, since it is in this “tightened” state that it weakens.
- If you don't wet the knot, you'll get a break.
- The knot may become loose and the line may slip out if not tightened enough.
- Untying can occur due to the tip of the fishing line being too short, which is cut after making the knot. Always leave a small piece of line.
- In order to tie the leash as efficiently as possible, dip it in warm water, this will warm it up and become more elastic.
how to tie fishing line to fishing line - fishing knot "Grapevine"
fishing video “Grapevine”
The fisherman's knot "Grapevine" for tying two fishing lines is based on the fisherman's knot of the same name for tying a hook. For those who are used to tying a hook with this fishing knot, it will be convenient to also tie the fishing line to the fishing line. This knot is slightly stronger than the Bloody fisherman's knot, but inferior to the Centaurus fisherman's knot.
The Grapevine fishing knot is not suitable for tying fishing line to fishing line with different diameters. The greater the difference in the diameters of the lines, the weaker this fishing knot. On identical fishing lines, a correctly tied fishing knot provides 70–80 percent strength. This fishing knot is not recommended for braided fishing. The number of turns should be from three to five, depending on the thickness of the fishing line. The thinner the line, the more revolutions.
| fishing knot "Grapevine" - characteristics | |
| The fishing knot “Grapevine” allows you to tie a broken fishing line while fishing. | |
| Types of fishing line | Monofilament |
| Knot tensile strength | 75-80% |
| Node purpose | Tie the line to a line with a similar diameter. |
how to tie a fishing line to a line - fishing knot “Grapevine” picture 1.
Two lines in parallel. Bend the end of one line back. Take the resulting fold with your fingers.
how to tie a fishing line to a fishing line - fishing knot “Grapevine” picture 2.
Pull the end behind both lines. You will get a loop.
how to tie a fishing line to a fishing line - fishing knot “Grapevine” picture 3.
Inside this loop, make five turns around both lines with the end.
how to tie a fishing line to a fishing line - fishing knot “Grapevine” picture 4.
Grab the long and short end of the line that contains the knot. Pull in different directions and tighten the knot.
how to tie a fishing line to a fishing line - fishing knot “Grapevine” picture 5.
Do the same on the second line.
how to tie a fishing line to a fishing line - fishing knot “Grapevine” picture 6.
Pull both knots by the long ends. Trim the ends. The fishing knot “Grapevine” is ready.
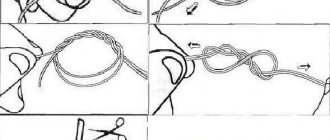
how to tie a fishing line to a fishing line - the “Water” fishing knot
fishing video “Water”
The Fishing Water Knot is a simple way to tie fishing line to fishing line. This is a very old form of fisherman's knot, but is still used today. The “Water” fishing knot is useful because it can quickly tie a fishing line to a fishing line when fishing, even in the cold; you can use fishing line of different diameters.
This fishing knot is not the strongest and is used primarily due to circumstances, for example, a broken line while fishing, when every minute counts. Also, the “Vodyanoy” fishing knot, due to its simplicity, is suitable for beginner fishermen who do not need to work with fishing gear at maximum power.
| fishing knot "Vodyanoy" - characteristics | |
| The “Water” fishing knot allows you to quickly tie a leash, tie monofilament to a braided line, or tie up a broken fishing line while fishing. | |
| Types of fishing line | Monofilament, "braided". |
| Knot tensile strength | 65-70% |
| Node purpose | Tie fishing line to fishing line with any diameter and composition. |
how to tie a fishing line to a fishing line - fishing knot “Water” picture 1
Place the lines parallel. Take both lines with your fingers, pull them towards you and turn them clockwise, forming a loop.
how to tie a fishing line to a fishing line - fishing knot “Water” picture 2
Take the loop and the left ends of the fishing lines with the fingers of your left hand. Pass the right ends of the lines into the loop.
how to tie a fishing line to a fishing line - fishing knot “Water” picture 3
Do three more turns like this.
how to tie a fishing line to a fishing line - fishing knot “Water” picture 4
Wet the knot and pull the left ends with your left hand and the right ends with your right hand. Trim the ends. The fishing knot “Vodyanoy” is ready.