Hook tying knots: palomar, trombone loop
These knots are used to attach the hook to the leader or main line.
- Palomar
- one of the simplest knots, which nevertheless almost does not reduce the strength of the fishing line.
- Trombone loop
- this knot is suitable for attaching hooks with a spatula instead of an eye.
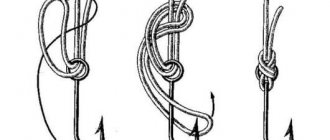
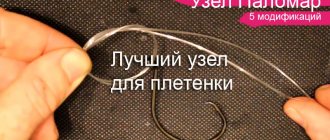
Palomar Knot
Optimal for both beginners and professionals. It is characterized by a simple design and can be used for thin and medium-thick fishing line. Limitation - Used for ring hooks only. Tensile strength - up to 80%. It is important to form the knot correctly.
Procedure:
- The line is folded in half and threaded through the ring. The length of the pull is slightly greater than the length of the hook.
- Forming a knot around the main part of the thread, but without final tightening.
- The resulting loop passes through the forend. After this, the final fixation of the node is done. The remainder of the thread must be trimmed.
- When finished, it is recommended to moisten the node.
This scheme is not suitable for thick fishing lines and traditional braids. This is due to the small size of the hook ring, which will not allow the formation of a reliable fixing element.
Knots for tying a leash: side, nail
Such knots not only secure the leash, but also prevent it from moving along the main line.
- Side loop
- a common knot for forming a lead outlet on the main line.
- Nail knot
- a reliable knot for attaching the leash to the main fishing line, for knitting which you will need a small tube. It is also suitable for tying two lines together.
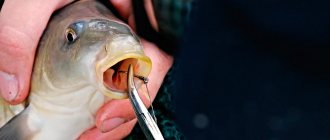
How to tie a hook to a fishing line
We will look at one simple universal knot that can be used both for tying hooks with a ring and with a spatula, without a ring.
This knot is called a simple Clinch (grabbing knot) . It is very simple, quick and easy to knit, versatile, and holds the load perfectly, retaining (if the tying is done correctly) more than 95% of the strength of the fishing line.
As the name suggests, this simple knot is designed to tie a hook to a leash. But if for some reason you do not use a leash, you can tie the hook to the main line. We will talk separately about how to tie a leash to the main fishing line.
To make everything as clear as possible, we include diagrams for tying hooks in pictures and videos, as well as an old but relevant guide to fishing knots.
How to tie a hook with a ring
The picture shows a step-by-step pattern for knitting this simple knot on a hook with a ring.
Scheme for tying a hook with a ring
- We pull the fishing line through the ring of the hook (optional);
- We stretch the end of the fishing line along the shank of the hook towards the bend and back, forming a loop;
- We fix the loop with our fingers, pressing the fishing line to the fore-end and wrap the loop with the fore-end with the free end of the fishing line 5-7 times;
- We fix the winding around the forend with our fingers, releasing the loop into which we thread the free end of the fishing line;
- Carefully and evenly, using both ends of the fishing line, we tighten the knot fixed between the fingers.
Before finally tightening the knot, it is necessary to wet the line to avoid heating during tightening and loss of strength of the line on the knot.
The result is in the photo below:
How to tie a hook with a ring
How to tie a hook without a ring with a spatula
You can tie a hook without a ring, with a spatula, in exactly the same way as with a ring.
Scheme for tying a hook with a spatula
A hook tied in this way will look like the photo below:
How to tie a hook with a spatula
Remember to wet the knot as you tighten it. How much your fishing line will retain its “breaking load” depends on this.
How to tie a jig with a hole
The leader knot is suitable not only for tying hooks, but also for jigs with a hole in the body:
Jig tying scheme
We insert the fishing line into the hole of the jig and tie a knot around the shank of its hook. Everything is similar to a hook that has a ring.
Knots for tying fishing lines: bloody, allbright
These knots provide a smooth joint that does not cling to the rings when casting and retrieving.
- Bloody Knot
- a simple knot for tying two fishing lines or cords, suitable for fishing lines of different diameters.
- Allbright node
suitable for tying lines made of different materials, such as cord and fluorocarbon
Attach the hook to the main line without a leash
Thanks to the fishing knot "Snood" you can firmly fix the hook with the spade. Such a knot can be created on both thin and medium fishing line. In this case, it is worth considering the pattern: the thinner the fishing line, the greater the number of turns around the fore-end it is recommended to make. Experienced fishermen do not recommend doing less than five turns.
- If your hook has a bent eye, then insert the fishing line into it. If the ear is straight, then you need to make a loop.
- Hold the edge of the loop and the spatula with your right hand. With your other hand, make revolutions around the axis of the hook, from 5 to 12 times, taking into account the thickness of the fishing line.
- Next, cut the fishing line that comes out from the side of the eyelet to be neat. The node is ready!
Video demonstration of tying a hook directly to a fishing line.
Knots for rigs: figure eight, uni knot
- Eight
- an incredibly simple and reliable unit for attaching equipment and accessories.
- Uni Knot
- a universal unit suitable for attaching all equipment elements, swivels, carabiners and hooks.
Float rod equipment
Attaching the float to the fishing line
There are many variations of attaching a float to a fishing line:
- fastening using a moving unit;
- with stopper;
- and the most popular: using cambric.
For detailed recommendations on attaching the float to the fishing line, read the special article.
Let's look at fastening using cambric . A cambric is a piece of a small rubber or plastic tube through which a fishing line is inserted. The float is inserted into the same cambric with its lower sharp end, thus obtaining a strong connection that can move when certain forces are applied.
Fishing with a float rod with a stopper . This fastening method is mainly used when fishing with a match fishing rod. In the case of such a connection, it is the stopper that is attached more or less tightly to the main line, but still has the ability to move. The float moves freely from the sinker to the stop along the fishing line. Where can I get a stopper? They are sold in stores, but you can get involved and make something of your own from scrap materials.
A moving knot involves tying a float through its ring to the fishing line and, if necessary, moving this knot due to its looseness. This method is undesirable to use, as it injures the fishing line. It may be useful if you do not have a stopper and a cambric .
Correct loading of the float with weights
Correct loading of the float tackle plays an important role at the moment of registering a bite. In this case, the correct selection of sinkers is ensured taking into account the carrying capacity of the float and the depth of the reservoir where it is intended to fish. Different conditions require the use of different methods of loading the float with sinkers. Experienced fishermen recommend spending more time on competent and correct loading, but then feel clear bites.
Method No. 1
This method involves the use of one sinker, which is located at a distance of 10 cm from the hook. The scope of application of such a load: fishing for small fish at medium depths. To do this, select a small and relatively light float.
Method No. 2
It is recommended to use it when fishing at depths greater than 1.5 meters. In this case, prepare several weights in advance, which will need to be placed evenly throughout the entire fishing line. It is only important to adhere to the proportionality of the reduction in the size of the pellets from the float itself to the hook. Naturally, it is difficult to wield long-length tackle. After all, there is a possibility of various places of overlap and entanglement. This loading method will give you the opportunity to evenly and slowly lower the bait into the water without causing any unpleasant incidents.
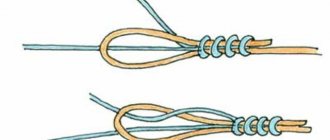
The first way to make the first loop: turn the hook 360 degrees
The thread lies on the first or middle phalanx of the index finger of the left hand. We hold the tip of the thread with our thumb, while the working thread wraps around the index finger and is pressed against it with the middle finger. Sliding the hook along the index finger of this hand (the movement is “from oneself”), we insert the hook under the thread.
Position of the thread on the finger. Hold the thread. Place the hook under the thread
After this, with the hook we make a full turn (360 degrees) in the air together with this thread. We make sure that the loop does not tighten; it should be free.
Full rotation of the hook around its axis
We press this weave with the thumb of our left hand - this is the future base of the first loop.
The working thread still lies on the index finger of the left hand, the head of the hook is to the left of the working thread. Place the hook under the working thread (from below), with the barb of the hook facing us.
We grab the thread with a hook and pull it through the loop, the base of which is held by the thumb. As soon as we pulled the thread, we immediately pressed it to the hook with the middle finger of our right hand. Thus, the first loop was obtained.
We grab the working thread. Pull it through the loop you made
The resulting first loop
We tie hooks (make leashes).
As a rule, a classic leash, designed for catching ordinary auk fish, for example, roach, ram or rudd, has 3 hooks, and therefore, we will also knit 3 hooks. By the way, in this article I already told you how to tie a fishing hook.
For leashes we use fishing line with a diameter of 0.30 mm. We thread the fishing line into the eye of the hook and leave the tip about 12 - 15 cm long.
We direct the tail towards the hook tip, and then bend it towards the eye, leaving a small loop next to the hook tip.
It should look like a loop like this.
We clamp the loop, take the tail and wrap it around the shank of the hook. We make 5 revolutions.
When you make one turn and grab the line for the next turn, press down on it with your middle finger to prevent it from unwinding (from personal experience).
Now we clamp the fishing line and insert the tail into the loop. From this position, pull the main line until the loop is almost tightened.
We intercept, holding the tail, and tighten the loop to the end.
You should end up with a knot like this.
Well, the hook is tied, and now the next step is to tie the resulting leash to the main fishing line.
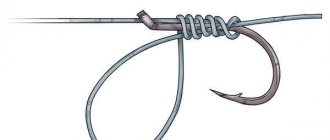
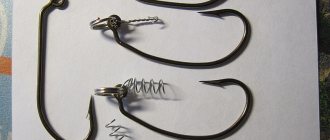
Knot on the shank of the hook (Easy knot - Clinch knot)
The photo above shows what a simple Clinch (also known as an Easy knot) looks like, tied on the shank of a hook with a ring, but the knot can also be knitted in the same way on hooks with a spatula.
This unit is most often used in feeder and float fishing by both athletes and simply experienced fishermen. They can also be used to tie a jig that has a hole in its body.
Why is it better to tie a knot on the forend?
- In addition to the fact that a knot tied on the shank of the hook, and not on the ring, is much stronger and more reliable, it ensures the most correct positioning of the hook during hooking.
- This minimizes the number of empty bites and fish escapes during fishing.
- At the same time, you need to understand that the success of bites is influenced not only by the type of knot with which the hook is attached, but also by the shape of the hook, its size, as well as how the nozzle is fixed.
If the hook is correctly selected and tied, the bait corresponds to its size, the number of bites realized will tend to 100%.
It happens that everything is done perfectly, but the fish is not detected. This happens even with obviously good hooks. The reason for this is difficult to understand, but the problem is often solved by simply replacing the unfortunate hook with a hook of a different shape.
How to tie a knot on the shank of a hook
The hook is attached to the forend, as shown in the photo below. In this case, if the hook has a fastening eye, then the free end of the fishing line is first passed through the ring from the side of the sting.
This knot, called Easy knot, is often included on hook packages as a reminder for anglers:
If you tie a hook with a spade, everything is done exactly the same, but in the absence of a ring, the fishing line is not passed into it. The knot is securely tightened around the hook wire and will not slip through the spatula under any circumstances.
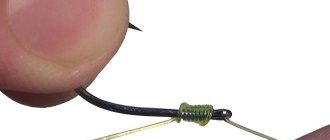
To make the knot strong and the hook reliable
The strength of any knot depends not only on its structure, but also on how it is connected. For any gripping units like the Clinch, it is important that the coils lie flat, pressing against each other and not intersecting each other.
How to tie any hook (even the smallest one):
- Holding the hook at the attachment point with the fingers of one hand, we stretch the fishing line along its shank and make a loop of the required length (so that it is located at the bend of the hook);
- We intercept the hook at the bend (along with the loop) with the fingers of the other hand;
- Making sure that the line is taut, we make several turns around the shank of the hook, and fix the knot by bringing the free end into the loop.
- In most cases, for a knot you need to make 5-6 turns around the fore-end, but for soft and slippery fishing line, their number should be increased;
- Before tightening the knot, wet the line;
- First tighten the knot on the shank, and then move it to the base of the hook and pull it past the root end.
Insert the fishing line into the ring from the side of the hook tip. If the hook has a spatula, then when tightening the knot, make sure that the root end is located on the side of the sting (as in the photo above). This moment affects the location of the hook in the water and its grip on the fish.
Useful: Basic fishing knots for feeder, float and spinning fishing