A paternoster for a feeder or a Gardner loop is heard by every angler interested in bottom fishing for carp species. One of the simplest, but at the same time universal and relatively sensitive equipment is relevant for use for most feeder fishing conditions. Beginners quickly master the technique of tying a classic rig, and experienced feeders bring rigs built on the loop type to perfection, based on their vision of the fishing process in the current situation.
Since feeder fishing already quite firmly occupies a leading position among fishing methods, mastering a technique that allows you to competently and quickly tie a Gardner loop for a feeder will not become an extra baggage of knowledge for the angler, but will only contribute to expanding fishing opportunities. And the article presented to his attention will tell the angler how to learn how to prepare installations of this popular equipment without errors and in various variations, about its advantages and disadvantages.
Features of the Gardner loop for the feeder
It is worth noting that today the Gardner paternoster for the feeder is the most common and popular bottom equipment. Its use is not limited to the feeder, and it successfully complements the installation of conventional donuts, where it replaces wire bends and anti-twist tubes. In addition, instead of feeders, ordinary weights are often used, which allows you to catch active fish at high speed.
An important feature of installation is the high probability of self-hatching of fish trying the bait. This is facilitated by the mass of the feeder or load, which, due to the specifics of mating, have a small stroke, spontaneously hooking the leading bait onto the hook, even a short distance, regulated by the length of the leash, the fish. The fisherman can only record the fact of the bite by making a control hook and engage in fishing for the caught trophy. But the principle arising from the installation technique only works for active fish. If the bite is depressed as a result of the passivity of the fishing objects, then the fisherman will see only idle bites, without noticing the fish. Feeling even slight resistance from the load, the trophy will immediately spit out the food it is trying. In such a course of the fishing process, switching to other types of rigs can save you.
Manufacturing of feeder equipment “Asymmetrical loop”
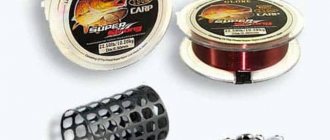
An asymmetrical feeder loop is a variation of the symmetrical model. The difference between them is the length of the fields. In the asymmetrical one they are different in length. To make the design you will need:
- a piece of rigid monofilament thread 1 m long, 0.2−0.4 mm thick or fluorocarbon;
- 2 swivels;
- feeder load;
- main line;
- hook.
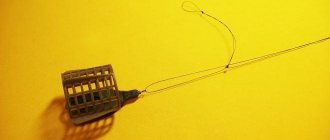
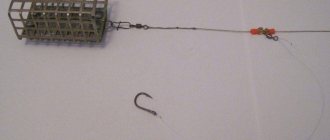
The monofilament or cord is folded in half, as for a symmetrical device. To obtain asymmetry, the loop for the feeder is formed at a distance of 8–15 cm from the bend. It is secured with a double or triple knot. A 10-15 cm long twist is made from the two ends of the fishing line. It is secured with a double knot. A swivel with a clasp is attached to the long part of the future asymmetrical structure, attaching the feeder. The length of the main loop is measured and fixed with a double knot. To attach to the main thread, a swivel is put on the end of the loop, which is secured with a double knot.
Read How to catch pike with a frog and choose the right gear
The remaining ends of the fishing line are cut off so that the gear does not get tangled when casting. A leash is connected to a small loop. The feeder moves freely along the long side of the bend. An asymmetrical loop for the feeder allows you to get rid of the problem of tangling the tackle due to the occurrence of overlap of the leash and the main thread.
Advantages of an asymmetrical loop
The asymmetrical model is made in different lengths (30−70 cm). When biting actively, a loop of shorter length is used, when biting passively, a longer one is used. The asymmetrical loop design enhances the sensitivity of the gear. This equipment is effective for catching carp, crucian carp, bream, and roach.
Controversies and myths about the asymmetrical loop
Among anglers, debates constantly arise about the effectiveness of asymmetrical loop gear. Some of them claim that this is a myth and a figment of the imagination of its creators and users, but in reality it is an unjustifiably complicated version of the ordinary Gardner paternoster.
Their opponents provide the following evidence in defense of the equipment:
- when tensioned from a slightly bent tip, the thread looks like it is broken, but the feeder slides freely along it;
- during casting, the leash with the hook does not touch the feeder due to the presence of a twist that moves it to the side;
- If the rig sinks into the silt, then in the paternoster version you need to apply force to pull it out, but in the asymmetrical rig the feeder easily slides along the monofilament.
Advantages and disadvantages
Both beginners and experienced fishermen use the paternoster on the feeder. When starting a fishing session, it is this equipment that can indicate the further development of a fishing strategy based on the conclusions made by the angler after the first casts based on the activity of the fish. In addition to the reconnaissance function, the knitting pattern is distinguished by its simplicity and speed of production. After all, the installation, already at the initial stage of gaining experience, can be assembled in less than a minute right on the shore of the fished reservoir. The paternoster works both in currents and in still water, which is a universal quality of equipment. Installation does not require additional fastening and fixing elements, and can be made using either monofilament or braided cords. The Gardner loop has a low degree of overlap and tangling.
The disadvantages of the technique include low sensitivity when biting inactive and cautious fish, and therefore, a high number of false bite signals requires a radical change in installation with a transition to a different type of feeder equipment. Also a negative factor is the twisting of the loop when winding the cord, which is especially clearly manifested when using monofilament fishing lines in assembly schemes.
History of the appearance of equipment
The Gardner loop rig began its history in the forties of the last century in the British capital, when the then famous English sports fisherman Steve Gardner improved the installation of the “ ledger rig ”. These actions were facilitated by the athlete’s wife’s passion for bottom fishing, where she was not entirely successful in tying the usual equipment at that time.
Gardner simplified the tying task for his wife by making a loop lead directly on the cord itself, which made it possible to quickly and quite simply attach leashes to the lead using the loop-to-loop joining technique. The very abbreviation “Gardner loop” was introduced into a wide range of use in feeder fishing by Russian fishermen. In the original, the improvement is called “ Looop ”, which translates as a loop. But the Russian name for montage has gained worldwide recognition and has firmly established itself not only in fishing slang, but has become regularly used in information sources covering feeder fishing and has rightfully become a legitimate term.
Separate installation of the paternoster and on the main line
Experienced fishermen do not think that the paternoster on the braid gets tangled, and tie it directly on the main feeder cord (shock leader). This is due to the established casting technique and extensive experience in the correct ratio of the length of the arms of the feeder and the leash. It’s easier with monofilament - if the line is stiff enough, there won’t be any overlaps or twists if everything is done correctly. If you can’t do this installation on a braided line or a shock leader so that it doesn’t get tangled, knit it separately on a rigid fishing line or fluorocarbon, tying it to the main cord with a loop in a loop.
Knitting instructions, subtypes
At this time, in modern feeder fishing there are a number of modifications of loop tying, which do not differ significantly from the original, classical method invented by the author. The differences lie in the installation package with additional fastening accessories and elements that prevent tangling. Before knitting a Gardner paternoster for a feeder, an angler will need a certain composition of materials, the list of which can be unified taking into account all possible knitting options.
To assemble the installation, the fisherman will need to prepare:
- The main line - on which the installation will be based.
- Feeder - simultaneously acting as a sinker.
- A swivel in tandem with a carabiner is used to secure the feeder.
- Stopper – to limit the movement of the feeders.
- Fluorocarbon or nylon fishing line - used as a leash in equipment.
- Hook – the size of which is selected based on the bait used and the size of the trophy planned for the catch.
To design the equipment, main fishing lines made of various materials and different thicknesses are suitable, capable of withstanding the weight of the filled feeder and the resistance of the fish being caught. After checking the presence of the required elements, it is enough to familiarize yourself with the instructions below for forming variations of the loop and begin to develop assembly skills.
Classical
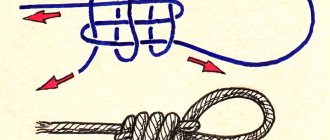
The easiest and fastest way to tie a Gardner loop is in the classic way. The knitting technique in the action algorithm is as follows:
- Two cords, the main one and the one intended for outlet, it is usually thinner, folded in half.
- A double figure eight knot is knitted from the folded cords. The difference from the ordinary figure eight will be that the fishing line is pulled into the loop not once, but twice.
- After tightening the knot, we cut off the tails of the fishing line, leaving them at a length of about 25 cm from the knot.
- On the main cord of the left tail we knit a regular loop into which the leash will be attached.
- We cut the tail of a thin fishing line to 10 cm and also knit a regular loop for attaching the feeder.
- We connect the leash and the feeder into loops, completing the installation with these steps.
With twist
Twisting in installation is an improvement that reduces the likelihood of overlaps. It is used not only in the formation of a Gardner loop, but is also inherent in other types of feeder equipment, improving the comfort of fishing. The step-by-step method is as follows:
- We fold two fishing lines in half, the main cord and the thread intended for retraction.
- We form a connection between the folded ends of the fishing line using a double figure eight.
- Pressing the cords connected by a figure eight to the table with a weight, we twist the double-folded main line into a braid, fixing the twist at a distance of 25 cm with a loop intended for fastening the leash.
- On the side branch, only at a length of 10 cm, we perform exactly the same operation with the formation of the final loop for mounting the feeder.
- At the end of the installation, we supplement the loops with a leash and a feeder.
With continuous loop
The difference between this modification is the formation of a large outlet loop to which the feeder clings. Assembly instructions are performed in the following order:
- On the main piece of fishing line half a meter long from the end, a large loop is knitted.
- The loop is folded in half and a figure eight knot is made so that the side branch, and it will be in the form of a loop, is no longer than 10–12 cm, and the main cord is 25 cm.
- At the end of the main thread we tie a loop to attach the leash.
- Using a carabiner, we attach the feeder to the side solid loop, and also connect the leash to the main fishing line, thus completing the installation.
Sport
This interesting variation of the paternoster is intended for sports feeder fishing, but is no less popular among amateurs due to the speed of formation and catchability. Assembly of the “sport” modification is carried out according to the following principle:
- A swivel with a clasp and a stopper is put on the main thread, stretching up the cord. A figure eight knot is made at the tip of the warp, creating a loop for attaching the leash.
- We tie a piece of fishing line to the swivel, intended for attaching the feeder, arranging a fastening element at the end, which is most easily accomplished using the surgical loop technique.
- Finally, we equip the mating with a leash and a feeder.
- The stopper regulates the movement of the feeder along the main thread.
Two hooks
Fishermen increased the likelihood of bites by modifying the paternoster with the option of installing two hooks in the equipment. The technique for forming the equipment itself is completely identical to the classic or other version. The only peculiarity is the installation of additional leashes or hooks. In a loop connected for the feeder with a surgical knot at the end of the base, you can mount two leashes of different lengths, or you can install two hooks on one leash, maintaining a certain distance between them. An installation option is practiced where an additional leash should be on the base in front of the feeder.
How to knit the Gardner Loop
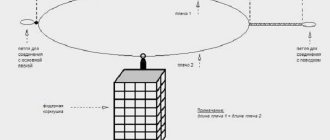
The simplicity of the design makes the manufacturing process quick. The essence of the feeder installation of the Gardner loop is the length of the outlet, which is significantly longer than the arm of the feeder (load). A bend with this property helps to avoid overlapping of the tackle and twisting.
However, if the loop is knitted on soft wood or braid, the tackle is likely to get tangled. Therefore, the use of monofilament line or fluorocarbon cord is preferable in this type of installation.
A step-by-step explanation of how to knit, and the given diagram of a Gardner loop will help you figure it out.
- The tackle must be tied on an already equipped fishing device. At a distance of one and a half meters from the free end, you need to fold the fishing line in half.
- From the bend it is necessary to measure a segment corresponding to the required distance from the leash assembly to the feed container. Usually this length is in the range of 7-20 cm, but no more than 25 cm. At this point, a double figure-eight knot is knitted - with the line pulled through again. You can use a triple or double “surgical” knot.
- After the knot is tightened, a loop is formed (about 10 cm) with two ends, which must be shortened so that the distance from the edge to the resulting knot does not exceed 25 cm. One of the ends (tails) is intended for the leash, the second - the main line or outlet for attaching to the cord (if braided is used as the main one).
- The loop outlet for the feeder is trimmed, the length of the remaining segment should be about 10 cm. Here you need to tie another loop (asymmetrical is often used) to secure the feed container.
- On the “tail” element, which belongs to the main one, the length is measured so that the excess above the shoulder with the feed container is 3-4 cm. A loop is knitted.
- The process is completed by attaching a leash with a hook to this loop.
You need to choose hooks and determine the required thickness of the line depending on the intensity of the bite and the type of fish; hunting for large prey requires choosing durable gear.
Is the equipment sensitive to bites?
Feeder gear equipped with a paternoster cannot be classified as high-sensitivity equipment. Many other techniques convey the weak contact of the fish with the bait much more subtly.
Important! The paternoster is recommended as a feeder rig for catching active fish.
From the point of view of the development of events when biting, it is worth focusing on such moments as the movement of the fish. If the fish that took the bait continues to move away from the shore, then the tension of the line will ideally transfer the bite to the quivertip tackle, but additional notching from the angler will be required. When the trophy moves to the shore, a situation is often created that the fish is completely self-hatching, but with indistinct work of the quivertype, expressed only in light but prolonged twitching.
Loop on the leash
We make the loop for the leash small and neat - just so that it can be attached. The loop knot, as always in feeder installations, is a figure eight or a simple double (triple). After tying, the tail must be cut almost under the knot itself. It shouldn't stick out to the side. When casting, it can catch the leash, as well as any debris on the bottom, which can interfere with the bite. The same loop is made on the leash. In feeder fishing, it is customary to prepare leads with loops of various lengths and diameters in advance, so that they can be quickly rearranged during fishing. Experimenting with the selection of a working leash is part of the feeder technique, especially when working with a paternoster.
About color schemes and accessories
In the success of the installation of feeder equipment, an important role is played by the camouflage of the mating located at the bottom. Attention is paid, giving priority to the selection of fishing lines similar to the color of the water in the reservoir and its soil. The massiveness of the feeders, the color of the accessory that does not correspond to the natural color of the fishing area, as well as the incorrectly selected mesh cell of the feeding device, which contributes to heavy dusting or, on the contrary, a small and insufficient supply of food to the fishing area, become the causes of no bite.
Bulky fasteners and anti-twisters also alert the fish, reducing the chances of success. The invisibility of the leash and an optimally thin but reliable hook, on the contrary, improve the results, smoothing out the negative effects of a weak bite.
Installation instructions for the removable part
Make sure you have fishing line or braided cord and a swivel with a clasp (not always required). Take a food container, leash, hooks.
Step-by-step paternoster knitting
Step-by-step paternoster knitting:
- Fold the line in half.
- Step back 15-20 cm from the bend and tie the thread with a convenient knot.
- Cut the resulting loop: one end should be one third higher than the other.
- Attach a feeder with “treats” for fish to the long section, the short one will be a leash.
This is a general instruction, it helps to understand the principle of knitting paternoster loops.
Is it possible to bet directly on the shock leader?
Using feeder tackle with a shock leader, there are absolutely no restrictions on the use of the paternoster. The equipment is tied with a knot directly on the cord material or attached to its end, as in the classic applications of a shock leader. When installing the shock leader on the cord itself, it is preferable that it be made of braided fishing line, since it is more convenient to install on thin and soft threads, and its reliability will be higher than when performing work on a thick monofilament fishing line.
Mounting options for paternoster equipment for feeder
In essence, the feeder installation of a paternoster is a blind feeder and a leash at a branch from the main fishing line. When biting, the presence of such a shoulder allows the fish to move a little away from the feeder with bait, which is transmitted to the quivertip of the feeder. If the fish jerks so much that it moves the feeder, if it has time, it will spit out the bait, and if not, it will hook itself. Paternoster is sensitive, but you need to fish with it literally with your hand on the butt and react to the bite instantly. Due to the installation configuration, the fish does not feel the heaviness of the feeder instantly, but gradually, which often allows it to have time to spit out the bait.
For self-notching in the feeder, it is better to use an asymmetrical loop or inline installation with a stopper on the rod side. Bites on the paternoster (except in cases of mad feeding) are usually short - a couple of hooks and a pull. You need to cut precisely at a deviation of the feeder quivertype that is greater than the previous ones. This is a matter of experiment - you need to select the moment of hooking on a reservoir individually. It all depends not only on the behavior of the fish, but also on the length of the arm on the feeder and the lead on the leash (and the leash itself).
For the paternoster you will need:
- Rigid feeder line 0.28-0.3 mm (but it can also be used on braid).
- Feeder.
- Swivel with carbine.
- Leash with hook.
In the simplest version for a feeder, we fold the fishing line in half, retreat the required distance (15-20 cm), and tie both folded ends with a figure eight or double simple knot (triple, surgical). We cut the resulting loop so that one end is 2/3, and the other is 1/3 of the total length of the fishing line in it. We put a feeder on the short branch, and a leash on the long branch. We cut off the extra fourth tip. You don’t have to cut it, but put it on a leash and fasten the feeder into a loop. The result is a type of paternoster - a Gardner loop. The British like to call every little thing by some name.
Classic paternoster and ledgering
Before we make the paternoster in its original version, let’s look at where this marvel came to us from. Initially, this exact option appeared in the English method of bottom fishing - ledgering. Ledger Rig - someone like Ledger was the first to come up with such a rig. Now in England this is a whole group of bottom rigs, either fixed (Fixed) or sliding (Running).
Scheme from an English magazine
Ledgering - for us, this is fishing with a donkey from the shore at close range, when casting from behind is not necessary or impossible (bushes, trees). In England, this term generally means bottom fishing in principle. Usually this method is effective when you don’t need to throw the feeder far in principle - a hole or edge right under your feet near the shore, a few meters from the angler. The feeder is cast from under the skirt, like a float rod, and feeding is done by hand with balls to the fishing point. So, the paternoster in its classic version was seen for the first time there (more precisely, its essence).
The classic paternoster was specially designed for sections of rivers clogged with branches and snags, for short fishing from the shore, as well as vertically from a boat. Therefore, the leash is attached to the continuation of the main fishing line. The outlet for the feeder (in ledgering - for the sinker) is obviously made from thinner and weaker fishing line. This was invented so that if the load gets caught while fishing, it will come off, and not the fish on the leash. In our conditions, for feeder fishing, such an installation is also suitable for fishing in trashy places, only instead of a sinker, a feeder is installed. By the way, in the smallest rivers, feeder lovers can catch any fish completely according to the canons of ledgering, only with a feeder (such casting is prohibited in sports).
A thin branch to the feeder feeder is just as easy to knit. We fold the main fishing line (0.25-0.3 mm) together with a thin one (for example, about 2 mm), and also tie it with a figure eight or triple knot. We attach a leash to the thick branch, and a feeder to the thin branch. Modern European ledgering is often used with sliding rigs and from a boat. By the way, this method of fishing with a short cast is perfect for us when fishing with a feeder from a boat. And in general, any other rigs can be used in this fishing method. Just a classic paternoster - the ancestor of all other installations in the feeder.
Amateur paternoster
Our fishermen usually don’t bother like that, and make a paternoster feeder rig with outlets of the same diameter for the hook and feeder. The rig is knitted directly on the main line, shock leader of the feeder (if used) or separately, on a rigid 0.3 mm feeder line or fluorocarbon. When knitting separately to the main cord, the equipment is attached through a swivel with a carabiner or a loop into a loop. In addition, you can attach another hook outlet above and get a paternoster with two hooks - like a classic hook. However, the use of two or more hooks in a feeder is not recommended. Fishing with feeder gear is tempo, the fishing rod needs to be constantly re-cast and the bait updated. Therefore, the second hook will be superfluous. This is unlikely to increase the amount of catch, but it will definitely add hassle and confusion.
Gardner's Loop
Knitting a Gardner paternoster is even easier - you just make a loop, nothing is cut off. At the free end we make a branch to the leash, and hang a feeder in the loop. In England, such editing is simply called “Loop”, that is, translated as a loop. In terms of functions - nothing new, it’s just easier and faster to knit a Gardner loop. Mr. Gardner, according to legend, came up with it after he saw that his wife, while fishing, could not knit a classic paternoster for a long time. Read more about the Gardner feeder loop.
Paternoster with twist
If the paternoster is knitted on a rigid line or fluorine, twisting is not needed. A long and rigid pull on the leash prevents overlaps when casting the feeder. However, most feeders use braided cord as the main line, which is soft. If you tie such a setup on a braided line, there is a high probability of overlap when casting or the arm of the leash twisting around the feeder when reeling in the feeder, especially if two maggots on the hook begin to work like a “helicopter”. The solution is to make separate installations on the fishing line and attach them entirely to the braid. Another way is to form a twist of rigid fishing line onto the shoulder of the leash. However, you cannot normally tie a twist to a braided line in a paternoster - it is tied as a single whole with the outlet to the feeder and to the main equipment. Therefore, it is advisable to do twisting if the installation is tied on an insufficiently rigid fishing line and gets tangled. The twist moves the leash to the side and does not twist the outlet of the feeder. For braiding, we knit a paternoster as a separate installation from fishing line and then attach it to the feeder cord.
Tying a paternoster for a feeder with twisting is not difficult. We also fold two pieces of fishing line. At the end of the fold of two lines we knit a small loop for a leash in a figure eight. Next we form a twist. How exactly to do this is in the video below. The length of the twist should be one third longer than the future intended shoulder on the feeder. At the end of the twist we tie a figure eight again. One remaining end is for attaching to the main line (or this is the main line). On the second we attach the feeder, the leash to the twist loop.
With fidergam insert
An insert made of feeder rubber is used when you need to use thin fishing lines on leashes, but the fish is taken by large ones. Federgam also helps not to lose trophies when fishing due to a steep edge. A paternoster with a feedergam is made in the same way as always, just insert a piece of feedergam into the loop into the outlet loop, and only then a leash. Learn more about using feedergam in equipment.
Diagram of insertion in paternoster
One-piece lead on the leash made of feedergam
Some anglers don't like the large number of joints on the leader. To make the installation of the feeder more accurate, without additional loops and inserts when using Feeder Gum, we make the entire feeder outlet from feeder rubber. Since the length of the elastic is selected according to certain elongation parameters, it cannot be very long. And the lead to the leash, so that there is no overlap, should be longer than the arm with the feeder. Therefore, this option is only suitable for a paternoster with a short feeder arm (so as not to use too long a piece of feeder).
Knitting a paternoster with a one-piece rib tap is also easy. The feeder is attached to the end of the main line (shock leader), and the feeder is tied to it with a regular double knot at the required distance. After this, we also make a knot on the main fishing line (braid) around the place where the rubber is attached - so that it does not slide along it. At the end of the elastic band, which should fall below the feeder, we knit a loop and insert a leash into it.