Information
Characteristics
Loop feeder equipment includes equipment such as symmetrical and asymmetrical loops. Compared to the Gardner paternoster, these rigs may seem a little complicated to make. But if you practice and knit a few test loops, you will find that in principle there is nothing complicated and once you get the hang of it you can do them very quickly.
Manufacturing of feeder equipment “symmetrical loop”
We will need:
- main line (monofilament)
- 2 swivels with clasp
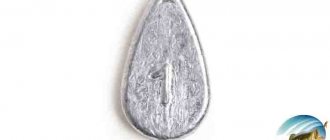
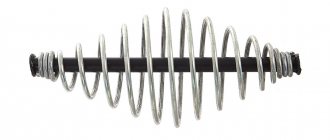
- feeder weight
- fluorocarbon leader line
- hook
The knitting process is very simple:
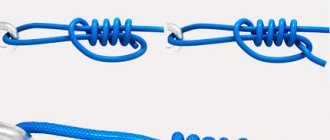
- you need to fold the main line in half and start twisting by rotating both ends of the line in one direction;
- achieve 5-10 cm of tight twist and make a knot (the right twist in the picture is ready);
- then insert a swivel into one of the fishing lines, we will hook the feeder to it and step back 20 cm (this will be our main loop);
- make a knot;
- and again we make a twist, and at the end either a loop or attach another swivel, then you get 3 swivels per tackle;
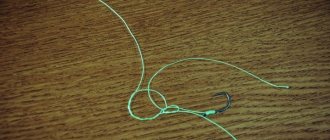
- to this last loop (or swivel) we tie a 30-100 cm leash;
- Attach a hook to the end of the leash;
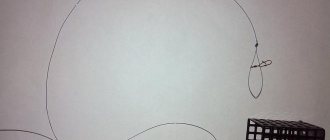
The gear is ready, all that remains is to attach the feeder to the swivel, which is located inside a large symmetrical loop, and the main fishing line will be attached to the very first swivel (in the picture on the right). It can be inserted into a loop using the loop-to-loop method.
How to properly tie an asymmetrical loop for a feeder, what is its advantage and why bream hooks itself when fishing with this equipment.
Feeder rigs – a guide to all popular feeder rigs, their advantages and disadvantages.
Fishing for crucian carp on a feeder - what bait and bait to use, where to look for crucian carp in spring, summer and autumn.
This is interesting: Gardner's loop (paternoster)
Characteristic nuances of fasteners
Now some general recommendations for installing symmetrical feeder equipment. The fishing line I use is the most common one, with a diameter of 0.22 to 0.30 mm. If you take it thicker, then the tackle will be coarser and more noticeable to the inhabitants of the depths, and thinner ones will no longer have proper reliability. In principle, I also focus on the weight of the feeder and the nature of the upcoming fishing.
The fishing line should prevent the leads from twisting, be sufficiently rigid, but at the same time be sensitive. As for its color, you can use both transparent and dark colors for muddy water. As for the hooks for the feeder, you can use almost any of them: preferably not the largest, but always very sharp.
While we are making the feeder rig, we will need to twist the remaining ends of the fishing line. We secure the remaining end with a regular double knot. If I provide sufficient rigidity to the leash, I can cast the feeder without overlapping or other similar difficulties. When I attach the manufactured feeder equipment to the main working line, I first cut off the ends of the resulting twist, and then fix the swivel at a distance of approximately 15 centimeters from the knot.
What is a swivel for? Some anglers remove this element to simplify the design.
But it allows the equipment to rotate freely along the working line and does not allow it to get tangled.
The main criterion in creating feeder equipment, both symmetrical and asymmetrical, should be the unhindered sliding of the feeder within the main loop. By using swivels, we leave ourselves the opportunity to change feeders directly while fishing.
It is best to fix the leash using the “loop-to-loop” method to avoid overlapping when casting. In addition, you should strive to avoid unused ends of the fishing line in every possible way - you should simply get rid of them, as they can interfere with the operation of the structure. To tighten the knot tightly and get away from the protruding ends, I additionally hook pieces of cambric.
And finally, I remind you that if you fish in a body of water that is characterized by the presence of a strong current, then you risk losing the sensitivity of the manufactured equipment, which can be called the main factor in successful feeder fishing.
In conclusion, a video about catching carp in the spring on a feeder.
0
Author of the publication
offline 7 years
Why are loops needed?
First, it’s worth answering the main question: what are symmetrical and asymmetrical loops for? The thing is that these components for the feeder represent special methods of installing gear directly to the fishing rod. Loops are classified as figured-type accessories. They are not very difficult to create, but the user must act in accordance with the instructions.
Symmetrical and asymmetrical knots are more complex to implement than the classic Gardner knot, but even a beginner can still knit them.
Gardner's loop
The Gardner loop is most often used to tie feeder gear. This fixation method has two important advantages.
- Easy to knit. Using a Gardner loop, you can easily assemble equipment directly on the pond. Installation does not require much time.
- The Gardner loop has a low tendency to overlap. The likelihood of tangling gear during casting is minimized.
Not without its shortcomings.
- The Gardner loop is attached to the main line without a swivel. Every few casts you will have to remove the equipment and lift the feeder up so that the main part of the line unwinds.
- Compared to, for example, an asymmetric loop, the Gardner loop has lower sensitivity. In order for the end of the rod to react to a bite, the fish must move the feeder from its place. Therefore, the Gardner loop is designed to work with the most lightweight feeders.
To make a Gradner loop, proceed as follows.
- At the end of the main fishing line, make a small (20–30 mm long) loop with a “surgical” knot. A leash with a hook is attached to it.
- Step back from the small loop about 130 mm and make a large one (length up to 100 mm). The feeder will be attached to the latter.
- Secure the feeder and leash. You have made a Gardner loop.
Note! To attach the feeder, it is better to use a double swivel.
To avoid mistakes, see how to correctly knit a Gardner loop for a feeder in the diagram and video.
Loop feeder installations
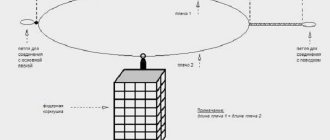
Installation of a symmetrical loop and an asymmetrical one are similar. In the first version, both shoulders are the same, in the second, one is 2 centimeters longer than the other. It is believed that the difference in length makes it possible to better feel weak, accurate bites, which are more clearly transmitted along a short section of the loop. Both options are self-cutting. When the fish just begins to pull the leash, the line slides freely through the swivel of the feeder, through which one of the segments of the loop is freely passed. When the line reaches the top knot, the fish self-cuts against the weight of the feed load.
Both rigs are effective and popular rigs among hobbyists. Athletes do not use them, since only the installation of the Running Feeder Rig is allowed at competitions. Most anglers fish on regular fishing trips with a paternoster or an asymmetrical rig. A symmetrical loop also works great for more active fish. This option should be used if the angler likes to observe sharper, more energetic bites and quickly respond to them. Unlike the paternoster, a symmetrical link (as well as asymmetry) perfectly shows the bite when the fish moves from the feeder to the angler - due to the hinge of the feeder. Loop rigs with a short running stroke of the feeder are a kind of intermediate link between a blind paternoster and a sliding inline. Read more about installations for feeder gear.
Application of symmetry
A short asymmetrical loop, no more than 10-15 cm, works great for small active fish - roach, bream, rudd. This type of fishing is the main purpose of this rig. Symmetry is effective both in still water and in currents. To catch larger and more cautious fish that throw the bait at the slightest resistance of the equipment, it is better to use an asymmetrical loop.
The symmetrical fishing rod is perfect for fishing with pickerel at short distances for small fish. It is more suitable for rivers where casting is not too far and relatively light loads are required. Small reaches, areas with return lines, exits from pits, turns - all promising places in small rivers for catching crucian carp, roach, chub and other whitefish. However, on a marshy muddy bottom, this option may not work well - if the attachment point for the feeder at the bottom sinks into the bottom sediments. For such places, a paternoster or running with a tap is more suitable.
Asymmetry
Symmetrical and asymmetrical loops
These types of loops belong to figured snap-ins.
Lately, feeder fishing has been very popular due to the special structure of the feeder rod. As a rule, such rods are very sensitive and you can very easily detect a bite without special equipment. At first glance, these loops are quite complex if you compare them with Gardner's paternoster. To dispel first impressions, you just need to take and knit a few loops to make sure of their simplicity. How to knit symmetrical and asymmetrical loops? These types of rigs involve a double line with a loop along one of which the feeder floats. On the same line, behind the loop, there are leashes with hooks. The only difference between them is that the arms of the loops are not the same: for a symmetrical loop they are the same, but for an asymmetrical loop they are different. According to anglers, an asymmetrical loop is more sensitive to bites. Moreover, a feeder that slides over a larger shoulder is less alarming to the fish, which means that such equipment is more attractive to it.
The Gardner paternoster is knitted directly on the main line, and the symmetrical and asymmetrical loops are prepared separately. You can prepare several of them and store them on reels, and when fishing, attach them to the main fishing line. This can be attributed to the advantage of these types of equipment, since in case of snags and gusts they can be very easily replaced. For their production, monofilament fishing line with a diameter of 0.22-0.28 mm is used. It may seem that it is a bit thick, but, as experience shows, because of this fishing line the equipment does not lose sensitivity, and when casting it practically does not get tangled. The color of the fishing line does not play a special role. The main thing is that it holds the knot well and is not very stiff. Leashes, naturally, are made from thinner fishing line, somewhere in the range of 0.12-0.15mm. Any hooks can also be used, depending on the fishing conditions, as well as the type of bait used.
Symmetrical loop
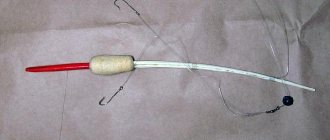
This type of equipment can be used both for fishing without a feeder with a picker or sinker, and with a feeder. It works great in still water, but in the current it gives a lot of empty bites. To install such a loop, you need to take 100-150cm of monofilament and fold it in half. Using a “surgical loop”, tie a small loop at a short distance from the bend of the fishing line (5-10cm). After this, you get two free ends of the fishing line. After the loop, a twist is made from the two free ends of the fishing line. The length of this twist is about 8-10 cm and is intended for the rigidity of the equipment. This twist will minimize the possibility of overlapping when casting. The end of the twist must be secured with another “surgical” knot. Having measured about 30 cm from this knot, another knot is knitted. The result is a 30-centimeter loop with equal shoulders. After this knot, there are also two free ends of the fishing line about 15-20 cm long, one of which is cut closer to the loop, and a swivel with a carabiner is tied to the other. Using a carabiner, this equipment will be attached to the main fishing line, and the swivel will prevent it from twisting in the water. The other end also has a loop to which you can attach leashes with loop-to-loop hooks. Thus, the “symmetrical loop” type equipment is ready for use.
Asymmetrical loop
The manufacturing technology is the same as the previous one. The only difference is that when standardizing a 30-centimeter loop, one arm should be 10 cm longer than the other. The rest is the same: one knot, then a twist, then a loop and a knot. In this setup, the feeder is attached to a longer arm. For fastening, you can use a swivel with a clasp, having previously installed it when forming the loop. This mount will make it possible to change feeders depending on fishing conditions. The asymmetrical loop is effective both in still water and in high currents. In addition, it prevents tangling when casting. The fact is that the load always flies in front and due to the fact that the length of this part of the fishing line is greater, the load will be in front of the entire equipment. Due to this effect, it is more sensitive compared to a symmetrical loop. When cutting the fishing line, you need to make sure that there are no burrs left, that is, you need to cut as close to the loop as possible.
Feeder tackle and installation
3
Do-it-yourself feeder equipment is made using the following components:
The biggest differences exist in the equipment - this is the element of the tackle, which is located closer to the end of the fishing line, intended for attaching a leash with a hook and a feeder.
She feels good on both hard and soft bottoms.
The installation methods are different; the symmetrical loop for the feeder has been improved due to its shortcomings. A symmetrical loop has 2 equal ends. Due to its size, the bait is more noticeable to fish and creates vibrations that scare away fish. Making a feeder with a symmetrical loop is an inconvenient procedure; tying a knot directly on a pond can be difficult.
Thanks to the reduction in the size of one arm, the tackle has become more sensitive and almost invisible to the fish; there are no vibrations that could alert the individual. This is how an asymmetrical loop on the feeder appeared. Both varieties are equipped with weights and anti-twisting devices.
Gardner's Paternoster
This type of feeder equipment is the simplest, as it is knitted on the main fishing line and consists of two loops. Paternoster is used when using mainly braids. Due to its simplicity and sensitivity, this type of equipment has great catchability. Thanks to the high sensitivity on such equipment, the fish hooks itself, so it’s not scary if the bite is missed. It is good for fishing both in still water and in the current. She feels good on both hard and soft bottoms. The only drawback is that when hooked, the main line may break and, on the spot, you will have to do “knitting” again. This is especially “pleasant” when the bite is in full swing, but the fishing rod is not functioning. It is clear that as a result of such fishing, negative emotions will prevail.
Installation of Gardner equipment
To form a “paternoster”, a leash loop is knitted on the main line. Behind it, at a distance of 20-30cm, another loop is knitted. The feeder will be attached to this loop. To prevent the braid from coming undone at the knots, make not one, but two or three turns. Leashes and feeders, in the classic version, are attached to loops using the “loop-to-loop” method. Nowadays, turntables with carabiners are used for various types of fasteners. They allow you to quickly restore the performance of the gear in case of breaks. So, the tackle is ready for fishing. All you have to do is fill the feeder and put the bait on the hook.
Monofilament fishing line with a diameter of 0.12-0.15 mm is used as leashes for the “paternoster”. It is possible even more subtle if the intended fishing is not large fish, for example, crucian carp, roach, silver bream, etc. The length of the leash ranges from 30-100cm. As a rule, fishermen prepare several leashes of different lengths before fishing. The fact is that the fish is unpredictable and today it can be caught on a 30-centimeter leash, but tomorrow it will prefer a meter one. Nowadays, fluorocarbon is increasingly used for leashes, which is not noticeable to fish in water. In this regard, it is possible to install leashes of larger diameter.
To increase the rigidity of the leash, it is twisted in the same way as when making symmetrical and asymmetrical loops. To do this, take a piece of fishing line of the required length and fold it in half. A knot is tied at a distance of 5 cm from the bend. The result is a small loop that will be used to attach the leash to the main line. Then this loop is fixed motionless and the two free ends of the fishing line are twisted. During this process, you need to ensure that the twist is as even as possible. About 10cm is enough, but with leashes over 40cm the twist can be longer. Then the twist is fixed by tying any reliable knot. The resulting two free ends of the fishing line are used to attach hooks. If one hook is intended to be used, then one free end is cut off in close proximity to the knot. Leashes made using this technology will minimize the number of unsuccessful casts.
Best HD Feeder Montages
Types and types of installation
Common types of feeder installations:
- large symmetrical loop. It is used infrequently due to design flaws, but is recommended in places with active biting, as it cuts off fish;
- asymmetrical installation. It is sensitive and invisible to fish;
- Gardner rig. It is the simplest and most popular method, although it is not classified as a self-hooking type, but it provides a strong fish hook. The essence comes down to attaching the feeder to a twist of 10-15 cm fishing line;
- The inline installation method involves free movement of the feeder along the fishing line. Easy to install, but has less sensitivity compared to the Gardner loop. When casting over long distances, the line may overlap with the leash and feeder. The inline method is ideal for fishing in still waters with close casting;
- loop in a loop. A fairly simple method - the leash is loop to loop, loops are formed on the main line and the leash, one is threaded into the other, and then secured with a hook.
We knit a symmetrical loop ourselves
Making basic equipment for a symmetrical loop feeder does not take a lot of time and patience. Since it is knitted on a separate segment of fishing line, it can be used many times.
To connect this type of classic equipment, arm yourself with the following elements:
- a hook with one point, which is perfect for catching peaceful fish;
- two swivels with an American clasp - the most popular and reliable type of design;
- fishing line to choose from - monofilament or fluorocarbon;
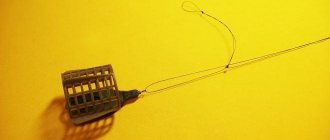
- light feeder. - mesh, spiral, frame.
The fishing line for installation should be rigid and resistant to abrasion. Therefore, fluorocarbon filament is an excellent choice for the main core.
A high-quality swivel does not have protrusions, which can often cause the line to get tangled.
Having prepared all the elements, we begin the manufacturing process:
- We prepare an eyelet for the leash from a segment of fishing line folded in half.
- We twist one end of the core to 20 cm and tie a knot. The fixed eye is designed to connect the hook to the leash. The hook is attached using a loop-to-loop method for reliability and durability.
- We put a swivel on the free end of the core. Make sure it rotates easily and fastens securely as it connects the feeder to the tackle.
- Having retreated 20 cm, we connect the ends of the fishing line and knit a knot.
- We perform the “core twisting” procedure again. At the edge we form an eye with which we connect to the main core. Many professionals advise putting a second swivel here for a stronger connection to the main cord. It is, of course, up to the hunter to choose.
- The fishing device is ready for use.
Fasteners allow you to change the types of feeders depending on the weight, and allow you to remove and re-attach the equipment to other feeders. It’s easy and simple to stock up on such an installation, making it before going fishing. The number of loops is minimal, but the result is maximum.
The more active the fish, the shorter the length of the leader. The most important thing about this type of underwater gear is that it allows you to use ultra-thin fishing lines and the lightest loads.
orybalke.com
Which one to choose?
Many anglers (especially beginners) ask a reasonable question: which feeder loop is best to choose - symmetrical or asymmetrical? Different users choose different options.
To choose a specific type of loop, it is worth considering their main features.
- An asymmetrical loop is easier to make at home than a symmetrical one. Independent preparation of the second option is considered not the most convenient and fastest procedure. It is very difficult to tie the necessary knot directly on the pond.
- An asymmetrical loop is more practical to use, since a symmetrical one works in conjunction with overly large baits, which are more noticeable and create more vibrations in the water, which often scares away potential trophies.
- Asymmetrical and symmetrical hinges are united by the fact that they are usually equipped with weights and additional means to prevent their possible twisting.
- If fishing will be carried out in a stagnant reservoir (where there is no fast current), in which small fish live in large quantities, then an asymmetrical loop will be more suitable than a symmetrical one. In addition, the asymmetrical option will be more suitable if the fish is not biting very well due to sufficient satiety and excessive caution.
- Asymmetrical loops are also attractive because they are suitable for repeated use if the knot is not damaged. If tied correctly, such a loop can last about 3 fishing trips.
Having correlated all the features, pros and cons of the feeder loops under consideration, you can settle on a specific option.
We make feeder equipment for beginners
Many novice fishermen ask the question: how to make, how to tie feeder equipment? Manufacturing and installation is not a very complicated process. Now I will tell you how I knit it. I bend the main monofilament in half and make a twist, for which I rotate both ends of the fishing line in the same direction. The resulting twist should definitely be longer than our feeder. After it is ready, we make a knot at its end.
We equip one of the arms with a swivel, measure 20-30 cm in order to secure the feeder. After that I make a knot again and then a twist at the end of the loop. Our leash up to 1 meter long is attached to the last loop, and we knit a hook to it. So we have prepared one of the best feeder designs. Now I tie the main monofilament line to the outermost (first) swivel and attach the feeder through the swivel located inside the large loop. At the same time, it must have free movement within the loop.
For a more detailed understanding of how to knit, I recommend watching the video below: how to knit a symmetrical loop for a feeder.
Important subtleties
Let's consider some important subtleties that have a direct impact on the quality and efficiency of the feeder equipment in question.
- To make such components, it is very important to use rigid fishing line. The ideal solution is fluorocarbon, which was mentioned above. This material has good density and abrasion resistance, so it will be a winning solution.
- It is very important to select the correct twist length parameter when forming a homemade loop for the feeder. If the length is too long, it will lead to overlap. In such conditions, the knot will need to be tightened to 6-8 cm.
- If the fish in the pond is too passive, then it makes sense to increase the length of the leash a little. If bites are activated, then the length can be reduced slightly.
- Before casting with tackle, you must first check the freedom of movement of the installed feeder. If any problems arise with this, they will definitely need to be eliminated in a timely manner.
- When fishing on a feeder with a selected loop, it is important to ensure that the carabiner and swivel do not have any protruding parts. Otherwise, these elements will inevitably begin to get tangled with the fishing line, which will lead to frequent snags. Such problems must be avoided.
- Feeder loops are best knitted from transparent fishing line. This component will be practically invisible in the water column.
- You should not forget the length of the shoulder. It is clear that this parameter should be at least 2 cm. If you make the overhang larger, the equipment will simply lose sensitivity. Because of this, many extremely careful bites will simply go unnoticed. If the parameter in question is less than 2 cm, then the leash and the feeder will begin to constantly get tangled and overlap.
- When the asymmetrical loop is fully knitted, you need to choose the right leashes. Their choice directly depends on the degree of activity of underwater inhabitants, as well as the fishing conditions themselves.
The thickness of the line is usually used from 0.12 to 0.16 mm. Extremely rarely, when hunting for large trophies, the diameter can be increased to 0.20 mm.
In the next video you will find an asymmetrical loop feeder montage.
Gear used
Rod
The main characteristics of a rod for feeder fishing include:
- length;
- maximum weight of cargo/feeder;
- rigidity;
- build.
There is a division of all fishing rods into pickers and feeders. As a rule, fishing on feeders is done using feeders, and on pickers - using sinkers. In any case, the choice of weight depends both on the characteristics and class of the rod, as well as on the preferences of the fisherman and fishing goals.
Picker rods usually have a length of up to 3 meters, feeder rods - over 3 meters.
fishing line
Currently, there are two main types of fishing lines: monofilament and braided. The type of fishing line used for feeder fishing depends on the characteristics of the reservoir and the main species of fish that are found in it. Braided fishing line has little stretch and has less windage in the water and a longer casting range compared to monofilament line with the same breaking load.
If, for example, you plan to catch carp weighing 2 kg or more, the low stretchability of the braid will not allow you to absorb jerks during fishing and will increase the likelihood of the fish leaving, so a stretchable monofilament would be preferable. But when fishing for bream with a long cast, especially in the current, the stretchability of the monofilament line will negatively affect the hooking, while the braided line will allow you to clearly hook the fish with a short movement of the rod.
Coil
The coil on the feeder must have a high gear ratio. Feeder fishing is characterized by frequent recasts even in the absence of a bite due to the need to replenish the fishing point with bait. The reel must have a large spool in diameter to ensure a good casting distance. It is desirable to have a shallow “match” spool, convenient for thin fishing line. It is desirable to have a fishing line tuck on the spool, which is convenient to use to fix the casting distance. Another main criterion for choosing a reel is the quality of the friction brake.
Bite alarm
There are a great variety of bite alarms for feeder fishing. There are mechanical and electronic alarms by type, and visual and audible ones by mode of action. There are also direct bite alarms, to use which you need to be within their hearing/visibility, and remote ones, which send a signal to one or another intermediate device (for example, a pager).
The choice of one or another bite alarm depends on the preferences of the fisherman,
Sinker
In feeder fishing, bottom sinkers are used if you need to cast without a feeder, which is usually weighted enough to hold the tackle at the desired depth.
Feeder
The purpose of the feeders is to deliver bait to the fishing point to attract and retain fish at one point in the pond. The choice of feeder depends on the fishing conditions and habits of the fish. It is important to have a supply of feeders with you and experiment with them - otherwise it will be difficult to attract and keep fish in one place. Functionally, feeder feeders are divided into several types:
- feeders for starter feeding;
- feeders for long-distance casting;
- supplementary feeders for standing water;
- supplementary feeders for currents;
- feeders for live food.
Also, feeders can be divided into types according to the method of attachment to the equipment and according to design features. The first ones can be sliding, remote on a separate leash and end. The second ones are open, semi-closed and closed. Feeders can also be light and loaded with lead. They vary in volume - from a tablespoon for light tackle to holding about half a kilogram of bait for super-heavy rods.
Leash
For leashes, high-quality monofilament or fluorocarbon fishing line with a diameter of 0.12 to 0.18 mm is usually used.
The diameter of the fishing line is selected depending on the size of the fish being hunted. The larger it is, the larger the diameter should be.
For leashes, you should select a soft line without memory with a good breaking load and the smallest possible diameter. On sale there are special leash lines from different companies wound in lengths of 20 - 25 meters. They are generally of better quality than regular large spool lines.
Advantages and disadvantages
The advantages of asymmetrical installation outweigh the disadvantages; such a loop belongs to the basic equipment; every self-respecting fisherman should be able to make it.
The advantages of fastening include:
- increased sensitivity, bites from neat or small fish are felt;
- often used for fishing in fast water conditions, because it allows you to catch fish on your own;
- thanks to the long leash, the fish bites and at first does not feel danger;
- used for passive fishing in stagnant waters;
- The leash and feeder do not get tangled.
Among the disadvantages of asymmetrical fastening:
- knitting and installing a loop is somewhat more complicated than a traditional paternoster;
- long leashes for novice anglers can lead to tangling of the fishing line;
- used in reservoirs without silt and tall thickets;
- the equipment includes additional elements;
- the fish does not self-hook in quiet waters, the fisherman has to constantly monitor the bite.
If the result is unsatisfactory, you can experiment: change the length of the leashes, the type of fishing line, the weight of the feeder structure.
Paternoster. "Deaf" installation
A paternoster is often called a Gardner loop, but these are different methods of installing feeder equipment. The Paternoster is different in that the feeder is attached with a swivel not to a loop, but to a leash made from the main fishing line. This installation method is also simple and convenient.
To tie the feeder equipment using a paternoster, proceed as follows.
- At the end of the fishing line, tie a large (length - up to 100 mm) loop.
- Cut it. You will get two leashes.
- Tie the feeder to one using a swivel.
- Make a loop on the second leash.
- Attach a leash with a hook to it.
All is ready. You made Gardner's paternoster. To visually familiarize yourself with the knitting technology of this feeder loop, study the video.
Feedergam insert
When using a braided cord and thin leashes as the main one, there is a risk of losing large fish during fishing due to the lack of shock absorption of the equipment. To soften the jerks of trophy fish, we insert a piece of feeder rubber - feedergam - between the leash and the twist of the symmetrical loop of the feeder. More details – feeder gam in the equipment.
Fidergam
How to knit an asymmetrical loop for a feeder
To tie an asymmetrical feeder loop for the first time, you need to take a larger piece of fishing line - about a meter long. Later, with experience, the correct length will be selected automatically so as not to waste excess material.
- Fold the fishing line in half. At the bend we form a small loop of 2-3 cm for the leash. This can be done with a figure eight or a surgical knot (that is, the usual ones with a double or triple pass of the fishing line into itself). The same units are used at all other installation points.
- Before tying an asymmetrical loop for the feeder, you need to form a twist, thanks to which the leash will not twist around the main line and get tangled when casting. The standard twist length is 15 centimeters. This is a critical point. The twist should be 2-5 cm longer than the overhang of the feeder, so that the leash does not reach the installation itself. We begin to twist from the tied loop - together with it this will be the lead to the leash. Twisting can be done by hand by grasping both ends of the fishing line and turning them inward at the same time. Another way is to take the loop in your mouth and lightly squeeze it with your teeth, and twist the ends of the lines around each other. It’s slower this way, but the weaving is tighter. Twisting in this installation is a direct part of the equipment. However, the idea can be applied to other fishing equipment. Learn more about how to make a twist on a fishing line.
- After reaching a length of 15 cm, we clamp the end of the twist. Tie a figure eight knot. The result was a leash with a loop and two fishing line ends of equal length. Let's start forming the shoulders for the feeder.
- But the end of the monofilament, which will be the long shoulder, we put on a swivel. We will then attach the feeder to it via a carabiner. We then measure 10-15 cm along the fishing line by eye. We move the end with the swivel towards the outlet by 2 cm - this is exactly the difference in the shoulders. If you do less, you’ll get an almost symmetrical version; if you do more, you’ll lose the sensitivity of the gear. A difference in symmetry of more than 2 centimeters will also register active bites, but weak ones may not be noticed. A large difference in the length of the arms conceals bites, and the meaning of asymmetry is lost. The long arm should be exactly 2 centimeters larger than the short one - this has already been tested and verified many times by experienced feeders. We tie a figure eight knot - the diagram of the asymmetrical loop on the feeder is almost ready.
- Of the two remaining ends, we leave one for connection to the tackle, and cut the second for a knot so that underwater debris does not stick to the remaining stump. At the remaining end, using a figure eight, we again make a loop for attaching to the main fishing line. The size of the loop is 4-5 cm, the resulting equipment for tying on the base should fit into it.
Feedergam insert
When installing an asymmetrical loop for a feeder, it often becomes necessary to use thin leashes to catch cautious fish - up to 0.1 mm. However, when using the main braided cord, the entire rig turns out rigid - the braid does not stretch
Because of this, you can lose large fish. To add shock-absorbing properties to the tackle, an insert made of feedergam 5-10 cm long is inserted between the leash and the outlet for it (depending on the characteristics of the feeder rubber and the required strength). The breaking load of the feederham must exceed the tensile strength of the leash. Read more about the use of feedergam in installations.
The concept of an asymmetrical loop when fishing with feeders
Not every angler will call this type of equipment simple to implement and universal to use in practice. This impression was formed due to a misunderstanding of the essence of the operation of the equipment, as a result of which the distribution of this design among a wide range of feeder lovers did not receive sufficient recognition and practical application. But in vain.
The principle of operation of this loop is based on the difference in the length of the arm of the main loop in relation to smaller fastening loops, which are located opposite each other. The longer arm is intended for mounting the feeder, and the short one is for transmitting the bite signal to the quivertip of the rod. I agree that there are difficulties in the implementation of the equipment, but they are not so difficult as to completely abandon the use of this type of installation. Most likely, in fishing conditions, trying to verify all the sizes is quite problematic due to the lack of time, but at home, spending two hours to prepare several ideal options for an asymmetrical loop, if desired, you can always find. And the time spent, with a high probability, will be well spent and will prove this by the effectiveness of fishing, while some fishermen in the neighborhood will not even see the smallest bite throughout the entire fishing.
Further, as the article progresses, I will try to clearly reveal all the secrets of knitting an asymmetrical loop for the feeder and its equipment, as well as the nuances of the proportional relationships between the elements of the equipment and point out the advantages of this installation under certain fishing conditions.
How to knit an asymmetrical loop
Don’t be too upset if your first practical knitting experience isn’t entirely successful. An asymmetrical loop for a feeder is indeed not the simplest element in feeder equipment, which is worth considering. There is no need to rush in this matter, since all the nuances of the work discussed below must be extremely consistent in size and elements.
A meter-long piece of fishing line is folded exactly in half and the first small loop is knitted at the place of the fold to install the leash. A variant of the loop knot is up to the angler to choose, the main thing is that the loop is blind. The next element will be the twist. Its size should not exceed ten centimeters. This size must be observed. Twisting to a lesser extent will not particularly affect the performance of the installation, but a longer element will periodically be the culprit for tangling the feeder loop. The finished twist in the same dimensions is tied with a knot. The easiest and fastest way is eight. Now let's move on to the main part of the work, which contains the main purpose of this design.
Important! We tie the two remaining tails of the fishing line so that one of them is only two centimeters longer than the second. This difference in size is asymmetry.
We finish the knitting again with a blind loop, which will serve as a connecting element to the main cord of the tackle. The installation is now complete. As can be seen from the description, with care and accuracy, the asymmetrical loop is not so scary, but quite effective, and this is what we will talk about next.