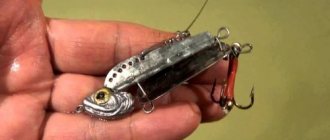
The world of ultralight (UL) is interesting not only for the diversity of the species composition of the fish we come across, but also for the ultralight baits that we catch. Today I would like to talk about small oscillating spinners (micro-oscillators), really small - their size does not exceed 30 mm. And not only about how to make these interesting microoscillators yourself at home, using the minimum of tools that are almost always at hand in any home, but I will also try to analyze some interesting points in the wiring of such homemade microoscillators. Let's talk about little secrets that will help you master this type of ultralight lure.
The undoubted leaders in the factory production of micro-oscillators are the Japanese. Even the smallest Japanese companies, focused exclusively on the needs of the domestic market, do not refuse the opportunity to have these interesting ultralight baits in their assortment.
We are unlikely to be able to master the production of such micro-oscillators on an industrial scale, but we can try to make a couple of ultralight baits of different shapes and weights for ourselves and our friends with our own hands. This is quite a troublesome matter, but the game is worth the candle. Well, let's add a little patience here.
Even at the dawn of my passion for fishing, I spent a long time looking at oscillating spoons, these variously curved metal lures of various configurations, in Fisherman-Sportsman stores. Those baits amazed with their massiveness and significant size. My imagination pictured huge pikes and pike perch. It’s all the more fun now to make greatly reduced copies of them yourself. And when they also catch fish, it’s just a thrill. For the sake of truth, it is worth saying that, for the most part, they are not at all of record sizes. But we don’t need this, everything is fine with fish in stores now. And it’s better to let our caught one go.
Making a template for making micro-vibrations
So, we should start with the fact that we will need a template, according to which we will subsequently leave the outline (contour) of the future micro-oscillator on a piece of suitable sheet metal.
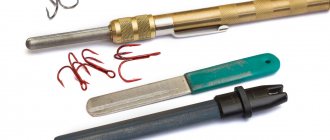
It is better to make the template also from sheet metal, only thinner in cross-section. Why metal? Firstly, it will last longer, because... It is practically not subject to accidental deformation, and secondly, it is quite easy to process to achieve the desired configuration. Using a sharp object (for me it’s either a large sewing needle or a sharpened drill fixed in a collet clamp), we mark the dimensions using a ruler or by eye, and then draw the shape of the future template for the micro-oscillator. To begin with, you can get by with a spindle-shaped form or a “Storling” form; they are the simplest and most proven. Have you drawn it? Next, using metal scissors or even tailor's scissors (they are easier to work with - they are more comfortable to grip), we cut out the template blank. We give it its final shape with a file, remove the chamfers - and the template is ready. My templates for microoscillators are shown in photo 1.
Manufacturing of micro-oscillator blank
So, now to prepare a micro-oscillator we need non-ferrous metal with a thickness of approximately 1 mm. This can be copper, as well as cupronickel, brass, bronze and similar alloys. Definitely plastic. It will be much easier for us to work with such metal.
To obtain guaranteed ductility (read softness), we anneal a piece of sheet metal over an open fire. At home, a gas stove is quite suitable for these purposes. After the metal is hot, we lower it into the water. This procedure can be done 2-3 times. Now we put a template on the surface of the metal sheet, and with a sharp object (remember - what kind?) we trace it - and we have clear contours of the future micro-oscillator blank. You can make several such contours on one sheet at once. We cut again with scissors according to the marks left. Using a file, we bring it to the given shape - and now we already have blanks.
We practically repeated all the operations that and when we made the template, but we should not forget that the metal of the blanks of our micro-oscillators is much thicker than the template and it is somewhat more difficult to work with it - due to the increased effort spent on cutting.
Homemade spoons for pike fishing
As mentioned above, many fishermen rarely buy spoons for fishing; they usually take them in order to study the structure, and make their own at home in their likeness. Fishermen make high-quality and catchable lures on their own with the help of many years of fishing experience.
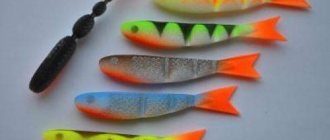
There are many types of baits that you can make yourself. A good lure should shine, have enough weight to provide a more interesting movement, and it should also be very similar to a real fish.
The best materials are:
- Lead
- Copper
- Brass
- Tin
- Stainless steel
Types of spinners
There are three main types of spinners:
- Turntables
- Balancers
- Oscillators (oscillating)
Hesitating
This species is especially good for pike fishing. They are made from metal plates that are either painted or a shiny material is chosen. A hook is attached to them.
There are several fairly simple ways to make such oscillations:
- The most popular way of making it is from the handle of an ordinary spoon. To increase catchability, you need to slightly bend the stem at the ends. Using a drill, holes are made for attaching the spinner itself and the hook. If you cut a few centimeters of metal from the handle of a spoon, it becomes very similar to pike’s favorite food - bleak.
- The blade of a spoon can also be used to make bait. It is sanded with a file at the cut site, and several holes are made for fastening. And that’s it, the beautiful spoon for pike is ready.
- From the handle of an ordinary teaspoon you can make an almost exact copy of a Devon spoon. The manufacturing principle is the same, only the tee needs to be attached to the narrow part of the spoon. This can keep the bait in the water while hunting. To make the vibrator play more beautiful, its ends can be slightly bent.
- A bimetallic spoon can be made from two types of metal. Alternatively, take copper and aluminum. To work, you need to take two identical pieces of metal, with holes already drilled for ruts and rivets. Metal parts must be riveted and sanded. Using stamping, the future lure is given the desired shape and geometry. For a better effect, you can polish the surface to a shine.
- You can also make an oscillator from an ordinary small metal tube. It is cut from both ends at different angles, leaving about 5 cm. A hook is attached to the sharper edge to more realistically imitate a fish.
[THERE IS AN ANSWER] How to tie a spinner to a fishing line
Rotating
This type is made from several elements - a petal and a base. They should have different shapes and sizes. When the fisherman plays the game, the petal spins around the base, attracting predators.
Spinner-balancer
This type of bait is very similar to real fish. The balancer is the only type of vertical spinner. It is made from a 4-5 cm tube, to the ends of which hooks are attached. The balancer is tied in the middle.
First, you need to cast a casting mold from plaster, then attach hooks to it, and pour hot metal. After everything has cooled and stuck together, you need to clean out all the irregularities and paint the future bait in a bright color.
Shapes of homemade lures for pike
Before making a blank, you need to decide on the shape. The type of petals can be different: round, rounded, elongated towards the ends, pointed. The most popular one is elongated and slightly pointed at the edges. It will be universal and suitable not only for catching pike, but also for asp and chub. The wide and oval shape of the petals also attracts predators well.
If you make a bait with a narrowed petal, the game will be faster and more active, but with a round one, the retrieve will be slow.
Color of homemade spinners for pike fishing
The most optimal coloring option for the pinwheel is silver or gold, because it most closely resembles the color of the fry. In general, you need to choose a color depending on the time of fishing, the type and color of the water in the reservoir. If the water is clean and light, there are a lot of small fish in it, then it is worth painting it silver.
Decoration of spinners
You can decorate in several ways:
- Attach plumage made from tinsel, silicone, and brightly colored threads.
- Additional coloring. You can completely draw the fish with eyes, fins and tail.
Making a spinner yourself is not as difficult as it might seem. To do this, you only need a small set of plumbing tools, suitable material and a little effort. The material can be stainless steel, copper, brass, aluminum or bronze, but, unfortunately, in our capitalist times this is no longer lying around, so there is nothing left but to use some simple objects familiar to everyone. Which ones exactly? Now let's find out:
Setting up the micro-oscillator game
Well, we have the blanks for microoscillators ready. Let's continue. In the back of the workpiece, laid on a dense but relatively soft flat surface - for example, rubber or thick linoleum - we use a hammer with a ball of a suitable diameter removed from the bearing to knock out a radial recess. Next, we drill holes for the winding rings from opposite ends of the workpiece. We put on the rings, hang the threesome, tie it by the free ring - and go for a preliminary test of the “game” of our micro-oscillator in a bathtub filled with water.
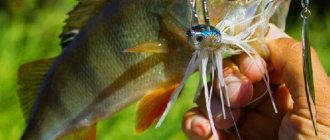
With the help of small round-nose pliers (precisely round-nose pliers, since they leave almost no marks on the workpiece) we achieve the “game” of the micro-oscillator we need. And we achieve this most necessary “game” by bending the bow in the direction opposite to the knocked-out recess (photo 2). But how should a microoscillator “play”? This is where I won’t give you an answer. Well, what will it do to you if I say that my “correct” microoscillator makes some kind of movement, such and such? After all, a lot depends on the shape of the micro-oscillator you get, its size and weight. This can be waddling from side to side, or wagging only the tail part, with different amplitudes and frequencies, etc. The main thing here is our faith that the microoscillator “plays” as it should. And the fish will really appreciate it, believe me!
So, as soon as the “game” seemed attractive enough to us, we remove all the “trinkets” from the workpiece and begin the final processing.
Non-snagging spinners
The best for catching fish in the middle of summer and in conditions of increased turbidity of water are small and medium-sized spinners. Small spoons are equipped with small tees, which rarely give dead hooks and most often unbend. Spinner baits of the “Universal” type and larger size spinners must be equipped with larger hooks, and therefore non-touching equipment should be used for them.
Spinners are very sensitive to loads on the spinner's axle, especially on its rear end.
Therefore, with non-touching equipment, it is very difficult to maintain good rotation of the spoon during slow retrieval. However, any weakly rotating spoon begins to rotate successfully if the tee is unfastened from it. This observation prompted the idea to use non-cluttering equipment, which allows unloading the spinner axis (Fig. 4). It consists of a thin wire curly bracket 1, the middle of which is curved like a winding ring. The ends of the staples are passed through the eyes of hooks No. 12 and twisted several times around the fore-end. A protective spring 2 made of thin steel string is soldered to each branch of the bracket. Then a small tassel of red wool is tied to each hook, and the petal of the spinner is fastened to the ring of the bracket.
When retrieving, such a spinner plays better than another one equipped with a tee. The tassels on the hooks pull out the rig as the spinner moves. A petal protected by a bracket is less likely to become clogged with algae, and the fish are caught reliably. There is no need to equip each spinner separately. For the entire set of rotating spinners, it is enough to have three or four rigs of different sizes and attach the corresponding size spinners to them.
Non-snag spinners (non-snag spinners)
Small spinners for fishing in rivers with small currents can be equipped with a large single hook (Fig. 5). The axis of the spinner is passed into the eye of the hook and wrapped around the fore-end several times, thereby achieving a rigid connection between the hook and the axis, which does not allow it to touch the fishing line. To preserve the spinner when there are dead hooks, the hook must be annealed.
It happened to me, after a 10-15 minute struggle, to pull out pike weighing up to four kilograms onto the nearest shallows. For catching smaller fish (1-3 kg), spoons are also certainly suitable. Inconspicuous rigging of spinners increases the number of bites from such wary fish as asp, chub and ide. A slight increase in the number of hits is more than offset by a significant increase in the number of bites.
Read How to put live bait on a hook
Final processing and fine-tuning of the micro-oscillator
Using fine-grained sandpaper, we remove all scratches and irregularities from the metal, and then using GOI paste and felt (say, from an old overcoat or felt boot) we bring the micro-oscillator to a shine. It is worth pointing out that shine, especially mirror shine, is not in all cases useful for our small ultralight lures. Therefore, the surface can be left treated only with sandpaper, then it becomes dull (photo 3). To remove excessive glare, I use a fine notch, or rather, scratches on the body of the micro-oscillator. Which I do using the same needle or drill. In principle, the micro-oscillator can be left unprocessed at all; this will not interfere - taking into account, of course, our correct actions - from catching fish regularly with it, but in terms of aesthetic perception, such a micro-oscillator, if I may say so, is unlikely to evoke positive emotions in us. For nothing it bites.
It is not prohibited to use micro-vibrations and multi-colored alcohol markers for painting, but I use them very rarely, and then only for applying contrasting dots or stripes (photo 4). If the microoscillators are made of copper, I prefer not to process them at all, I just apply notches (photo 5). Yes, for beauty.
Good micro-oscillators can also be made by soldering two separate workpieces, but this is a topic for another discussion.
Types of homemade spinners
Experienced fishermen love hand-made lures for pike, choosing the ideal bait for specific conditions. It is more catchy and cheaper than ready-made options.
It is important that the imitation baitfish attracts the toothy hunter in appearance and moves naturally in the water.
For the manufacture of devices , brass, stainless steel, copper, lead and tin . They are not deformed , durable and strong, easy to process and polish.
Based on their design and principle of operation, there are 3 types of lures for pike:
- oscillating (oscillators);
- rotating (rotators);
- balance.
All of them are easy to make yourself from scrap materials ; how to do this at home will be discussed.
Important! The stronger the current, the heavier the bait must be to overcome its resistance.