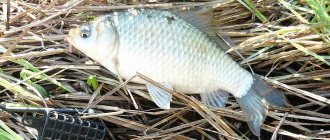
Basically, pike are caught with live bait in winter, using equipment such as a zherlitsa, despite some difficulties in acquiring live bait in winter. Fishing for pike with a zherlitsa in the summer can be just as productive. The use of a girder in the summer is justified where it is unlikely that you will be able to catch anything using a spinning rod, since placing the bait is associated with certain difficulties. Making a girder is so simple that you can whip it up right next to a pond, as long as you have fishing line, hooks and live bait.
Interesting! It would not be amiss to note that Europe has abandoned fishing with live bait, as it considers this method of fishing barbaric.
Do-it-yourself summer girder
With the arrival of summer, most reservoirs begin to be overgrown with aquatic and coastal vegetation. In addition, there are other underwater surprises that limit the use of spinning rods. As a rule, pike are found in hard-to-reach places, so the problem can be solved with the help of a girder.
For those who regularly catch pike with girders in winter, it will not be difficult to convert winter gear to summer gear. Unfortunately, there are fishermen who do not have information regarding the construction of girders. Basically, the vent is made from simple and affordable materials, sometimes unsuitable for other purposes. If you have to fish on a river, then you need to think in advance about how the tackle will be attached.
Do-it-yourself summer bait for pike. What could be simpler?
Homemade winter bait for pike
How to properly make a winter vent with your own hands is a very pressing question that many beginners face. It is no secret that such tackle is highly valued due to the following advantages:
- Universal purpose.
- Efficiency.
- Easy to install.
- Affordable price.
Modern fishing girders can have very different configurations and design features. At the same time, fishermen themselves decide whether to buy a ready-made store-bought tool or whether it is better to assemble it themselves.
Design features of the vent
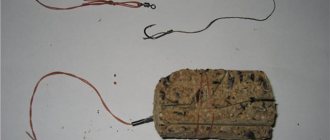
You can find many different designs of such gear. The most important thing is to find elements of gear on which a certain amount of fishing line can be wound. This could be a piece of wood, a plastic bottle, or a plastic circle that can float on water. There are designs of girders that are installed on the water, but they need to be regularly monitored, otherwise the pike may pull it into snags. These are the so-called circles, which are considered one of the varieties of zherlitsa.
One of the ends of the fishing line must be attached to a base of the type mentioned above (for example, a plastic bottle).
The fishing line is wound around this element so that, with a certain effort, it can be easily retracted. At the other end of the fishing line, a tee (hook) is tied and a sliding weight is installed. The base of the girder (frame) must be securely fastened to the shore, otherwise the tackle can be dragged away by a large pike or pike perch.
In case of a bite, the line is slightly pulled off the base, which allows the predator to swallow the bait. After all the line is reeled in, the fish hooks itself.
Progress
To ensure that the home craftsman does not encounter any problems during manufacturing, he should work following a clear sequence of actions:
- First of all, remove the bright label from the plastic bottle. The middle is wrapped with forest or cord. It is tied with a strong knot at the very neck. Additionally, you can secure the scaffold with a rubber ring under the lid.
- The free end of the fishing line is equipped with a hook.
- A spring is attached to the wall of a plastic bottle with adhesive tape or tape. Its end is connected to a bright canvas flag. The spring is bent towards the bottle and firmly fixed in this position with an elastic band.
Read Night fishing on the feeder, catfish, chub, burbot and silver bream
Some fishermen equip the line with a sinker in such a way that it is located in front of the tee. It is also allowed when the weight is 300-400 mm higher than the hook. After these steps, you can put live bait on the hook. Then the bait is thrown into the water. If the predator swallows it, the scaffolding begins to unwind. As a result, a spring is released, which is connected to the signaling flag.
Equipment for summer vents
To arrange a summer barn you will need:
- The place where the pier will be attached to the shore. This can be a specially prepared stick or coastal vegetation can be used: trees, bushes or branches of overhanging trees.
- As the basis of the girder, it is possible to use elements prepared at home or elements found on the shore of a reservoir. For example, you can easily find a wooden flyer or a plastic bottle. For the initial clamping of the fishing line, cuts in the wood or rubber rings are used, which securely hold the fishing line until the bite.
- A fishing line with a thickness of 0.4-0.6 mm and a length of 15-20 m is suitable as the main fishing line. It is not recommended to install longer sections of fishing line, as the pike can get caught in snags. Using a very short length will not allow the pike to swallow the bait.
- Sliding weight with swivel. The weight of the cargo is selected depending on various factors, such as the size of the bait and the presence of a current.
- The swivel is needed to connect the leash. Especially needed when there is a current.
- Retaining rings will limit the movement of the load along the fishing line.
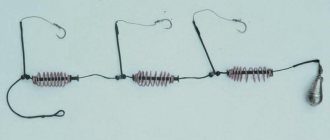
- A metal leash is required. Its length is 30 cm.
- Any type of hooks can be installed, both single, double and triple. It is possible to install two leashes with hooks, but no more, so as not to complicate the fishing process.
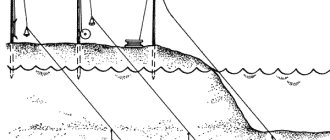
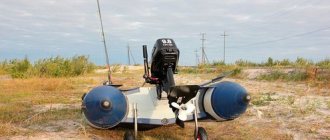
If you have a boat, then installing the vent in the right place will not be difficult. It is extremely difficult to install summer girders from the shore, without a boat, especially if there are coastal thickets. Although this is not a problem if you take off your clothes, especially since it’s summer outside and not cold winter.
Making a summer girder
As mentioned above, making such gear yourself is not at all difficult. Making your own gear allows you to take into account all the fishing subtleties and fishing conditions. For novice fishermen, this is not entirely clear, since they have not yet mastered the intricacies of fishing.
Classic zherlitsa - flyer
This is the simplest design, the principle of operation of which has remained unchanged for many centuries. Such gear is successfully used in our time, since it can be made directly near a reservoir, with minimal waste of time and components.
Preparation method
- First, you need to find bushes near the pond. After this, cut off the flyer, about 1 cm thick. The length of two branches should be 10-15 cm, and the length of one branch from which the branching is 5-7 cm. It is better if this flyer is dry, as it can be much stronger , unless it is very old and rotten. For regular use (not one-time use), it is better to choose a thicker material. The main thing is that the line is freely released from the workpiece.
- At the branched ends, you need to make clefts located on the same line, but not parallel to each other. They are designed to secure the fishing line. At the thick end of the flyer, a cutout is made in a circle, which will serve for attaching the gear. If you have something, you can make a hole in this place, which will make the fastening more reliable.
- A fishing line is taken, 0.4-0.5 mm thick, 5-7 meters long than the depth of the reservoir. When the fishing line is tied to the hole, they begin to wind it in a figure eight around the branched ends of the flyer.
- A snap ring should be attached to the end of the line, then a sinker and swivel should be attached, and then another snap ring should be installed. The rings will serve as limiters for the load to slide along the fishing line.
- A swivel is tied to the end of the fishing line.
- A leash is attached to the swivel. This can be a metal leash, about 30 cm long. The leash is attached with a carabiner.
- The hook is connected to a metal leash by means of a winding ring. If the leash is homemade, then the hook can be installed during the process of making the leash.
- After installation, the zherlitsa must be securely tied with a rope to some object located on the shore.
Tackle summer zherlitsa. Flyer. Slingshot. Catching pike with live bait. Fishing. Fishing.
Zherlitsa with flags
Almost all ice fishing poles are equipped with signal flags. Similar girders can be used in the summer, but you need to figure out how to fix them on the water. For summer fishing, girders with legs are more suitable, which will require a minimum of modification.
How to make
- You need to take a suitable durable material in the form of a tube or strip. A piece of wooden stick with a cross-section of 50 by 50 mm and a length of 30-40 cm is suitable, which will serve as the basis of the girder.
- The flags are installed on elastic material, for example, a piece of an old, unnecessary tape measure or a vertical piece from a plastic bottle.
- The flag rod is attached to the end of the wooden blank using electrical tape or adhesive tape. If it is an old tape measure, then it is better to nail it with small nails.
- Somewhat lower, a small inertial reel, similar to the one used on a regular float fishing rod, is attached to a wooden base. It should be secured so that when scrolling, the rod with the flag can straighten.
- The main line is wound onto the reel. It should be 15-20 m.
- A locking ring, a sinker and another locking ring are attached to the end of the fishing line.
- A swivel is attached to the end of the fishing line.
- A metal leash with a hook is connected to the swivel.
- The zherlitsa is attached by means of a wooden base to a stake or tree driven into the bank.
Summer zherlitsa with your own hands !Without the cost!
Grandfather's homemade winter donka: assembly diagram
The only condition for this donkey is the presence of a current in the reservoir.
And one more difference from the girder - 2 sinkers are used.
The first and lightest weighing 5-8 grams. It helps to dissolve our catchy gear downstream.
The second and heavy weighing 20-30 grams. It presses our tackle to the bottom - it lays it along the surface of the bottom.
These sinkers are sliding ones. They move freely and easily along the line. And either carabiners or the most ordinary lead pellets serve as limiters.
The only thing is that the heaviest sinker moves more freely than the lighter sinker. And the sinker should be equipped with cambrics inside so as not to damage the fishing line.
And in the assembly scheme for such a winter donkey, as many as 3 leashes take part!
The first leash is tied to the end of the fishing line. It is located before the first light sinker. And the other two leashes are tied higher along the line, further from the limiting pellet of the first sinker.
Read Fishing knot “Carrot” and “Albright”
Another advantage of such a cunning old-fashioned donkey for catching winter fish is that you can attach different attachments to these three leashes. This way the chances of being caught will be higher.
More often, live bait, pieces of fish and a worm are baited at once.
On ice, you first need to lower the first leash with a light sinker into the hole first and gradually slowly release the rest of the tackle, while holding the heavy weight in your hands. The current will pick up our tackle and carry away the leashes with the first sinker.
When the current drains 5 meters of fishing line, you can smoothly lower the large sinker.
You can try this: cast out more fishing line and then tighten the tackle.
Such a donka is placed on the ice in spacers in the form of wire flyers. They cling to the fishing rod and prevent the fish from being dragged away.
I borrowed this winter donka and the diagram for its assembly from the book by Konstantin Storozhev “Do-it-yourself fishing tackle and hunting equipment. Manufacturing and repair."
So this is not all fiction, but an experienced opinion!
Follow my channel - it will be even more interesting!
Some features of fishing with girders
For beginners, the following instructions may be useful:
- The load must be such that the live bait can move only in a certain area of the reservoir. Otherwise, he can simply hide in nearby thickets.
- The stake to which the pier is attached on the shore must be of sufficient length. If the stake is dry, it should be tested for strength. It would be a pity if it couldn’t withstand the pressure of a serious specimen.
- If the bottom is rocky, then the girder can be tied to a stone, while the girder itself can be on the surface of the water.
- The fixation of the fishing line should not be noticeable to the pike. If she feels resistance, she may refuse to bite and spit out the bait.
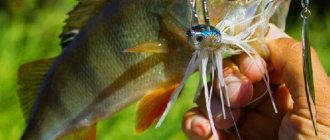
- Live bait is placed on a hook in the area of the upper fin, although there are other ways to place a fish on a hook. This is especially true when fishing in the current.
In summer, fishing on the girders is divided into fishing from the shore and from a boat.
- When using an empty plastic bottle with a volume of 1.5-2.0 liters, our water bottle can easily replace an expensive mug. This method is popular in the Lower Volga. Active fishing requires constant movement around the water area and hooking after the second jerk. For other predators, you can put live bait on the bottom. An interesting method of fishing from a boat is by hanging girders on strong branches of bushes hanging over the water. From the shore, the girders are invisible and inaccessible.
- When fishing from the shore, we use ready-made plastic rods. In remote places it is easier to cut a rod 3-5 meters long from coastal bushes or trees. It is imperative to fix the butt part in the ground or tie it to the bushes.
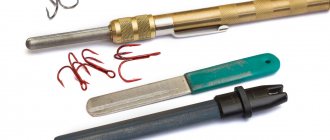
When fishing for pike, it is necessary to have a gapper and an extractor to safely remove the fish from the hook. A bottle of iodine and an adhesive plaster wouldn't hurt.
Ivan Nazarov — Specially for Samodelki FISH
- How to quickly and easily make mugs for pike fishing. Optimal balanced sizes
- Why do you need a hard leash when fishing for pike?