Wrong many are already familiar with such a device as a downrigger. And many have seen him either on TV or live with advanced fishermen. But the idea that you can easily make it yourself probably hasn’t occurred to many people. But first, I would like to make some clarifications for those who are just at the beginning of their fishing journey and do not understand what it is and what it is eaten with.
A downrigger is a device that allows you to fish at certain depths. It is used for fishing from a boat. Thanks to this device, we can carry out the bait at any depth at our request, but more often the wiring is done at the depth at which the fish is located.
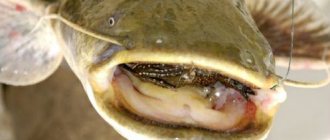
As you already understand, this type of gear is most often used for fishing in bodies of water with great depths such as the sea or deep lakes. It is used to catch fish such as trout, salmon, catfish, pike perch, and other deep-sea fish.
How to make a weight for a downrigger with your own hands
I would like to separately specify the shape of the cargo. The downrigger is just gaining momentum in Russia, but in the Scandinavian countries it has been used for a long time and during its use, fishermen managed to make their own adjustments to the shape of the load. So, over the years of operation, three almost ideal shapes were developed: an oval, an ellipse, and also a round shape into which a kind of feather fin is inserted.
When making homemade products, it is worth considering that there are restrictions on the weight of the load: 500 grams for every five meters of bait depth. That is, for comfortable fishing at a depth of 10 meters, we use a load of 1 kg.
Making such a load yourself is very simple: just take a small piece of clay, make a semicircular depression in it and fill it with hot molten lead. After it has cooled, take it out and sand it a little to remove any unevenness. Then make another half identical to the first. The two halves can be connected to each other with bolts after making holes in the load.
It is advisable to recess the bolt heads in the load so you will avoid unwanted snags when wiring. Insert the rudder feather between the halves. This will give additional durability to the bait when casting it at depth. But that’s not all, you still need to make several holes in the load for attaching the main cable, for attaching the cord with a clip, and for attaching additional weights. After collecting it, you need to paint it in the color of the bottom of the reservoir on which you will fish.
Downrigger device
The principle and design of this device are familiar to many. Therefore, I will not explain in depth. By lowering the weight on the cable, we thereby get the opportunity to deliver the bait to the desired depth. Downriggers are produced by not many companies, and each of them makes them different from all the others, while maintaining the principle of operation. Of those that can be found on our market, Big Jon, very popular in Canada, stands out. They do not have a bulky plastic case, they have a minimal set of structural elements, but the entire structure is made of high-strength alloy, therefore it is durable and reliable. The differences between models are usually based only on their size and power. For a larger boat, it is preferable to have a larger downrigger, and for greater depths it is better to be able to use a larger weight. This ultimately allows for a powerful downrigger.
Another difference is the presence or absence of an electric drive. Therefore, all downriggers are divided into electrical and mechanical. Obviously, the former are more expensive. An electric device raises and lowers the weight by turning on a motor that rotates a drum with a wound cable. The larger model, and therefore more expensive, makes this operation faster with a larger kettlebell. Can we say that this is critical for fishing? Perhaps not in the case of Lake Onega.
You can also fish using a mechanical model. However, fishing is also about comfort. When purchasing a good boat, equipping it with modern equipment, installing navigation devices, we still realize that each device or piece of equipment by itself will not catch fish, but in general they make fishing more comfortable and convenient. It's like clothes. You can fish in chemical protection and cotton pants, or you can wear a modern suit made of breathable materials, purchased from a specialized workwear website.
In general, our clothing does not affect fishing. Although there may be exceptions here, because when you feel comfortable in bad weather conditions, you pay more attention to the operation of the gear, and you are more willing to make changes, if any are required. It’s the same with a downrigger: there’s no problem lifting a weight from a 30-meter depth by hand, but you won’t want to do it again. It's another matter when you just need to press a button. Such, it would seem. minor points ultimately have a major impact on the final result.
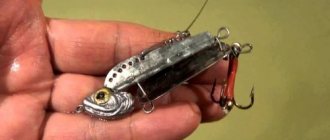
In addition to the device itself, it is necessary to note other devices that take part in the downrigger equipment. First of all, there is the kettlebell itself. At first glance, its function is simple - to sink quickly, and the length of the cable will not allow you to do this too quickly and will stop the weight at the desired depth. However, it’s not just the weight of the kettlebell that matters. For fishing conditions in Lake Onega, 2.5-4.5 kg is quite enough, depending on the period, provided that the shape of the weight is streamlined, if possible with a stabilizer tail. In this case, the load does not sail too much and goes smoothly
This is very important, especially if 2-3 gears are installed on one cable
Many people attach the weight directly to the cable using special carabiners. This is not entirely correct. During the swing, when lifting the weight, and especially during installation of the first tackle, the weight practically jumps out of the water. At such moments, the load on the tackle increases, moreover, you can easily damage the side of the boat. To avoid such troubles, a special shock-absorbing leader is used. These are sold in fishing stores.
Read Recipes for feeder bait for different fishing conditions
Like gliders, all gear is attached to the cable using special clips, which are divided into cargo and cable clips. The first ones are attached directly to the downrigger weight using a fastener. Cable ones are installed in the designated places on the cable. After the bite, the fishing line shoots out of the clip, which remains on the cable. Therefore, after each bite you have to lift the downrigger weight, loading the gear with new ones. And if the bite is good, you can easily compare which model is more convenient: mechanical or electric.
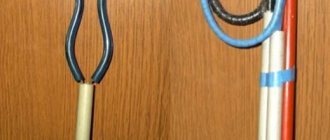
Making a clothespin clip for the downrigger
Now let's move on to another component of our masterpiece - the clip. The clip holds the line and helps set the depth of the bait's working area. It also helps ensure that our bait stands in front of the load and does not get tangled on the main cable.
Clips are divided according to the type of fastening. There are those that are attached to the torso, and there are those that are attached to the load.
When making a clip, you should take into account several parameters, such as the force with which the clip will hold the fishing line and the tension force when opening the clip. Your catch often depends on these parameters. Understanding how to properly clamp a clip will come with experience.
Finding such a clip in stores is still problematic. Since this type of fishing equipment has just begun to gain popularity in Russia. In general, the purpose of the clip is to release the line in time for a bite.
Downrigger manufacturing process
The process of manufacturing a downrigger is that pre-fabricated parts and mechanisms are sequentially assembled into one special system, which will be mounted directly on board your boat.
Based on careful observations, the supply of fishing line directly under the input part on the line in the downrigger should be about 1-3 meters of the entire input length. At the same time, you need to assemble it using specialized working tools, since the downrigger must be secured and fastened very securely.
At the moment, in order to create for yourself the highest quality downrigger for a PVC boat, it is recommended to use the drawings, of which there are a lot on the Internet
But they are not all perfect, and at the same time, it is important to pay attention to the fact that now, thanks to the use of special equipment, it is possible to create the highest quality and most reliable universal downrigger for catching different types of fish. But the most important thing is to choose the highest quality and reliable spinning rods , which fully meet the requirements. This is due to the fact that you need to select spinning rods in strict accordance with all preferences - because if you choose the wrong rods for your downrigger, they will simply break under the load of tension and speed
This is due to the fact that you need to select spinning rods in strict accordance with all preferences - because if you choose the wrong rods for your downrigger, they will simply break under the load of tension and speed
Read: Catching grayling with a fly
But the most important thing is to choose the highest quality and reliable spinning rods that fully meet the requirements. This is due to the fact that you need to select spinning rods in strict accordance with all preferences - because if you choose the wrong rods for your downrigger, they will simply break under the load of tension and speed.
How to make a winch
For a downrigger, a special winch is used with a meter counter for the depth of the cable being lowered. But many DIYers use an electric car winch or invent something of their own. If you do not have the opportunity to purchase a winch with a drive, then you can make a winch with a mechanical drive, which will not affect your catch at all.
In order to make a winch with your own hands, you will need to take into account several factors; this will depend on how powerful the winch you need. If you plan to catch fish at shallow depths, then you don’t need a too steep and powerful winch.
You also need to think about the issue of attaching the winch to the entire structure. Watch the video on how to properly and securely attach a winch. Because if everything is not done well, you risk simply losing your winch while fishing, and believe me, pulling it out from the depths will not be very easy. Therefore, as the popular saying goes, measure seven times, then cut.
How does a downrigger work?
This device includes 5 main components. Eg:
- Coil.
- Special device for fastening.
- Cargo.
- Clips.
- Rod holder.
If the device is equipped with a cord rewind counter, then it will be a more modern device that allows you to control the fishing depth. It is also possible to mount an electric drive on it, which will speed up the operations of raising and lowering the equipment into the water column. The operating principle of the device is as follows:
- First, the device needs to be secured. Fastening is carried out using a special clip. If the device is not secured correctly, it will not work properly. Also, if the device is not securely fastened, it may fall into the water.
- Then the tackle is lowered into the water to the required depth. A sinker and a spinner will help you do this; you just have to wait a while until the fish swallows the bait.
Before this, you need to find out the depth at which the fish is located. In this case, it is better to use an echolocator.
How to assemble a downrigger at home
In order to correctly and efficiently assemble a downrigger with your own hands, follow the following instructions.
Assemble all the parts and check their workmanship.
Collect everything sequentially and slowly. Check the drawings. Check the attachment of the downrigger to the side of the boat. There should be no backlash or wobble. He must sit tight.
Making a clip
a clip for trolling with your own hands from an ordinary clothespin . Such clips hold well on the fishing line and work no worse than commercially produced trolling clips.
Manufacturing will not take much time . Instructions for making a clothespin for trolling with your own hands:
- first of all, you need to put rubber tubes about 1.5 cm long on the jaws of the clothespin (they can be cut from sealing rubber);
- the next step is to make a lock to attach the clothespin to the cord; it can be bent from ordinary stainless steel wire with a thickness of 1-2 mm.
The clip is attached to the cord so that the fastener lock faces down and the free tab of the clothespin is on top.
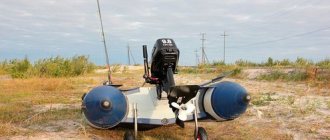
Downrigger based on auto window lifter
Here is a video example of how you can assemble a downrigger based on a car window lifter. Everything is done quite simply.
To ensure that your gear works without interruptions, compare, take several drawings of which there are a lot on the Internet and read reviews for them. Remember, even though this is a manual assembly, the parts for it are still not cheap.
Another piece of advice regarding spinning rods should also be selected based on the weight of your load. Try to choose a high-quality spinning rod that can withstand the weight of the load you are using. Otherwise, during the first fishing, the spinning rod will shatter into pieces, which is also not very pleasant.
Otherwise, follow the drawings and your heart and you will succeed.
Downrigger design
A device that is essentially reminiscent of a simple winch with a small reach and a pulley at the end. The downrigger is rigidly attached to the transom or side of the boat. Consists of the following main elements:
- Volumetric drum with a handle for winding the cable and a stopper function. On more advanced models there is a depth indicator in meters.
- The thickness of the downrigger cable depends on the degree of its load and the intensity of the current. For convenience, marks can be placed on the cable indicating the amount of immersion.
- A load, usually drop-shaped, is suspended at the working end of the cable. Its weight is directly dependent on the fishing depth. Approximately, for every 10 m of dive, the weight of the downrigger load is increased by 1 kg.
- At 35 - 45 cm from the load, a very important piece of equipment is attached to the cable - a clip (clothespin) into which the fishing line is tucked.
- The rod itself (usually a powerful spinning rod) is inserted with the butt into the holder, next to the downrigger.
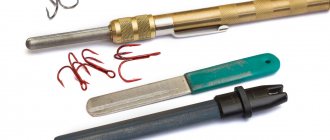
Photo 1. Downrigger kit.
Thanks to the many models on the market, every angler can choose the most suitable downrigger for himself. The only differences are in their sizes and materials. The most expensive models are equipped with an electric drive and a gear depth counter. Canadian manufacturers are rightfully considered the leaders in this industry.
How to significantly increase your fish catch using a downrigger?
Using a downrigger can really increase the number of fish caught, which is why many anglers make it. Fishing performance increases thanks to the following features:
Fishing has always been valued among the stronger half of humanity. This is due to the fact that you can not only relax, but also provide your family with fish. Recently, fish as a product has become much more expensive, but it is needed to replenish the human body with vitamins and microelements. In addition, fish is an easily digestible food that does not negatively affect the gastrointestinal tract. Unless personal intolerance to this product may become an obstacle to its use.
Source
How to significantly increase your fish catch using a downrigger?
Using a downrigger can really increase the number of fish caught, which is why many anglers make it. Fishing performance increases thanks to the following features:
Fishing has always been valued among the stronger half of humanity. This is due to the fact that you can not only relax, but also provide your family with fish. Recently, fish as a product has become much more expensive, but it is needed to replenish the human body with vitamins and microelements. In addition, fish is an easily digestible food that does not negatively affect the gastrointestinal tract. Unless personal intolerance to this product may become an obstacle to its use.