How to make feeder stands with your own hands
Knowing the basic modifications and principles of operation, you can quickly and inexpensively make feeder stands with your own hands.
For this purpose, resourceful and savvy fishermen adapt improvised material, which in most cases can be industrial waste, and therefore have a fairly low price. Another positive side of homemade fishing is the fact that by doing this creative work, the fisherman produces a product that satisfies his own needs, according to his own requirements and nuances in fishing tactics. We will present some examples of self-made feeder holders to the reader as a continuation of the article, versions of which can become the right guideline for the creative activity of every fisherman.
Wire frame stand
The fastest and cheapest way to get a stand is to make it from a wire frame. In addition to wire, a plastic household clothes hanger or old car wipers that have served their time are ideal for these purposes. To complete the work, you will need soft wire 3–4 mm thick, from which you should bend the frame to the desired size and shape. The rigidity of the structure will be ensured by soldering the two ends of the wire bent into the product, after which the angler will receive a solid product.
Having determined a point for fastening on the vertical central axis in its lower part, using the same soldering method, the wire frame is connected to a nut prepared in advance, the threaded connection of which will allow the stand to be installed on a single stand, or the feeder tripod can play the role of a support for such a case. At the end of the work, the wire frame is wrapped with insulating or heat-shrinkable tape to prevent deformation of the gear placed on it.
Butt holder
In the second option, we will present to the reader a method for manufacturing a butt holder, which, like the first option, is not difficult or expensive to implement. To carry out the work, you will need to stock up on a piece of polyethylene sewer pipe with a socket with a diameter of 50 mm and such a fitting, from the same set for plumbing communications, as a plug. These parts will be the basis of the homemade product, and all that remains is to attach the pin holder to them.
A pin holder for a homemade feeder stand is made from a metal strip, cutting off one edge at an acute angle, which will stick into the ground. The metal strip is attached to the polyethylene pipe with rivets. The length of the finished product, taking into account the pin, does not exceed half a meter.
Rod-under your own hands
At the end of the article, we present a method for inexpensively manufacturing a rod-pod type feeder stand. In this case, as in the second option, we will borrow the parts of the design blank for the holder from the plumbing industry, using material for installing water pipes from polypropylene pipes. For a plumber who is interested in fishing, performing such work will not be difficult at all.
In addition to purchasing a pipe with a diameter of 20 or 25 mm, as well as the corresponding diameters of the fittings, you must have equipment for soldering polypropylene pipes and special scissors for cutting the material. It’s easier to do the work if you have a clear example in the form of some model of a real factory rod-pod. Dimensions are taken from it, transferring them to blanks made of polypropylene pipe, which are soldered into the structure using connecting parts of various configurations.
Under the bed frames, brackets are used to fasten the pipes, placing them at optimal distances. Often, for a support, it is wise to purchase a factory-made tripod with a function for setting the angle of rotation of the upper mounting platform, which will allow you to provide the homemade product with wider functionality. As a result, they get a light and compact, non-deforming, homemade rod-pod for fishing at a low price and with the capabilities of a full-fledged factory product. Using the same algorithm, you can successfully create a buzz bar, subsequently enjoying all the delights and comfort of feeder fishing.
This is interesting: Holder for a spinning rod for a boat (PVC), how to make a stand for a fishing rod with your own hands - let’s look at it carefully
Butt holders
Butt holders are primitive devices that hold the rod in a given position by the handle. They are made of rigid wire and the main advantages are compactness and light weight, that is, ease of transportation. The holders can be installed in any damp soil, but they cannot be fixed on concrete or wooden surfaces.
But the most serious drawback of butt holders is the instability of the rod blank and in low winds it is difficult to see a bite, if in principle it is possible. The holders are used by bottom fishers who like to fish at night on a still body of water, when there is practically no wind and the current does not interfere with seeing the bite.
Homemade stand for feeder fishing rod
If you don't want to spend money on a feeder rod stand, you can design one yourself. A do-it-yourself feeder stand among fishermen is usually constructed from ordinary metal wire (up to 7 mm thick). With it you can make racks for one or more fishing rods.
To prevent the rod blank from wearing out and ruining its appearance, the wires are wrapped with electrical tape or simple tape.
We cut off the hook of the plastic hanger, wrap the lower part with threads at a distance of 5-7 cm and lubricate the coils with high-quality glue. To change the tension of the fishing line, it will be enough to simply move the tackle along the stand. The upper end of the rod is perfectly fixed on such a stand, and with the help of a small, quiet bell, you can install a bite alarm.
To holder the rear end of the rod, you can cut the base of the hanger (bottom bar) and insert a plastic tube in its place. Its length should be slightly longer than the cut piece so that the tube fits into the hanger with tension. A rod (suitable from an old cornice) will be inserted into the upper part of the former hanger, which can be secured with a lamb. This rod must be inserted into an ordinary rack. A similar design is suitable for the front end of the feeder, but so that the feeder can be secured there in the desired position, bones from accounting accounts can be inserted into the tube.
Another option if you know how to use welding or you know a welder. Take a metal rod up to 10 mm thick. From a rod you need to weld an ordinary spear, at the top of which there will be a U-shaped holder. It is better to wrap this cutout with tape, electrical tape or rubber. The disadvantage of this option is that on a rocky shore you will need a bucket of stones to keep the structure firmly in place.
Homemade stand for feeder
If it is not possible to purchase stands for the feeder in the store, then you can make homemade stands for any spinning rod. Most fishermen make stands from metal wire, the diameter of which is on average 5-6 mm. You can make a single support or a structure with several supports and designed for 2 or more fishing rods.
Be sure to wrap the places where the fishing rod comes into contact with the wire with electrical tape. Or you can put a cambric on the wire. You can choose different lengths and diameters, depending on the size of the structure you are going to make.
A tripod can be made from a plastic hanger. To do this, just remove the hook and cut off all excess. The lower part should be carefully wrapped with thread, which is filled with glue for strength. This type of winding on the hanger should be done every 5 centimeters.
Thanks to this, you can easily fix the spinning rod in the desired position and move it while fishing, as well as adjust the line tension level.
For night fishing, you can make another version of the feeder stop, where a regular bell attached with a clothespin will act as a signaling device. You can install the bell on any stand that is available.
Structures for holding a feeder rod are much cheaper than store-bought devices, especially when compared with a rod-pod. Homemade racks will cost very little, and if you try, the result will be the same as using professional equipment.
Interesting! Some models of feeder stands, which are branded equipment, can cost up to 20 thousand rubles.
Supports for feeder rods
When fishing with feeder gear, the use of stands is a must. This is explained by the fact that the stretched fishing line should transmit any touch of the fish to the bait to the tip of the rod or bite alarm.
Therefore, the rod must be in a stationary position and not move due to gusts of wind or the angler’s movements along the shore
In addition, the stand should facilitate comfortable fishing, which is important for long-term fishing
Types of stands
The oldest supports are wooden pegs that can be cut right on the shore and stuck into the ground. Such spears and flyers can still be found left on the shore today. In addition to causing damage to surrounding bushes and trees, such stands can also damage an expensive fishing rod, especially at the time of hooking. Another significant drawback may be the lack of suitable vegetation for making a spear.
Butt rod holder for shore
Some anglers use butt holders, which hold the rod by the handle. But in strong winds, this method of attaching the feeder does not allow you to see the fish biting, because the upper part of the fishing rod is unstable. Butt holders are also driven into the ground, so they cannot be used everywhere.
For feeder fishing, it is better to use modernized single stands made of aluminum alloy or stainless steel. Such stands are convenient to use when fishing at different points. Racks come in either one-piece or two-piece, which can be adjusted in height. It is best to use such racks in pairs. One is installed under the butt part of the rod, and the other is closer to the tip. The main advantage of single racks is the ability to install rods at a considerable distance from each other. In this case, when fishing for large fish, the neighboring tackle will not interfere.
The main disadvantage of the racks is the impossibility of installation on a rocky shore, on asphalt, on wooden flooring, etc.
The most versatile and convenient stands for feeder gear are the pods. They can rest on a tripod or on 4 vertical posts. Tripod structures have one hinge joint and are unstable.
Rod Pod - a multifunctional rod stand with built-in bite alarms
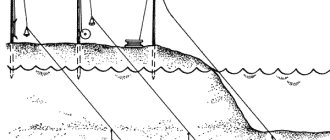
The most convenient stands for several fishing rods will be a type of pod with 4 vertical posts that are adjustable in height. This stand can be installed on any shore by placing the fishing rods at the desired angle to the shore. On a still body of water, the rods are positioned parallel to the shoreline, and on rivers with strong currents, the upper part of the feeder is much higher than the butt. Additional rear holders and bite alarms can be mounted on such stands.
The disadvantages of this type of hearth are the bulky design, the need to spend time on assembly and disassembly, and the high price. When fishing for large fish, it is necessary to take out the remaining fishing rods so as not to tangle the gear.
Making your own coasters
Stand made of hanger with a bell
The most popular material for making stands among fishermen is metal wire with a diameter of 5-6 mm. It can be used to make both single stands and stands for several fishing rods. In order not to damage the form of the feeder rod, the areas of contact between the stand and the fishing rod are wrapped with electrical tape.
If you show a little imagination, you can make an excellent stand from a plastic hanger. You need to remove the hook from it and cut off the excess elements. On the lower part of the hanger, a thread is wound (each turn is treated with glue) with a discreteness of 5-7 cm. The rod will not only be fixed, but it will be possible to change the tension of the fishing line by moving the tackle along the stand.
For night fishing, a bell on a clothespin is additionally suitable. This bite alarm can be easily installed on a stand so that the rod touches the bell.
The cost of homemade products is often limited to 50-100 rubles, while the price of a branded pod reaches up to 20,000 rubles.
The use of stands for feeder fishing is an objective necessity. A good stand extends the life of the rod, allows you to see the bite in a timely manner and make a hook. Which option to choose depends on the fisherman. Some people can buy a kind for themselves, while others prefer a homemade design. The main thing is that the stand performs the functions assigned to it.
Making your own coasters
Stand made of hanger with a bell
The most popular material for making stands among fishermen is metal wire with a diameter of 5-6 mm. It can be used to make both single stands and stands for several fishing rods. In order not to damage the form of the feeder rod, the areas of contact between the stand and the fishing rod are wrapped with electrical tape.
If you show a little imagination, you can make an excellent stand from a plastic hanger . You need to remove the hook from it and cut off the excess elements. On the lower part of the hanger, a thread is wound (each turn is treated with glue) with a discreteness of 5-7 cm. The rod will not only be fixed, but it will be possible to change the tension of the fishing line by moving the tackle along the stand.
For night fishing, a bell on a clothespin is additionally suitable. This bite alarm can be easily installed on a stand so that the rod touches the bell.
The cost of homemade products is often limited to 50-100 rubles , while the price of a branded kind reaches up to 20,000 rubles.
Feeder fishing (video) - watch a collection of videos about feeder fishing. Secrets of preparing bait, choosing a bait and fishing location from professional feeders and more.
The use of stands for feeder fishing is an objective necessity. A good stand extends the life of the rod, allows you to see the bite in a timely manner and make a hook. Which option to choose depends on the fisherman. Some people can buy a kind for themselves, while others prefer a homemade design. The main thing is that the stand performs the functions assigned to it.
DIY feeder stand
The feeder stand is simply an irreplaceable thing for fishing. If you forget it at home, your fishing trip may turn out to be unsuccessful. Every fisherman has several stands in his arsenal. Some models were more suitable or liked before, some are used more often now.
Breakage of stands occurs more often due to careless transportation. But working stands are often replaced with more convenient ones.
Such “holders” for fishing rods can be easily made with your own hands. To do this you need very little material, tools and skillful hands.
Let us remind you that we have already published an option for making a comb for a feeder with your own hands. Now we are publishing a few more.
The first video about an unusual and simple form of a do-it-yourself feeder stand. As you can see, the design is different from those bulky stands that we are used to seeing. This is its plus and minus.
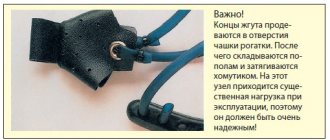
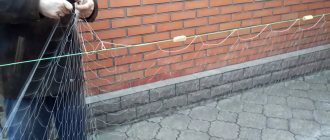
This design consists of two parts. The base is bent steel wire with rings at the ends. The middle part, the one on which the feeder is placed, is suspended on ordinary bank elastic bands. It is not difficult to bend such a wire with your own hands. The main thing would be the desire, and the skill, even if it is not enough, can be developed.
We get a very sensitive model. Any bite on the feeder, even from the smallest fish, is instantly transmitted to the moving part and to the bells.
For this design we will need:
- A piece of rigid wire, a metal rod (4.6 mm in diameter);
- Bank rubber bands (light colors are better, dark rubber fades faster in the sun and loses its properties);
- Bells;
- Tools: pliers, vice
Stand made of polypropylene pipe on video
The design of the stand made of plastic pipe can be called a classic. Alexander Kumerkin, in our opinion, offers one of the optimal manufacturing options.
We will need:
- Polypropylene pipe for water supply (16-20mm) 45-50cm long for cold water.
- Thermal insulation (insulation) for a pipe of the same length.
- Technically, hair dryer, burner, gas burner.
- Nails, self-tapping screws, for fixing.
- Stick for installation in the ground. You can use any suitable one, or you can take it from a purchased stand.
- Form (blank) - a board with nails driven into it according to the diagram below (needed to shape the pipe).
Polypropylene pipe is very easy to process by hand. It is enough to heat the desired place on it for about a minute, and it becomes soft. After this, you can give the desired curvature and fix it in this position for about a minute. After cooling, the pipe regains its previous strength.
For the stand we make a blank on the board, as shown in the diagram. On such a workpiece the pipe will be well fixed in the desired shape. The scheme is conditional. A feeder lover can choose the length and width he needs, the shape of the stand, and make it with his own hands.
We mark the required places for bending on the pipe. We warm the first place on the future stand for the feeder. It takes about a minute to heat up. We install the pipe into the workpiece, fix it with a nail or self-tapping screw. Give it a minute or two to cool. We pull it out and repeat the procedure for the next bending place. We cut off the excess pipe.
To attach the stick, drill a hole in the middle of the stand on one side. A stick is inserted into this hole for fastening. For ease of use of the feeder stand, we cover the pipe with insulation (insulation).
Another video on how to make a stand for a feeder. This time the author is modifying the finished stand by installing an additional clamp made of thick steel wire on it.
As a result, we get two places on one stand for installing a feeder or another fishing rod. It is not difficult to make such a design with your own hands.
Making a tripod for a pot with your own hands from scrap materials
A device for placing a pot over a fire is called a taganok. Tagankas on three supports are:
- In the form of three long poles. They are stuck at one end into the ground. The upper ends are connected by a pyramid. A hanger for the pot is attached to the top.
- In the form of three supports connected by crossbars, a ring or a lattice. A cauldron or cauldron is placed on top.
Although today another device is called taganka, with a horizontal surface-grid on which a pot is placed, like on a stove.
The structure on three supports is more stable than on two slingshots. To hang a bowler hat, experienced tourists take with them a chain or rope with hooks. A steel pot hanger holds the ends of the poles together.
The pot is hung on hooks at different heights. This is how the temperature is reduced or increased. On a tripod it is convenient to cook in a round cauldron with a spherical bottom.
Experienced fishermen and tourists know how to make a tripod for a pot with their own hands. Young trees are cut down onto poles. The tops of the poles are tied with thin branches. The pot hanger is cut from the fork of thick branches. Sometimes trees standing close to each other are bent down and their tops tied together.
A wooden tripod is made from freshly cut trunks. Dry poles burn out. Not everywhere it is allowed to cut down trees. That’s why metal Tagankas are taken on hikes.
A homemade tripod for a pot lasts for years. Tagankas are made from fittings, metal corners and tubes in garage workshops. Long supports are carried in the trunk. For carrying in backpacks, the supports are made collapsible.
Before installation, the support segments are connected with bolts, couplings and other types of fasteners. Telescopic supports are made from pipes of different diameters.
Types of feeder stands
Fishing practice has shown that the following types of feeder rod holders are most widespread:
Wooden spear
The most ancient version of a rack for any type of fishing rod - both float and bottom. The convenience of such a stand is that it could be made directly on the shore of a reservoir by cutting a branch up to one meter long with a branch at the end from a nearby bush.
The main difficulty was the bark burrs, which often caught the line when the fishing rod was raised sharply. To avoid such troubles, the branch had to be sanded.
The disadvantage of a wooden product is that you have to spend time searching for a suitable material, that is, rely on chance, and cause harm to nature.
Particularly advanced fishermen made bamboo stands by splitting the top part, and then using hot water or steam to give the top the desired tulip shape. Such racks weigh little, but periodic getting wet and drying leads to cracking. Therefore they are very short-lived.
Butt holder
This type of feeder stand is a metal structure that holds the fishing rod by the handle. The holder itself can be plastic or wooden, but the pins driven into the ground must be steel.
The disadvantages of this fishing solution are obvious:
- unstable position of the tip - even with the slightest wind, due to the low center of gravity, it will sway and poorly register a bite,
- to hook a fish, you must first remove the form from the holder, which wastes precious time,
- The shore may be rocky, and it will not be possible to insert the metal pins of the stand.
You can make such a device yourself if you have a welding machine and a set of metal wire with a thickness of 6 mm or more at hand.
Rack
The most common stand for a feeder rod. It is an aluminum or steel tube, one end of which is stuck into the shore, and on the other there is a plastic spear, designed for only one fishing rod.
Execution is possible in the following options:
- one-piece (non-sliding),
- telescopic (sliding and adjustable in height due to this).
The convenience of such devices is that they can be placed at any distance from each other and adjusted in height
As a result, the rod is successfully installed at an angle, which is important in the current. On lakes and ponds, it is required that the fishing rod be at the same height along its entire length, but at an angle (or parallel) to the water's edge
This is also easily achieved with two single posts.
There is only one drawback: this stand cannot be used on rocky shores.
Types of single stands for feeder fishing
It is easily manufactured independently, and its products are in no way inferior to factory-made devices.
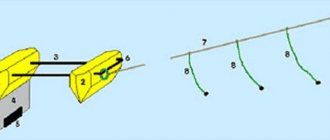
Rod-under
The modern technological type of supply called rod-pod is a complex structure. At the base there is a central tripod for the feeder or a pair of stands on two legs, on which several holders (from one to six) are mounted.
Each fishing rod is placed on two fork holders, the height of which can vary. When fishing for carp, the front fork is replaced with an electronic signaling device.
Advantages of the rod-pod:
- You can place 2 or more fishing rods on one stand,
- there is no dependence on the soil on the shore, since the base is a tripod or other mechanism that does not require digging into the ground or bottom,
- you can raise the tip of the rod, leaving the butt at the same height, which is convenient when fishing with a feeder in the current.
Flaws:
- it takes a lot of time to assemble the mechanism,
- bulkiness,
- high price of the device,
- It is difficult to make a convenient design yourself.
A rod-pod stand is a complex design that allows you to hold rods motionless. When feeder fishing, more than 2 rods are rarely placed on a rod-pod. The fact is that due to flexible forms, when catching carp or carp, you have to remove neighboring fishing rods when catching a large trophy, so that when catching a large trophy you do not collect neighboring gear. This contains another significant drawback.
You can also make a similar stand yourself using available materials. Read about this in this article.
DIY tripod for a pot
You will need a place to work with metal, a garage or workshop.
| Materials | Equipment | Tools |
| Steel angle or rod with a diameter of 10-15 mm Chain S-shaped hooks | Welding machine Drilling machine Bench vice Grinder | Hacksaw (disc) for metal Files |
Manufacturing of supports:
- The rod is cut into pieces of the required length. The dimensions of the supports depend on the volume of the boiler.
- An end 50-100 mm long is bent 30 degrees relative to the axis of the rod, or welded to the ends of the loop supports.
- Remove burrs with a file.
Options for manufacturing and installing a pommel with a suspension:
- Holes are marked on the metal plate. The centers of the holes are on the same circle. Diameters at an angle of 120 degrees.
- Drill holes. The diameter of the drill is selected so that the rod can be inserted. In the center of the plate, a hook for hanging is welded or attached to the thread. To install the tripod, the bent ends are inserted into the holes of the top. This is one of the most stable Taganka designs.
- A ring is threaded through the loops at the ends of the supports. The advantage of the design is that the height of the tripod can be adjusted. If the supports are moved wider, the pot goes lower.
The finished Taganka is tested. Before going on a trip, you need to determine how much weight the homemade structure will support.
The tripod is stable on any flat surface. For rocky terrain this is the optimal solution.
Lure and bait for feeder fishing
Today, no matter what kind of fish is fished with a feeder, every fisherman can choose from the following variations of complementary foods:
- Complementary foods purchased from a specialized store.
- Mixed (made) at home.
- A combination of store-bought and homemade complementary foods.
“Store” bait has two advantages:
- Excessive odor.
- And the ability not to saturate the fish, but only to “awaken” its appetite.
Of course, preparing complementary foods at home is cheaper, but experienced fishermen recommend mixing store-bought and homemade mixtures; the effect of such fish food will be much higher.
As for bait, the choice here is quite large, but fishermen more often use:
- A piece of a worm.
- Maggot.
- Barley.
When choosing bait for feeder fishing, you need to take into account what time of year the fishing will take place, so if in winter many fish feed mainly on animal food, then in the summer they switch to “green” food.
DIY stand for feeder rod
Fishing is a favorite pastime for many of us, but everyone has their own preferences. There are several main types of fishing equipment aimed at catching a specific type of fish, and each of them has its own advantages.
Feeder gear was invented by amateur fishermen of Foggy Albion, but it also quickly became popular among us. The fact is that with the help of feeder equipment you can catch almost any peaceful white fish, even very large ones. If initially the feeder gear was focused on catching relatively small specimens, then over time its functions expanded significantly. Nowadays, not only bream or roach, but also large carp and grass carp and even silver carp are successfully caught using a feeder rod.
What are the advantages of fishing with feeder gear?
The advantages of this type of fishing lie in its compactness and mobility, because thanks to a small amount of equipment, the angler can move around the reservoir as needed in search of a promising place. At the same time, the use of feeder gear is justified both in currents and in still water, and in both cases it allows you to achieve very decent results.
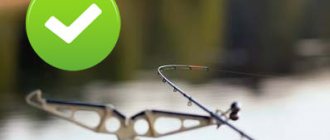
Perhaps the main feature of the feeder is that the registration of bites when fishing with such a rod is carried out using a quiver tip, a flexible tip that sensitively reacts to the bite of even the smallest fish. That is, after casting the rig, the angler needs to remove the slack in the fishing line and tighten it so that the tip is in a slightly bent state. In anticipation of a bite, the rod is placed on a special stand, and I would like to talk about the manufacture of such a stand in this article.
What are the requirements for a feeder stand?
The main requirements for such stands are:
- ease of use;
- strength;
- sustainability;
- durability;
- ease of transportation.
After casting and installation on the stand, the rod must be securely fastened, but it is important that in case of a bite it is convenient for the angler to make an instant hook and not give the fish a chance to escape
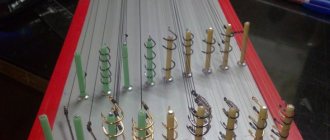
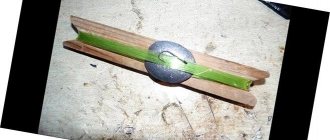
How to make a comb stand for a feeder
The simplest version of such a stand is the so-called comb, which can be made from scrap materials, and in this case the following is used:
- regular fishing stand;
- a piece of dense EVA material;
- a small piece of cornice for curtains or curtains;
- a screw for attaching the structure to the rack and a nut of the appropriate diameter.
First you need to cut a suitable size piece of EVA material from which the comb itself is made. The length of the comb is usually between 35 and 40 centimeters. In order for the waves to be even, when cutting them, instead of a regular knife, it is more convenient to take a thinner and sharper stationery knife or a regular drill. By using a drill with an attachment, you can achieve an almost perfect wave shape for the comb, and this will give you confidence that the rod will be securely fastened. If everything is done carefully and accurately in size, then homemade coasters are generally difficult to distinguish from branded ones.
The next stage is making the base for the comb, and for this, a piece of cornice of the required length is used. But before attaching the prepared comb to it, you need to make a hole in the middle and glue a screw with a diameter suitable for the washer of a standard stand. The screw will be more securely fastened if it is inserted into the hole and secured with a nut at the point where it comes out. After the screw is secured, you can install the comb itself, and it is absolutely not necessary to use glue, since the cornice will tightly fix the EVA material.
What to do if there are no suitable materials
In some cases, if some materials are not available, a tripod is used instead of a stand, and ordinary pipe insulation is used instead of EVA. The cornice can be replaced with a metal profile of the appropriate size, and the finished stand can be painted using a regular can of paint. Not only feeder lovers prefer to have such combs, because it is convenient to put fishing rods on them for both carp fishermen and fans of float fishing.
Making a stand for a feeder with your own hands allows you not only to save a certain amount, but also to create the most convenient design for each specific situation, of which, as you know, there are many when fishing.
What are the advantages of fishing with feeder gear?
The advantages of this type of fishing lie in its compactness and mobility, because thanks to a small amount of equipment, the angler can move around the reservoir as needed in search of a promising place. At the same time, the use of feeder gear is justified both in currents and in still water, and in both cases it allows you to achieve very decent results.
Perhaps the main feature of the feeder is that the registration of bites when fishing with such a rod is carried out using a quiver tip, a flexible tip that sensitively reacts to the bite of even the smallest fish. That is, after casting the rig, the angler needs to remove the slack in the fishing line and tighten it so that the tip is in a slightly bent state. In anticipation of a bite, the rod is placed on a special stand, and I would like to talk about the manufacture of such a stand in this article.
Trolleys
How do you like it?
Beach carts are generally very common among our ocean-spoiled colleagues, for example, here’s a smaller option:
Another small fishing beach cart
Working example of axle assembly
Or this. As you can see, the person is engaged in this masturbation clearly not from a lack of funds.
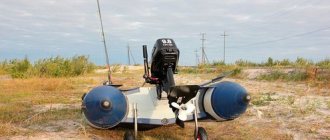
An option for a small cart is a canoe stand.
Another boat option.
Very miniature and durable design.
This topic has become so widespread among kayakers that on the English-language Internet you can find detailed instructions with a list of parts for purchase and self-assembly. For example, here is https://palmettoka. build.html
Tips and tricks
So:
- It is imperative to prepare a marker float; it will be useful for determining the water relief.
- Before you start fishing, you need to carefully feed the chosen place. To do this, it is not enough to give up complementary foods once; this action must be repeated at least ten to fifteen times. In this case, the fish will definitely not leave this place without attention.
- If the bottom of the reservoir where feeder fishing takes place has a muddy bottom, then you should not overload the feeder too much, as there is a high probability that it will simply get stuck here. In this case, it is better to use a feeder with wide sides and a longer leash than usual.
- Complementary foods used in bait and supplementary feeding should be as similar as possible. In this case, the fish will safely swim up not only to the bait, but also to the sharp hook.
- In order to notice even the slightest touch of aquatic inhabitants to the hook, you need to take a so-called bite alarm with you to feeder fishing.
No need to feed the fish anymore?! Now you just need to throw it into the water... For predators For white fish Read more...