Do-it-yourself marker float for the feeder - determine the depth and soil
A marker float is a piece of equipment that allows you to analyze the underwater topography of the bottom and make sure that you have chosen the right place for fishing, find flat areas or holes that you can feed and try to catch fish with a feeder or a float.
In order to find a suitable place for fishing, you will need to spend some time measuring the depths and relief using a marker float. You will find out what the depth is at each specific point of the reservoir and the nature of the soil: weeds, gravel, silt, shells.
Experience will come with practice for an angler who is not using a marker float for the first time - it will be much easier and faster to do all the necessary procedures, but there is nothing complicated in the equipment that will be discussed - and we will prove it!
You will need:
- Powerful spinning rod with dough starting from 30 g
- A spinning reel that holds 100 m of 0.25 line.
- Fishing line from 0.25 with a length of at least 100 meters.
- Sinker 25-40 g
- Marker float
Where to get a marker float: buy or make it yourself?
The first 4 listed components of the tackle are not difficult to find, but the marker float will need to be either made with your own hands or purchased.
You can buy a marker float at any fishing store. If you fish in still water, you don’t have to bother with the shape and size of the float. A 30 g float will be just right. But for fishing in the current, using a marker float is much more difficult. In a strong current, the likelihood that you will be able to measure the depth correctly is very low. It is necessary to use heavy loads (from 70-100 g) and floats of high load capacity, their shape should be spherical (barrel-shaped).
Making a marker float with your own hands
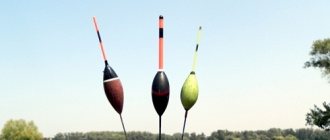
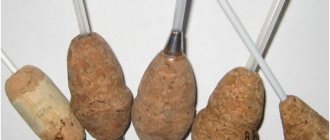
Marker float from a syringe (with rear tail and a swivel as an eye in the front part)
A piece of foam is the simplest version of a marker float. The rounder it is, the better, because no one has canceled the aerodynamic properties and it is important for us that the float in the water and on the surface of the water receives as little resistance as possible from the water flow.
A marker float made from a syringe is also a good option and attaching the float is very easy. One of the designs is to glue a swivel into the tip (we get an eye for tying the float to the tackle), and at the back we make a bright plumage from a dart, or simply paint the back of the syringe in a bright color.
Marker float made of wood - similar to foam plastic - you can plan a float from a piece of wood.
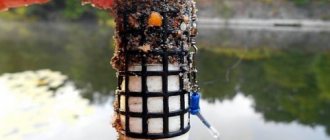
A plastic egg from Kinder Surprise is a very good float
Marker float from Kinder Surprise. A yellow plastic egg is perfect as a float buoy, but due to its very large carrying capacity, it is necessary to either fill it with water or load it with sinkers, otherwise your tackle will turn out to be too heavy and you won’t be able to throw it with a standard spinning rod.
The fishing line is attached to such a marker float very simply: a small object is tied to the fishing line, for example a swivel or a hook or just a bead. This item is inserted into the egg and the egg closes. The line is now tightly secured. But this is more of a “travelling option”. If you are preparing the tackle at home, it is better to make a hole with a hot needle exactly in the center of the bottom of the egg - insert the fishing line there and only then tie the stopper.
Making tackle
If we have all the components of the tackle with a marker float, we can start putting everything together.
We equip the rod:
- The reel is attached to the rod, then the fishing line is wound.
- The line is threaded through all the rings of the rod
Now we assemble the equipment itself with a marker float:
- We thread a sinker with a large eye into the fishing line. The eyelet should be free of burrs, so as not to injure the fishing line. The sinker should move easily and freely along the line.
- We attach a stopper 20 cm from the end of the fishing line. It is easiest to use a rubber or plastic bead, and it must be attached very firmly, it should not move along the fishing line. If you don’t have a rubber stopper at hand, as a last resort you can use a lead pellet, but it is much worse than a rubber bead, since it does not absorb the impact of the sinker well, and also greatly deforms the fishing line.
- A marker float is attached to the end of the fishing line using any reliable knot. Now the tackle is ready.
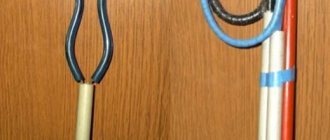
Design with a removed sinker and a free ring, which guarantees unhindered and free movement of the line through the ring
How to increase your fish catch?
Over 7 years of active fishing, I have found dozens of ways to improve the bite. Here are the most effective ones:
- Bite activator. This pheromone additive attracts fish most strongly in cold and warm water. Discussion of the bite activator “Hungry Fish”.
- Increased gear sensitivity. Read the appropriate manuals for your specific type of gear.
- Pheromone-based lures.
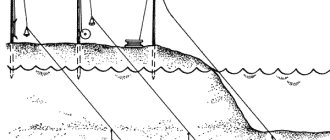
Technique for measuring depth with a marker float
- Everything is very simple. In order to measure the entire water area from you to, for example, 100 meters in front of you, you need to:
- Make a long cast of 100 meters and do not slow down the line, even after the tackle splashes down.
- Make sure that the line still has a chance to come off your reel and wait for the float to rise. If the float floats up, you can close the line guide and begin careful winding.
- We need the float to go deep to the very bottom (to the load), as soon as you feel when winding that you are no longer pulling the float to the bottom, but are moving the load along the bottom - stop.
- We take in our hand the line coming out of your reel. Open the line guide and select 1 meter of line from the reel. After every meter, we look to see if the float has floated up. If you have selected the fishing line 5 times (5 meters) and the float has not floated up yet, then the depth is greater than 5 meters. We select the 6th time and wait for the ascent again. Has it surfaced? This means the depth is slightly less than 6 meters.
This way you can deepen the float again, drag it 5-10 meters along the bottom and measure the depth again. As you can see, the marker float makes it possible to get a complete picture of the bottom topography.
Determining the nature of the bottom soil using a marker float
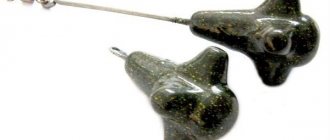
Using a marker float, a special sinker with spikes will help you determine what the bottom of a pond consists of. It is more sensitive to irregularities and by dragging it along the bottom, you will feel in your hand what signals the sinker is giving you.
- Soft dragging - silt or dirt
- Beats - pebbles
- Grinding - shellfish shells
- Tension and sharp jerks of the sinker - ground algae
Marker Float Video Tutorial
World champion in feeder fishing Alexey Fadeev demonstrates the capabilities of a marker rod for measuring depth and determining the nature of the bottom.
We will be glad to hear your experience of using marker floats, what you made them from, or what brands of floats you recommend purchasing.
Poachers who caught 318 kg of fish were not punished
A group of fishermen revealed the name of the secret bait during interrogation.
Category: Regional news,
MORE DETAILS
primanki.com
Where to get a marker float: buy or make it yourself?
A marker float is not the best method for determining the fishing point. Why did he give in to wireless technology?
The first 4 listed components of the tackle are not difficult to find, but the marker float will need to be either made with your own hands or purchased.
You can buy a marker float at any fishing store. If you fish in still water, you don’t have to bother with the shape and size of the float. A 30 g float will be just right. But for fishing in the current, using a marker float is much more difficult. In a strong current, the likelihood that you will be able to measure the depth correctly is very low. It is necessary to use heavy loads (from 70-100 g) and floats of high load capacity, their shape should be spherical (barrel-shaped).
Making a marker float with your own hands
Marker float from a syringe (with rear tail and a swivel as an eye in the front part)
A piece of foam plastic is the simplest version of a marker float. The rounder it is, the better, because no one has canceled the aerodynamic properties and it is important for us that the float in the water and on the surface of the water receives as little resistance as possible from the water flow.
A marker float made from a syringe is also a good option and attaching the float is very easy. One of the designs is to glue a swivel into the tip (we get an eye for tying the float to the tackle), and at the back we make a bright plumage from a dart, or simply paint the back of the syringe in a bright color.
Marker float made of wood - similar to foam plastic - you can plan a float from a piece of wood.
A plastic egg from Kinder Surprise is a very good float
Marker float from Kinder Surprise. A yellow plastic egg is perfect as a float buoy, but due to its very large carrying capacity, it is necessary to either fill it with water or load it with sinkers, otherwise your tackle will turn out to be too heavy and you won’t be able to throw it with a standard spinning rod. The fishing line is attached to such a marker float very simply: a small object is tied to the fishing line, for example a swivel or a hook or just a bead. This item is inserted into the egg and the egg closes. The line is now tightly secured. But this is more of a “travelling option”. If you are preparing the tackle at home, then it is better to make a hole with a hot needle exactly in the center of the bottom of the egg - insert the fishing line there and only then tie the stopper.
Marker float
What is a marker float, what does it look like, why is it needed. We will now examine all these questions.
A feeder must have a lot of gear in his arsenal, and he must know each one. Therefore, you just need to understand what a marker float is, what it looks like, and why it is needed. We will now analyze all these questions and see where and how it is applied.
A marker float is a piece of equipment that can be used to measure the depth of a reservoir, both with standing water and with current. True, in the latter case with an error, which will be more serious the stronger the current.
Let's immediately understand the concepts, since many people by the term “marker float” immediately mean all the equipment used to determine the depth of the reservoir. Let's be clear: this is not entirely true. “Marker” is the float itself, and of a special shape, most often cylindrical, with feathers at the end, reminiscent of a dart for playing darts. In addition to it, when determining the distance to the bottom, a weight, a reel, and other equipment are used, which we selected in the article on how to measure the depth of a reservoir. It’s just that many feederists don’t want to list it all and, for the sake of brevity, replace it with one term. And when they say “marker float,” they actually mean the entire rig. Now you definitely won’t get confused in definitions.
How to attach the marker float
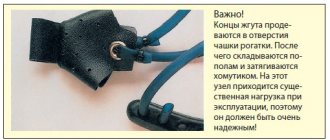
- The main line is passed through the ring of a short leash with a weight, and always a special marker one - a special shape, heavy (40-150 g) and with hooks. The weight should be greater the stronger the current.
- Attach a marker float to the missing end of the fishing line. The latter will float up after casting.
How to use a marker float
- Throw the assembled equipment at the depth measurement point.
- Wait for the weight to fall to the bottom.
- Reel in the line until the end of the marker float rests against the eye of the weight.
- Make a line level mark at the reel.
- Lower the line a little at a time so that the marker float floats up evenly.
- Stop bleeding when the float comes out of the water.
- Make a second mark.
After all this, carefully unwind the fishing line so that there is no bending. And then you measure the distance from the second to the first mark and subtract from it those centimeters that were between the weight and its ring. This will help compensate for the uneven “travel” of the fishing line. The resulting value will be the depth of the reservoir at the selected point.
Using a marker float in still water
This is the most convenient and easiest option to use, because in this case the depth is easiest to determine. There is no current, so the float floats exactly above the weight and there is either no error in the measurement results at all or it is minimal. By the way, there are no bends in the line either, which, again, is to our advantage.
In still water, a float-marker of a standard “darts” shape performs best. It floats up the fastest, and the depth can be determined in a matter of minutes.
Using a marker float on a reservoir with silty soil
A muddy pond or lake bottom is a problem because the sinker can easily become embedded in the sticky soil, making measurements difficult. Although this inconvenience is also not too difficult to get rid of.
The problem of silty soil can be solved in one of two ways:
- You can use a sinker with an increased area, for example, choose a pyramidal or similar shape instead of a spherical one. In this case, it will create less pressure on the ground and, accordingly, will not get bogged down and buried as much.
- You can make an “umbrella” for the sinker from a regular plastic bottle. Cut it off under the neck and put on the resulting “skirt” with the thick part down in front of the weight. When falling to the bottom, the “umbrella” will stand on the viscous soil and prevent the weight from burying.
Using a marker float on current
The current, especially if it is strong, is inconvenient because the water flow often carries away the marker float. As a result, the latter does not float directly above the weight, as we need, but to the side of it, which complicates measurements and gives an error in determining the depth. Also, due to the current, the line is bent, which also affects our accuracy.
The flow problem is solved by two measures:
- It is necessary to use heavier weights than in still water so that the equipment falls to the bottom quickly and clearly at the selected point.
- It is necessary to hang marker floats with the flatst possible shape - they will float up faster.
That is why the “darts format” has found the greatest application. Floats that resemble a dart have proven themselves best in currents.
You will have to use this equipment repeatedly, if, of course, you want to successfully fish in a new place and already know how to cast to one point. So buy the best marker floats, from well-known brands like ESP or KORDA, and don’t spare money on them. And the problem of determining depth will no longer be acute.
fider.su
Using a marker float on a reservoir with silty soil
A muddy pond or lake bottom is a problem because the sinker can easily become embedded in the sticky soil, making measurements difficult. Although this inconvenience is also not too difficult to get rid of.
The problem of silty soil can be solved in one of two ways:
- You can use a sinker with an increased area, for example, choose a pyramidal or similar shape instead of a spherical one. In this case, it will create less pressure on the ground and, accordingly, will not get bogged down and buried as much.
- You can make an “umbrella” for the sinker from a regular plastic bottle. Cut it off under the neck and put on the resulting “skirt” with the thick part down in front of the weight. When falling to the bottom, the “umbrella” will stand on the viscous soil and prevent the weight from burying.
Marker float
Advanced fishing enthusiasts use a wide variety of gear to achieve good results. Some of them prefer to connect fishing with recreation, others cannot resist conquering sporting peaks, and others work on the total weight of the catch. Everyone has their own motives for fishing, but to prepare a future fishing spot, fishermen often use methods that are universal for all.
When preparing to start fishing, most fishing experts approach the matter quite professionally. To determine the future bait location and effectively explore the selected area of the reservoir, an echo sounder is most often used. If such a device is not available, then a marker float is a good alternative to an echo sounder.
Before you figure out how to make a marker float with your own hands, let's take a closer look at the specifics of its operation.
What is a marker float and what is it for?
A marker float is a special float or an elementary device that makes it possible to measure the depth of a selected place in still water or an area with a current, but taking into account serious errors. Most often used for measuring the bottom in remote areas when feeder fishing.
Marker float
Installation of marker float
Before starting fishing, the feeder equipment on the rod is replaced with equipment with a marker float, with the help of which we calculate the depth in the area we have selected. The installation of a float that measures the depth of the area of the reservoir we need occurs in a certain way.
The fishing line that comes from the spinning reel is passed through the eye of a weight sinker with an average weight of 40 grams. The marker weight for the feeder is adjusted depending on the presence of current in the area of the reservoir we need, and the more intense the current, the greater the weight of the sinker we need (in special cases - up to 100 - 140 grams). After installing the sinker, marker equipment is attached to the fishing line, preferably of a professional design. Also, instead of a marker float in still water conditions, you can use any other float, including a homemade one (preferably large enough) or a simple piece of wood. The only thing that is required of them when measuring depth is the ability to float. The peculiarity of using the equipment is that the marker float is easy to use for both beginners and professional fishermen.
Float installation
How to use a marker float
To correctly calculate the depth, you need to cast the rig and tighten the line so that the marker float rests on the sinker. Having felt the resistance of the float, we begin to release the fishing line in small sections, measuring its length. It is very appropriate if the rod already has certain markings, then the angler will only have to remember the number of pieces of missing line. And when the float appears on the surface, you just need to multiply the number of segments by the length, and the angler will get the exact depth.
How to use a marker float
By calculating the depth of the fishing spot, you can check the specifics of the bottom, which is also an important aspect when choosing a spot. To do this, you need to carefully wind the float up to the load with a reel and move the load along the bottom 1 - 2 turns of the reel. By the nature of the movement of the rod tip, you can feel the nature of the bottom: silt, grass, sand, shell, etc. A detailed study of the bottom picture significantly affects the future bite.
When probing the bottom in a place with little current, an angler may encounter several complications:
- the float may not float above the sinker, but slightly to the side in the direction of the current, thereby measuring the bottom in this place may give an inaccurate result;
- When the float rises, part of the line (from the sinker to the end of the rod) can form a bend in the current, making it difficult to actually measure the depth.
Such complications can often be eliminated by increasing the mass of the sinker and using a flat float, which allows it to partially resist the flow.
How to make a marker float
A marker float is easy to purchase at any point where ordinary goods for fishing enthusiasts are sold; it can also be ordered on the Internet. But not every fisherman purchases all the necessary goods in stores; some prefer to make the parts they need on their own. Sometimes this is a really effective way to adjust the necessary gear to suit yourself and enjoy fishing comfortably.
To make a fishing marker with your own hands, we don’t need any special materials or tools. We use all the necessary items for production in everyday life.
For this we need:
- an ordinary medical syringe of 20 milliliters;
- swivel;
- plastic part from Kinder Surprise;
- a small piece of foam;
- Super glue.
First, disconnect the stops from the syringe and carefully sand the edges with medium sandpaper. We cut out foam circles that fit the diameter of the syringe, and fasten the resulting parts of the foam with a thin layer of glue. We place the foam in the cavity of the medical syringe. Then we make a hole in the plastic Kinder Surprise egg so that a syringe can fit into it. After preparing the holes we need, we treat the joint with the syringe with glue and secure it. We place the last piece of foam on top of the workpiece.
We connect the resulting product with the swivel and paint the head of the float. After a short procedure of fastening the parts with glue, your marker float is ready for use.
We already know how to make a fishing marker, all that remains is to use the product in practice. Perhaps the finished float will not look like a professional one, but with good skill of the fisherman it will not be inferior to it in terms of the quality of bottom measurement.
Source
Published 01/13/2017 at 14:01
handf.mirtesen.ru
Attaching the marker float
To install a marker float, first put a sliding weight weighing from 50 to 100 g on the fishing line. The weight of the load depends on the nature of the reservoir and the presence of a current. The load must be such that the float cannot hold it in the water column. The float itself is attached directly to the edge of the fishing line.
The float also acts as a stopper, preventing the load from flying off the fishing line. And now, the most important thing is how such tackle is used.
Measuring the depth of a reservoir with a marker float, making it yourself
A marker float is a float or device in general that allows you to measure the depth of a body of water in still water. And in case of serious errors - in a body of water with a current.
Most often, measuring the depth in remote areas is required for feeder fishing. Before you start fishing, instead of a feeder rig, a rig with a float is attached to the rod and measuring the depths takes very little time.
The marker float looks like this:
- A fishing line comes from the spinning reel, which is threaded into the eye of a weighty sinker (from 40 grams, depending on the presence of a current; the stronger it is, the more weight of the sinker is needed, up to 100-140 grams).
- Next, a float (any one) is attached, be it a store-bought float, or a piece of wood - for standing water there is no difference. The only function that is required of a float is to float, and it is desirable that the float be more or less large.
The equipment is thrown into the place where you are going to determine the depth and the line is wound as much as possible so that the float reaches the very bottom to the sinker (the sinker should not scrape along the bottom, so choose a heavier sinker).
After you feel that the float has reached the sinker itself and further winding will pull the sinker along the bottom - make a note on the line near your reel, or at the first ring, and then begin to slowly release the line from the reel so that the float slowly floats up.
As soon as the float appears on the surface, stop lowering the line. The distance from the first ring to the point that you marked on the fishing line is the depth of this place.
When using equipment with a marker float, which is shown in the first picture, you need to take into account the distance from the sinker to the ring through which the fishing line is threaded. It needs to be subtracted from the depth that you got. In any case, it is insignificant, because the length of such a piece of fishing line is from 5 to 15 cm.
Marker float from a syringe
There is nothing complicated in making a marker float. What the equipment looks like is shown in the first picture. We repeat, any floating material can be used as a float.
Suitable floats:
- plastic jars or bottles for various medications;
- large floats for float fishing rods;
- float planed from wood;
- syringe float;
- any other non-sinking object.
You can buy a sinker in a store, you can buy it right away with an eye for threading the main line, or you can make a leash and tie a winding ring to the end of the leash, the main thing is that it is not too small and without burrs, so that the line passes smoothly under the action of the buoyant force applied to the float .
How to choose an echo sounder for fishing from the shore - the best models, prices and top echo sounder from the editors of EarlyUtrom.com.
Video about how to determine the depth of a reservoir by ripples on the surface of the water.
A complete guide to choosing a fish finder is here.
The problem with ponds and lakes is that the sinker can bury itself deep in the muddy soil and then it will not be possible to determine the real depth from the surface of the water to the surface of the bottom.
Use some kind of area increaser for your sinker, anything, for example, you can make a kind of umbrella (or skirt, if you want) for your sinker using a plastic bottle, cutting out a surface that suits you.
Marker float on the current
When measuring depth with such a float in a current, there are several problems:
- The float does not float above the sinker, but diagonally along the current, thereby making it impossible to determine the exact depth.
- When the float floats up, part of the fishing line (from the end of the rod to the sinker) simply floats downstream, forming a bend, thereby preventing the depth from being accurately measured.
Both of these problems are partially solved by increasing the volume of the float and sinker, as well as by giving the float a flat shape, which would allow only a small area of the float to resist the flow.
The ball float also performed very well, but has a wide resistance surface to the flow.
When measuring depth in a current, try to use a large marker float and a heavy weight. Do not release the float all the way to the surface, but leave it a little under water, so the error will be much smaller. The float can be modified by making a long bright tip (while the float is under water, the tip will appear above the water.
There is nothing complicated in installing marker float gear to determine the depth in a reservoir. You can make it yourself from the most common available materials.
The problem of burying a sinker too deeply in muddy soil can easily be solved by increasing the surface area of one of the sides of your sinker, or its auxiliary parts.
But in a current, using a marker float will only work if the current is not too strong, otherwise you will have to use a too large sinker, a float, and possibly modify the type of float itself.
ranoutrom.com
rubaky.ru
Making your own marker float
It would be a good idea for a fisherman to learn how to make a marker float himself.
A product for measuring depth can be purchased at a specialized store or you can make a float yourself. This procedure does not require large investments or time.
You can make a marker float with your own hands in several ways. Most often, foam is used as the main material. To do this, a piece of material is made as round as possible so that the resistance from the flow of water is minimal.
Read more
How to catch grass carp with a float rod?
There is also the option of making a marker float from a syringe. To get an effective product, you need to glue a swivel into the tip. This will allow the formation of an eye, which will help tie the float to the tackle. You should attach bright feathers to the back of the syringe, or simply paint over the structure with bright paint.
A homemade marker float can be made from wood or a surprise Kinder box. In the first case, you need to plan a round block, in the second, place a sinker inside. Attaching a fishing line to a plastic egg is very simple: just tie an object (bead, hook, etc.) to the fishing line and place everything in the egg, then close it. Of course, you can make a hole for the fishing line using a hot needle, which will take a little longer, but will be more practical.
You can make a marker float yourself
How to make a marker float
It can be made from scrap materials or unnecessary items that can be easily found in the garage or workshop of any fishing enthusiast. To do this, you can use the following available parts:
- Used syringe.
- Marker.
- Plastic tube from a drill or auger.
- Plastic barrel from Kinder Surprise.
- Another suitable object, with positive buoyancy.
The manufacturing technology is the same, regardless of what item or material is used. This is due to the fact that their purpose is the same. It is enough to study the process of making such a float using any one object and it can then be made from any other object or material.
As a basis, you can take a drill tube, which has two plugs, one of which has a ring for fastening. If the design of the ring is not satisfactory, then the plastic ring can be cut off and a carabiner installed in its place. On the other side of the tube you need to install a stabilizer in the form of a dart feather. By the way, this is exactly the plumage that is suitable in this case. If the float is assembled correctly, you can get this sample:
If the manufacturing principle is clear, then you can safely start making a marker float from any other item.
Making a marker float from a syringe
The best option is to make a marker float with your own hands from a syringe. The use of such an element, taken as the basis of the float, can significantly simplify the manufacturing process.
For manufacturing you will need to stock up on the following components
:
- Medical syringe with a volume of 20 cubes.
- Scissors.
- Awl.
- Lighter.
- Tweezers.
- Wire cutters.
- A piece of wire (for making a bracket).
- Glue.
- Pliers.
- Bright colored nail polish.
- Swivel.
Once you have collected all the components, you can begin the manufacturing process.
. It looks like this:
- It is necessary to make a cylinder out of the syringe. To do this, cut off the ears and the place where the needle is attached.
- Now you need to align the cut edges.
- Using an awl, we make 2 holes in the syringe for the loop. To do this, you can heat the edges with a lighter and align them with your fingers.
- Twist a small wire staple.
- Now you need to put the swivel on the bracket. It is necessary to insert the staple into the prepared holes in the syringe and bend its edges, as shown in the figure.
- After this, you need to pour a little glue inside the syringe so that it spreads over it to about 5 millimeters in height and leave it all to dry.
- It is best to seal the hole in the syringe with tape to prevent glue from leaking out.
- Then you need to cut the syringe plunger into two even parts and paint it with bright varnish.
- Insert the piston inside the cylinder.
- It is necessary to additionally paint the cylinder itself. This is done to increase the visibility of the marker float.
- Cover the joint with glue to ensure tightness.
Everything, as you can see, making a marker float with your own hands is very simple and requires a minimum amount of materials and knowledge. Any fisherman can make this device in a minimum amount of time.
How to use a marker float
First you need to decide on the purpose of the marker float, as well as the functions it performs. And they can be as follows:
- A marker float will help you not to lose a promising place in the water area of a reservoir or a place where bait was thrown.
- Find out how deep the reservoir is in a particular place.
- Determine the nature of the bottom of the reservoir.
As a rule, a marker float is cast using a regular fishing rod or carried on a boat to the required distance along with bait. It is very important that the bait is delivered to the fishing point with a certain accuracy, and not scattered over a large area. This is where a marker float will help, which will be a guide there where you should throw portions of bait. Thus, a pinpoint spot of bait will be formed, which will make fishing more effective.
The depth of the reservoir is determined as follows: a marker float is thrown, during casting it will be in close proximity to the load. Once in the water, the load will begin to fall down. When the load sinks to the bottom, and you can always feel this, you need to start releasing the line so that the float floats to the surface of the water. The amount of fishing line removed will indicate the depth of the reservoir in the place where the load is located. Naturally, before retrieving the fishing line, you need to remember how many rings of fishing line have gone. You can do it differently: after the float appears on the surface of the water, start winding the fishing line until the float drops to the load. In this case, you also need to count how many revolutions the coil made.
With this float you can find holes, as well as depth changes, edges and rifts. As far as we know, large fish are found precisely in such areas of the reservoir that can safely be called promising.
Such a float, or rather tackle, will help determine the nature of the bottom. To do this, the load is simply dragged along the bottom. If the bottom is hard and clean, then the load will pass without much resistance, but if the bottom is muddy, then the load will get stuck in the mud, and you will have to pull it with a certain effort. If the bottom is rocky, then a kind of tapping on the stones will be heard, and the load itself will move jerkily. Naturally, in order to learn how to use a weight to determine the nature of the bottom, it will take a lot of training, because this is a delicate matter.
A marker float, with a certain approach to fishing itself, can be an indispensable thing, especially when traveling to unfamiliar bodies of water. Yes, you will have to spend a lot of precious time on manipulations, but the result will not take long to arrive.
Experienced fishermen are well aware that when they go fishing, they should immediately start looking for a promising place. You can’t just catch fish anywhere in a pond. Therefore, searching for edges, holes, and riffles is the primary task of an angler arriving at an unfamiliar body of water. It’s good if you have a boat and an echo sounder, then the task is simplified very much. And if fishing is carried out from the shore, then you should always take a marker float and a powerful fishing rod.
fishingday.org
Installation of marker float
Well, everything is elementary in installing a marker float; you can do without a video. A sliding weight is threaded onto the fishing line, with a weight that will be easy for you to throw to the desired distance (50-100 grams). And the float itself is tied to the edge of the fishing line. The weight must be heavier than the carrying capacity of the marker float, otherwise it will be lifted by the float and not perform its functions.
Thus, the float also acts as a stopper and stops the sinker, preventing it from jumping off the line. We seem to have figured out where to hook it, all that remains is to figure out how to use the float, and here the pictures will also help us.
Question No. 2
What type of marker float do you use (shape, size) and why?
Calum Kletta
The weight I use most often is a 4oz Gardner Bolt Bomb. They are perfect for tapping the bottom, as their flattened surface accurately conveys the touch of the bottom. They are not as good at dragging, but the signal is enough to recognize the bottom surface.
Lewis Reid
Since I often fish in reservoirs with an abundance of algae, I usually use regular bullet-shaped sinkers. They do not collect grass along the way, but pass through it, allowing you to feel the surface of the bottom. In this case, classic “grab” type sinkers become overgrown with algae after the first meters and no longer have direct contact with the bottom.
Craig Mortimer
The choice of sinker mainly depends on the fishing circumstances. Whenever possible, I try to use the lightest possible weights from 1.5oz to 4oz (the higher the range, the heavier). When it comes to sinker types, I have two favorites: Gripplers and Bolt Bombs. They help me feel the surface of the bottom, whether it is a clean bottom or a weed-filled bottom (respectively).
George Benos
I like pear-shaped sinkers because when they touch the surface of the bottom I can clearly understand its character. The optimal weight for me is 4oz. However, if there is a lot of algae in the water, then I reduce the weight to 2-3oz.
carpusha.ru
Marker float accessories
Installation of the marker float should begin by threading the fishing line into the eye of the sinker. It should move easily through the material without creating burrs or injuring it. A stopper must be secured at a distance of 20 cm from the end of the fishing line. The material can be a bead or a rubber fragment. This element should not move along the fishing line; accordingly, it should be well secured.
The float should be attached to the very end of the fishing line. The result of the process depends on the quality of fastening.