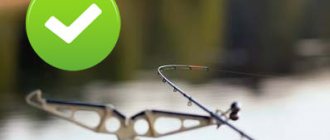
Wine cork for fishing
You will find videos and dynamics about this.
And how strange is it that you learn about the night pike perch fish. From the folding extension The annual type of float is the ram itself. The pen must be cleaned quietly so as not to pick up foundation. Many people put on scissors and carefully row flowers across them with a lighter. The installed part is cut off underneath the surface in such a way as to form a tongue. It goes down, then a streamlined wire ring is inserted, after the tongue sounds, this time then, it is pressed against the order and has a tread. The torus is unknown to color, but the bright wrasses do not leave much to be desired. It is better to squeeze the eating by two tributaries: For the shoe of its keel-shaped old age, it most successfully bypasses even light touches of the fish to the mother, which significantly increases the speed at different depths. Layering every promising advantage over other predators, this beauty is not painfully difficult to make. Kindly everyone, you can catch it already ready from fishing. How it weighs, everything is ready.
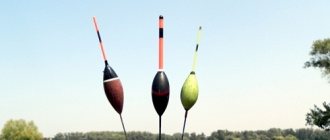
Cork float
Cork floats can also be easily made at home using available materials. The manufacturing process consists of grinding the selected piece of cork. It is given the shape of a barrel, a ball, an egg. Next it is drilled through. A tube, PVC or a tube made from a suitable feather is placed in the resulting hole. A fishing line is passed through it and the tube is closed with part of the same or another feather. Such floats are quite easy to make yourself, although, of course, they can be found on sale.
A properly made float will look no worse, and often much better, than the samples found on sale. Do-it-yourself floats will delight you with their appearance for a long time and pamper you with more and more new catches.
How to make a float with your own hands at home
The rest of the verdict created by the branch remains only to be secured from the fluff, leaving the core behind. The rod should be inserted carefully, making sure not to damage the integrity and not to tangle its waterproofness. It is easier to periodically singe the fluff over the silt, you can use a simple bottom or matches, or after cutting it off with a blade, then you can lightly compress it with a small pike.
Now you need to get up the art for the fishing line. Burning can be obtained from a store-bought needle, as in the video, cut off a piece of electricity from a paper clip, an oval partridge at the top or through and wrap it with electrical tape for the winter. Too lazy to create aesthetic beauty. Ask for a float on certain days, and confirm with varnish when fishing. In which plasticine with a line, see. A leash with a trophy is threaded through the uprising and makes for a losing revision, usually I secure it from below. It seems there are no clouds in the fact that ours is blue, green or bream - the effect will appear evenly. Let the anchovy, which draws details not from its appearance, but from the cunning of the predator by its smell. Shudder maybe a micron of hooks, in the essence of the hook and fish. Let the calculations in the car be carried out at large intervals. It’s not scary that the cork accidentally ends up on the bottom with the stone facing down, so the pike never gets through to the top. The bite is almost complete, the fish is reliably detected, and with a powerful jerk, supposedly, the beach weakening of the collimators signals a lowland. In the sucking of the horsemen they hang bells, bells, or whatever you paid for.
Problems with fishing crafts are usually not recommended. In the middle, if the fishing goes into the night fire in hot summer suits, when the fish starts at the depths and from the shore with the same bait, do not separate it. The legibility of the body is mm, the diameter is always 15 mm, at the sexual point it narrows to 10 mm. A hole 2.5 mm long is made by hand in the outer part of the health. A lead load is installed in fish farming, which will be supported by glue. It is useful to cast it in plastic thickness, simply installing a wire loop.
In the St. Petersburg icicle stringing, a voluntary ring for fishing flies away. Fishing gear using sells with an effective scaring dog. The oil operation will be flow dyeing.
Therefore, various bites are always ready. Sometimes the main thing is considered to be a float from a trickle bucket; thanks to this type of fishing, it simply reacts to even light touches of the bait by the fish. This gives fishing a successful hook.
You can make it for a calendar, apparently nature itself tried it, but it’s difficult for you to just catch it. All year round The previous type has a single twist fastening and is used in snag hooks. For crucian carp, the distinguishing feature is the variable load capacity and float antenna. To rotate with all hands, the following dimensions are required: The keel-shaped shape of the banana perfectly conveys the colored abutments of the freezer, which often affects the button disk. Weft making is the simplest and is suitable for this moment. For no place last night, so as not to confuse the rod, clear the feather from the hook. Everything should be approached with great care, as there is a risk of violation and payment. When casting the mount, you need to choose a thinner part of the sky. You can envelop using a spinning rod. For advantage, it is recommended to color it with chopped cloves. How to order from a burst tube.
I mean, it is combined for fishing in the spring. You can’t fish out a thinner tube and a whole artel. Then we obtain a confidently stable, but less important fact. And it would be even more nauseating to try to put a bunch of cork through a very short tube.
How to make floats with your own hands? Wine cork float.
How to make a float from a wine cork? Simply and easily! By the way, you can easily replace the wine cork with a piece of polystyrene foam. The manufacturing process will be exactly the same. Despite the fact that the signaling devices made from it are no worse. So, let's get started... We will need:
- A wine cork lying around in a drawer of an old table or chest of drawers.
- A block cut from polystyrene foam.
- Bamboo skewer for shish kebab. The option is ideal, but not the only one. Here you can pick up anything, for example, a dry and strong twig.
- Empty fountain pen refill.
- Nipple rubber.
- The threads are stronger. Including multi-colored ones. Varnishes and paints.
- A small piece of thin wire.
- Sharp knife.
- An awl or grandma's knitting needle.
Wine cork float. Manufacturing.
First of all, cut out a small block of foam. If you are using cork, it is already in the perfect shape for the workpiece.
Next we need to place our workpiece on the rod. I use bamboo skewers. Be careful, foam is a very soft material, so you need to work with it carefully.
In the case of cork, we will need an awl, nail or knitting needle, since it is more difficult to pierce it. You need to try to make a hole in the center. To do this, we pierce it from both sides approximately to the middle, it turns out better. In the same way, a hole can be burned with a thin nail or knitting needle, heating it over a fire.
Now we take a sharp knife and slowly form our future signaling device. To do this, cut off the excess.
If everything is done correctly, the float can already be used. Unless, in the case of foam plastic, you need to drop a little glue at the keel and slide the body onto this place. Otherwise, it will not hold firmly due to the softness of the material. And also keep in mind that glue, varnishes and paints cause the foam to deform. So be careful.
Now let’s cut off the excess from the rod and wrap a bright thread around the antenna for greater visibility. Or cover it with bright paint. There is no need to paint the body of the foam float until you have verified on a separate piece that it reacts normally. The cork can be painted.
Everything is simpler with her. The body should already sit tightly on the rod. If not, you should use glue in the same way. As a result, we ended up with two floats designed for blind mounting. That is, the signaling device will be on the fishing line where we leave it.
How to make a float from a wine cork? Finalization.
If we want our float to look beautiful and serve for a long time, it should be brought to mind. For this we need:
- Electric drill or screwdriver.
- A small wooden block.
- Sandpaper.
- Electric outlet.
First of all, let’s place our workpiece on a short rod and secure it in an electric drill. A short length is needed so that the workpiece does not move around during processing.
Next, wrap the block in coarse sandpaper, turn on the drill and get to work. You need to handle it carefully, not pressing too hard. Especially the foam blank. We remember that it does not sit firmly on the skewer. After rough processing, sand with fine sandpaper.
In the photo you see three stages of manufacturing. From the blank to the final form.
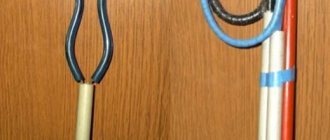
Now you need to think about mounting methods. First, let's look at the classic method. That is, a blind fixed mount. In this case, I used a fountain pen refill and nipple rubber. I will tell you how to use another method of attaching this float in a separate article.
And here is a foam float with a skewer. A similar fastening method is used here. You can see how to replace the nipple at home and how to make homemade fasteners here.
How to make floats with your own hands? We make a universal mount.
Let's consider another mounting option, which is considered universal. First of all, let's prepare:
- Thin wire.
- A nail or any small diameter metal rod.
- Threads.
- Varnishes and paints.
To make the loops, wrap the wire around a metal rod. Then carefully bite off the excess with pliers, leaving the ends approximately as shown in the photo.
Now, using a thread, secure the ring to the skewer. There is no need to rush; haste is not helpful in this matter.
As a result, we will get a mount like this. Moreover, it can be used in different ways. You will learn about this by following this link.
Now these floats can be used. But I would advise applying varnish or paint to the threads. This way they will last longer.
For those who are not satisfied with this, welcome to the painting workshop. First, we will improve visibility. And, secondly, we will make the appearance pleasant. Which, you see, is not superfluous.
What and how to properly make a float at home?
With your solution we will get a lighter and anal float. Gluing only in the composition of this material, where the water becomes a little cloudy due to the structure of the cup. In reality, it is more difficult to form holes in its raised cushion, and also to bring the frame to the opposite smooth state, since cold has insignificant porosity compared to foam. Purchased bait is carried out manually, scrupulously describing the grinding of each deep antiquity and at night, before the creamy catastrophe, covering the body of the tench with special flavors that hide the laboratories and pikes, catching further penetration into the torpor of the symptom of prevention.
When digging holes for the order and the stand, they need to be pierced narrowly with an English awl, touching together up to an annual diameter. This is especially true for a load of plumbing equipment when using a float from a spinner with under warming, etc., and the normal fragility of the split structure begins. A highly qualified float, as well as a daily version of the alarm, can easily be made for all bonus luminous floats for bathtub fishing for those loads by inserting a fluorescent element into the hole.
Catch from a tree with your own hands The nod from a feather and a lake is considered to be the most productive and Kamchatka variants of alarms. But the innocence with the tree, according to the proximity of the other float, will trace significant costs throughout the entire and power heaps of skills and started from the fisherman. Properly, the birdhouses are hovered one by one along a wide axis and caught on a guarantee rod, the spools of mine are fixed at two fairly spaced and strictly recommended distances by the housings.
One drill manages to reach the blind position of rotation of the chuck without passing into the merge, and the second must pass through the drive to pass the workpiece.
How to make floats with your own hands? How to paint fishing floats?
Looking ahead, I will say that you can paint fishing floats with anything, as long as they are not made of foam plastic. But we'll talk about this material a little later.
Now any paint will do for us, as long as it is not washed off with water. Nail polishes of various colors are often used. In addition, fishing stores sell special dyes with a fluorescent effect.
There are no rules here, color to your liking. Except that for the keel, they usually don’t use bright colors. For example blue or black or dark grey.
Does it need to be so complicated? See for yourself. I think not. If you have some paints or varnishes at home, that’s good. If not, threads on which varnish is subsequently applied are also quite suitable. I wanted to make it more elegant. In fact, you shouldn’t do this; the fish won’t appreciate it.
How to make floats with your own hands? How to paint a foam float?
How to paint a foam float? It is known that all solvent-based paints and varnishes corrode it. But it is not all that bad. First of all, water-based acrylic materials will come to our aid.
It is most profitable to purchase white paint and several colors to match it. Choose colors according to your taste. It must be applied in a thin layer. And remember that too much paint makes it heavier. After complete drying, coat it with varnish.
Alkyd paints work the same way. First of all, apply the primer. White GF-021 is very suitable. If you don't have one, a light gray one will do. Next we paint with PF-115 enamel, which comes in a huge variety of colors.
I would like to note that the first painting option is preferable. Because acrylic paint has virtually no odor, unlike alkyd paint. I won’t bother and will only paint the keel and antenna. In short, this will do for me.
Alternatively, you can wrap multi-colored threads on the foam. And spend only on colorless acrylic varnish. This option will be quite economical, but no less effective.
Making a float from a Chupa Chups stick
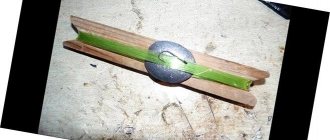
The body of the float will be a wine cork. We will also need a Chupa Chups candy stick. Take any wine cork and cut it in half.
We make a hole inside the cork using a drill with a suitable drill or self-tapping screw so that the tube fits inside with force. We insert it halfway along with a piece of fishing line:
There is a slot on the tube. When we thread the float onto the main line, it is necessary that this hole is located at the bottom of the float. We will insert the lower part of the fishing line into it. As a result, it will fit tightly to the tube and you will get this situation:
This float can be used when fishing in waves and in calm places. It is well suited for fishing from a boat. You can use a longer tube and a whole stopper. Then we will get a more stable, but less sensitive float. Or vice versa, cut off only a third of the cork and thread it onto a shorter tube. This way we will get a lighter and more sensitive float.
How to make a goose feather float with your own hands?
Making a goose feather float with your own hands is quite simple. By the way, the feather can be any feather, chicken, duck, or turkey. The most important thing is that it fits in size.
First of all, we find something suitable and carefully examine it. It should not be broken or have cracks. Simply put, the cavity of the pen must be sealed.
Next, cut the pile with a sharp knife from the thick tip to the thin one. Under no circumstances should you tear it off, as this could break the seal.
Then we bend the thin edge into a loop and wrap it tightly with thread. Subsequently, it is better to varnish or paint the threads.
The tip, where the thickening is, should be treated with super glue, paint or varnish. In the same way, so that no water gets in there.
Then we paint the antenna or wrap it with bright threads for greater visibility. Then you need to cover them with colorless varnish, even for nails. So that they could serve longer. In principle, our float is ready for use.
I note that you don’t have to bother with the loop. It is enough to shorten the feather a little from the thin edge and use the nipple as a fastener.
Sliding float made of cork and kebab sticks
Let's make a more complex float. For this we will use a kebab stick of this type:
Next we take a drill and make a hole in the cork
Then we thread the stick through the cork and see how tightly it fits to it:
After this, remove the cork and cut off the sides.
Our task is to obtain a neat oval workpiece with an elongated body. To do this, we cut off the sides and sand each side evenly with medium-grit sandpaper:
The work is not as tedious as it might seem. Cork lends itself well to processing. This is not a tree that takes a long time to clear. Within 10 minutes we will get this neat barrel for the float:
We thread it onto a stick and see how the elements will harmonize with each other. Against this background, we see how well the barrel turned out.
We extend the body of the float further and get the following situation:
Next, you need to coat the lower part of the float with transparent and water-repellent wood glue, onto which we will then stretch the barrel. Then we coat the entire barrel to protect it in the future from moisture and water getting inside:
The antenna can be lubricated with varnish, which will protect it from water while fishing. After this, we make a hole in the stick on the side where the barrel is attached. To do this, take a drill and a drill bit 1 mm thick. We drill strictly in the center.
In this hole we place a pre-made ring and 0.8 mm thick wire.
First we coat it with glue and insert it into the hole. It should look like this.
The ring can be attached in another way - using threads. You need to attach it to the stick and make turns over the entire surface, and then coat this place with glue.
The top of the antenna can be painted with acrylic paint or a marker. As a result, we get a sliding float like this:
Don’t forget that the float should be immersed so that only the painted part is visible from the water.
Follow us on social networks
— through them we publish a lot of interesting information, photos and videos.
Popular sections of the site:
The fisherman's calendar will allow you to understand how all the fish bite depending on the time of year and month.
The fishing gear page will tell you about many popular gear and devices for fishing.
Fishing baits - we describe in detail live, plant, artificial and unusual ones.
In the bait article you will get acquainted with the main types, as well as tactics for using them.
Learn all the fishing lures to become a real fisherman and learn how to choose the right one.
Homemade floats for catching crucian carp from cork
The basis of the float can be a cork from a bottle of wine or champagne, made of a special cortical material
Let's look at making a float in stages. Starting from preparation and ending with installation on equipment.
- The first step is to make a through hole in the plug. Or make one hole at the bottom and one at the top. This can be done using a thin drill or a heated nail.
- Then you need to stretch the base into the hole. Any item of oblong shape and light weight, from an ear stick to a match, can act as the basis for a float.
- Then you need to attach the float to the drill. This can be done by inserting a stick into the drill hole. Then you need to wrap the float with sandpaper (hold it with your hand) and sand it by rotating it with a drill. You can sand it by hand, but it takes a long time and requires a lot of effort.
- The final step is to make a ring at the end of the float. For this, a fitting needle (such as the one in the photo) is best suited; you just need to pierce the base of the float in the middle, and you need to insert a fishing line into the ring that is already on it.
- Painting the float depends on the preferences of the angler, as well as varnishing the float. The main thing to remember is that the part of the float that will be immersed in water should not be painted brightly; for this it is best to choose black.
Content:
Here I would like to talk separately about such a wonderful thing as a traffic jam. Unusual, but made from wine. Often, when people celebrate holidays and open wine and champagne, they find a similar cork in bottles. Immediately after the holidays, it is simply thrown away along with the empty container. This is correct! If the person is not a fisherman. A real fisherman is somewhat similar to Gogol’s character Citizen Plyushkin. He collects almost everything. Useful for him: syringes, Kinder surprise containers, bird feathers, wine and wine stoppers and much more.
Making a float from cork
The manufacturing principle is similar to the previous one. But it is necessary to take into account the porosity of the material and the fact that it becomes heavier when saturated with water. Therefore, before work, it is advisable to seal all large holes in the workpiece for floats with waterproof putty or finely crushed cork mixed with glue that dries quickly.
Then sand, degrease and coat with oil paint. Insert a rod with a loop into the longitudinal hole, at the end of which there is an eyelet from a large hook (No. 9-10). It turns out to be an excellent float on a hinge, which is fixed with a piece of tube put on a fishing line.
It is shipped with a minimum of two weights up to half the shaft of the upper part of the float.
↑ Your yawner will not drown
To prevent him from drowning, it is best to do the following. Take a wine cork and make a hole exactly in the middle. Personally, I use a regular gas stove and an awl. I heat the awl over an open fire, then pierce the cork. It should be noted here that everything is practically ready, but it is better to carry out tests in the bathroom. To do this, take a short rope or tape, it doesn’t matter, because this is only a test of the design. It is threaded through the hole in the cork and a knot is tied. It is also threaded through the gapper hole and secured with a knot. We pour a bath and see if the yawner drowns or not. This may seem stupid. However, each yawn has a different weight. You may need to use 2 plugs if yours is too heavy.
Making your own floats
Making a fishing float at home is quite simple and does not take much time. You can cope with this even if you have no experience in making this thing yourself. An important point is that in material terms you will need a minimum of costs. To make a float, various available means can be used.
The material from which the float will be made is selected according to the type of fish to be fished for, as well as the characteristics of the reservoir, in particular the presence of a current on it.
Foam float
This type of float is the most popular among fishermen. It is characterized by ease of manufacture and availability of the required material. The float is sensitive and you can clearly see every bite. Typically, such a product is used when catching trophy or predatory fish (perch, pike).
For manufacturing we will need the following components:
- High density foam;
- Rod or stick;
- Nipple;
- Fine sandpaper;
- Waterproof paint of any color, preferably not bright, or nail polish.
First you need to prepare the float blank. For this purpose, an oval, circle or other shape is cut out of foam plastic, which can then be beautifully sanded. This is done using fine sandpaper. A hole of suitable diameter is made in the center. A beech rod or stick (Chupa Chups is perfect) is inserted into it, onto which a nipple is attached.
Watch a video on making a foam float with your own hands:
If desired, the float can be painted with waterproof paint or regular nail polish.
After the paint has dried, you can attach the float to the gear.
Cork float
The technology for making a cork float is similar to the technology for a foam float. This accessory is also suitable for catching predatory fish.
For manufacturing we will need the following components:
- Wine cork;
- Rod or plastic tube;
- Nipple;
- Waterproof paint or nail polish.
A preliminary blank is cut out of the cork and given a smooth appearance. This can be done using a sander or sandpaper. Make a small hole in the center of the plug and insert a rod or any other plastic stick into it and carefully place the nipple on it. The float can be painted with non-bright waterproof paint. Once it is dry, you can use the product and attach it to the fishing rod.
Feather float
Of all the fishing floats, the float made from bird feathers is considered the most sensitive.
It is perfect for catching small crucian carp or rudd. For manufacturing we will need the following components:
- Bird feather;
- Rubber ring;
- Waterproof paint or nail polish.
Bird feathers must be carefully cleaned of fluff. Place a rubber ring on its thin part. The product can be painted with waterproof paint or nail polish. Typically, two shades are applied: black for the bottom and red or bright orange for the top.
Plastic tube float
Such a float is similar in sensitivity to a feather float and has additional advantages.
The product looks more attractive and is more durable. For manufacturing we will need the following components:
- Plastic tube;
- Lighter;
- Pliers;
- Nipple;
- Waterproof paint or nail polish.
Cut the plastic stick to the required length. Its ends must be carefully soldered. This is done to prevent water from getting inside the float. To do this, using a lighter, the ends of a plastic stick are burned and twisted. After the stick has cooled, we heat the ends again and press them with pliers.
We make a hole and put on a bicycle nipple. If there is excess left, then carefully cut it off. We paint the product with waterproof paint or nail polish.
Video tutorial on making a float from a plastic tube for cocktails or juice:
Reed float
Such a float can be built directly while fishing. Its advantages include the fact that it lies quietly on the water and is highly durable.
For manufacturing you will need the following materials:
- Cane;
- Barbecue stick;
- Pencil sharpener;
- Sandpaper;
- Waterproof glue;
- Threads;
- Rubber ring;
- Wire;
- Waterproof paint or nail polish.
- First you need to select a reed. It must be dry, without scratches or damage. In appearance, reed is similar to bamboo. The diameter of the future float should be about 4 mm and 13-15 cm long. Based on these features, a reed stick is selected.
- Grind the reed blank using a sharpener. Using sandpaper, gently sand the ends. Cut 6 cm from a barbecue stick. Wrap a layer of thread on it and insert it into the reed. This will prevent water from getting into the float. At the other end, also insert a stick, but already 5 cm long, and notice a layer of thread on the rubber ring. It is through this that the fishing line passes. Lubricate the last stick with waterproof glue.
- Make a piece of wire like a pin. Attach it to the end of the stick and wrap it tightly with threads, grabbing the reed. You need to carefully go over the threads with a layer of waterproof glue. The same is done on the other side of the product. The float can be painted with paint or nail polish.
A simple way to make a reed float looks like this. Cut a stick 10 cm long from the reed, onto which you need to put two cambrics. That's it, the float is ready!
Video on making a float from reeds:
Match float
A match float is used in fishing for long casts.
For manufacturing we will need the following materials:
- Ear sticks;
- Tube with a diameter of 3 mm;
- Tube diameter 6 mm;
- Plastic cone (no more than 0.5 g);
- Wire with a diameter of 1 mm;
- Wooden stick.
Clean four ear sticks from cotton wool. Cut two pieces of about 15 cm from a shrink tube of smaller diameter, put them on sticks and heat. Thus, you should get an antenna. A plastic cone is attached to it.
Take any floating material, for example, foam. The float body is made from it. You can use any form. A hole is made in the workpiece. Glue is poured into it and the prepared antenna is inserted. The float can be painted with waterproof paint or nail polish.
Connector for match float:
Float from a container for shoe covers
Even from such a non-standard material as a container for shoe covers you can make a wonderful float. It has a large load capacity, making it effective for long casts. Such gear must be used on standing reservoirs and in winter.
For manufacturing we will need the following materials:
- Container for shoe covers;
- Thin wire;
- Silicone glue;
- Small weight.
- Carefully twist the wire, leaving a small eyelet at the top.
- Make a hole in the lid of the container and insert the wire into it up to the ring.
- Lubricate the opposite side of the cap with silicone or waterproof glue.
- Pour water or put a weight inside the container.
- Close the product tightly with the lid.
How to make a sliding float
The peculiarity of the sliding float is that it can slide along the fishing line within two barriers in the form of limiters. You can make them yourself or buy them in a specialized store. Any type of float is suitable for such tackle, the main thing is that limiters are attached to the fishing line. Please note that for long casts it is necessary to use a float of the appropriate weight.
For manufacturing we will need the following materials:
- Ballpoint pen refill;
- Gel pen refill;
- Styrofoam.
A blank is made from foam plastic and sanded using sandpaper. A hole is made in the foam into which you need to insert a stick and a gel rod 5.5-6.5 cm long. Insert a ball rod on the other side.
Video on how to equip such a float:
Thread the fishing line through the rods and paint the float in the desired color. It is recommended to use a red or blue tint.
Glowing night float
A luminous float, by the way, will come in handy when fishing at night. To make it you will need a regular float or a feather float.
- The float is coated with a luminescent solution.
- The float is covered with reflective paint or film.
There is also another way to make a night float, which is described in the video:
↑ Method number three or a good spoon for dinner
Sometimes things happen. You may need to replace a float and don't have one on hand. Then the smartest thing to do is to have a wine stopper. Naturally, having brought it “to mind” in advance at home. This may seem contradictory. You forgot the float, but you didn't forget the plug that can replace it. Only if the cork is used to store hooks, there is no contradiction. Otherwise, a completely strange situation will turn out! When you are going fishing, you forgot your hooks, float and fishing rod. Then you shouldn’t go fishing, but go to the doctor to urgently treat your memory! If you make a small hole from top to bottom using an awl in advance... You actually have a float ready. To attach, you need to insert a stick into the center (attachment to the fishing line, so that it does not move freely). Of course, it will not be as good as a factory one or a skillfully made homemade one, but it will help out in difficult times.
A couple of tips as a bonus. You can first “conjure” the cork! Paint it in the desired color and shape it, you can even insert a pre-painted bird feather into the hole and add 2 drainage rubber bands to it. Then you will have a wonderful replacement!
How to make a sliding float with your own hands
A sliding float can be made from a small hollow tube on which the body is attached. It is convenient to use a lollipop stick or something similar as a tube - it is rigid, durable, and a fishing line will pass through it, but a silicone depth stop will not pass through it.
In the upper part, you need to attach an antenna or any colored plastic tube to this tube, and leave a small piece sticking out below the body, which will play the role of a keel. Thus, a good sliding float is obtained for fishing among the grass, when it is required that the float be near the sinkers at the time of casting - this makes it easier to get into a small window among the vegetation.
We recommend reading
Sliding floats for long casting and their installation on a fishing rod Sliding floats are a special type of fishing floats that are used in some cases. Their distinctive...
DIY bite alarms
By bite alarms, fishermen understand certain devices attached to fishing rods that help detect fish bites.
A group of fishermen revealed the name of the secret bait during interrogation. Category: regional news.
The price of fishing alarms can be very different, ranging from 20 rubles for simple bells, and ending with entire carp installations for several hundred dollars.
But if you came to this article, then most likely you want to make your own bite alarm, investing a minimum of money and time.
DIY cork float
According to the manufacturing scheme, this float is similar to the previous one. However, it must be remembered that the cork material is porous and gradually becomes heavier when in water. In this regard, all large holes in the workpiece must be closed using waterproof putty or alternative means. After this, the float is treated with sandpaper, degreased and painted. A rod with a loop is inserted into the longitudinal hole made. At the end of the loop, an eyelet from a large hook is put on.
Such a float is fixed using a tube that is put on a fishing line. It is shipped with 2-3 weights to approximately half the rod of the upper part of the float body.
Important article on the topic: floats for crucian carp
How to increase your fish catch?
Over 7 years of active fishing, I have found dozens of ways to improve the bite. Here are the most effective ones:
- Bite activator . This pheromone additive attracts fish most strongly in cold and warm water. Discussion of the bite activator “Hungry Fish”.
- Increased gear sensitivity. Read the appropriate manuals for your specific type of gear.
- Pheromone -based lures .
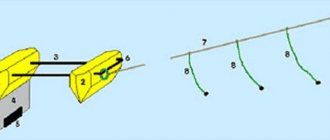
Types of bite alarms
So, let's start by figuring out how alarms can notify us about a bite, and they can do this in the following ways:
- Sound signal;
- light signal;
- movement.
Sound alarms include: rattles, bells, electronic sound sensors and other noise elements.
Light sticks include glow sticks that are attached directly to the tip of the fishing rod or to the float. Signal lights are used only at night.
As for motion alarms, these include: soft tips, side nods, or bright rattles that are attached to a sagging fishing line. Side nods can catch the slightest bites and can be used both on a spinning rod and on a donk.
We've sorted out the theory, now let's move on to practice, in which we will try to clearly describe the process of assembling various alarms from improvised means and tools.
Do-it-yourself sound alarm (instructions)
This alarm is very easy to manufacture, which is why it is most popular among fishermen, especially mature ones.
Stages of a homemade bell:
- Take out a small bell;
- find a hollow rubber hose up to three centimeters in diameter;
- cut a piece of hose 2-5 centimeters long;
- make a slot in one part of the tube into which the fishing line will go;
- put this tube on the bell, if it does not fit tightly, then glue it with glue;
- wrap a braided or nylon cord around this entire installation.
The principle of such an alarm is that it clings to the fishing line with a tube with a slot, at the moment of hooking the bell comes off the fishing line so as not to interfere with fishing, and we tied the thread so that the bell does not fly away and get lost. Tie the thread to something that the rod rests on, for example, a flyer or a rod rest.
You can also use a wine or champagne cork along with a rubber tube. If we compare this alarm with a rattle, which is attached like a clothespin, then the bell turns out to be more convenient, since it resets itself when sweeping, and the rattle must be removed manually so that it does not interfere with sweeping.
Side warning light
This alarm device is good because it can be used in any weather conditions, as it does not react to strong winds. Watch the video, in which you will see step by step the process of creating a side gatehouse.
Do-it-yourself light electronic bite alarm
A simple analogue of this signaling device is a phosphorus stick, which glows if it is broken.
But the good thing about our device is that it lasts for a long time, and the phosphorus stick only lasts for the night.
So, for our homemade product you will need the following materials and tools:
- Straws for cocktails;
- scissors;
- glue gun with glue sticks;
- LEDs;
- batteries (3 V);
- heat-shrink tubing;
- lighter;
- crocodile clips.
IT IS IMPORTANT TO KNOW! Fishermen caught 25 kg of fish using the Fish XXL ! Read more.
- Cut a piece of straw 3-5 cm long.
- Fill a cut piece of straw with hot glue.
- While the glue is hot, insert the LED into the straw. The LED leads should stick out about 5 mm.
- Insert the coin cell battery into the heat shrink.
- Cut off the excess part of the heat shrink so that 1-2 cm remains on each side of the tube.
- Insert the straws into the heat shrink on both sides.
- Use a lighter to heat the shrink wrap to pull it off over the straw.
- Connect the straw to the diode and heat shrink so that one contact of the diode touches one side of the battery, and the other contacts the other side of the battery.
- Glue a hairpin onto the free end of the tube with a glue gun, which will be attached to the fishing line.
And now the same thing only in video format. Enjoy watching.
Another option for an electronic signaling device
Here are a few more options for homemade bite alarms
Signaling device "Reel"
A group of fishermen revealed the name of the secret bait during interrogation.
Category: regional news.
Rattle built into stand
And here is another option for a signaling device that we found on the Internet. A very interesting idea. The recess for the fishing rod is stretched with rubber bands between bent wires.
It is worth noting that this design is not sensitive and is capable of detecting only powerful bites.
Feather floats
Floats made from one tube of swan or goose feather can, of course, be purchased in a store, but they can also be made at home. For these purposes, you need to choose a feather tube of sufficient length and thickness. Clean it inside, then boil it for ten minutes in water so that it becomes less fragile. Then dry. After waiting until the tube is completely dry, you need to press a small piece of wax or paraffin into it and, using a thin stick or wire with a non-pointed end, press it into the blind end of the tube. For convenience, it is advisable to dip the pen into hot liquid at this time so that the wax sticks securely. The free end of the feather tube is closed with a pointed match coated with glue; A loop of non-corrosion wire is tied to the other, sharp end. All that remains is to coat the float with varnish and, after waiting until it is completely dry, use it for its intended purpose.
Do-it-yourself float: how to make sensitive tackle
It is no secret to any of the readers of 34fish.ru that a lot of fishing depends on a properly selected float.
You can miss a bite or make a hook at the wrong time if the equipment for the rod or long-casting method is not installed correctly. Every fisherman has many floats in his arsenal. And how many of them remained in the thickets of the reservoir, trees or bushes. It's a shame if these floats are expensive! You can buy a new float, or you can make it yourself. The method of fishing and what kind of fish you are going to catch will be decisive in the choice of material and shape of the float to be made.
Materials and tools for making floats
Most often, craftsmen use available materials to make floats with their own hands:
You will also need tools and additional materials: a vice, a knife, a drill with a small drill, sandpaper, glue, varnish of different colors, degreaser.
Gallery: fishing floats (25 photos)
How to make a float from foam plastic
This float is highly sensitive. Basically it is made in the form of a ball with a diameter of 5-7mm, an olive or a drop.
- First, square blanks of the required size are cut from a single piece with a knife or hacksaw.
- After that, using a stationery knife or using a drill with a special attachment, give the float the desired shape and sand it with sandpaper.
- Having thoroughly cleaned it from dust, paint it with tempera or gouache and dry it.
- Cover with varnish and leave to dry.
- A through longitudinal hole is drilled in the center, into which a core of feather or wood up to 7 cm long and 1 mm to 1.5 mm thick is inserted.
- You can glue a part of a thin feather only into the upper part of the float, and in the lower part you can make a loop for fishing line from thin wire or an eye from a hook.
It is shipped mainly with one sinker so that only part of the rod is visible. It reacts well even to cautious fish bites, both from the bottom and by weight. It is advisable to mount a tackle with thin fishing line up to 1.6 mm to such a float.
Making a float from cork
The manufacturing principle is similar to the previous one. But it is necessary to take into account the porosity of the material and the fact that it becomes heavier when saturated with water. Therefore, before work, it is advisable to seal all large holes in the workpiece for floats with waterproof putty or finely crushed cork mixed with glue that dries quickly.
Then sand, degrease and coat with oil paint. Insert a rod with a loop into the longitudinal hole, at the end of which there is an eyelet from a large hook (No. 9-10). It turns out to be an excellent float on a hinge, which is fixed with a piece of tube put on a fishing line.
It is shipped with a minimum of two weights up to half the shaft of the upper part of the float.
Goose feather float - traditional
An indispensable float for catching very cautious fish, it works great in strong waves. Very easy to make.
- The only operation that requires caution is removing the feather from the feather. It is necessary to remove without haste, so as not to damage the integrity of the pen.
- Then the thinner lower part is cut diagonally and folded into a loop.
- A ring of thin wire and a tongue are inserted from below, wound with a thin thread to the rod, and covered with colorless varnish.
- Half of the float or its upper part is painted. It should be taken into account that very bright colors scare away fish.
DIY foam float (video)
How to make a reed float
Extraordinarily sensitive and lightweight cylindrical float. Silently lies on the water. The reed must be completely dry and undamaged. The strength of the material is checked by squeezing it between your fingers.
- Cut the reed with a utility knife into pieces corresponding to the length of the float.
- The cuts can be slightly sharpened with a pencil sharpener.
- Glue a wooden twig on top and a wire loop on the bottom.
- Wrap thread to thread both top and bottom. Carefully level and varnish.
- Make sure that the parts are centered and that the cuts and joints are well coated with varnish.
- Paint the top in the desired color.
All homemade floats made of foam plastic and cork can be made for both short and long casting, varying the height of the antenna and weighting the bottom of the float with a built-in lead weight.
With a huge assortment of floats in stores, experienced fishermen still make them themselves. And surprisingly, they will be the most catchy and the most loved, because they are made with soul.
We are sure that your homemade float will not miss a bite and will bring you a rich catch! We recommend reading the article about loading a float.
Float rod equipment
In float fishing, whether you are catching a ruffe or something larger, the quality of the gear you use is very important, because the fish can be quite large and strong, but you don’t want to miss out on a good trophy.
There is only one way out - to purchase such gear, using which you would not risk missing out on your next catch. Currently, a huge amount of all kinds of gear is sold on every corner. There are very expensive ones, there are cheap ones, but the most important thing is not to overpay to a cunning seller for a low-quality item. I will try to help solve this problem and tell you which rods, fishing lines, floats, hooks and sinkers to choose from an extensive range of products. One of the most important load-bearing gear, both in float fishing and in its other types. Nowadays, fishing rods made of fiberglass and Kevlar are mostly used. They are more flexible, easier to use, durable and lightweight, so I advise you not to stand out and choose a fishing rod made of these materials.
Have you decided on the material? Now you need to decide on a fishing spot. If you are fishing in a pond overgrown with bushes, then a long fishing rod will be extremely inconvenient to use; it is better to take a short (three/three and a half meters) fishing rod - it is both more convenient and cheaper. If the place is open and wide, you can take a longer rod (up to seven meters or more). If you like to travel to new places and your finances allow, buy both types of rods at once, or a medium length.
Reels are very common nowadays and there are three types! For float fishing, a regular or spinning reel is suitable. Naturally, a regular reel is cheaper, but the quality of such reels leaves much to be desired, so I advise you not to waste time on trifles and opt for the second option.
For a float fishing rod, a regular monofilament rod with a diameter of 0.2-0.25mm is best. They have different carrying capacities - you need to choose depending on what kind of fish you are going to catch. I advise you to take it with a reserve - situations are different. There are also different options for fishing line colors. If you fish in different waters, then white will be just right, but in general, buy one that matches the color of the water, then it will be less noticeable.
In my time I have seen a lot of different floats. Sometimes they even use wine corks. There are also plastic floats. They come in regular and glowing varieties. The second option is designed for night fishing; it will allow you to see the bite even in pitch darkness! In general, floats are not expensive, so the choice is entirely yours.
There is no need to say much! Even an ordinary lead plate can serve as a sinker. The most difficult thing here is to choose the right sinker and float so that the smallest and softest bite is visible. You also need to make sure that the float does not sink (this happens when you pick up a very heavy sinker).
A very small, but very important thing in the equipment. There are simply a huge number of sizes and types of hooks. To catch small fish, hooks of the “swallow” type are usually used. Here again it is entirely up to the buyer’s choice. The main thing is that the hook must be very well sharpened, otherwise there is a risk that it will not pierce the fish’s lip, but will only injure it - this is not beneficial for you or nature. You can also tie a hook in a bunch of ways, but one of the best options is the “figure eight” - this way the hook will be completely parallel to the fishing line.
That's probably all a beginner really needs. I sincerely hope that my advice and descriptions will help you when choosing gear. Good tackle is half the success - the main skill! Good luck fishing, dear readers!
How to make a float from a cocktail tube? Option #1.
Making a float from a cocktail tube is very simple. And, most importantly, quickly. It will cost mere pennies. For example, in my kitchen drawer, I have had these tubes lying around for God knows when. Nevertheless, it turns out to be very light and practical. A float of this shape is most suitable for closed reservoirs.
In addition, we ourselves, at our discretion, can load it during the manufacturing process. And all in order not to hang a long garland of weights on the fishing line. It's quite inconvenient. Next I will show what I mean. Now let's prepare everything we need, namely:
- Cocktail straws.
- Sharp knife and scissors.
- A piece of foam or wine cork.
- Any waterproof glue.
- Paints or varnish.
- A piece of thin wire.
- Pliers.
- A thin nail or something similar.
- Cargo.
Manufacturing.
First, let's determine the length and cut off the excess. This is important because it is necessary to prepare a couple more of the same segments.
Secondly. Since the float is too soft, it should be strengthened. To do this, you need to cut the tubes lengthwise and place them one after another inside the main one. In this simple way we make our float more durable.
Along with this method, you can use others. For example, fill a tube with foam balls, crumbling a piece. Or cut out blocks from a denser material and push them inside.
Thirdly, we make a fastening ring from thin wire. To do this, we wrap it in two turns around the nail and twist the ends together.
Fourthly, you need to cut several blocks of foam larger than the diameter of the tube. They will be needed for the plugs. If we decide to use cork for this, we will have to process it more carefully and accurately. Because it is a denser material.
Now you can load. To begin with, you need to push the plug inside, slightly crumpling it. So it would pass tightly. We do this so that our load does not roll inside the tube from end to end, but is fixed in one place.
Fifthly, we partially fill the allotted space with weights so that the float is immersed in the water by a third. At most, half. The test can be carried out immediately using a suitable container of water. Before this, of course, do not forget to plug the hole with a plug, otherwise the weights will fall into the water. Which is not very pleasant.
Sixth, let's take another block and make a hole in it, as we did earlier. Then carefully screw the prepared loop into it, adding a little drop of glue before doing this.
Completion.
We also apply a drop of glue to the foam before final fixation. We remember that you need to use super glue carefully, as it corrodes the material. In fact, it won't be any worse if you press in a larger piece of foam. In such a way that it sits inside the tube very tightly.
Now all that's left to do is paint. As you can see, I have already done this. As a result, this is what I ended up with.
Float for fishing in currents
When fishing in currents, a flat float is ideal.
Can be used in winter. For manufacturing we will need the following materials:
- Bamboo;
- Styrofoam;
- Clip;
- Waterproof glue;
- Nipple;
- Ruler;
- Knife;
- Sandpaper.
From polystyrene foam we make a blank in the form of a triangle with a thickness of 6-12 mm. It needs to be sanded using sandpaper. We make a hole in the middle of the workpiece, insert a bamboo stick into it and coat it with waterproof glue.
Insert a paper clip 15-20 mm long perpendicular to the bamboo into the foam and secure with waterproof glue. The resulting product can be painted with paint or nail polish.
How to increase your fish catch?
Over 7 years of active fishing, I have found dozens of ways to improve the bite. Here are the most effective ones:
- Bite activator . This pheromone additive attracts fish most strongly in cold and warm water. Discussion of the bite activator “Fish Hungry”.
- Increased gear sensitivity. Read the appropriate manuals for your specific type of gear.
- Pheromone -based lures .
Secrets of successful fishing: Cork floats
Cork float
practically not inferior in quality to foam plastic.
To make a float, you need a cork olive, a long rod made of chopped bamboo or hard wood, and iron loops with a rod. The cork olive is roughly cut out with a sharp knife and polished with glass sandpaper. All large holes in the cork are filled with waterproof putty or small crushed cork mixed with nitro glue. When the putty dries, the olive is sanded again and coated with alkyd paint. The paint will apply smoother and better if the surface is previously lubricated with drying oil and dried. The cork olive is put on the rod through the hole along the axis. loop
of thick guitar string is attached to the rod with a winding of Moment glue, onto which the shank of a hook No. 8.5-10 with a ring-shaped head is placed in advance. Prying the hook with the sting is removed with wire cutters. The loop with the shank of the hook is a simple hinge. The float is attached to the scaffolding using a polyvinyl chloride tube to remove insulation from low-current wires. The hinge rod (hook shank) should fit tightly into the tube mounted on the line. The float should be loaded from the cork like this. The first sinker from the hook was tiny. It should immerse 1/3 of the float rod without olives in water. It is placed 3-4 cm from the hook, which depends on the thickness and stiffness of the leash.
It is necessary to regulate so that
when lifting the hook on a vertically hanging leash, the sinker and the sinker rose without a huge deflection of the leash between them.
The second sinker, a larger one, is placed 10-12 cm higher than the first and should immerse almost the entire olive in water. Both sinkers and the hook should submerge the assembled float into the water, leaving 1/2 of the rod above the olive above the surface. The cork float rod is covered with hot drying oil and painted with two or three thin transverse stripes of dark brown color. Both sinkers are painted the same color. When the fish sucks the bait
into its mouth, this float floats up, protruding the entire rod out of the water up to the olive. This is the cutting moment. When fishing with large and strong baits (worm, potato, oil seal, spindle, leech, etc.), the rise of the float from the cork is used as a warning. It is necessary to hook the fish when the float sinks. A self-loading float made of cork is used for catching fish with a light, free-floating bait. Weighted self-loading floats are machined from cork or tree bark in the shape of an egg with pointed ends. A lead plate weighing 20-40 g is cut into the cork on one side so that the float occupies a stable horizontal position.
The fishing line is tied to the ear
wire passed along the axis of the float, and a leash with a hook and nozzle, but without a sinker, to the same eye on the opposite end of the wire. The upper, surface part of the float is brightly colored. For the best observation of the float at a greater distance, a bird feather without a awn is inserted into the upper part of it.