Factory rod options
Important! Due to the low weight requirements, side rods are quite practical and reliable in the fiberglass version of a summer telescopic fishing rod with three or four legs up to three meters long. It is easy to transform a winter spinning rod with a length of 0.6 to 1 meter, designed for ice trolling and fishing with balance beams and winter rattlin-type wobblers, from winter fishing to a sideboard.
Such a frame made of carbon fiber or composite material makes it possible to conduct more sensitive fishing with thin equipment, which is more necessary for the process of bottom fishing. The selected tackle is completed with a spinning reel and guide rings, subsequently installing the installation required for hunting conditions.
Do-it-yourself onboard fishing rod: manufacturing, equipment, fishing
There are many options for trim, I have developed my own ideal. This time I’m making a light, compact fishing rod for catching white fish in the river current from under the feed. The tackle will be designed for technical fishing using a rod and reel (in our area, reels are sometimes not installed at all, and the fishing line is selected manually after hooking). Here are the materials and tools we will need.
How to choose a fishing rod for a side nod
Rod characteristics
In order for fishing with a side nod to be comfortable, it is necessary to select a light and balanced rod, moreover, it must have a small windage and be rigid. During the fishing process, you will constantly have to hold the fishing rod in your hand, making movements, playing with a jig, and here, unlike winter fishing, the quality of the game depends not on the nod, but on the form.
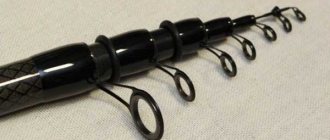
There are no special fishing rods designed for lateral nod fishing; for these purposes, it is best to use reinforced flywheel carbon-fiber telescopic blanks with fast action. These rods allow you to make quick and high-quality hooking, control the fish when playing and bring it to the shore at an accelerated pace. Also, for these purposes, you can use Bolognese fishing rods.
The presence of rings on the blank is necessary when you are fishing with a sliding rig (large fish, fishing from steep banks, presence of current). For small and medium-sized fish, in conditions of a standing reservoir, a rod without guide rings and blind equipment is sufficient.
Since fly fishing rods do not have guide rings, to fish with a sliding rig, you will need to attach them yourself.
The choice in favor of telescopes is made due to the fact that fishing with a rod with a side nod takes place in a wade, besides, you are constantly moving from place to place, fishing promising areas, and forms with a plug connection will significantly reduce your mobility.
Fast action rods are minimally susceptible to uncontrolled tip vibrations, which negatively affect the performance of the jig.
The length of the fishing rod will depend on the fishing conditions:
- When fishing from a boat or on a small river, a long rod with a side nod is not particularly needed, a 5-6 meter blank is enough. If you are on a boat and the depth at the fishing point is no more than 3 m, then the length of the form can be reduced to 4-4.5 m.
- On large rivers and ponds, it is necessary to use rods 7-8 m long, while such rods are universal and allow you to fish comfortably in various conditions (except for a boat).
- When fishing on large bodies of water, when you need to reach a hole or fish a large area of the shallows, you need to use a 9 m long form. Of course, the weight of such fishing rods begins to make itself felt, and not everyone will be comfortable fishing with such rods.
Onboard fishing rods
There are several conditions that onboard fishing rods must meet:
- unsinkability. When fishing from the side, there is a high probability of losing the fishing rod when the bream actively jerks when biting. The ability of the fishing rod to float will protect it from being lost in this case - sooner or later it will float up nearby and can be picked up. Attaching a fishing rod to a boat is still very inconvenient.
- flexibility. The distance from the end of the rod to the signal system when fishing from the side is minimal. It is important that an overly sharp hook is compensated by the flexibility of the form.
How to make a side fishing rod with your own hands
No one has ever considered fishing with side rods from a boat as a sport, but it is still one of the most productive, inexpensive and at the same time very exciting ways of summer fishing.
Typically, a side fishing rod is considered a rather crude “folk” tackle. However, you can achieve excellent results and get maximum pleasure at low cost with such a fishing rod.
Manufacturing, equipment and fishing.
There are many options for side rods these days. This article will describe step by step how to make a light and small fishing rod to catch white fish in the current from under the feed. Such tackle will be intended for technical fishing using a reel and rod (in some areas such reels may not be installed at all, and after hooking the fishing line is selected manually).
The photo below shows all the necessary tools and materials that you will need to make a side fishing rod.
There are fishermen who like to control large forms, up to approximately two meters in length. And some people prefer to have short rods in the boat, so that their size does not exceed 60 cm. Following the main indicators (weight, strength, length and action), the fiberglass end from Chinese telescopic rods is well suited, which perfectly ties large fish at a short distance and is known for its endurance. These whips are sold as spare options. Their price is approximately 50 cents.
The best handle for such a fishing rod is a cork. It may seem strange, but there is no shortage of this material. You can use narrow wine corks or mushroom-shaped corks for sparkling wines individually to suit your hand, create any configuration, and also play with shape and color.
Using a drill with a diameter of 6 mm, you need to drill the plugs along the axis and assemble a handle from them, pulling the parts of the plugs through the narrow end of the whip. The end cap should be cut off. Then the plugs need to be removed and carefully placed on the glue one at a time.
Reels should be small and inertia-free. Inexpensive Chinese models work well. In such reels, the throwing element used for fishing is practically absent, and cords are not used at all. The most important thing is a well-functioning clutch. In this case, winter soap dishes will work well. Spincast reels equipped with a closed spool are also perfect.
In this article, the “old-fashioned” method of attaching the coil will be used. So, you should make 3-4 turns of electrical tape on the side of each paw. You can also use a good cheap factory method - a reel seat, which is designed to equip Bolognese fishing rods.
The factory rings must be used. One of them should be the one that is used in telescopic fishing rods as a loose discharge (it is usually fixed approximately in the middle of the whip). In general, it can be glued. In this article it was simply tensioned and wedged.
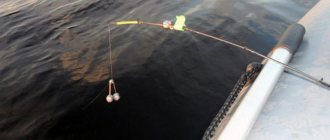
An excellent option is a winter nod in the shape of a spring with a ball. After installing such a nod, the fishing line passes inside the spring and through the ball itself. Such an element performs a certain number of functions - it registers a bite, compensates for the vibrations of the boat on the wave, and also plays the role of a tulip. During night fishing, chemical fireflies also attach well to it.
Onboard fishing rod rigging.
Line should be used with a diameter of approximately 0.2-0.25 mm. with a large measure of stretch, so that at close range it is possible to compensate for the jerks of all kinds of captured trophies, as well as sharp bites of river chub. You don’t need to wind the line much, about 20-25 meters. Leashes should be made from a slightly thinner fishing line and a length of 25 to 60 cm.
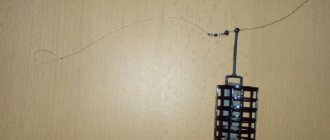
Loads must be secured with an “inline” fastening with an anti-twist outlet. The weight should be approximately 30-50 grams (depending on the strength of the current in the place where fishing occurs).
Receive a selection of new homemade products by email. No spam, only useful ideas!
*By filling out the form you agree to the processing of personal data
Making a side fishing rod
To make a light but strong side tackle for catching white fish - roach, bream and so on - you will need:
The tools you need are a knife or hacksaw and a drill (screwdriver) with a drill bit.
Fishing rod
A side rod can be made from almost anything. For example, some use iron rods for this. If you plan to catch fish by holding the line with your hands, without using a fishing rod, any whips will do. But it’s still better if the tackle is lighter - in this case, it will be much more pleasant to fish with it.
At the same time, the tips for fiberglass rods are very strong and durable; if used fairly carefully, fishing rods made from them are difficult to break and will last almost forever. Perhaps you have the last leg of a broken telescopic fishing rod at home. These whips are also sold separately in fishing stores and are inexpensive.
If desired, the purchased whip can be cut to the desired length. The optimal size of a side fishing rod for catching white fish is about 60 cm, but many people prefer longer gear. Longer tackle may be needed if holders are not used and after casting the rod is placed on the bottom of the boat and rests on the side.
Making the handle
The handle on the side rod is optional. You can catch by holding the whip itself with your hands. But fishing with a handle is more comfortable. In addition, you can easily attach a reel to it. If there is no handle, you will have to use a reel instead of a reel.
Cork is the best material for making the handle of a side rod for catching white fish. It fits nicely in the hand and does not slip. Cork is a “warm” material that does not cool your hands, even if the temperature drops below zero degrees.
Other options are foam and wood. A wooden one is best suited for making a fishing rod handle designed for hunting pike perch and other predators, as well as for catching large peaceful fish such as carp and carp. It will be tough and durable and will allow you to feel confident while fighting a serious trophy.
To make a good handle, just take 3-5 plugs, drill holes in them and place them on a whip with glue. A good configuration is 2 mushroom corks from champagne, between which there are 2 straight wine corks. Such a handle will have sides at the front and back and fit comfortably in the hand.
Fastening the pass rings
In addition to the handle on the fishing rod, you need to place guide rings. If you plan to use a nod with a line mount, a tulip is not needed, and one guide ring located in the middle of the fishing rod is sufficient. If you glue it securely, it will last for many years. Another option is to simply tighten the pass ring so that it fits snugly and does not wobble.
If there is no fastening for the fishing line on the nod, there should be a tulip at the end of the fishing rod, which must be glued if it is not there.
Reel mount
The coil can be wound with electrical tape. Another option is to use a reel seat for Bolognese rods. It must be glued and then also covered with electrical tape. The advantage of this method is that the coil can always be easily removed or replaced with another one.
Fishing rod with reel
You can do without a coil. In this case, you need to place a reel on the handle, on which the fishing line will be wound.
To make such a fishing rod you will need:
- whip;
- a round bead, a wooden handle from an old mop or another suitable piece of wood for making a handle;
- paper clips;
- insulating tape;
- thread, varnish, heat shrink tube and hot glue.
Manufacturing process:
- drill a through hole in the bead and remove the sawdust;
- glue the handle onto the whip;
- wrap it with electrical tape;
- make 2 pass rings and 2 hook blanks for the reel from wire or paper clips;
- make bends at the ends of the workpieces and hammer them into the handle to securely fix them;
- secure the reel hook blanks with electrical tape and bend them;
- wrap the guide rings onto the whip with thread and cover it with varnish;
- Place a heat-shrink tube onto the tulip mount for a more secure fit.
At this point the fishing rod is ready.
Making a nod
The nod requirements for a side rod are small. It should be consistent in stiffness with the weights you are using, but still be soft enough to show good bites. To equip an onboard fishing rod, a spring nod for a winter fishing rod is well suited.
You can also make this important element of the onboard fishing rod yourself.
To make such a nod you will need:
- coil spring;
- Styrofoam;
- a piece of thick hard rubber.
The spring should be soft enough to show bites clearly, but not sag too much under the weight of the sinkers you plan to use. Before making a nod out of it, it is worth checking it by hanging a weight. If the spring is too stiff, release it by holding it over the fire. If it is too soft, you need to look for another one.
Cut a ball or cube out of foam plastic, make a hole in it and glue it to one end of the spring. Make a rectangular nod mount from rubber. Make two holes in it. Insert a fishing rod into one of them, and a spring into the other. At this point the nod is ready. Such a guard must be attached to the fishing rod before the tulip is glued. Another option is to insert the spring into the tulip and tape it to the whip with electrical tape.
The glue must first be checked to make sure that it does not corrode the foam. If desired, the foam ball or cube itself can be painted red or any other color so that the homemade nod is better visible against the background of water.
Onboard float rods
Float fishing from a boat is also widely practiced. However, it is inconvenient to use gear that is usual for coastal fishing in a limited space and in the absence of the need for long casts on a floating craft. Among fly rods, short, so-called “bleak” models, which are distinguished by their short length (you can often find fishing rods less than 3 meters long) and low weight, which makes it very comfortable to catch relatively small fish at a fast pace, can also be suitable. In some places it makes sense to use short Bolognese rods. This is true in cases where the thickets on the shore do not allow one to get to the water, and the current makes it advisable to fish with a wire. The only significant drawback is that finding a Bolognese fishing rod less than 4 meters long can be quite problematic. Also, for float fishing, any onboard rods are quite suitable, from which the nod should first be removed, since the more familiar float acts as a bite alarm.
Characteristics of fishing rods used for fishing from a boat
The side rod must meet certain requirements:
- It should be short and with a powerful body.
- Have a flexible, sensitive guard.
- Must be equipped with several access rings.
- The rod should have an inertial reel.
The length of the fishing rod for catching a certain fish is selected experimentally; the structure of the fishing rod is important when casting over long distances and when catching large fish. As a rule, the length of a fishing rod for fishing from a boat is rarely more than 3 meters.
The degree of buoyancy of a fishing rod and its weight depend on each other. The fact is that when a trophy fish bites, the angler must be very careful so that the fish does not drag the rod out of his hands into the water. If the weight of the fishing rod is large, then it may drown if it gets into the water, but the tackle is more difficult to tear out of your hands.
For the convenience of onboard fishing, rod stands are installed on boats (similar to shore ones). As a rule, the handles of fishing rods are fixed with a cord or thick fishing line to the side of the boat. If it ends up in the water, it won't float away.
And finally, let's talk about equipment. Basic kit includes:
Fishing line. To select its length, you need to be guided by the total length of the fishing rod
It is also important to know whether the tackle has a reel. The thickness of the fishing line should range from 0.2-0.3 mm
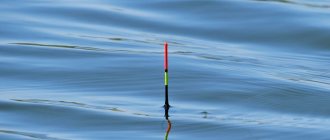
Select a light float, set the weight identical to the weight of the float. On purchased models, the weight of the float and shipping is already indicated. For homemade floats, select the shipping weight experimentally. Lead pellets are sold in fishing stores. Cambrics. Fishing hooks should be thin and sharp. Try to choose their color based on a specific body of water (the less transparent the water, the darker the color of the hook). When selecting an item number, be guided by the size of the fish you hope to catch.
Thank you for fishing with us! Or not yet?
How to do it yourself?
You can achieve the best results in fishing with the help of homemade side rods. Make an onboard fishing rod yourself, choosing a blank size that is convenient for your boat.
The rod whip is removed from an old or broken shore rod. Then the extreme knee of the Bolognese fishing rod is connected to the handle of the bead. What else can you make a whip from:
- The whip from the feeder quivertype is more sensitive.
- Sometimes the rod blank is made from a bamboo leg, borrowed from a float rod.
- You can use a wicker product that is specially selected and dried. If you compare this material with carbon fiber and carbon fiber, then they make rough whips. But they are well suited for catching large fish.
The handle provides maximum convenience when using the fishing rod. This is the most important detail in the product, which, in addition to convenience, allows you to securely and efficiently fasten the reel. Thanks to the handle, the tackle has the property of buoyancy and it will not sink when it is in the water.
- The part is made of lightweight material with buoyant properties. Natural cork (bottle) is suitable for this.
- A hole is made along the entire length of the cork.
- A steel wire with a diameter of 3-5 mm is inserted into the hole.
- The ends of the part are glued together, creating a strong frame that will securely hold the reel and rod blank.
Reel mount
There are 3 types of reels that can be used on board. These are inertial and inertial-free reels, as well as reels. The product is selected in accordance with the size and weight of the fishing rod, and the reel must be securely connected to the handle. Connection process:
- The most suitable option for equipping a fishing rod is inertia models with a drum diameter of no more than 10 cm, and inertia-free products of small sizes.
- If the rod is short, then the reel and blank can be connected in a blind way, by gluing or riveting. Blind mounts are also used when you need to fasten the metal frame of the tackle and the reel leg.
Equipment options
To equip the side daughters, several options of equipment are used.
- The first is the well-known float, in which the float is attached to the main line with one or several cambrics, and the sinker, as a rule, is fixed to the line. This option is practically no different from the equipment of the same fly fishing rod.
- However, rigs with a nod as a signaling device have become relatively more popular among fans of fishing with sideboards. The sinker here is sliding, and does not interfere with the transmission of information about the bite to the nod, and also allows you to fish in the current.
- When using feeders, purely feeder installations such as a symmetrical or asymmetrical loop are often used, but many anglers do not consider using a feeder in this case advisable, since almost any point can be fed from a boat.
- By attaching a vertical spoon or balancer to the side fishing rod, we get tackle for trolling. This type of lure is especially common for pike perch with tube spoons as bait.
What is a bottom fishing rod?
Donka is called gear for catching fish from the bottom of a reservoir using live bait or a specific bait. The equipment is statically fixed in the place where the bait was previously applied.
Basically, bottom tackle looks a certain way:
- fishing rod;
- coils;
- garters;
- fishing line with a weight and from 1 to 3 leashes and hooks;
- sinker, which is considered one of the most important elements for bottom tackle, since it holds all the equipment near the bottom. There are different types of loads - they are either placed on a fishing line or thrown along with all the elements.
Bottom tackle must be equipped with a feeder with loading, which makes it possible to provide targeted feeding each time you cast a fishing rod.
You can catch predators and peaceful fish on the donka. The list shows just a few of the possible types:
- crucian carp;
- roach;
- ide;
- burbot;
- salmon species;
- bream;
- carp;
- perch;
- soma;
- chub.
Do-it-yourself onboard fishing rod and the subtleties of selecting materials
Making your own onboard fishing rod is not a difficult task. Most often, the remains of other gear are used as materials. You can remove the elbow of the Bolognese fishing rod, which has a pass ring and a tulip. The handle is made using bottle caps, a piece of thick polystyrene foam (solid floor insulation) and even using foam. The foam is poured into a simple plastic bag and dries in this state. Next, a handle of any thickness and shape is cut from the hardened mass using a knife.
If wine corks are used as a handle for the rim, then about 4 of them are needed, depending on the size of the palm. Holes are drilled in them, which are lubricated with glue, after which the plugs are placed on the rod (on the knee which we have already prepared). The reel seat is attached using electrical tape or glue. Similarly, you can buy a cheap reel and immediately attach it to a homemade fishing rod.
The nod must be selected depending on the fishing conditions. For small fish, a sensitive soft nod is suitable, and for large bream, a harder and longer one. Onboard fishing rods are usually inexpensive, but the undoubted advantage of homemade fishing rods is the handle, which you can customize for yourself. Many people have gear lying idle in the garage or on the balcony, which it would be a pity to throw away, but they no longer have any use for fishing. They are suitable for manufacturing; there is nothing complicated in the process and there is no point in dwelling on this for a long time.
In the end, even a hazel twig will be suitable as a base (the rod itself), attach to it a nod from a winter fishing rod, a small inertial reel and that’s it, your hand-made tackle is ready! The catch can only be affected by a nod, which should be longer than usual, since the motion from the waves dictates its own rules. But such subtleties come after the first time on the water and practice on the spot.
How to attach a side fishing rod to a boat
There are three main methods to secure a fishing rod:
- Special fastenings are the most reliable fastening method. Among the disadvantages, it is worth noting the rather large size; the device will take up a lot of space in the boat
- Paddle lashing - This method should be used on wooden boats. Attached to the board with an oar or hook. The disadvantages include the fact that the fishing rods with this approach are fixed almost vertically.
- Magnetic mount - attaches to the board using two magnets. One is on board, the other is directly on the fishing rod. Contrary to expectations, the method is quite reliable, but loses to the two described above.
Fishing rod equipment
For onboard fishing rods, equipment is selected depending on the conditions of the reservoir. The most popular configurations:
- The universal set includes a rod up to 2 m long, fishing line, sinker and hook. A float is used as a bite catcher, so an alarm is not installed here. To catch large fish, you need a lot of fishing line, and for this you install a reel. If you intend to catch small fish, then the reel does not need to be mounted.
- The simplest equipment with a minimum set of elements is assembled from scrap parts. It is based on a reel and a signal bell. Instead of a bell, you can install a nod for a winter fishing rod.
- Universal spinning equipment is used for fishing both on the shore and on a boat. If fishing in still water is done from a watercraft, then long casts need not be made. For jig wiring, the role of a bite alarm is played by the feeder tip.
The fishing rod is equipped with a fishing line with a diameter of 0.2 mm. Hooks No. 4-8 are tied to the base or leash. The weight and equipment are attached to the vein using a triple swivel or loop. The place where the wire exits the load can be soldered.
To make the equipment sliding, the required weight is fixed on both sides at a distance of 10 cm and the main fishing line is threaded through it.
For a rigid rod and for catching small fish, a nod is mounted, this allows you to see how the fish bites the bait.
Equipment
The equipment includes:
- Main line
- Float held on by rubber cambrics
- A series of lead pellets for correct loading of the float
- A leash made of a thinner fishing line than the main one (10-20 cm long)
- Hook (of such a size that the fish can swallow completely)
How to properly equip and select all the details of a fly fishing rod
Read the article on how to assemble a fishing rod (including loading the float, selecting and attaching the hook). In the article, we used an example of rigging a fishing rod for catching small crucian carp.
First of all, you need to understand what size fish you are going to hunt, at what depth and in what weather.
Strength of equipment. A very important parameter. When fishing for carp, large chub, ide, you need to use a main line of 0.3-0.35 mm, and when hunting for specimens above 5 kg, even thicker. In this case, the thickness of the leash must be set to 0.05 mm less than the main line, or you can do without a leash at all.
When catching smaller fish (up to 500 grams), a fishing line of 0.2-0.25 and a leash of 0.12-0.15 mm are suitable. Cautious crucian carp and many other species of fish are very reluctant to take a bait from which a thick fishing line extends. Therefore, a thin leash is important.
Fluorocarbon is the material from which they began to make the most transparent fishing line possible. Its cost is significantly higher than regular monofilament, but you can buy small reels only 10 meters long. This is enough for a large number of leashes. The disadvantage of fluorocarbon is that its breaking load is two times worse than regular monofilament, so you should choose fluorocarbon that is 1.5-2 times thicker than a monofilament leader.
The depth of fishing and the presence of wind determine how heavy-duty a float you need to use. In calm water and fishing at a depth of up to 1.5 meters, a float with a weight of 1.5-2 grams is suitable, while in windy weather or for deeper places, a float with a weight of 3 grams or more is required.
There’s nothing you can do about the weather, but at great depths it’s completely inconvenient to fish with a fly rod with a blind rig. This gear is intended for fishing at a maximum depth of two meters, or you must have a fishing rod from 7 meters.
Tooling process
Sensitive float load
- When using a reel, the end of the fishing line from the reel is threaded through all the rings, then tied to the reel with the most ordinary double loop, the excess end is cut off with scissors. If you are not using a reel, tie the line with a knot to tie the lures to the tip of the rod.
- The line is wound onto the reel, the tip is cut off, and if you are not using the reel, then pull the line in the direction of the fishing rod and cut it at the place where the rod ends. In other words, the length of the fishing line should be the length of your fishing rod (maybe 0.5 meters longer).
- The tip of the fishing line is threaded into the ring of the float, then a small rubber cambric (or several pieces for a tighter fastening) is put on the fishing line, and the lower part of the float (keel) is threaded into this cambric. Cambrics are usually either sold with a float, or in boxes with lead weights, or separately.
- Move the attached float away from the end of the line and begin attaching small lead pellets one at a time. After each pellet attachment, lower the float with the sinker into the water (for example, into a plastic bottle). It is necessary to ensure that only the long, bright tip of the float appears from the water, possibly with a small base - useful when using heavy baits (for example, boilies).
- If you are not using a leader (for larger fish) skip this step. If you catch cautious, smaller fish, you need to tie a piece of fishing line 20 cm long with a smaller diameter than the main one (this will be a leash). Most often, a leash with a diameter of 0.15 mm is used when catching fish weighing up to 0.5 kg. When using fluorocarbon, use 0.25-0.3 mm in diameter (it is still very faintly noticeable in the water, the fish will not be afraid).
- A hook is attached to the leash. Regardless of whether the spatula has a hook or an eye, you can use the same knot.
Onboard fishing rod design
Like other fishing rods, side ones have the same main parts:
- rod – length 1.8–2 meters with a flexible whip at the end;
- the main line is preferably a braided cord with a cross-section of 0.2 mm;
- forest intake - reels of various designs, reel;
- signaling device - float, nod and others;
- sinker;
- leashes with hooks.
Simple float rod
This is the most budget-friendly and far from hopeless option , easily made with your own hands.
It is best to use a goose feather as a float. The float is installed on the main line and fixed with two pieces of cambric 3–5 mm each. In this case, it is better to use a regular fishing line with a cross section of 0.25–0.3 mm as the main one. The sinker must be selected very carefully according to the weight of the float, having adjusted its load in advance. The working part of the float, visible from the water, should be no more than ¼ of the length of the float. For leashes, it is better to use fluorocarbor line with a cross section of 0.18–0.2 mm. It is better to use medium-sized hooks. They quite confidently hook both small and large fish.
With this design of a side rod for catching bream, pulling is done by hand directly from the main line. The length of the main line on the reel should be about 25–30 meters. Catching bream from a boat usually occurs at a depth of 4–6 meters; if it is difficult to fish for a large specimen, you may need some supply of fishing line to allow the fish to take a walk and get tired.
Float rod with reel
This device of such a float with on-board equipment may look like the most acceptable option, while remaining budget-friendly and more convenient to use. The difference from the previous option is the use of a sliding float. A knot of ordinary thread is installed on the main line, designed to stop the float in the desired position when the gear is immersed, depending on the depth at the fishing site. The passage rings must be wide enough to allow the knot to pass freely.
Fishing technique and tactics
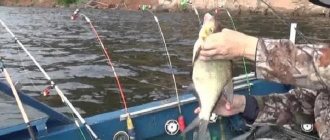
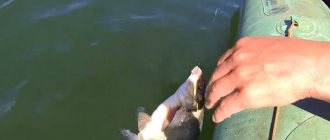
When catching bream with side rods, you should constantly hold these rods in your hands. When a bite signal occurs, you should immediately hook the bream.
Today, self-cutting rods for onboard bream fishing have begun to appear on sale. With such fishing rods, when biting, the bream spontaneously gets hooked, and the fisherman can only remove the prey from the water.
But when hooking, the fisherman himself should not make particularly sharp jerking movements, so that the bream cannot fall off the hook. In addition, the presence of such an element as a landing net can provide significant assistance when fishing for bream, especially if a large individual of the bream family is caught on the hook.
Tips for beginners
- When lifting the fish itself from the water, you should be especially careful, because the bream can make a last attempt to escape from the fisherman.
- Boat fishing allows you to fish more promising areas of the reservoir.
- If the bites are weak, try to diversify the game with bait, this will help interest the bream.
- Don't make too much noise when fishing for bream, otherwise you will scare away all the fish.
- When catching bream using the onboard method, do not try to take three or more fishing rods with you; two fishing rods will be enough, one of which is used to catch bream, and the other will serve as a spare.
- When fishing for bream, you should constantly keep the line tense so as not to give the bream room to maneuver.
- Choose fishing rods for onboard fishing with a length of no more than two meters that will float in the water; for example, some fishermen use school pointers rather than fishing rods.
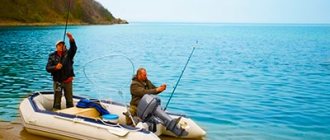
Features of fishing from a boat
Fishing from a boat
Ideal fishing, which will bring true pleasure, is possible when the angler does not feel any discomfort while fishing. In order to fish from a boat, the following factors should be considered:
- where to fish (river, lake, reservoir);
- what kind of boat you will be fishing from (size);
- from what depths the fish will be caught;
- Is the body of water familiar to the fisherman?
Having chosen a suitable place for fishing (it is better if there are several such places), you must first install two poles. The poles will perform several functions:
- point to the fishing spot (they should be visible from afar);
- the boat will cling to the poles. If fishing takes place on a river with a noticeable current, then the boat should be positioned across the current. And if you plan to fish on a lake, reservoir or river with a very small current, then the boat can be installed in different ways (along the wind, along the coastline, taking into account the sun, and so on);
- There will be complementary foods on the poles (you can attach a bag to each pole).
In order for the fish to be constantly at the fishing site, it needs to be fed and this must be done constantly, periodically changing and adding new food. In this case, she will, as it were, “graze” in this place, get used to the feeder, and success in good catches will be ensured. At the same time, there is no need to overfeed her, otherwise she will become fat. That is, having fed first, then take breaks for several days so that the fish is on a kind of starvation diet.
But during the fishing itself, you should remember that the bite can change frequently. Therefore, you need to constantly experiment (either remove the complementary food completely, then change the bait on the hooks, then adjust the depth to half-water, and so on). But one rule should always be followed. This rule says that complementary foods should not be more attractive in taste than the bait itself, which is used to attach to hooks. Otherwise, the fish will simply ignore the bait.
Construction of tackle
Recommendations for choosing gear:
- The choice of line depends on the fish you want to catch and the weather conditions. For example, grayling is caught with a fishing line of 0.20 - 0.30 mm. In shallow water, when fishing with a light lure, use the thinnest fishing line; and in deep-sea reservoirs, a thicker fishing line is required.
- The diameter of the fishing line depends on its quality. It is necessary to remember the rule: the sum of the diameter and height of the throughput ring does not change.
- Rotating spoons are considered the most universal, followed by oscillating and wobblers. It is preferable to have several types of the same brand, varying in weight and color.
- The bait is chosen at the request of the fisherman. The choice of bait weight in a given body of water depends on the depth and other factors (casting distance, casting speed, etc.).
Gear collection:
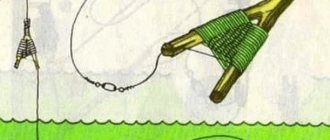
- A sliding float is attached to the fishing line of the fishing rod. Then, a small bead. After that - a sliding sinker. Next is another bead. The first is necessary so that the float does not break on the sinker, and the second is necessary so that the sinker itself does not damage the assembly.
- A loop is knitted at the end of the main line using a double knot or figure eight. A leash is attached inside the loop (the thickness is 0.1 mm less than the fishing line), which is made from a very thin fishing line. The leash itself reaches up to 20 cm in length.
- All that remains is to install a stopper that prevents the float from moving freely along the line. The most effective and simplest way to do this is to tie a stopper knot. It is compact, easily passes through the rings and carefully stops the movement of the float in the right place.
Taking into account all of the above, we install blind equipment for long-distance casting. We will describe the differences that need to be made when constructing a sliding option below.
So, here is the sequence of actions in order to correctly assemble the tackle for long casting: 1. We choose a float, Bolognese or match rod about four meters long.2.
We put on it a medium reel with a Shimano coefficient of 3000 and a conical spool.3. We equip the spool with monofilament fishing line with a diameter of 0.14 millimeters.4. We pass the line through the guide rings of the rod.5. We attach the float to the working line, using the method that is suitable for the selected float.6.
The rod should be selected from 3 to 4 meters long. Longer tackle is more difficult to control and make hooks, but short tackle makes it impossible to throw a light-weight bait over a long distance.
The fishing rod must be well equipped and contain:
- conical reel seat;
- handle (necessarily cork);
- about 16 passage rings located on high holders. They will help to distribute the load evenly, and the wet line will not come into close contact with the gear;
- rod test.
It is quite natural that it is recommended to buy an inertia-free open type reel. It must have the following characteristics:
- small size;
- average price. The cheapest reel gives only one guarantee - it will fail at the most crucial moment, so you should not skimp when purchasing;
- equipped with at least three bearings installed in the line laying roller and in the handle;
- the line layer must be made of hard alloy and must be treated with titanium nitride, which increases strength;
- An important point is the presence of a friction brake. For small fish it should be located in the front, for large, or even trophy specimens, the brake should be located in the front and rear.
- The diameter of the coil should not exceed 40 centimeters.
It is recommended to select fishing line based on the characteristics of the reel. She must have the following qualities:
- sinking, good quality - when immersed in water it will not be influenced by the wind;
- have a small diameter. 0.12-0.2 millimeters is suitable for amateur fishing, but in competitions they use a slightly different diameter of 0.1 - 0.16.
- As an option for fishing line, you can also consider braided line. With its fairly thin and durable structure, it is not exposed to strong winds.
Important! The line winding should never reach the edges of the spool, but should be two to three millimeters lower. Otherwise, peculiar beards may form and long casts will be impossible to achieve.
Gear structure and equipment options
I use a fishing line with a diameter of about 0.2-0.25 mm, preferably with high elongation, in order to compensate for the jerks of possible trophies and sharp bites of river chub over a short distance. I don’t move it a lot, about 20-25 meters. I make the leashes from a slightly thinner fishing line (0.18 - in the current there is no need to make them too shallow, the fish takes it more boldly), with a length from 25 to 60 cm.
I place a silicone stopper above the sinker on the main line (it is used to prevent the load from hitting the nod during transportation). The stopper should be raised by 20-30 cm during fishing.
At the end of the main line I knit a swivel or a swivel with a clasp (to quickly change leashes twisted by the current). Carp anglers have special plastic fasteners for changing leads. I close the swivel assembly with a bead made of elastic rubber (also taken from carp fishing - such strays are called “anthers”). I pull it directly onto the knot and the swivel ring, so the leash never gets tangled through a piece of the knot’s line.
The onboard fishing rod consists of:
- short fishing rod with a handle;
- coil located on it;
- nod;
- fishing lines with equipment.
Usually 2-3 fishing rods are used. Then the chances of a good catch are higher than with one tackle. The more hooks with bait are thrown into the water, the higher the likelihood that one of them will be found by a fish.
And also when fishing with several fishing rods, you can try different baits to quickly determine which one will be more attractive.
A few words about the equipment of the onboard fishing rod
I use a fishing line with a diameter of about 0.2-0.25 mm, preferably with high elongation, in order to compensate for the jerks of possible trophies and sharp bites of river chub over a short distance. I don’t move it a lot, about 20-25 meters. I make the leashes from a slightly thinner fishing line (0.18 - in the current there is no need to make them too shallow, the fish takes it more boldly), with a length from 25 to 60 cm.
I prefer weights with a through-fastening “inline”, preferably with an anti-twist outlet. I select the weight in the range of 30-50 grams - depending on the strength of the current at the fishing site.
I place a silicone stopper above the sinker on the main line (it is used to prevent the load from hitting the nod during transportation). The stopper should be raised by 20-30 cm during fishing.
At the end of the main line I knit a swivel or a swivel with a clasp (to quickly change leashes twisted by the current). Carp anglers have special plastic fasteners for changing leads. I close the swivel assembly with a bead made of elastic rubber (also taken from carp fishing - such strays are called “anthers”). I pull it directly onto the knot and the swivel ring, so the leash never gets tangled through a piece of the knot’s line.