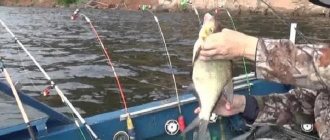
The article talks about catching bream with side rods on the reservoir. The important aspects of fishing, bait, gear layout, feeding features and other important nuances are covered.
It’s worth noting right away that onboard fishing is not very widespread in all the reservoirs where I’ve been. There have been approximately the same number of onboard boats in recent years. Apparently, this is a stable circle of fans of onboard tackle, and other fishermen are not particularly eager to join their ranks. Although in winter almost everyone fishes from the ice with almost the same gear and similar techniques.
Reasons for the low popularity of onboard tackle
So why don’t many people practice airborne? I see three possible reasons. The first is that they don’t believe in its capabilities. Here, until you try it yourself, you won’t be convinced. I, too, used to be very skeptical about this method of fishing, but now I’ve changed my opinion for the better. The second reason is the sharp increase in the popularity of modern float fly and match fishing, which people enjoy fishing not only from the shore, but also in a boat. I will not compare the possibilities of summer float fishing and onboard fishing. I will only note that if the latter had lost even a little in bream catches, this ancient tackle would have long since gone into oblivion, because everyone has float rods. I think there are other reasons here, ranging from “in the summer you need to fish with summer gear, which is promoted by modern float fishing” to a simple fisherman’s “I like it better.” And for me, it’s just more pleasant to fish with onboard gear, while I’m sure that I won’t catch more or larger bream with summer float gear. And the third possible reason for the low popularity of onboard fishing is that despite the external similarity of winter and summer vertical fishing, onboard fishing has its own characteristic features, without taking these into account, it is problematic to successfully transfer ice experience to fishing from a boat.
How to catch
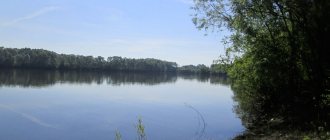
The best time to catch bream is from July to the end of September. The depth at the fishing spot should be at least 5-6 m, more preferably 7-8 m. It is believed that in shallower places it is not possible to catch bream from a boat.
In addition, it is desirable that the fishing site is not a local depression, but a fairly extensive plateau of approximately the same depth. Fishermen often call such plateaus a “table”. Usually, bream stays in such places during the day, and only at night does it get out into shallow water.
It is believed that bream prefers a bottom with a small amount of silt, and does not like a bare bottom, so when choosing a place, you should make sure that there is silt on it.
Once the place is chosen, you need to start baiting. Before doing this, the boat should be anchored. But not just by throwing a stone with a rope to the bottom, which will immediately scare away all potential trophies, but by using trip wires. For this purpose, two weights of 10 kg each (consisting, for example, of bundles of bricks with a rope, 8-10 m long with a float in the form of a plastic bottle at the end) and twine at least 25 m long are ideal.
They should be positioned in accordance with the directions of the wind and current so that the boat is located exactly above the chosen fishing spot, and both anchors do not interfere with fishing.
Complementary feeding is carried out in the evening, after which you should untie the anchors to start fishing in the morning.
You can use commercial bait for bream or make it yourself. The latter can be a mixture of cake, breadcrumbs and bran, fastened with flour and rolled into balls. Common boiled peas are often used.
The best bite will be in the morning, from about 4 to 9 o'clock. In the afternoon, the bream practically does not bite. Usually on the first day the bite is mediocre, and only with the second feeding are more or less decent results obtained.
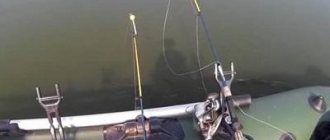
Either one lies on the bottom, and the second is located slightly higher (and sometimes significantly), since sometimes bream bites at depths of up to 5 m at a bottom level of about 7-10 m.
Wiring with an “active” fishing rod is carried out according to the following scheme: gentle movements of the fishing rod in the up and down direction, as much as the hand allows. In this case, you should monitor the nods on all fishing rods. You need to react to any deviation of the nod movement from the norm and react instantly - the hook must be lightning fast.
The use of onboard fishing rods pays off when fishing from a boat not only for carp, but also for predators such as perch or pike perch. It is believed that this fishing method is most effective at the beginning of summer. At this time of year, the fish have a good appetite and they go well even with heavy spoons and jigs.
Catching bream from a boat is a more effective way to catch this fish than catching it from the shore. Since bream most often loves deep water and flat bottom areas during the day, a boat is often the only way to get to it.
Bream has long been considered a worthy catch for a fisherman, whose measure of skill was the capture of especially large trophies of this cautious and cunning fish. Fishing places are not always accessible for comfortable fishing from coastlines and anglers have to look for schools of bream far from land, where bream are more relaxed and active, without fear for their safety. Catching bream from a boat with onboard fishing rods under such conditions becomes the most productive method of hunting, but to ensure it requires an individual selection of equipment both for the fishing itself and for its technical support.
Differences from winter fishing
I like to catch bream in winter. Comparing ice and summer boat fishing, I see the main difference - when onboard fishing, it is impossible to achieve absolute immobility of the boat and, accordingly, the gear. This winter you sit confidently, clearly fixing the tackle and hook with bait, over and over again lowering it onto a nickel of bottom soil no larger than a matchbox. I also point feed, opening the feeder at the very bottom. In winter, there is an opportunity to play along with a jig. And even the wind is not very dangerous for the operation of the nod; it can always be neutralized by sitting with your back to it, or hiding in a tent. But sitting in a boat, you won’t be able to fish like that. Perhaps, in absolute calm, no special problems are expected, but on reservoirs, the wind, at best, wrinkles the water, and at worst, drives a decent wave. As a result, no matter how you anchor the boat, you won’t be able to fix it absolutely motionless, which affects many aspects of fishing.
Equipment
There are 3 main types of mounts for onboard gear, from which you can choose the appropriate one depending on the conditions or your personal preferences.
Standard
The most versatile rig option for a side fishing rod is with a sliding sinker. This type of rig can be used in any conditions, but its disadvantage is that when fishing on a muddy bottom, it can fall into the silt.
The weight of the sinker is selected according to the fishing conditions: for fishing in the current, a weight of 25–50 g is suitable; in still water, lighter weights can be used. It is better if the sinker has an anti-twist.
To tie a standard onboard fishing rod rig, you need to:
- put a sinker on the main line;
- tie a swivel at the end of the main line;
- tie a leash with a hook to the swivel.
A swivel is required when fishing in a current that strongly twists the line. Also, it will not be superfluous for fishing in still water, although you can fish here without it. If silicone stoppers are placed below and above the fishing line, they will protect the nod and the knot with which the swivel is tied from impacts from the sinker.
Donnaya
Bottom rigs are the best option for fishing on muddy bottoms. When fishing with this rig, a hook with a nozzle will not fall into soft ground.
To assemble this equipment, you need:
- stepping back from the end of the main line about half a meter, tie a side leash with a hook to it;
- Attach a sinker to the end of the main line, which will be located at the bottom.
The length of the leash must be selected in such a way that the hook cannot fall on the ground and fall into it.
Feeding process
There are no big problems, just like in winter from the ice, feeding point-wise in order to activate the fish’s bite. But it won’t be possible to fish exactly along the compact stern spot - no matter how you pull the anchor halyards, no matter what angle you let them in, the boat still drifts a little to the left and right along the guy ropes. If the wind changes, the boat will shift slightly in the new direction of the wind. Accordingly, there is no point in feeding compactly in order to fish somewhere away from the bait spot. But you don’t want to scatter the food too widely, because this will disperse the fish. And I usually try to place the bait in a spot with a diameter of 1-2 m; I choose a specific option depending on how much the boat is rocking today. I try to form the spot so that the bait approximately falls into its center. Starting feeding is five times more than in winter. So, if I immediately lower one full standard feeder from the ice into the hole, then in the summer there will be at least five. A large amount of food in open water is in itself good for collecting and retaining fish, and also allows you to properly feed the required bottom area.
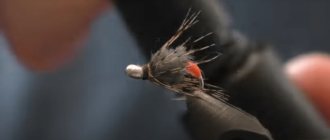
Do-it-yourself onboard fishing rod and the subtleties of selecting materials
Making your own onboard fishing rod is not a difficult task. Most often, the remains of other gear are used as materials. You can remove the elbow of the Bolognese fishing rod, which has a pass ring and a tulip. The handle is made using bottle caps, a piece of thick polystyrene foam (solid floor insulation) and even using foam. The foam is poured into a simple plastic bag and dries in this state. Next, a handle of any thickness and shape is cut from the hardened mass using a knife.
If wine corks are used as a handle for the rim, then about 4 of them are needed, depending on the size of the palm. Holes are drilled in them, which are lubricated with glue, after which the plugs are placed on the rod (on the knee which we have already prepared). The reel seat is attached using electrical tape or glue. Similarly, you can buy a cheap reel and immediately attach it to a homemade fishing rod.
The nod must be selected depending on the fishing conditions. For small fish, a sensitive soft nod is suitable, and for large bream, a harder and longer one. Onboard fishing rods are usually inexpensive, but the undoubted advantage of homemade fishing rods is the handle, which you can customize for yourself. Many people have gear lying idle in the garage or on the balcony, which it would be a pity to throw away, but they no longer have any use for fishing. They are suitable for manufacturing; there is nothing complicated in the process and there is no point in dwelling on this for a long time.
In the end, even a hazel twig will be suitable as a base (the rod itself), attach to it a nod from a winter fishing rod, a small inertial reel and that’s it, your hand-made tackle is ready! The catch can only be affected by a nod, which should be longer than usual, since the motion from the waves dictates its own rules. But such subtleties come after the first time on the water and practice on the spot.
Fishing
The winter experience of fishing for bream, with hand-pulling the line, is largely in demand when onboard fishing, where I fish in the same way, putting the rod aside after hooking. Yet there are two differences in this matter. The first is pleasant, due to the fact that when the bream is brought to the boat, in the water, all its movements are visible in the palm of your hand. In winter, especially if the ice is cloudy or covered with snow, I only see bream lips, and then only when I have already brought the fish into the hole, and before that everything is done by touch. The second feature of fishing is that the process is more complex than in winter. In open water, problems with large bream often arise when I bring them to the upper layers of the water. He often starts playing in circles and goes under the boat. It can pretend to be completely exhausted, but as soon as you start to bring it into the landing net, the bream turns around and powerfully tears to the side or down. And so, it happens, he mocks him two or three times until he ends up in the landing net. Of course, it would be useful to tire the fish somewhere closer to the bottom, but it will scare away the whole school there. And immediately after hooking, a side fishing rod cannot, due to its design, move it away from the baited area, as a float rod or feeder can do. And at any stage of fishing I can’t force it, because in winter and summer I fish with a fairly thin line of 0.12 mm (real diameter), which usually gives more bites, and they are more confident, compared to thicker equipment.
Installation and equipment of an onboard fishing rod
From a boat, bream is caught mainly using onboard fishing rods. We'll talk about them.
What is a side rod?
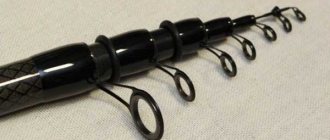
- Actually, the rod itself has a not very soft whip, since you have to catch and hook at great depths
- Coil
- Nod, guard (also not very soft)
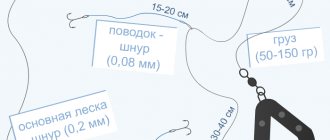
Onboard fishing rod equipment for catching bream:
- Line 0.3 mm
- Sliding sinker. With a small current of 20 grams. At high currents from 40 grams.
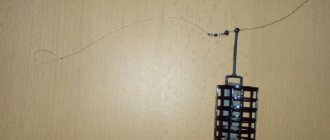
- Spring
- 2 leashes
- Cambrics on locking units
- Hooks No. 6-7
- Bait: worm, maggot, bloodworm, bread crust, garlic-scented lard.
The fishing line is attached to the spring in the center using a carabiner; the spring will lie horizontally. 2 leashes are also attached to the spring with a carbine, on the left and on the right.. We make a stopper above the spring and hook a sliding sinker. And again we attach the equipment to the fishing rod with a carabiner.
As already mentioned, a fishing rod for onboard fishing should be taken around two meters; this is the length that will ensure a comfortable process of catching bream from a boat. The tip of the fishing rod itself should have good flexibility.
I use a fishing line with a diameter of about 0.2-0.25 mm, preferably with high elongation, in order to compensate for the jerks of possible trophies and sharp bites of river chub over a short distance. I don’t move it a lot, about 20-25 meters. I make the leashes from a slightly thinner fishing line (0.18 - in the current there is no need to make them too shallow, the fish takes it more boldly), with a length from 25 to 60 cm.
I prefer weights with a through-fastening “inline”, preferably with an anti-twist outlet. I select the weight in the range of 30-50 grams - depending on the strength of the current at the fishing site.
I place a silicone stopper above the sinker on the main line (it is used to prevent the load from hitting the nod during transportation). The stopper should be raised by 20-30 cm during fishing.
With one fishing rod
If in winter, when fishing for bream from ice, I can put out several fishing rods without any problems, then I fish from the side of a boat with only one tackle. After all, I don’t experiment much with bait, relying on a reliable, repeatedly tested bunch of bloodworms. In some places it can be useful to add maggots, but this is not the kind of variety that forces you to put out several fishing rods at once in order to quickly figure out the best bait for today.
I don’t see the need to fish with several gears in order to figure out the coolest horizon - usually bream in the reservoir either takes it from the bottom, or doesn’t take it at all. And most importantly, active fishing with one fishing rod allows you to significantly better control the entire fishing process, especially when the wind blows the boat. And after successful hooking, there is no need to worry that the bream will have time to get tangled in the equipment of the second fishing rod.
Catching bream on a float
Catching bream with a regular float rod requires great care. The first thing you should always keep in mind is that bream is very shy, and if it notices the slightest sign of danger, it will most likely immediately run away and hide again in the depths
Therefore, you should take care of silence and camouflage, because even the shadow of a person on the water can drive cautious fish far from the shore. You only need to get to the fishing spot on foot, so that the sound of the vehicle’s engine does not scare away the aquatic inhabitants. Conversations and other noise while fishing for bream on a float rod should also be kept to a minimum.
Scheme for loading a float when fishing for bream in windy weather
Bream should be caught on a float in the morning and evening, when the fish moves closer to the shore in search of food. First of all, you need to feed the place with a couple of casts of complementary food prepared for bream, so that a kind of feeding spot is formed in this place of the reservoir, luring hungry fish. Next, you can throw bait and fish, throwing in bait every two hours. Tackle for catching bream on a float rod requires careful preparation, since many conditions must be met for such fishing to be successful:
- You will have to choose a long rod, 6-7 meters, if we are talking about fishing from the shore, and not about using a watercraft.
- The fishing line is 0.2-0.28 mm, since a thinner one may not withstand a strong and large specimen when fishing, even if it has already been hooked.
- Strong hooks of 10-14 mm will prevent the pecked fish from being torn off.
- To catch bream, you need a long float weighing 1-2 g, the keel of which is often made from a bird feather.
- Several weights are placed on the line at regular intervals in a row in descending weight, from heaviest to lightest.
Usually, when biting, bream does not pull the float under the water, but, on the contrary, places it on the surface of the water.
Video on catching bream on a float in spring:
Bait for catching bream in early spring
In early spring, from early March to April, voracious hungry fish effectively bite on “fatty” baits of animal origin:
- Bloodworm.
- Maggot.
- Caddisfly.
- Muckworm.
- Crawling out.
Bloodworms are well suited for catching bream in reservoirs rich in these insects
Fish get used to feeding on them even without human intervention, so a moth in the water does not cause any caution in it.
But it is important to remember that in addition to bream, almost all other fish feed on bloodworms, so much more often the nimble and small fish will be on the hook
Maggot is a universal bait option for catching almost any fish. As in the case of bloodworms, in addition to bream, all other sea inhabitants will also peck at maggots, but in this case you can use a trick. If you put several baits on a hook at once, forming a small ball, then such a large object will scare away small fish, but large bream, as well as other fish of decent size, will willingly grab it, which will allow you to weed out the unnecessary bite of small things.
Caddis flies and dung worms have approximately the same qualities as maggots. Bream loves them just like other types of fish, so in order to sift out small things, it is better to put such bait on the hook in small bunches.
The crawl is an option for those fishermen whose target is precisely large bream and specimens of other species similar in size, such as carp and carp.
Mid-Spring Bait
In April, bream is no longer so voracious, since its belly is already often filled with caviar or milt. However, he will never refuse to eat something small, but high-calorie and nutritious, so the following baits are suitable during this period:
- Bloodworm.
- Maggot.
- Muckworm.
Bait for fishing in May
Around May, the bream's spawning period ends, which entails some changes in its diet: the bream begins to actively peck not only on bloodworms and maggots, but also on the following baits of plant origin:
- Canned corn.
- Green peas.
- Pearl barley.
- Semolina.
- Dough, bread.
- Pasta.
Here the fisherman has a little more room for experimentation. You can try different recipes for preparing dough and cereals from which the bait will be molded, so it is possible to add vanilla and other aromatic additives: cinnamon, chocolate, caramel. Combinations of different baits on one hook also prove effective. Simple recipe:
- Canned corn.
- Vanilla dough.
- Maggot.
Best fishing spots
They say that bream points for fishing with onboard tackle often coincide with winter ones, and then ice experience is a great help when searching for fish in open water. Things work out a little differently for me. In winter, the main bream depths where I fish are no more than 5-5.5 m. But in open water I fish in completely different areas, although the depths are almost the same. This is an almost flat plateau, there are just regular drops of ten centimeters up and down. The bottom is soft, the anchor is covered in a black mess, there is no grass. That is, a vast, uniform area along which the bream most likely moves widely, and there is no need to find a point that worked well before on the next fishing trip. But where can you not return to where the bream pleased you with the bite last weekend! Therefore, I enter a place into the navigator and stand on the stretchers approximately in the same place where I fished earlier. Although it is quite problematic to become absolutely perfect, especially in the wind - by the time you figure out the stretch marks, you will be wrong by 3-4 meters.
Time of day
Compared to winter, the daily fishing period is quite short. In winter, I often fish at night, and even during the short winter day there are periodic outbreaks of biting. In general, you can feed the point, relax and, having gone out for the night, calmly wait for the fish to approach. With onboard gear, fishing is more dynamic, often only taking place in the morning hours.
The first bites for me usually begin an hour and a half after dawn - until you feed, until everything on the bottom settles down, until the fish approaches and the main peak of the bite begins. Something else may continue to hatch, but after 10 o’clock there was never much bite, and I sit until lunch at the most.
Making a side fishing rod
To make a light but strong side tackle for catching white fish - roach, bream and so on - you will need:
The tools you need are a knife or hacksaw and a drill (screwdriver) with a drill bit.
Fishing rod
A side rod can be made from almost anything. For example, some use iron rods for this. If you plan to catch fish by holding the line with your hands, without using a fishing rod, any whips will do. But it’s still better if the tackle is lighter - in this case, it will be much more pleasant to fish with it.
At the same time, the tips for fiberglass rods are very strong and durable; if used fairly carefully, fishing rods made from them are difficult to break and will last almost forever. Perhaps you have the last leg of a broken telescopic fishing rod at home. These whips are also sold separately in fishing stores and are inexpensive.
If desired, the purchased whip can be cut to the desired length. The optimal size of a side fishing rod for catching white fish is about 60 cm, but many people prefer longer gear. Longer tackle may be needed if holders are not used and after casting the rod is placed on the bottom of the boat and rests on the side.
Making the handle
The handle on the side rod is optional. You can catch by holding the whip itself with your hands. But fishing with a handle is more comfortable. In addition, you can easily attach a reel to it. If there is no handle, you will have to use a reel instead of a reel.
Cork is the best material for making the handle of a side rod for catching white fish. It fits nicely in the hand and does not slip. Cork is a “warm” material that does not cool your hands, even if the temperature drops below zero degrees.
Other options are foam and wood. A wooden one is best suited for making a fishing rod handle designed for hunting pike perch and other predators, as well as for catching large peaceful fish such as carp and carp. It will be tough and durable and will allow you to feel confident while fighting a serious trophy.
To make a good handle, just take 3-5 plugs, drill holes in them and place them on a whip with glue. A good configuration is 2 mushroom corks from champagne, between which there are 2 straight wine corks. Such a handle will have sides at the front and back and fit comfortably in the hand.
Fastening the pass rings
In addition to the handle on the fishing rod, you need to place guide rings. If you plan to use a nod with a line mount, a tulip is not needed, and one guide ring located in the middle of the fishing rod is sufficient. If you glue it securely, it will last for many years. Another option is to simply tighten the pass ring so that it fits snugly and does not wobble.
If there is no fastening for the fishing line on the nod, there should be a tulip at the end of the fishing rod, which must be glued if it is not there.
Reel mount
The coil can be wound with electrical tape. Another option is to use a reel seat for Bolognese rods. It must be glued and then also covered with electrical tape. The advantage of this method is that the coil can always be easily removed or replaced with another one.
Important features of onboard gear
Nod or float. The choice in this important issue depends not only on personal skills and habits, but also on real conditions. Based on my own experience, I will say: in winter I can play along with bait, and here I can’t do without a nod, but on board fishing I never play along, and the need for a nod disappears by itself. The conclusions here are simple - why it’s bad to play along crookedly, it’s better not to do it at all. I can also admit that playing along is useful when fishing in a calm state or in a very light breeze, when the boat is almost motionless. But I don’t remember fishing trips when I found myself in such conditions on a reservoir - a constant wind of 5-6 m/sec, a wave, plus a small current.
At the same time, the boat is in perpetual motion up and down, and even if this amplitude is not so large, it is sufficient to disrupt the play of the jig fishing rod, no matter how hard you try to play along carefully. Such disruptions and sudden movements may be suitable for perch, but bream is a more cautious and respectable fish. That’s why I use a float rig, and since I don’t need to play along, I don’t see the need for a jig. I tie a high-quality hook No. 14 to the fishing line, one weight is clamped on the fishing line of 3-4 cm, everything is simple, traditional, but I’m experimenting with the float.
Now about how to anchor correctly
On the eve of fishing, I always listen to the weather forecast on the radio and try to find out the direction of the wind. If there is a breeze in the morning, then I lower the bow anchor to the maximum length of the halyard. Then I wait until the boat is positioned exactly downwind and lower the stern anchor. I pull up the bow halyard and secure it so that it is securely on the stretch.
If there is no wind, then after lowering the bow anchor and its halyard to the maximum length, I take the oars and position the boat in the predicted wind direction. Nowadays, weather forecasts are rarely wrong, and the boat, as a rule, can be positioned correctly. I lower the stern anchor and tighten the bow halyard.
All that's left to do is choose a fishing spot.
It's not easy to catch big bream. He is cautious and timid. But there are still ways to do this. One of them is fishing with a side rod with a nod. In this article I describe fishing for bream from a boat in bodies of still water.
The gear for this kind of fishing is very simple.
In fact, this is a winter fishing rod with minor differences. You can buy a special fishing rod, about 0.7 m long, equipped with a simple reel for storing fishing line. Or you can take an ordinary winter fishing rod and attach a whip from a fiberglass telescope to its handle with electrical tape. That's all the rod is.
The only requirement for the whip is that it must be hard, since it only takes part in the game of bait and hooking. Fishing is done by hand. I use main line from 0.15 to 0.22. It is not worth using a thinner line because it is inconvenient to use. Since the likelihood of beards increases when choosing gear. After all, the fishing line has to be stowed in the boat. Greater thickness is not recommended, as the tackle becomes too rough.
A leash of 0.13-0.14 is possible, but not required. The length of the leash is about 0.5 m.
When fishing with two hooks, there is a danger of the free upper hook catching on the boat when landing the fish, and the threat of it getting off. Therefore, in the absence of the necessary dexterity and experience, it is better to fish with gear with one hook or jig.
The last part of the tackle is the nod. The nod for summer fishing is longer and more powerful compared to the winter version. Selected empirically. It should not sag much under the weight of the bait and allow for a smooth game. I use lavsan nods and metal ones made from a watch spring.
The next necessary part of preparing for fishing is preparing bait.
The best bait Sometimes, with the addition of maggots. There should be a bunch of 3-4 worms on the hook. In some reservoirs, large bream can also be caught using bloodworms. But it is difficult to use in summer. The hooks are too big, and it is difficult to keep bloodworms in warm weather. It also sometimes bites on pearl barley, but it’s worth fishing for it only if you’ve run out of animal baits.
So, gear, groundbait, bait - everything is ready to go.
The best weather for catching bream in the summer with a side fishing rod is, oddly enough, a stable anticyclone, with a weak wind, heat and sun. It is on such days that bream stays in the cool depths during the day. Although quiet cloudy weather is also good.
The best fishing time is from July to October. And of course, people don’t go fishing for a good bream for one day, without spending the night.
Tips for fisherman: How to properly equip a float rod for roach - What to choose for fishing
All that's left to do is choose a fishing spot.
Bream do not like to stand in the pits themselves in summer.
If everything is in order with the place, then you can start feeding it.
Before this, you need to anchor the boat with guy wires.
Now I will describe the technique for setting the boat up.
A few words about the boat.
It can be anything, but it’s better not to fish from metal and plastic longboats. It is difficult to maintain silence on them while fishing. And the larger the sail of your boat, the more inconvenient it is to fish from it. For ease of fishing, many fishermen install seats from old Zhigulis in their boats. It is difficult to sit for many hours on ordinary benches without a backrest.
Complementary food can be delivered under the boat using a feeder (an enlarged version of the winter one) or simply scattered around the boat. Some bodies of water have strong undercurrents. Feeding with a feeder is preferable on them.
I usually fish with two fishing rods.
The best bite is usually from 4 to 9 am. But it can bite even before lunch. After 15 o'clock the bream rarely bites. On the first day, the bream may not bite at all or bite weakly, but on the second day the bite is usually better and the fish are larger. If you fish for several days, then additional feeding (1 kg of peas) should be done in the evenings.
To store fish while fishing, I use a fabric cage about 1.5 m long. Although many sources write that storing fish in water scares away others, I have not noticed this. Still, it’s usually far from the bottom. However, when fishing at a depth of 5-6 m, it is still better to store the fish in a boat.
After finishing fishing, do not forget to get the anchors. Don't pollute the pond. If the load is stuck in the mud, use the gradual rocking method.
Good luck to you in this exciting activity - onboard fishing!
Bream is an omnivorous species of fish that can take an interest in virtually any bait of plant or animal origin. Usually it bites well on dough with the addition of a small amount of natural honey, various insects or their larvae.
Feeding the chosen fishing spot is one of the most important stages, since the bream remembers the places where a large amount of food was found and then often returns to them.
It is recommended to prepare bait mixtures that combine ingredients of plant and animal origin; they are especially effective in the summer, when the main growth of fish is observed, which contributes to more active consumption of food.
One of the recipes:
An alternative option for preparing a bait mixture to attract bream:
6. Rod “Ob”: a reliable compact rod consisting of two sections. Designed for fishing with light equipment. Equipped with guide rings and a neoprene handle. Length – 0.9 m, test reaches 12 g.
Float nuances
Now I fish with a double float, the same one that many people use when fishing from ice, completely submerging both alarms under the water. The lower one is larger, designed to neutralize the main weight of the load. The top one is a signal one, small, and even when it floats up completely, the bream does not spit out the bait, because the bottom float is always submerged.
I plan to experiment with other options, including with one float, also sinking it, maximizing the sensitivity of the equipment, which floats whose antennas protrude above the water lack. I conduct the main experiments for better visibility of the bite, because with rough water and even small ripples, the float is not always clearly visible, because it regularly begins to be pulled under the boat, or, conversely, away from it. You have to use a fishing rod to return the float to its place. Of course, this problem can be solved radically - by dramatically making the equipment heavier by placing a massive load on the bottom. Maybe somewhere on reservoirs with unafraid bream this technique will work, but on reservoirs that are under considerable pressure, it is very useful for the bream rig to be delicate, light, almost “roach-like” not only in winter, but also in open water, only then can confident swimmers bites even during periods when the fish are not very active.
By the way, about the visibility of the float. I myself do not have very good eyesight - a typical difficulty for many floaters who have similar problems, which makes it very difficult to observe the float when fishing with a long stroke, during match fishing. You have to install large floats with thick antennas, with bosses on thin antennas. All this reduces the sensitivity of the float equipment, but floaters are forced to do this so that the float is clearly visible and bites are not missed. Onboard fishing solves the problem radically - the float is nearby, but I submerge it no more than 1-2 cm from the surface, for greater visibility. Although I don’t deliberately play along with the bait, the play is still present beyond my desire - precisely at those moments when the float is pulled together, and I return it to its place. After all, at this time the entire equipment is moving, and the slow movement is transmitted to the hook with a bunch of bloodworms. Whether this is useful for catching bream or not, I don’t know - the fish are caught, and that’s fine. I know for sure that the bite is much worse with rough equipment, even if the bait doesn’t move. So let it pull, but it will bite.
When and how to properly catch bream on a float rod
Bream fishing in open water begins in early spring, as soon as the ice melts. But the early spring bite before spawning is short-lived, despite the fact that the fish, hungry during the winter, take very well and the catch can be very successful. Already in the spring on the river, when the fish are walking, catching bream with a fishing rod can be successful in not very deep places with a flat sandy bottom, and of course using bait.
Tips for a fisherman: How to catch bream in a reservoir in winter - Tips for a beginner
When catching bream with a fishing rod, there is no need for the float to be deeply immersed and stand upright; it is better if it is slightly inclined. So in calm weather you can see the subtlest bite, even the sinker moving from its place, and not just raising the float upward, which is a characteristic bream bite.
The boat should not sway noticeably, much less move. There are several ways to securely secure a boat in a fishing spot, but they are all based on the principle of guy lines. Depending on the strength of the current and wind, I use two or three anchors on nylon guy ropes.
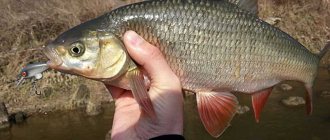
It is not easy to catch a large bronze beauty; bream is shy, distrustful and very careful. There is practically no chance that he arrived and immediately caught a bream. In addition, fishing from the shore is futile here; you need a boat. And besides this, catching bream requires not only certain gear, bait and bait, but also knowledge of the bottom topography to select a fishing area, as well as long-term feeding of the selected place. Content:
CHOOSING A FISHING PLACE
One thing is clear - you need to look for bream sites. Therefore, I highly recommend not to rush, but to spend an extra hour searching for a promising place for catching bream, rafting downstream, especially if you plan to fish for several days. It would be very nice to use an echo sounder, but if you don’t have one, you should carefully examine the shore and the border of aquatic vegetation, which will indicate where to start taking depth measurements.
When taking measurements and remembering promising points, it is better not to rely on any landmarks on the shore, because everything is so changeable on the water, but to immediately mark such places with small weights with buoys, prepared in advance before sailing. A perfectly acceptable option would be a piece of soft cord 10 meters long with a weight and a PET bottle as a buoy.
The cord is connected at one end to the neck of the bottle, the other to the load, and the entire supply of cord is wound directly onto the side surface of the bottle. When a promising point is found, this entire simple structure is simply thrown overboard, while the load rushes to the bottom, unwinding the cord. With this type of self-reset, tangling of the cord is practically impossible. Several such signaling devices will help to identify promising places and choose the “best” one from them.
BOAT INSTALLATION
The boat should not sway noticeably, much less move. There are several ways to securely secure a boat in a fishing spot, but they are all based on the principle of guy lines. Depending on the strength of the current and wind, I use two or three anchors on nylon guy ropes.
WHAT DO WE FEED, WHAT DO WE FISH WITH?
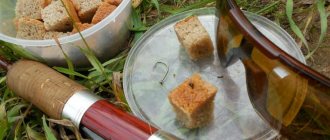
Cooking peas in a regular saucepan is troublesome and takes a long time, so I do it easier - I cook the peas in a pressure cooker. For this case, my “kulak farm” has a 5-liter industrial pressure cooker. Cooking peas in such pressure cookers is much faster. So, in a 5-liter pressure cooker, peas are cooked to the desired condition within just 15 minutes after boiling.
!If fishing is carried out over several days or even weeks, cooking peas is most reminiscent of a conveyor belt - in the morning, before going fishing, I filled the dry legumes with water, during the day I boiled the swollen peas in a pressure cooker, before the evening dawn I took the finished peas out of the pressure cooker and again overnight I poured water over the dry peas, which were to be cooked after dawn.
It would be a good idea to experiment with the color of the nozzle and flavors. On the last fishing trip, for example, a large roach could not resist pearl barley, which was painted bright red with food coloring when boiled. Beyond competition for roach is barley flavored with fragrant honey. I successfully caught bream using a bait that had a faint aroma of anise and vanillin. But the smell of garlic seems to be not to the bream’s taste. In general, you need to try everything. And now, finally, you can start fishing.
WHAT DO WE FISH?
The reel is intended only for storing a supply of fishing line; it does not take part in casting bait and landing fish, so it can be of any type. I prefer light-throwing wire-type reels that have a stopper and trigger. With such reels, it is very convenient to adjust the length of the line at the fishing spot, achieving the optimal position of the sinker near the bottom. It is desirable that the reel be strong enough so that when it moves freely, it unwinds itself under the weight of the sinker.
The main line on the reel is 0.14 mm, maximum 0.16 mm. It doesn’t make sense to bet less, because fishing is done by hand, and a fishing line of this diameter is not the same as bream, but it doesn’t scare small roach either.
Equipping a side fishing rod with weights is somewhat different than equipping a float fishing rod - only the main sinker is available, there is no additional weight. Depending on the strength of the current, the mass of the sinker varies from 1.5 to 5 g.
The downward deflection of the guard under the weight of the sinker is approximately 40 degrees relative to the horizon line. And, of course, the guard must be able to change the length of the working part, adjusting to the weight of the sinker to achieve the optimal bending angle.
If the length of the guard is up to 120 mm, you can safely refuse additional passage rings for fishing line on the guard plate, but if its length exceeds the specified value, then one passage ring located in the middle part of its plate is still appropriate. It is desirable that such a passage ring be able to move along the nod plate. This will make it easier both when transporting the fishing rod and when setting it up in preparation for fishing.
Tips for fisherman: What fishing line is needed to catch bream - What to choose for fishing
A FEW TIPS
In addition to the obligatory accessories - an extractor or a medical clamp for removing the hook from the fleshy lips of the caught fish - the boat should have a landing net with a short, up to one meter handle, preferably with a fishing line so that the sinker and hook do not get tangled. With such a landing net it is not only more convenient to take fish from the water, but also to carry out further manipulations to remove the hook and lower the fish into the net without bringing it into the boat, which will help keep the “workplace” and clothes clean.
If you have a steady hand and strong nerves, you can do without a landing net, taking the fish out of the water by the head. As I already noted, the hooked bream goes to the surface quite calmly, without making circus somersaults, as often happens when fishing in shallow water. On the surface, after taking a breath of air, the fish freezes for a few seconds, and at this moment you can safely pick it up with your hand. But I still prefer a landing net. No tail, no scales!
Forgot your password? Enter your email address. You will receive an email with a link to reset your password.
Forgot your password? Enter your email address. You will receive an email with a link to reset your password.
Once registered, you can ask and answer questions and earn money. Read the rules, we will be glad to see you among our experts!
- Interesting Facts
- 10% from referrals
- Earnings on Vamber
- TOP authors
- Work without experience
Once registered, you can ask and answer questions and earn money. Read the rules, we will be glad to see you among our experts!
Fate has developed in such a way that for the last thirty years the main “testing ground” where I hunt for bream has become the nearby reservoir. In the summer, as a rule, I fish from a boat and always with a float rod. Somehow I don’t recognize bottom tackle, my passion is a float, although they say that a feeder is a more catchy bream tackle. But I don’t believe in this, and I don’t like watching a bunch of fishing rods placed along the shore.
Choosing a fishing rod
For me, the choice is directly related to the same float - when it is carried away from the starting point, returning it to its place with the movement of a fishing rod, which should have the length that allows you to return the equipment conveniently, quickly, and easily. This cannot be done with an ordinary standard winter fishing rod, since you will have to work too widely with your hand, bending somewhere, in general, is inconvenient. It’s more convenient for me to work with a fishing rod a meter long. Otherwise, nothing is required from it, because it’s just a mount for a small reel, and after hooking, the fishing rod doesn’t really work anymore. And while waiting for a bite, I usually don’t hold it in my hand, but put it on the side of the inflatable boat. So the choice here depends on personal preferences, which are varied; accordingly, the onboard fishing rods themselves differ significantly from one angler to another.
Onboard – solo fishing
Many experienced fishermen who love to fish with side rods say that they always fish alone, and if they fish with a partner, they are separated from each other by several tens of meters. And I understand their position. So, when my friend and I are chasing mugs for pike perch, the two of us in a boat are a nice thing, everything goes better with four hands. But if we catch bream with onboard fishing rods, then everyone fishes from their own boat, and we also disperse a little. Still, this fishing requires solitude with your gear and fish. Any unexpected movement of a partner is transmitted to the boat, affecting my tackle, and in the same way I, albeit a little, disturb my friend, this is especially noticeable when the boat is small. Maybe on a large river, where they fish from the side with heavy sinkers, it doesn’t matter how many people are sitting in the boat, but on a reservoir it’s important.
The onboard fishing rod does not like other gear
If we talk not about catching leucorrhoea in general, but specifically about bream, then in my experience, onboard fishing is rarely successful if you start being distracted by other gear. In winter, when there is no bream bite on baited holes, you can place bets somewhere nearby on pike perch or pike, and use a jig to go to smaller places, looking for roach or perch. Onboard tackle requires concentrated fishing with it, its essence is such, and the period of daily fishing is short, there is no time to be distracted. As you know, according to the old classics, a bream fishes a place that is important for several days, generally for the shortest possible period, usually at dawn, when a significant catch is taken in a few tens of minutes, if the flock has approached. If it’s not there, then tomorrow will come – the fisherman will definitely check his treasured point.
Overnight fishing
Fishing for tench in the off-season
Burbot in the heat