Content
- 1 Feeder functions
- 2 Types of feeders 2.1 Mesh feeders
- 2.2 Spiral feeders
- 2.3 Special feeders
- 3.1 Making a mesh feeder
- 4.1 Feeders and fishing from a boat
- 6.1 Types of winter feeders
Mesh feeder
Mesh is an ideal material that allows you to make a high-quality feeder. In construction stores you can easily find sheets made of plastic or metal, which are used mainly for finishing work. A mesh fish feeder can be made in a matter of minutes. This can be done directly while fishing. For production, scissors, wire, mesh, and sheet lead are required.
Feeder functions
Feeder for fishing
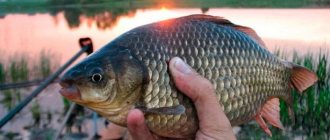
Feeders are used for catching all common types of fish in all bodies of water, and this is an excellent fishing method that allows you to carefully feed fish at different distances from the shore.
A feeder is a container of bait attached to a fishing line that allows the contents to be gradually released. The feeder is quite heavy, so it quickly sinks to the bottom of a river or lake, where it remains during fishing.
You can fill the feeder with the same bait you are fishing with, and due to the feeder being so close to the hook, feeding is extremely gentle. This is especially important when fishing in deep water and in fast-flowing rivers, where it is difficult to ensure that the bait and free bait will end up in the same place.
Long cast
The considered bale is a separate interpretation of the half-bottom for a narrow set of places, fishing the coastal edge. A standard donka with a float in the current with rings and a reel on a long rod from a fishing rod is a universal tackle. You can either tap the bottom underneath you on the edge or use it for long-distance casting. This is an excellent tackle for catching crucian carp, for example, when you need to cast a lot and search in a strong wave. With a heavy feeder, we can use fairly large floats with long antennas - and they are clearly visible from 20, 30 meters. The depth at the fishing point is set on the fishing line after several casts to this point - usually so that the float lies, reclines, or only the antenna peeks out.
If we have a float tackle with a spring threaded through the main line (like a sliding spring in a donkey or a watermelon with a rocker), then the bite is expressed in dragging the float. If the feeder is in a blind version at the end of the main line, and the hooks are higher on the retractable leashes, then you can see more sensitive bites and small fish. This question is already from the category of experiments on a specific reservoir.
In this case, it is better to use a sliding float, on stoppers - as in a regular fishing rod. The only difference here is that there is a heavy load at the end.
Read Fishing for rudd
Types of feeders
There is a huge variety of feeders. They all perform the same function, but differ in place and conditions of use. Some work better in calm, standing water, while others cope well even with strong currents. Let's look at some of the most popular types of feeders.
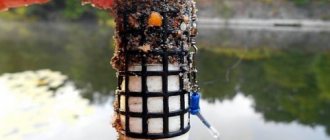
Mesh feeders
Mesh feeders are a small cage that is filled with bait. Each such cell is equipped on one side with a metal plate-weighting agent. Different types of mesh feeders differ in shape and size.
In form there are:
- square;
- round;
- triangular;
- rectangular;
- semicircular.
Different shapes of feeders are used in different conditions. For example, round ones perform best in calm water. For places with strong currents, it is better to use square or triangular ones.
There are also cage feeders:
- open (best suited for fishing in calm waters, food is consumed faster);
- semi-closed (used in strong currents, ensuring slower flow of bait).
Spiral feeders
Round-shaped spiral feeders cannot be used in currents, but they are quite simple and fly excellently over long distances. The fishing line is passed through the central rod, and the entire structure of the feeder moves freely along it.
Spiral feeders
Spiral bait can be considered the initial version of this type of feeder, and Method-Feeder is their further improvement, a hybrid of a feeder and a fixed sinker for catching carp and bream.
- Behind. A simple bait spiral
is a classic unloaded feeder for bait that has a fine consistency (not suitable for large grains). The fishing line runs inside the rod of the feeder, so its replacement is possible only with a new installation of the equipment. - Zb. Wide bait spiral:
the line passes through an elongated lead “olive”. Thanks to the weight, this spiral can also be used on rivers. - Zs. Bait bomb.
This feeder has a weight located at the lower end, so it is convenient to cast it far. Attached to the main line by the upper end using a swivel or locked using a ledger stop. - 3d + Ze. Two Method-Feeders
. Such special bait “spirals” were invented in England, where this method is used to catch carp and large peaceful fish.
Special feeders
These feeders are designed for special situations.
- 4a. Feeder with lugs
for fishing in strong currents. Thanks to wire lugs and a very large load, it is used even on rivers with rapid currents. - 4b. Sponge for maggots
. It is placed in a jar with maggots, and the larvae crawl inside the sponge. Unfortunately, some of them remain there forever. - 4s. Attractant feeder made of microporous material
that can absorb liquid attractants and then release them very slowly. - 4d. Eel feeder
. The nylon mesh is filled with strips of fish, chopped worms or grains. - 4e. Wire feeder
. It is quite bulky, so it is difficult to throw. Used for feeding very large quantities of bait or in strong currents.
Types of gear for current without using rods
The fishing rod is a useful, but optional part of the bottom tackle. You can do without using a form using the following methods:
- Carousel
- Rubber
- Zakidushka
- Spring
One of the advantages of fishing without a rod is its small size. Such gear is fixed on reels that can hold them firmly in strong currents.
However, additional reinforcement will not hurt when it comes to catching large specimens. Such gear does not require a spinning reel, which makes it lighter, but complicates fishing.
Elastic band - for frequent bites
Reducing monotonous actions to the required minimum is the task performed by the “elastic band” tackle. Active bites require frequent recasts, and the elastic helps reduce the amount of hassle. Rubber equipment provides the necessary shock absorption and is always delivered directly to the fishing spot due to its stretchability. Required:
- Fishing line. Length - 1 meter, cross-section - 0.25 millimeters
- Swivels. 2 pieces. Type No. 8
- Leashes. Material: monofilament line. Hooks No. 10-14
- Fishing elastic. Length - 20 meters
Manufacturing:
- A swivel is attached to the end of the fishing line
- An elastic band is fixed on the reverse side of the swivel
- Leashes are placed at intervals of 10 centimeters
- After fixing all the leashes, the remaining fishing line is cut off, about 20 centimeters should remain
- The second swivel is attached to the main line
- A weight is tied onto the empty end of the elastic band
Spring - universal method
A spiral feeder made from wire is called a spring (there may also be a plastic analogue as in the photo above). It can be used both with its own load and with a suspended one. Both types of equipment are suitable for such a feeder: blind and sliding.
Whether you need self-hooking in conditions of active biting or a high level of sensitivity during passive biting - decide for yourself, depending on the situation. The spring leads have a relatively short length of about 10 centimeters.
Spring usage:
- Dense bait is being prepared
- Complementary food is placed inside the feeder
- Hooks are added to complementary foods
This method allows the fish to swallow the bait while feeding with the bait.
Groundbait and spring bait
Pea mastyrka is considered an ideal complementary food. It is easy to make at home, and its smell is great for attracting bream. As bait, you should give preference to the following options:
- Foam balls half a centimeter in diameter
- Steamed peas
- Mastyrka
- Maggot
- Bloodworm
- Worm
Carousel for those who have a boat
The carousel has a certain resemblance to the elastic band described above. It has up to 10 leaders and is also a tackle without a rod. It takes its name from the similarity of the interaction process when fishing. A fishing line is taken, folded in half and threaded in the middle through a load thrown into a pond. At the moment when one of the sides is pulled by the fisherman, the second begins to sink into the water.
The fishing line is attached to the reel, a signaling device is installed, and the fisherman goes into standby mode. When biting, the tackle is pulled out on one side and plunged into the water on the other. This method allows you to catch bream without much effort, but you shouldn’t count on large specimens. The carousel is too primitive for truly big fishing.
Nipple and top for fishing in still water and during currents
Makushatnik is a good option for universal tackle. It is suitable for both a river with a stormy current and a quiet lake. Its main disadvantage is the length of the wait. This inconvenience stems from the very principle of the tackle, according to which the top of the fish must first be washed away and attract the bream. After the bait has worked and the fish is within range, the multi-hook tackle detects it.
Foam is used as bait. The nipple is a little faster, but the difference in vole time does not differ fundamentally, although in conditions of good flow this process occurs more actively due to the rapid erosion of the bait. These rigs are good because they can bring in a really large fish and do not require a fishing rod.
DIY feeder
All developments for bottom feeding can be divided into several main types, based on the fishing location. The decision on how to make a feeder for fishing depends on the personal preferences of the fishing enthusiast.
Making a mesh feeder
Mesh feeder
Metal wire is an ideal solution for making your own fishing feeder. If desired, suitable canvases for the job can be found at points of sale of building materials.
How to make a fishing feeder from a metal mesh? First of all, you need to have a sufficient piece of material, a small piece of lead, and also have scissors on hand.
First, a piece of the required size is cut out from a piece of mesh. Next, a strip of lead is cut to serve as a crimp for the edges of the pyramidal or cylindrical structure. Finally, a wire fastening is formed to connect the finished product to the fishing line.
Making a feeder from a bottle
Feeder from a bottle
To make such a model yourself, you will need the plastic container itself, a marker, scissors, a ruler, a soldering iron, sheet lead and flexible wire.
The work is carried out in several stages:
- The neck and bottom of the bottle are cut off. The resulting cylinder is cut across and unbent.
- The locations of future holes are marked with a marker. It is recommended to place them in a checkerboard pattern approximately every 2 cm.
- The workpiece is folded back into a cylinder with some overlap. The edges are connected using glue or a stapler. Alternatively, the planes can be heated and joined with a soldering iron.
- The previously marked holes are made with a hole punch, drilled with a drill, or burned with a heated metal rod. To avoid deformation of the material, it is better to perform the procedure using the first two methods.
- A lead plate is adjusted to the shape of the circle of the edges of the workpiece. A reinforcing ring is formed, the edges of which are tightly pressed around the entire perimeter of the plastic.
- If a semi-closed feeder for fishing is required, the sides of the basket are tightened with wire.
Making a feeder from curlers
Feeder from curlers
You can make effective equipment from ordinary plastic hair curling accessories. Thanks to the variety of ready-made, available options, such a do-it-yourself fishing feeder can be made in any color and shape. To change the size of the product, you only need to apply a minimum of effort. It is convenient to carry out the work with pliers and wire cutters.
When choosing a suitable base for making the desired design, you should not give preference to curlers made of unreliable material, as well as options with a pronounced, repulsive odor.
To make the product heavier and stronger, as in previous cases, the edges are crimped with a piece of lead plate.
Making a feeder from cork
Cork feeder
An ideal option for catching bottom fish (carp, carp, catfish, bream), which prefer to look for food in the ground, would be a model known as a “nipple”. Such a fishing feeder can easily be made from a cork from a drinking water container. To complete the work, you only need a plastic base, a piece of lead, a winding ring, and a hole punch in the form of a nail or an awl.
First, a flat sinker is placed at the bottom of the cork, which can be made from sheet metal. To fix the weighting agent, it is enough to make through holes in the product, into which a strong, pliable wire is inserted and twisted inside. Using any suitable hole punch, openings are prepared on the walls of the cork for a wire ring, leashes and hooks.
In conclusion, all that remains is to prepare bait with a viscous consistency that will hold well in the existing current, fill the “nipple” with it and hide the hooks in the bait.
Making a spring feeder
Spring feeder
Such products turn out to be especially effective when fishing in still waters or with a slight current. A spring feeder for fishing can be made from wire of various sections depending on existing conditions.
The simplest option is a spiral design. As a training exercise, it is recommended to make the first feeders from a thin base, which will allow you to hone your skills and learn how to work with the necessary set of tools.
As a template, it is enough to take a steel rod onto which brass or copper wire is wound using pliers. It is enough to make 10 to 15 turns. Next, the metal rod is removed, after which the future feeder is given an elongated or barrel-shaped shape. When choosing the distance between individual turns, you must rely on the strength of the current and the consistency of the bait used.
Finally, a leash is attached to the spring feeder. To securely fix the element, it is necessary to solder or firmly connect the outer turns of the structure.
Making a closed feeder
Closed feeder
This type of product is made when it is necessary to feed with worms or maggots. Here you can use any plastic container as a housing, be it a film or Kinder Surprise box.
A weighting agent is placed at the bottom of the product, the weight of which is selected depending on the level of the current. Holes are drilled in the walls of the structure, the diameter of which will be sufficient for the bait to gradually emerge into the wild.
The most resourceful fishermen resort to an alternative option, using a porous sponge as a replacement for the maggot container. It only takes a few minutes for the live bait to crawl inside and later crawl out of the material while at the bottom of the pond.
Plastic cork construction
A do-it-yourself fish feeder can be made from plastic cork. This design is usually called “smoktukha” or “nipple”. This type of feeder is ideal for catching those types of fish that usually collect food from the bottom. This design can be made from a plastic container or from a regular lid. To do this you will need a winding ring, an awl or nail, sheet lead and a cork.
Using a feeder for fishing
Feeders are an effective fishing tool, but their disadvantage is that they often break off and in order to use them, you need to be sure that there are no algae and snags on the bottom, that it is clean. Therefore, you shouldn’t waste too much money on them; it’s better to make them yourself, it’s not difficult.
But, despite some disadvantages, fishing with feeders brings a lot of impressions and gives good results. The good weight of the feeder, taking into account the weight of the bait, allows you to cast to a very large distance from the shore, namely, large specimens “walk” away from the shore. The bites on the feeders are very sharp, which is of particular interest and can be fished with both in windy weather and on a calm sunny day. Catching fish on feeders has many advantages and brings a lot of pleasure, and most importantly gives a good result.
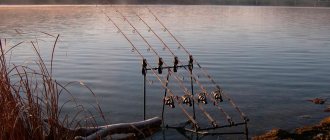
Feeders and fishing from a boat
To fish from a boat, you need to turn the bow against the current and lower the anchor from the bow. From the stern of the boat, on a monofilament line with a diameter of 1-1.5 mm, we lower a feeder filled with bait. In conditions of weak or medium currents, you can fish not only with bottom or feeder tackle, but also with a regular float rod. The float will not work in strong currents - the tackle will be carried away too quickly. You can simply register bites when fishing with bottom gear using the tip of the rod, but it is more convenient to do this if the rod is equipped with a side nod about 20 cm long. This nod allows the angler to detect even cautious fish bites and hook at the very beginning of the pull, without delay. When fishing in the dark, you can install a “firefly” on the nod using transparent tape. It must be said that manufacturers of fishing gear have ignored this important element of equipment, and therefore fishermen have to make homemade nods from spring wire with a diameter of 1-1.2 mm. A small “tulip” is mounted at the end of the nod, into which a fishing line or cord is passed. The second edge of the nod is bent, tied to the tip of the spinning rod with thread, and this place is covered with waterproof glue.
If you do everything correctly, then the fish will definitely be suitable for bait, which means that an active bite is very likely. Therefore, I would not recommend fishing with several bottom fishing rods at the same time. It is much more difficult for an angler to manage with so much gear - it is more difficult to keep track of the nods, and landing large fish becomes problematic. My many years of experience suggest that if you fish with several fishing rods at the same time, then even a relatively small carp weighing 2-3 kg can “collect” and tangle your gear, and this will completely ruin your fishing. Therefore, do not tempt your fishing luck and fish with only one tackle.
And you should always remember that no matter how you feed the fish, it is still impossible to keep it in shallow water next to the boat. Therefore, if the depth of the river at the fishing spot is 5-10 m or more, the tackle with the nozzle can simply be lowered, and then your equipment will fall to the bottom 3-5 m from the boat. At shallow depths, and even in clear water, the fish will be cautious, so in this case the tackle should be cast downstream of the river at least ten meters.
Feeders and shore fishing
Feeders and fishing from the shore
There may be several options for fishing from the shore with a feeder. The first option is fishing with a float fishing tackle. A strong fishing line (or cord) is tied to the feeder - let's call it a safety line. This fishing line is needed in order to remove the feeder from the water at the end of fishing. Also, by tugging on this line, you can periodically shake the feeder bag when fishing in a weak current, which will make the contents more actively splash through the cells and attract fish. In addition, it is advisable to tie a piece of fishing line to the feeder with a “beacon” (usually just a piece of foam) at the end. The length of this line should be slightly greater than the depth at the fishing spot.
The fisherman throws the feeder prepared in this way and filled with food into the water, and the free edge of the safety line or cord is fixed on the shore. The “beacon” that floats up above the feeder clearly shows the place where it lies. Wiring fishing is done with ordinary fly gear, cast slightly downstream of the river, but in such a way that the hook with the nozzle gets into the train of food washed out of the feeder.
The second option is bottom fishing. Regularly throwing the feeder into the same place is not difficult. To do this, you need to correctly calculate the force of the throw. We put bait into the feeder and throw it at half force, this will allow us to maintain a constant distance throughout the entire fishing period. And if you make the first cast with maximum effort, then it is not a fact that after three or more hours, when you get tired, you will be able to do the same. After casting, it is recommended to make a landmark for yourself on the opposite bank.
Option three is fishing along a guide using a “tuning fork.” A strong safety line is tied to the feeder, which in this case will also serve as a guide. On this line, already at the very neck of the feeder, any bump stop should be installed. This could be, for example, a piece of sheet rubber or a piece of foam. Its task is to prevent the supplied tackle from falling too low and getting tangled in the feeder mesh. The feeder is thrown from a steep bank or installed in the intended place from a boat, the free edge of the safety line is somehow fixed on the shore. When the feeder is abandoned, the safety line should be well stretched and tied to something strong and motionless - a bush, tree or a reliable pin stuck into the ground. The fisherman is positioned relative to the feeder slightly downstream of the river in order to provide himself with space for landing hooked fish and avoid the risk of tangling the main line with the guide line leading to the feeder.
The main element of equipment for this method of fishing is a lead “tuning fork”. This is a very conventional name for an accessory with which a fisherman sends equipment to a feeder, and they call it that because it actually somewhat resembles a real tuning fork. This simple device can be made without any problems from a lead sinker of any shape: pyramidal, cylindrical, oval, etc. In the upper part of the “tuning fork” there is a hole with a diameter of no more than 1 mm, into which the main fishing line is passed. A rubber stopper is put on the fishing line, and a swivel is tied to its end. A leash 1-1.5 m long is tied to the swivel.
Bite alarm for donkey
An important component in fishing using the described method is a bite alarm for donkey. Further material will be devoted to signaling devices in various designs, which will give the angler direction in choosing the one suitable for his option.
Further material will be devoted to signaling devices in various designs, which will give the angler direction in choosing the one suitable for his option.
Bells
The classic and cheapest type of bite alarm, which, after installing the gear, is placed on the main cord and gives a mechanical sound signal when a fish savors, sucks or swallows the bait. A small, frequent sound indicates the fish’s interest in the bait. A long ringing indicates the moment of hooking. The bells are attached to the fishing line using a wire hook in the sag, right next to the reel or reel.
Read Pinched fish
Electronic bite alarm
A modern sound device that emits an electronic sound signal when the fishing line moves in the signal roller. The equipment is installed on a stand and at the same time can serve as a holder for a fishing rod. The sound device can be equipped with a swinger that pulls the fishing line, which makes even a tiny bite noticeable, and a pager for transmitting a signal over a distance. In addition to the sound signal, the device also emits light pulses, which greatly simplifies night fishing.
The equipment set operates on individual batteries. Fishing with a donk with an electronic alarm is the most comfortable, but at the same time the most costly in material terms.
Bells
Bells, like a modernized type of bell, are attached either to the fishing line of the tackle or directly to its quivertype itself. The sound mechanical signal is transmitted from the tightening of the fishing line or from the vibration of the rod blank during bites. Improved bells can be combined with LED lighting from a miniature battery, which makes it possible to control several installations in the dark. The device is fastened to installations using a mechanical clamp, similar to a clothespin.
Rod as a signaling device
The quivertype of the rod itself can act as a signaling device, which the fisherman will need to constantly visually monitor, and, focusing on the intensity of its shaking, make a decision on timely hooking the fish. This type of bite control, in relation to the methods described above, does not leave the angler time for related activities when fishing and makes it possible to hunt with only one weapon.
Tips for using feeders
- If the bait does not come out well through the holes in a closed type feeder, then you can widen these holes or connect them in pairs using scissors or a razor. Fishing stores sell special devices for enlarging the holes in the feeder. How can you tell if the feeder is working correctly? Everything is very simple. If you take out the feeder and find that some of the bait remains, then you need to either enlarge the holes in the feeders or make the bait looser.
- How can you make sure that the feeder is at the bottom where you want it? It must be taken into account that the thicker the fishing line, the more resistance it creates in the water. In this regard, to ensure a stable position of the feeder on the bottom, a relatively thin fishing line and a medium-weight feeder are usually used.
- Your tackle can be very adaptable to almost any fishing location. To do this, you need to have replaceable tips with you. If the current is strong and therefore you need to place a heavier feeder, then we use a stiffer tip. If the flow is weak or absent at all, then we use a softer tip.
Making a snack
Zakidushka is the simplest version of a bottom fishing rod that does not have a rod. It can be used to catch various types of fish. To do this, you need to purchase the following equipment:
- cord or fishing line;
- sinker;
- hook and leader material;
- reel.
The length of the fishing line can be different and is determined by the casting distance of the tackle. As a rule, 50m of fishing line is enough for casting. The diameter of the fishing line is also determined by the type of fish you intend to hunt. If the task is to catch catfish, then for the donkey you should use a nylon cord designed to catch fish weighing from 50 to 100 kg.
For such powerful gear, it is advisable to use equally powerful hooks, which can be used to bait up to a kilogram of worms or the same weight of live bait. To catch burbot, thinner and more sensitive tackle is used: a line with a diameter of 0.3-0.4 mm, a weight weighing 50-100 g and a leash with a hook (line 0.2-0.3 mm and hook No. 6-No. 4).
Even a novice fisherman can equip a hook. A sinker is tightly attached to the main line or a sliding version is used, after which, on the main line, several loops are made for attaching leashes with hooks. The reel can be made from any available material: wood, plastic, foam. The main thing is that the reel is light and durable. The bait is stored on this reel; in the same condition it can be transported to the fishing spot without any problems, especially since in this condition it takes up very little space.
Winter feeder for fishing
If in summer everything is simple: mix it and throw it, then winter fishing requires the use of feeders that are as invisible as possible to the fish or that can carefully deliver the bait mixture to the bottom and carefully unload it.
For these purposes, special winter structures are used.
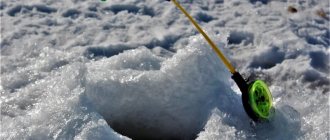
Types of winter feeders
Winter feeders, unlike summer ones, cannot boast of a variety of designs. There are only two types of them:
- Stationary feeder designed for fishing in the current. It is lowered to the bottom with the help of a fishing line, where it remains throughout the fishing. Feeders for fishing on currents usually have a perforated body so that the water flow can freely wash out the bait mixture, spreading it throughout the bottom space.
- Opening feeder? or "dump truck"? used for fishing in still water or low currents. Typically, this design has a movable lid, which is opened by the fisherman only when it is immersed in the bottom.
Making winter feeders
Let's look at how simple winter feeders for fishing are made with your own hands.
Bottle feeder
Bottle feeder for winter fishing
A bottle feeder is very easy to make. It is enough to calculate the size and number of holes for perforation, make them in the walls and bottom, load the feeder and tie a piece of strong fishing line to it, long enough to sink it to the bottom in the deepest fishing area.
However, there are also requirements here. Firstly, with intense flow, the bait is washed out faster, therefore, its volume should be larger (1-1.5 liter bottle). Secondly, the size of the holes for strong water flow is no more than 0.5-0.8 mm. Thirdly, if the feeder is installed directly on the bottom surface, the bottom of the bottle will not be perforated. If you plan to hang it, you will still have to make a hole in the bottom.
As for loading, the bottle feeder must have vertical stability, despite the strength of the current. This is achieved by placing a weight at the bottom of the feeder. You can use nuts, bolts, lead weights, etc.
Disposable paper feeder
A homemade feeder for winter fishing, imagine, it can be disposable. A similar design can be made right at the fishing site. The main thing is to have a sheet of paper, some kind of weight and, in fact, bait on hand.
A cone of the required size is made from paper. A fishing line of sufficient length and strength is tied from the side of its top. Next, our “bag” is filled with bait. This can be food bloodworms, plant mixtures, and their mixes. A weight is placed at the end. The lower edges of the cone are folded tightly inward so that the bait and sinker do not fall out. Homemade feeder for winter fishing
When such a feeder is lowered into the hole, the paper will get wet, and the fisherman, when it reaches the bottom, will only have to make a sharp but gentle tug on the fishing line. At this time, the bait will fall out to the bottom in the right place.
Of course, such a homemade feeder for winter fishing is not the best way to feed, but it still has a right to exist.
Feeder made from a plastic bag
The next design is also very simple, but it works. To make it we will need:
- small plastic bag;
- a load in the form of a large bolt;
- nylon thread;
- fishing line
We form a cone from a plastic bag (you can cut off its corner). At its top, using a nylon thread, we fasten the bolt with the head up. We tie the fishing line to the head of the bolt. That's all, a homemade feeder for winter fishing from a bag is ready.
The principle of its use is simple, as is the design. Turn the cone upside down. We fill it with bait and lower it into the hole. When immersed, the water will compress the bag and the bait will not spill out. And when the feeder reaches the bottom, the angler will only need to sharply pull the line. As a result, the bag will turn inside out and the bait will fall to the bottom.
Opening winter feeder
Opening winter feeder
Now let's talk about how to make a reliable, reusable model from tin. The design that we will try to make has been used by fishermen for a long time and everywhere. In addition, its simplicity has earned it an excellent reputation. Making a tin winter feeder for fishing with your own hands is a simple task, but quite troublesome. There is nothing complicated in the manufacturing process itself. The only thing is that making a feeder for winter fishing from tin requires basic skills in working with metal.
To make a feeder we will need:
- galvanized sheet;
- metal scissors;
- marker;
- drill with a set of drills;
- thin steel wire;
- lead washer or plate.
On paper we make a drawing of our future feeder. We draw a square 30x30 cm. Now we transfer the “pattern” to the tin and cut it out. Next, use a marker to mark the points where the holes will be drilled and drill them.
Now we need to roll the sheet of tin so that we get a cone. It is important here to connect its edges correctly. You can lay one on top of the other and secure them with rivets, or fold them over and rivet the edges. At the top of the cone it is necessary to provide a wire loop through which the fishing line will pass. Make a winter feeder for fishing
When the cone is ready, we begin making the lid. We place the feeder base on paper and outline it. Next, on the “pattern” of the bottom you need to draw a loop for the lock. To do this, draw a small round protrusion anywhere in the resulting circle with a marker. We transfer the drawing to the sheet metal and cut out the cover. We sand the edges to avoid snags in the line in the future. Now we drill a hole with a diameter of 0.8-1 cm in the loop for the lock and clean its inner surface.
You need to think about how the lid will attach to the bottom of the cone. It usually has a single point attachment. To do this, we again drill a small hole in the lid on the opposite side of the hinge. We perform the same operation with the lower edge of the feeder. Next, using a winding ring or ordinary wire, we fix the lid to the body.
The lid must be loaded with lead, for which we attach a weight weighing 10-15 g to its outer side using self-tapping screws or glue.
How and from what to make a “harvester” donka
Donka “harvester” is a multi-hook tackle consisting of a feeder with loading and three leashes made of soft leash material. Bait is hammered into the feeder, and a floating bait is attached to the hooks, and this installation shows excellent results on lakes and rivers.
The main feature of the “harvester” is the design of the feeder, which is a spring with a flat lead bottom. After casting, such a feeder splashes down in a certain position and the hooks with the bait are always on top.
We can say that the donka “combine” is the progenitor of the now fashionable flat-method feeders, which help catch trophy fish.
How to assemble a catchy donka “harvester”
To make a “combine” donkey you will need:
- spring feeder with a flat weight;
- three leashes made of soft leash material 5–7 cm long;
- a piece of braided cord 30–40 cm with a diameter of 0.25-0.3 mm;
- stop bead;
- float stopper.
The rig is tied on a braided line to ensure strength and reliability during power casting and landing fish.
Assembling the “harvester” donka:
- At the end of the braid we firmly fix the mounting bead;
- we pass the braid into the feeder and lower it down to the bead;
- put on the float stopper and lower it all the way to the feeder, firmly fixing it;
- twist all the leashes together in one knot;
- 1–2 cm above the float stop we tie the leashes to the braided line;
- At the free end of the braid we make a loop to connect to the main fishing line.
How donka works
After completely assembling the “combine” donkey and attaching it to the main fishing line, bait is stuffed into the feeder, and techno-dough or foam balls are attached to the hooks. Hooks are stuck into the bait in rings, and the tackle is thrown into the water.
During the process of washing out the bait, the hooks are released and float in close proximity to the feeder. The fish approaches the aroma of the bait and, out of curiosity, tries the foam ball, getting caught by the hook.
The “harvester” donka is used to catch any bottom fish, and even wild carp bite on it. The strength of the tackle is enough for catching and landing trophy fish, and they can pull out crucian carp or bream without any problems.
Using foam plastic as a nozzle rather than technotest is preferable, because the synthetic material does not get wet and is not washed off with water for a long time, maintaining buoyancy. Fishermen use scented foam balls with the “combine” donkey, and this increases the attractiveness of the entire tackle.
Donka “combine” is used for fishing at any time of the year in open water, and this simple and catchy tackle is very popular among fishermen.
Making a spring for a “harvester”
How to make a flat lead weight was already described in the first part of the article, and when making a spring the process is very similar. Only after lead is poured into the sand mold is a spring inserted into it, and the structure is allowed to cool to normal temperature.
This is followed by processing the lead load with a file or emery, and the result is a spring feeder with a flat bottom and a streamlined shape. Such a feeder has flight characteristics at the highest level, and the location of the load ensures that it falls to the bottom of the reservoir in the only possible way.
The size of the donkey “harvester” feeder depends on the dimensions of the spring and, accordingly, the preferences of the angler who makes the choice.
Important! Do not make overly large springs, they are more difficult to cast, and too large a volume of bait does not provide any advantages.
Bait and lures for fishing with cork tackle
The success of all fishing depends on the correct choice of complementary foods. You can buy the finished mixture at the store or prepare it yourself.
The most effective and efficient bait options:
Corn
- chop 1 can of canned corn;
- pour the remaining juice over the mixture;
- add 100 gr. roasted and crushed sunflower seeds;
- 1 tbsp. a spoonful of honey, vegetable and flaxseed oils;
- Before starting fishing, add breadcrumbs to obtain a thicker and more elastic slurry.
Pea
- boil 3 cups of water;
- add 1 cup of peas and let it brew;
- after half an hour, add half a glass of corn and cook this mixture for 40 minutes, stirring constantly;
- 2 minutes before the end of cooking, add 1 tsp. honey, a tablespoon of sunflower oil and 3 tablespoons of sugar.
Potato and bread
- boil the potatoes;
- grind in a convenient way;
- chop the flour;
- mix these two ingredients;
- add black bread, vegetable and anise oil.
Purpose of the feeder
Its main function is to deliver fertilizer to its destination during the fishing process. The bait is of great importance. It must not only attract prey, but also keep it in place. In order for your fishing to be successful, pay attention to the contents of the feeder and feeding the main fishing area.
Before fishing, be sure to throw a full box of bait into the pond.
The maximum number of casts should be ten to twenty times in the same place. Remember that the rod is always in the waiting position during the feeding process.
If you want your bait to attract and hold fish, consider the different types of feeder feeders and their functions:
- Feeding in stagnant water deters fish and prevents them from quickly leaving the area.
- Live food (worms, bloodworms, maggots) move, thereby attracting catch.
- The first feeding for large fish should be done before the main fishing begins.
- If there is a strong current in the reservoir, it is necessary to weigh down the bottom of the bait.
- For a feeder (casting over long distances), choose a streamlined shape, for example, resembling a shuttlecock.
Feeding the fish in your pond
Of course, carp and crucian carp released into the pond must be fed periodically.
Although the water in a small pond contains some natural food base in the form of daphnia, bloodworms and other small animals, this fish food in a small pond is unlikely to be sufficient to ensure the required weight gain in your pets. Therefore, you need to be a hospitable and generous owner, providing the necessary ration of additional nutrition “at hand” for the inhabitants of your pond in order to ensure the desired result of fish farming. The solution to this problem is made easier by the fact that carp and crucian carp are not picky about food and are omnivores. For complementary feeding, plant foods and feed for pigs or chickens are suitable. Excellent plant food for carp fish are: flour, bran, lupine, corn, vetch, rye and boiled potatoes. There is a tradition of going to Akhtuba for fish. You can read about one of the databases here. Your own pond cannot be a worthy substitute for such a vacation.
If you stocked your pond with yearlings, it is enough for them to sprinkle flour on the surface of the water, since it floats on the surface of the water for a long time until it gets wet. Rye can be served raw. Lupine is a legume and therefore, like corn, it is better to grind it coarsely, then they quickly soak in water and carp eat them more willingly. It is better to steam legumes and grains in boiling water. Compound feed should be prepared in the form of balls of thick dough. To create the most economical menu, you need to monitor the growth of the fish. The average consumption of grain feed per fish is no more than 3 - 5% of its weight. Feeding the fish should be done once or twice a day and preferably at the same time. It is advisable to immediately decide on the place of feeding in the pond and it is necessary to prepare a “feeding table” for this. For a small pond, you can use a simple table made of a plastic cover with perforated holes secured with a cord to a fishing rod. The table with food should be lowered to a depth of 30 - 35 cm. Fresh food should be added only to the empty table. The use of a “feed table” allows you to constantly monitor how much food is eaten and remove its excess so as not to spoil the water in a small pond, which occurs when uneaten food sours. The volume of a portion of food must be determined taking into account the water temperature, since the lower the water temperature, the less carp fish consume food. The water temperature favorable for their life is +24° − +26°С. When it decreases to +12°C, their feeding intensity will decrease and they will stop growing. With a further decrease to +4°C, or an increase to +30°C, cyprinids will completely refuse food. Therefore, feeding can begin at the end of April or beginning of May, if the water is already warm enough (usually from mid-May), and it should be stopped around mid-September, depending on the weather.
You need to make so many of these tables in the pond so that the fish don’t get too crowded when feeding. By autumn, carp lose their appetite, so the portions of food should be reduced at this time, otherwise the food will only be wasted and will not be useful to the fish.
The fish that live in the pond eat with great pleasure all insects that fall on the surface of the water. To increase the supply of this free food, you can use night decorative lighting on the pond using lanterns with solar panels, which are placed along the shore of the pond or float on its surface. Most of the insects that fly into the light will become a high-calorie snack for your pets. In addition, such illumination will save you or your guests from unexpected night swimming in the pond.
That's all I wanted to tell you about fish food in the pond and feeding them.
Advantages of a wire feeder
Today, having the opportunity to purchase any materials, wire feeders can be made from anything, but they all have a number of advantages, such as:
- fast and at the same time simple manufacturing option;
- the ability to create the required shapes and sizes;
- complementary foods are washed out well;
- good results in the fishing process;
- the ability to cast from the shoreline over a long distance;
- possibility of fishing in various weather conditions - from sunny to windy and rainy;
- If you lose the feeder, you don’t feel sorry for it, since the time and money spent on making it are minimal.