How to make a case for fishing rods with your own hands?
Every fisherman understands the importance of covers and bags to protect expensive fishing equipment.
They are convenient for storing and transporting fishing rods. When the need arises to purchase a protective case, you are faced with the dilemma of which case is better - a factory-made one or a home-made one. Of course, it’s easier to buy a ready-made tube and not waste time and effort. But you will have to spend money on the purchase, and a good case is not cheap. Having made a choice in favor of a homemade product, you suddenly discover advantages over the purchased option. Firstly, it is economical, since there are always available materials for making a cover. Secondly, the product can be made to the required parameters, taking into account not only the length of the rod, but also the space in the trunk or in the boat.
In addition, it is possible to supplement the case with pockets and holders in the required quantity, giving them the most suitable sizes. Individually designed handles and shoulder straps are as comfortable as possible, commensurate with your own height and hand grip.
DIY purse for spinner spinners
The wallet is made from an old CD case. This is where it would be convenient to store a spinner or how to make a box or a wallet for spinner spinners (fishing lures) with your own hands.
No duplicates found
Fishing community
3.7K posts 7.1K subscribers
Community Rules
The rule of good manners is to indicate the place where the trophy was caught and basic politeness.
Posts of an advertising nature are highly discouraged.
The rest of the rules are no different from the rules of pikabu. You can read it here https://pikabu.ru/html.php?id=wtf
Thanks for the idea! 5 minutes. and a gift for New Year's Eve is ready)
please, many people have such boxes lying around idle) now they have a use
The box from a car first aid kit worked perfectly
How to sew a bag for rods and reels?
It’s nice when you come fishing, lay out your gear, and it’s ready for use. Because the size and shape of the bag allows you to pack your fishing rod and reel. We will tell you how to sew a roomy soft or semi-hard case for a fishing rod with your own hands, providing a separate compartment for the reel. Sewing a special case is no different from making a regular soft case for a fishing rod, with the only difference being that this model has a special section.
We will describe how to sew a soft case in the next chapter, but now let’s talk about the method of making an additional pocket. It is located at the bottom of the case.
First, measure the fishing rod, taking into account the volume of the product, the total length and the size of the rod to the reel. Then markings are made on the fabric. The pocket should clearly fit into the location of the coil.
The compartment can be made in two ways - make it soft or hard. The first option must be supplemented with foam rubber to protect the important part of the equipment from damage during transportation.
To make the pocket rigid, a plastic box of the required size is placed in it and lined with water-repellent fabric. By fitting, the compartment is aligned with the coil with maximum accuracy. With this addition, the fishing rod can not be disassembled, but can be easily transported assembled to the fishing spot.
Case for fishing rods and reels: sewing nuances
The cover for fishing rods and reels is cut according to the same principle as conventional soft models, but an additional recess pocket is attached to the outside of the lower part where the reel will be inserted.
When making a reel chamber, it is important to consider the size of the fishing tackle. In addition to the width, you need to measure the length from the tip of the fishing rod to the reel and apply the corresponding marks on the fabric.
The pocket is made according to the size of the coil. It can be soft or hard. In the first case, the compartment must be reinforced with a piece of foam rubber or polyurethane to additionally protect the reel from mechanical damage.
The hard pocket is made from a plastic box lined with waterproof fabric.
The pocket is sewn to the base of the cover in such a way that when laying the gear, the reel fits exactly into the slot intended for it.
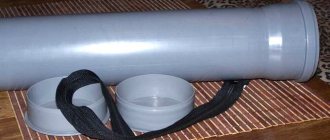
Some anglers do it easier. They buy round insulation for pipes made of foamed polyethylene of the required diameter in specialized stores and put it under a heavy press for several hours. The pipe takes on an oval shape, after which it is inserted into a soft case. According to reviews, a fishing rod and reel are protected in such a bag no worse than in a hard tube.
How to make a soft version?
You can sew a case or bag for fishing rods from a new, durable, waterproof fabric - for example, tarpaulin, taffeta, taslan or oxford. But sometimes it makes more sense to use old items, like jeans or an abandoned sports bag, and repurposing them can be a fun activity.
Soft covers do not protect rods from mechanical damage as reliably as tubes, but they have their advantages:
New fabric case
To sew a cover from a new material, you need to prepare the following.
Making a cover is not difficult, especially if you have experience in sewing. All you need to do is follow the sequence of actions.
All actions during cutting and sewing are carried out from the wrong side of the material, and only after sewing is completed is the product turned out onto the front side.
Case made from old jeans
The denim fabric is thick and durable, making it quite suitable for the case. Having cut off one of the legs, we get an almost finished case; all that remains is to modify it a little.
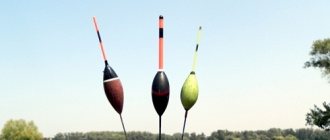
Spinner: what is it, features
A spinner is an artificial bait that has been used for many years.
They are:
- metal;
- plastic;
- differ in shape and color;
- there are 1-3 hooks;
- there is camouflage.
These products are suitable for catching predatory fish using classic spinning, fly fishing, plumb fishing, and trolling. They are produced separately for winter and summer fishing. There are differences between them. Winter models are vertical, and summer models are rotating and oscillating, which have a specific bend that allows you to play with the fish. Rotating products spin around an axis and rotate due to the movement of water.
On sale you can find catchy “Devon” models, which became the original development. They have a small propeller. It creates turbulence in the water, which attracts fish.
The choice of lure depends on when and for whom the fishing will take place.
Making a hard case
Hard cases include tubes. They reliably protect spinning rods and other expensive fishing rods from impacts and falls.
The factory product is a plastic pipe covered with waterproof fabric. The interior of the case is lined with soft lining and equipped with fishing rod holders. The tube has a bottom and a lid with foam filling to protect the thin ends of the rods. A homemade hard case should look similar.
Plastic pipe cover
Most often, the case is made from a piece of plastic drainpipe. We'll tell you how to do this. Before you begin, you need to prepare the following tools and materials:
The work process follows a certain sequence.
To give the product a beautiful aesthetic appearance, you can use a cover made of waterproof fabric. It is easy to sew, using the same method as for making a soft case. Only in the case of a tube, both ends of the cover must be the same size.
Profile case
For a rigid product, a square profile is selected. It can be metal or plastic, which is used when laying the cable. The manufacturing principle is as follows.
To protect your fishing gear, you can choose any suitable method of making a case, the main thing is to make it with love, think through every detail for the safety of the fishing rods and your own comfort when using the case in field conditions.
How to make a case for fishing rods with your own hands, see the video below.
Making a soft case
It is recommended to make soft cases for spinning rods and fishing rods with reels from durable, moisture-resistant materials. Such cases are very practical to use; you can sew a lot of pockets on them for storing and transporting fishing trinkets and bait.
Materials
This cover can also be easily sewn at home. For this you need the following materials:
- waterproof fabric (preferably tarpaulin, canvas, bologna, etc.) measuring approximately 2 x 1.5 meters;
- belt tape (15-17 meters);
- zippers: 4 pieces 70 centimeters long and 4 pieces 25 centimeters long;
- sewing machine.
DIY fishing bag
It is advisable to use the second waterproof bag only in the cold season or for short fishing for two to three hours on a summer morning or evening.
The first bag was sewn with my own hands on a sewing machine from a dense material that does not allow fish mucus to pass through, but is highly breathable, making the fish less likely to spoil when fishing, even in warm weather. Especially if the carcasses are topped with fresh nettles or sedges.
The second waterproof pouch is also hand-sewn in the full sense of the expression, that is, by hand. This soft container is waterproof, more versatile and is intended not only for storing fish for winter fishing.
The design of the homemade bag made of rubberized fabric has two compartments sewn into it for carrying a fishing rod and a hook separately from the fish. That is, everything is provided so that during winter fishing, without a box or backpack, we can walk along the old holes.
To make a waterproof rubberized bag with your own hands, the topic contains patterns for a soft container.
What should a fishing bag be like?
Choose bags made of thick, waterproof material. Even if your dexterity is worthy of an Olympic medal and you never drop your bag into the water, there is always high humidity near bodies of water and the contents of the bag can become damp. And no one canceled the rains.
Fishing bag S-09 AQUATIC 2,032 for 1 piece. Fishing bag (N-630-038349) NISUS Nisus 5,810 for 1 pc. Fishing bag C-03 AQUATIC 2,819 for 1 piece. Thermal bag with pockets C-20 AQUATIC 2,696 for 1 pc. All fishing bags are here
The more, the better - yes, this is just about the pockets of fishing bags, there are never too many of them, there is a filling for each pocket, you will find something to fill each one with. And then you will be incredibly glad that your supplies are clearly distributed, like in a pharmacy, and not mixed into one mass that even Cinderella couldn’t handle in three days.
Your fishing bag should have compartments for boxes - the more, the better. Boxes for small items can be used by you either together with a bag or separately. In addition, there is no need to fill your bag to capacity every time you go fishing. By deciding on the type of fishing you will use, you change the contents of your bag. This is simply amazing rationality!
How to sew a fishing bag
You can sew a canvas bag for storing and carrying your fish catch while fishing.
A bag hung over the shoulder during summer fishing allows the fisherman to leave the backpack in the trunk of the car, and go along the pond to try his luck on a spinning hunt.
After fishing, fish packed with sedge and nettles in a canvas bag can be taken home, if not alive, then fresh, even if the journey from the shore to the kitchen table lasts 3-4 hours. When storing fish in a hand-sewn bag for several hours, you don’t need to salt it.
At the same time, the fairly thick tarpaulin from which the bag is made prevents mucus from leaking from the fish carcass, which means that your clothes will not be damaged by it while fishing.
Everything you need to sew a bag for summer fishing is presented in the photo. The dimensions of the homemade product are arbitrary. The dimensions of my bag are quite large (35x30x10 cm). For fishing, folded into a half ring, it can accommodate a pike weighing up to 4-5 kilograms or pieces of 5-6 kilogram pinches.
A fishing bag can be sewn from scraps of tarpaulin. From relatively small pieces of material, a front side, two sides, a bottom and a back wall, ending with a cap and a buttonhole, were cut out for it.
If you have a large piece of tarpaulin, it will be easier to sew a fishing bag if the front side, bottom and back wall of the bag are cut out in the form of one strip of tarpaulin, to which two sides should be sewn.
All seams of the fishing bag with a single hem of the material are stitched on a sewing machine. It is advisable to overcast the cut elements with thread before sewing them along the edge of the material.
Fish storage bag strap and buckle
The belt and buckle to the side wedges of the bag, as far as I remember, were sewn from an old gas mask case. And the canvas bag itself for storing and carrying fish while fishing is very similar in appearance to a different case, only larger in size.
Instead of a branded belt, you can sew a wide braid to the side walls of the bag. To adjust the length of the belt while fishing, sew a buckle into the braid. Both are sold in stores.
It is better to sew the buckle that regulates the length of the bag belt on the side rather than on the top. Then it will not rub off the impregnation of the jacket on your shoulder, both during fishing and when moving with a catch of fish along the pond.
If some of the fishermen don’t really like carrying boxes with spoons and other small fishing gear in their jacket pockets while fishing, then you can sew an outer pocket on the front side of the canvas bag, and sew a zipper on top of it.
You can sew such a homemade container without having a sewing machine, using the same technology that a bag for storing fish in the winter is sewn. It is shown in the photograph in the following article.
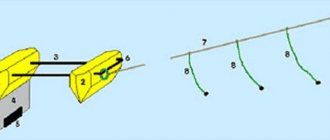
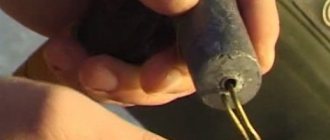
Under the bottom pocket of a waterproof bag made of rubberized fabric, the picture shows a very convenient release for spinners and jigs for summer and winter fishing.
Waterproof fish bag
This waterproof bag for storing and carrying fish while fishing is sewn by hand.
It takes 3-4 hours to sew soft containers from waterproof rubberized material with your own hands and install a pair of locking buttons.
If you have a little free time, you simply need to sew a waterproof bag for winter fishing for your own convenience.
The details of the pouch can be seen when watching the video on my YouTube channel. The link is located at the bottom of each page of the site.
Homemade fish bag
A homemade waterproof bag for storing and carrying fish when fishing is shown in the photos.
You can estimate the dimensions of the soft container “live” from an ice fishing box, which, by the way, is also homemade.
Below are the dimensions of the segments of the homemade waterproof bag patterns, which can be changed by you.
I just want to warn you: the article presents a sketch, and not a drawing of a homemade bag for carrying fish while fishing.
Therefore, when cutting the elements of a fishing bag, you should refer to the dimensions indicated in centimeters, which are given taking into account the width of the seams.
Patterns of a pouch for winter fishing, sewn from rubberized waterproof fabric, are presented in the sketch drawing.
In the simplest version, three patterns are enough for sewing a pouch: the middle part-A and two side walls-B.
If you want to carry fishing rods separately from the mucus-covered fish you catch during winter fishing, then when sewing the pouch you will need two more patterns-B.
Sewn to the sides of a waterproof pouch, they are pockets designed to carry a cutter, a pair of fishing rods and a small box of jigs or lures.
First, let's look at all the pattern elements of a pouch for winter fishing indicated in the drawing.
A large vertically elongated rectangle “A” with an orange perimeter outline belongs to the pattern of the front side, bottom and back wall of the future homemade pouch.
These three components of an ice fishing bag are cut into one strip of waterproof rubberized fabric. Although they can be sewn from three composite strips. Just like the canvas pouch shown at the beginning of the page is sewn.
The pattern under the letter “B” with dimensions 8x12x24 centimeters belongs to one of the sides of the fishing pouch. You should have two such patterns. At the bottom, the corners of the pattern are slightly rounded, which is not at all necessary.
Waterproof pouch pockets
Superimposed on the pattern for the side of the pouch is a sketch of the pocket pattern (a dark burgundy outline), which has the same length as the side wall, but the width should be greater by the height of the two sides of the pocket.
This will happen because part of the length of the pockets will be spent on forming (bending) the plane of the bottom of the pocket. So you have several options here.
Or initially decide: let the pocket on the bag be a couple of centimeters shorter than the side wall of the fishing pouch. In this case, the cavity of the cut pocket is sewn two centimeters above the bottom of the pouch, as I did.
Personally, this height is enough for me to carry the necessary gear and small fish for winter fishing. To lure pike and pike perch in winter fishing, I take a larger waterproof pouch made of rubberized fabric when fishing, or I do without it altogether, putting the large fish I catch in a backpack.
If you are fishing for a perch on winter fishing with tackle with a removable reel, which takes up a relatively large amount of space, then lengthen the size of the pockets to the bottom of the pouch, and raise the sides to 3 centimeters.
How to sew a pouch for fishing
The process of sewing a waterproof pouch for fishing is generally discussed below, but if your homemade product will have pockets, you should first form a configuration of pockets for carrying gear for winter fishing and sew them into the side cavities of the pouch.
The width of the bottom edge of the pocket (at the base of the trapezoid) should be equal to the width of the side of the fishing pouch, to which should be added twice the height of the sides of the pocket. Total: 2x2+12=16 centimeters.
We place the pocket pattern on the table WRONG UP, fold the fabric at the bottom by 2 centimeters along the entire length of the border strip. See the sketch of the side wall of a homemade fishing pouch in position “B1”.
Next, the folded corners of the pocket on both sides are sewn by hand diagonally. So, as shown in sketch “B1” with two thick dotted lines. As a result, we get a hem at the bottom of the pocket of a waterproof pouch, shown in the drawing as a thin horizontal line.
The angle between the stitching and the base of the trapezoid (bottom of the pattern) of the side of the fishing pouch should be 45-60 degrees. On my pouch, which I constantly take for winter fishing, the seam is sewn at an angle closer to 60 degrees.
By the way, what is striking in the drawing is that the width of the bottom of the pockets is greater than that of the side walls. Here 1 centimeter of rubberized fabric is left for the inner hem.
Before you start sewing the elements of the waterproof pouch, be sure to make this hem of the rubberized fabric and secure it with several large stitches. On a fully sewn pouch, the threads can be pulled out.
To sew together individual patterns of a fishing bag made of rubberized fabric, I used a large needle and thick paraffin threads. After regularly using the hand-sewn pouch for winter fishing for more than two decades, not a single seam has come apart.
If you don’t have paraffin threads to sew a fishing pouch, make them yourself. To do this, melt a piece of candle in a canned food jar and dip a coil of raw cotton thread into the melted stearin. Then remove them from the jar, cool, knead and thread a needle with a large eye.
Sewing fishing pouch patterns
The technique for sewing the pocket pattern and side wall to the edge of the cavity of the fishing pouch is shown in the photograph.
Finally, we sew the folded bottoms of the pockets on both sides of the fishing pouch to the side walls. On one side, this seam is shown in the photograph with an orange line.
Our fishing pouch, sewn from patterns, is almost ready for use on fishing, but for those fishermen who are doing sewing for the first time, I will describe some of the nuances of sewing the segments of the pouch in detail.
Sewing a bag from rubberized fabric
It is better (more durable) to sew all the seams of a bag made of rubberized fabric in two lines.
First, run a row of stitches along the length of the stitched surface of the pouch, say, with stitches 5 mm long. The distance between stitches should also be 5 mm.
Then sew another line of thread through the rubberized waterproof fabric, the stitches of which should lie in the gaps between the stitches of the first line already sewn.
As a result of such sewing, you will get a seam similar to the one that is sewn into the fabric by a sewing machine, which with a large margin will withstand the weight of the fish catch in your rubberized bag while fishing.
Choose the location for the buttons on the valve and on the front wall of your fishing bag yourself. Instructions for their installation, as well as auxiliary devices for flaring buttons, are included in the kit packages.
For strength, I recommend sewing a homemade fishing bag along the top edge with an overcast stitch, which will increase the strength of the rubberized fabric along the edges of the rubberized fabric patterns.
You have already read the recommendations for choosing a belt or braid and buckle for a hand-sewn fishing bag from rubberized or canvas fabric at the beginning of the page.