Tube manufacturing process
We measure the size of the spinning rod, taking into account that 2 cm of foam rubber will be glued to the plugs on each side. We add another 4 cm to the measurements. An ordinary plastic pipe will do, on which you need to mark the length of the gear, and saw off the unnecessary remainder with a hacksaw.
The sawn-off part will be closed “tightly” with a plug, while the other side will be equipped with a removable lid. After these steps, a butt ring is placed in the pipe, which should move freely along the entire length.
At the next stage, we make a cover for the case and make several small holes in it to sew on the foam rubber. You can use a sponge for this. At the final stage of work, we give the tube the proper appearance - we cover it with fabric.
As a result, you will get a tube for your spinning rods, which you make yourself, and will be even better than the analogues sold.
DIY hard case for fishing rods
A hard case for fishing rods is convenient because the gear in it is not exposed to any dangers, since they are located, as if in the protective shell of a tube.
Modern hard specialized cases are quite expensive, but they can be replaced using a plastic pipe and other tools.
Necessary materials
To make a hard case with your own hands, you will need the following materials:
- PVC pipe (along the length of the fishing rods)
- stub;
- bolts;
- washers;
- adhesive tape (duct tape or tape);
- hacksaw;
- foam;
- belt.
Manufacturing
The process of making a women's fishing rod case looks like this:
- The PVC pipe must be sawed off using a hacksaw so that its length is 15-17 cm longer than the total length of the folded fishing rod. The diameter of the finished tube should be such that a fishing rod with a reel and all the rings can easily fit into it. If a fisherman uses removable reels, then the case can accommodate several folded fishing rods at once, which is very convenient. If the hard case is a little small in size, then this plastic pipe can be easily “pulled out”. To do this, you will need to heat the plastic on top of the pipe and, using a hammer or other tool, add the desired shape.
- Place a plug on the lower section of the plastic pipe (you can buy it at any store that sells plumbing fixtures). It needs to be attached using high-quality super glue.
- You should also put a plug on the other side of the pipe, but do not glue it, as it should be removable. To ensure that the top plug does not get lost during fishing, it is advisable to drill a small hole in it, through which to stretch a lace or rope and tie a knot at the end. This knot will not be able to pass through the hole, and the rope, which is glued to the inner body at the other end, will prevent the top cover from getting lost.
- The inside of the hard case can be covered with thin foam rubber so that the fishing rods do not “beat” against the walls of the pipe, and on the outside, if desired, the pipe can be covered with a two-layer adhesive film to add beauty. But here it is important not to overdo it, since the practicality of the case should come first.
- Finally, you should adapt the belt to the case so that it can be worn on the shoulder. An unnecessary belt from a briefcase or bag is quite suitable for this. To attach it, you need to make small holes at the top and bottom of the cover through which to thread the bolts. Fasten a belt on top of them. If the belt you are using stretches well and has a good length, then you can simply tie it behind the cover.
After this, the hard case for storing fishing rods, which you made yourself, is ready and can be used for its intended purpose at the first opportunity. You need at least five such covers if the fisherman has a large number of fishing rods.
Necessary available materials
Perhaps you still have unnecessary pipes after repairs. If not, this accessory can be found at a hardware store. Finding another suitable material is also simple; similar profiles that have the required stiffness parameter will do.
It is also necessary to additionally purchase plugs for plastic pipes. You will also need foam rubber to prevent damage to the rods inside the case. It is not necessary to buy a whole sheet of foam; you can use a sponge or washcloth.
The design of a hard case for a fishing rod can be done in various ways, which we will discuss below.
How to make a homemade tube
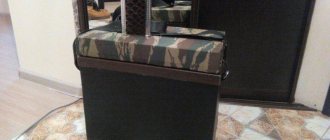
The task was as follows: I have free space in the trunk of my car (Octavia Station Wagon) above the wheel arches, like many other car models, where I put a fishing rod and spinning rod, but in fabric covers the gear is still prone to breakage, so it was decided get a homemade tube for storing rods.
The option of a store-bought tube was out of the question due to the size of the distance between the arches (mine is 120cm), choosing a ready-made one for this length is a bit difficult, and I didn’t want to sacrifice even a centimeter, because I already had a spinning rod with a transport length of 119.5 cm. Plus, almost all ready-made tubes are round in shape, which was also not desirable, because... it could roll off the arches when moving and maneuvering, so the common option of making it from a round sewer pipe was eliminated. Well, the price of more or less decent ones started from 1000 rubles and above.
Thinking my thoughts, I came across Era ventilation ducts in a hardware store, which were both round and rectangular in cross-section, which was exactly what was required for my needs
The plastic from which they are made is quite durable, and at the same time not hard, so it will not crack from accidental impacts. The size that suited me was 120x60mm, which I purchased to make a tube with my own hands. But a question arose with the rectangular end caps. Apparently they don’t exist in nature, I looked at both Era and the Khokhlyat manufacturer, so I had to take rectangular connectors with valves.
I cut off the piece of ventilation duct I needed, 120cm long. I cut off the side of the connectors on one side, almost right under the valve. Because it opens and closes freely, fixed it in the closed state and coated it with glue for plastic window sills (but I think any glue for gluing plastics will do). The result of this shamanism was end caps.
But due to the internal thickness of the plugs, the tube (which is not bad for a spinning rod of my size) increased slightly in length, and after calculations and estimates, the air duct itself was cut off by about 1 cm. Inside the made plugs I glued pieces of foamed polyethylene (backing under the laminate) to soften and absorb possible impacts of the rod tips.
The plugs themselves sit quite tightly on the box, but to be on the safe side, I tightened small self-tapping screws with bitten ends on one (blind) end, and wrapped a little electrical tape on the other. Next we had to come up with something with the handle. The handle was first taken from a package of blankets, I think many people have such packages.
The handle itself is rubber and has a flexible connection. In the transport state, it practically does not protrude, which is quite convenient, but after loading the rod into the tube, I decided to abandon it, fearing for a certain flimsiness and unreliability of the design, although for those with light weight gear, this option may be suitable.
I bought a new handle from a sewing and weaving accessories store - it’s rigid and durable. Which was attached to the middle of the tube.
When attaching the handle, a problem arose - how to tighten the screws from the inside of the box with your own hands; your hand couldn’t reach the middle of the tube, and you couldn’t see where to screw the screws. I solved the problem in the following way: I marked a place for the handle on the air duct on both sides, drilled holes with a diameter for screws on one side, and 1.5-2 times larger holes on the other side. And using a thin screwdriver with a magnetic tip, the handle was screwed on.
In principle, the extra holes did not spoil the appearance much. Next, you can cover the tube with fabric, but I abandoned this idea, because smooth plastic is easier to clean and wash than fabric.
In this homemade convenient tube, I can easily accommodate a spinning rod, a feeder and a lapdog fishing rod, and the tube itself lies on the wheel arches, without interfering with the loading and unloading of things in the trunk, and the gear is always with me.
As a result, the costs for the tube turned out to be the following: - rectangular plastic air duct 120x60mm, length 2m. -315r. (but I used 1.2m, so I spent about 240r) (according to the Era catalog there are also 1.5m and 1m, but I needed another piece for home ventilation, so I killed 2 birds with one stone.) -two rectangular channel connector with check valve -88r. -pen -100r.
In total we have about 430 rubles. and a little personal time and effort, but the tube made will be exactly the size you need, to suit your fishing rods and trunk dimensions.
Author Pavel, Dzerzhinsk based on site materials
- Fishing on the Black Sea. How to fish with a tyrant
- Homemade hip platform-holder for spinning rod
Cover for case
To transport fishing rods, you need to equip the tube with a lid. A thick layer of leather can be used. It is necessary to measure the diameter of the plastic profile and add 3 mm to it. We cut out a circle of leather of this size. A slightly larger size will not allow the lid to fall inside the profile. We also cut out several more similar parts from leather, but this time they should be 1.5 mm smaller than the diameter of the tube.
All that remains is to glue the leather parts together. The lower part of the lid will fit tightly into the plastic pipe, and the larger upper element will prevent it from falling inside. The covers, which are made of leather, are practical.
Making a tube from a pipe
First you need to decide how many fishing rods will be in the case. If there are several, in this case we choose a pipe with a diameter of 110 mm. If a cover is needed for one fishing rod, we purchase a pipe from 40 to 60 mm.
The tube produced must fully match the length of the rods. The simplest version of a pipe cover is made in several steps:
- Having measured the entire length of the rod, we saw off the pipe.
- We purchase plugs and put them on the structure.
All this will take less than 20 minutes. We first glue the plugs on the inside with foam rubber; for this you can use PVA glue, superglue or moment. It is best to glue one plug to the base of the structure.
Necessary materials
Before starting work, you must ensure that you have the following materials:
- PVC tube (average length up to 2 meters, diameter from 40 to 110 mm);
- a simple pencil or marker;
- meter or ruler;
- a piece of fabric that will cover the tube;
- several pieces of foam rubber;
- hacksaw for metal;
- several plugs;
- glue.
Blueprints
Before you start assembling a homemade gear case, you need to think through the plan in more detail and complete the drawings. Before starting work, it is worth considering how many spinning rods will be stored in the case, what material it will be made of and whether it will eventually be covered with fabric.
The drawing must indicate all the necessary dimensions of the future structure, taking into account the length of the rods. If the calculations are incorrect, all subsequent work will not be effective, so it is better to check everything and calculate it several times.
PVC pipe 50 mm
To make a tube version for storing one fishing rod, you need to buy a sewer pipe with a diameter of 50 mm. This will be ideal. If we consider a larger diameter, then it will be suitable for several spinning rods.
Required tube materials:
- pipe 50 mm (you must first measure the required length in accordance with the parameters of the rod);
- two plugs;
- fabric for covering;
- foam;
- glue.
If desired, one side of the tube can be sealed. To do this, first apply adhesive to the plug and secure it. Fishing rods must match the size of the tube. When sawing off the pipe, add 2 cm on each side, since the foam rubber will be attached - this is very important.
DIY spinning rod tube, how to make it yourself for a fishing rod and reel
Tube is a convenient and compact storage of fishing gear. Performs a protective function during their transportation.
Consists of the following parts:
- The body is in the form of a cylinder. Often they are served by a lightweight but durable plastic pipe. Diameter varies. Depends on how many forms the tube is designed for.
- Shell. Made from strong fabric. Gently covers the entire surface of the product. In expensive purchased models, the shell material is waterproof. Has a wide range of colors.
- Bottom. Lower part of the body. Equipped with soft material (full) for additional protection of gear during transportation.
- Lid. Its diameter is the same as the body. In other words, a stub. Sewn to the shell or inserted tightly into the cylinder for closure. For convenience, it is equipped with a lock and a snake.
- Short handle, long strap. Designed for carrying a tube.
- Additional compartments. These are sewn-on pockets that will be needed for separate storage of reels and fishing lures.
https://www..com/watch{q}v=8IxW7cy_G7E
To prevent the tube from being too hard, its inner surface is lined with soft material, which prevents scratches on the gear during friction against the walls.
The difference between a tube for feeder and regular fishing rods with reels and spinning rods
The advantage of self-assembly is that the fisherman can add a compartment for a reel, additional gear of any size, and attach the handle in the place where he wants. Considering the fact that spinners are accustomed to transporting gear separately from reels, the tube will be assembled without pockets, and the reels will already be folded separately.
The photo clearly shows the ordinary assembly of a simple tube. Moreover, the diameters are selected differently so that one or more spinning rods can be placed there.
Don't rush to buy materials. It’s better to first conduct a thorough inspection of the garage or utility room. Many unnecessary improvised means can become an indispensable part of a future product. In addition, before starting work, we recommend double-checking the dimensions of your gear several times so that the tube is not small or too wide. For clarity, it is worth drawing up a detailed drawing with all dimensions.
We will need:
- sewer pipe with a diameter of 100 mm, 50 mm;
- reduction from 100 to 50;
- 2 blanks for a tube cap (peel, a piece of thick leather);
- thin flexible insulation (a heat reflector for batteries is suitable);
- a belt from an old bag, backpack or thick fabric in the form of a ribbon;
- construction tape;
- material for decoration;
- grinder with a metal disc (an alternative is a hacksaw);
- marker;
- pencil;
- polyurethane foam, epoxy resin (optional);
- screws.
The size of all spinning rods is measured to find the longest composite half. On top of that size, it is better to take another reserve of 5 - 10 cm. The resulting figure is the length of the future tube.
Assembly
The size of all spinning rods is measured to find the longest composite half. On top of that size, it is better to take another reserve of 5 - 10 cm. The resulting figure is the length of the future tube.
The sequence of work is as follows: Take a pipe 1.5 m or 2 m long. Measure it with a tape measure. The required size is marked with a marker.
- The pipe is cut in a circle with a grinder.
- Now you need to make a edging on the outside of the pipe on the side where there was a cut in a circle. To do this, you need to walk along it with the smooth side of the grinder disk and slowly scroll the pipe.
- After cutting the pipe on one side, the cover is placed on mounting foam or epoxy glue. This is the bottom.
- It is important that the tube lids are soft on the inside. To do this, place a sponge, foam rubber, or piece of foam plastic (optional) on the glue.
- On the other hand, the lid is removable. Since the factory seal on the pipe is very thick, you can make a homemade one.
- Place electrical tape or adhesive tape inside the pipe in a circle to tightly close the lid but allow it to be easily removed.
Fastening the belt
To position the belt, use a marker to mark two symmetrical, parallel points on the pipe.
There are several mounting methods:
- Drive the screws through the belt and set them in epoxy for longer life.
- Fix the belt with superglue in the places marked with a marker for ease of use. Then a thread or rope no thicker than 0.6 mm is wound around the pipe with a belt grip. Impregnated with superglue or epoxy (which is available).
- The third method is even simpler. The belt itself is wrapped around the tube. They are fastened together, you can use rivets or make a seam. The main thing is that the belt is very tight, otherwise it will ride on the tube.
The photo clearly shows how to fix the belt on the tube using the third method.
Next, the tube can be supplemented and designed:
- paint;
- cover with a fabric cover;
- insert soft insulation inside not only along the cylinder, but also under the bottom, on top of the two covers;
- make stripes from bright threads.
This is a budget-friendly way to create convenient storage for spinning rods and their transportation.
https://www..com/watch{q}v=C9yR9HLd43E
Exactly the same tube can be assembled from a ventilation square pipe, from the cover of a roll of expensive wallpaper that was left over after renovation. The last option will be the least expensive, but it will have to be waterproofed.
It is recommended to use a durable but at the same time elastic fabric that can fit the body tightly and can be easily removed if necessary (for washing).
It is better that the cover is 2-3 mm less than the length of the tube - this way the fabric will fit well and stretch along the entire length of the tube.
After taking measurements, a pattern for the future cover is prepared. The necessary places for cuts and seams are marked on the fabric with chalk.
First, the lower part is stitched with compacted threads along the marked straight line. After which a side seam is applied - it goes at a right angle to the bottom.
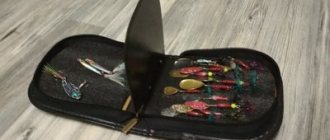
If desired, the finished case is equipped with pockets for bait. They are sewn on top or made removable and secured with Velcro. To close, a snake and buttons (optional) are sewn in.
It consists in the fact that it has an insert for reels and floats, so that it is convenient for the angler not to remove it from the rod every time. This means, without wasting time, just insert or put down the entire equipment.
Let's take a closer look at how to cut out an insert in a tube and make a closed part of the coil.
Winter tackle is small, unlike summer fishing rods. Therefore, the tube for them is made in the same ways as listed earlier, but in reduced sizes.
In addition, there is a simpler method for creating a tube for winter gear.
The work order is as follows:
- Take two bottles. Suitable for volumes of 1,2,3 liters. It all depends on the size of the fishing rods.
- We make marks with a marker in a circle at a suitable distance from the bottom of the bottle. Let's cut it off.
- Next, two cuts are made on one of the bottles from the edge along the bottle, 5 cm each. This is enough so that at the entrance one side opposite the other narrows, forming a tube for winter fishing rods.
The advantage of plastic material is its lightness, resistance to moisture, ease of use and transportation.
The low cost of raw materials allows you to create such fishing rod cases in unlimited quantities without any financial investment.
Assembling a tube at home is very easy and does not take much time or labor. Therefore, all a fisherman needs to know is the design of the future product, have the appropriate tools, materials and imagination.
- Plastic pipe,
- durable fabric,
- braid,
- threads with a needle,
- two rings,
- two carabiners and a cord.
- And, of course, your hands.
https://www..com/watch{q}v=b8mwNhfotR0
Use a hacksaw to cut the pipe to the size you need. You can do it by eye using a spinning rod, or you can measure it with a meter first. Sand the ends of the pipe with sandpaper or a file to avoid scratching your fingers later.
Measure the diameter of the pipe, I did this with a cord, since there was no sewing meter, add one centimeter to the resulting size for the seam and get the width.
To the already familiar length of the spinning rod, we also add a centimeter on each side, maybe two, in case the fabric shrinks. Using the finished dimensions of length and width, we make a pattern with chalk, and then cut it out with scissors.
On the resulting blank we determine the place for the handle, and also mark it with chalk.
We sew the braid to the required places; if there is none, you can use the fabric from which you are making the cover. Having sewn one side of the braid, insert the ring and sew on the other. Do the same with the second ring.
Then we bend one side of your workpiece one centimeter from the inside and iron it well,
The lace will be inserted here, but first sew this area with thread so that you can thread the lace.
All that remains is to attach all the sides, again from the inside out, and stitch along the entire plane, you can do it yourself with a needle,
You can use a sewing machine.
Of course, you don’t sew the side with the lace. When you're done, turn it inside out and get a finished case.
You insert a pre-prepared plastic pipe into it.
The tube does not have a lid; at first I used shoe polish. Then he threw them away as unnecessary. The thing is that I insert the tube into the spinning rod in the factory case, because of this it does not dangle. And I cut the pipe with a margin, so the tip of the spinning rod simply does not reach the fabric.
Since I carry the tube behind my back, it turns out that the spinning rod stands vertically with its handle on the fabric and the tip is next to it, so the lid is an extra element, the main thing is that the spinning rod “fits” into the tube with a slight tension.
The tube is almost ready, all that remains is to make a belt for it. I took it off an old bag. If you don’t have the habit of leaving unnecessary things, then you can make a belt yourself. Take the braid of the desired size, sew carabiners to it and fasten it to the rings.
Now I actively use this homemade product and do not experience any problems with transportation or safety of the spinning rod.
And you won't have to worry about its contents. You won't spend a lot of money or time on it. And most importantly, it will be the right size, and you won’t have to carry air.
Happy fishing!
Alexey Churakov – Specially for Homemade FISH, Kyiv, Ukraine
Purchased types of products
There are a lot of models of such fishing accessories. They all differ in length, number of additional compartments, diameter and external design. Based on these factors, the price of these goods is formed.
Products with a small diameter are used to transport one spinning rod or 2-3 fly fishing rods. A large diameter should be chosen in cases where several feeders and spinning rods will be transported simultaneously.
The length of the magazine tube can vary from 1.1 m to 1.8 m. In this regard, they are divided into 3 types:
- short (1.1–1.2 m) – for small spinning rods and fishing rods;
- medium (1.2–1.3 m) are suitable for Bolognese rods and pickers;
- long ones (from 1.45 m and above) are used for transporting carp fishing rods and three-part feeders.
According to hardness they are divided into 3 classes:
- hard;
- semi-rigid;
- soft.
But, despite the variety of purchasing options, choosing a good tube at an affordable price is quite difficult. It is much easier and more practical to make it yourself. This will not require much expense. The manufacturing process is not complicated. So, even a beginner can cope here.
How to make a cover for a fishing rod?
You can do it simply and purchase a plug for a plastic pipe, which will serve as a cover for the cover. If for some reason there is no plug and it is impossible to get it out, you can make a lid from improvised materials. Cut a circle out of leather.
The diameter of such a part should be 1.5 mm larger than the tube itself. We cut out the second circle so that its diameter is 1 mm smaller than the tube. All that remains is to glue these two elements and put the lid on the case. To make a lid, you can use not only leather; felt or other dense material is also suitable.
It is also worthwhile to “tightly” attach the lid to one side of the case; for these purposes we use an adhesive substance.
Tube design
You can attach a handle to the case to make it comfortable to carry; you can also cover it with fabric or decorate it with rivets. Get creative and design your case to suit your preferences and it will attract the attention of other anglers.
How to cover a tube with fabric?
For these purposes, it is better to choose fabrics that are not too dense in structure, so it will be much easier to work with. The stretchy and elastic fabric will fit perfectly on the hard cover, and if necessary, it can be removed and washed.
It is necessary to sew a cover from an elastic material that will be a couple of millimeters smaller than the tube. To do this, you should first prepare a pattern and mark it with chalk. The lower part of the cover is sewn with strong threads in a straight line, only then a side seam is made, which runs perpendicular to the bottom.
You can also equip the case with additional pockets in which you can store fishing lures. The pockets are sewn on top of the cover itself or Velcro is used, with which they will be attached to the tube itself.
How to make a handle?
If you want to equip your tube with a handle, then you need to attach it to the base of the pipe with bolts, this will be more reliable. The handle itself can be purchased at any bag store or tailor shop. If you equip the tube with a carrying handle, transportation of gear will be more convenient, especially since attaching the handle to the case is easy.
You need to drill several holes in the pipe for the bolts and use them to secure the handle itself, the length of which is selected individually.
What will you need?
If you want to make a tube for storing and carrying fishing rods with your own hands, then first you need to prepare everything you need for this. You will need:
- pipe (you can take plumbing material for sewer systems);
- hacksaw for metal;
- black marker;
- woven material (the tube will be covered with it);
- rivets;
- a small piece of foam rubber;
- ruler.
You need to choose the right foundation. If you want to make a rigid container, then you should purchase a pipe with a cross-sectional diameter of 50, 60 millimeters from a plumbing store. If you plan to use the case for several fishing rods at the same time, then you will need designs with a diameter of 100 or 110 millimeters.
Store tube models
There are several models of fishing cases in the fishing store:
- hard;
- from soft materials;
- semi-rigid;
- tubes.
An economical option is simple soft cases made of waterproof fabric. However, tubes are considered the most popular accessory for storing and transporting fishing rods. They will not only protect your gear from moisture, but also protect it from mechanical damage.
Making a spinning tube
To make a tube we will need:
- Sewage pipe (50-110 mm diameter)
- Foam rubber
- Protective fabric (you can successfully use a pant leg from an old pair of jeans)
- Velcro (purchased at a sewing store
- coupling
- Stub