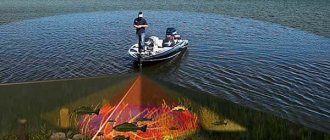
One of the common problems that anglers have is attaching the echo sounder to the boat. An incorrectly installed device may show erroneous data, which leads to a lack of bites.
The transom echo sounder bracket allows you to securely fix the device and is suitable for most popular gadget models.
Mounting the echo sounder sensor to the transom
A large number of echo sounder models include a mount that allows you to fix the device. Most often, such fasteners provide for stationary installation of the device. However, this method can be a problem for people who have several boats or use temporary inflatable boats.
Most often, the fasteners are installed on the transom wheel stand, but there are also special devices for boats that do not have transom devices.
When purchasing a product, you must clarify this point. Fasteners are most often made of stainless steel, which allows the device to serve for a long time, regardless of operating conditions.
Let's celebrate! The mount is installed using a clamp, where a special mechanism is placed, with the help of which the depth of the sensor is adjusted.
The mounts are suitable for all types of devices.
Types of holders and design features
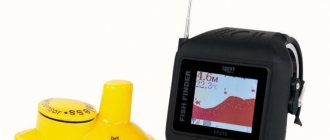
The device consists of two functional parts:
- housings with a liquid crystal screen;
- emitter sensor or transducer.
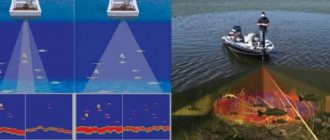
To obtain adequate readings and achieve a clear bottom relief pattern, several conditions must be met when attaching sensors for boats:
- The signal emitted by the transducer must be strictly at an angle of 90 degrees to the surface of the water.
- There should be no air bubbles near the transducer under water.
- Even slight vibration of the transducer should be excluded.
It is recommended to use one of three fastening methods:
- transom;
- fastening to the bottom;
- remote method (homemade).
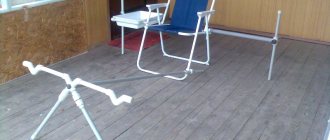
The device screen does not require special installation conditions, and it can be fixed:
- on a stand (bench) in a convenient place;
- on the lateral surface;
- at the bottom of the boat.
Mounting methods for holders are selected individually. Available options include a bracket, special couplings with locks, glue, and a vacuum suction cup.
Transom
The transom is a rigid metal plate. Its length should be equal to the width of the craft or slightly less.
The transom acts as a support for the outboard motor. It bears a large load, so it must have high strength. If an inflatable floating device is used, the transom design can be stationary or hinged. Fasteners for a mounted transom on a boat can be purchased at a retail chain.
The transom is often used for fastening additional devices and elements.
To install the device sensor on the transom of a floating craft, special transom holders or transom brackets are used.
Attachments to the bottom of the boat
Several methods of attachment to the bottom are used. One of them is most often used and only in boats made of polyvinyl chloride. The transducer is attached to the bottom of the boat using epoxy. This method is for amateurs.
Professionals use mortise and mortise swivel fasteners. The best methods for attaching an echo sounder sensor are those that are done using factory-made fixtures. They are easy to use and safe.
Mortise
The mortise mount is a bracket or angle that is used to mount the sensor into the bottom of the boat. The connection is hermetically sealed; neither the flow from the propeller nor algae interferes with the sensor’s operation.
The sensor, fixed by means of a cut-in, should be mounted in front of the rudder or propeller. It is important.
Mortise rotary
This device is a mortise mount, inside which the sensor rotates at an angle of no more than 120 degrees. Thanks to this, the image on the echo sounder screen can be seen from different angles. This installation method is used if the bottom of the reservoir has a complex topography.
Homemade
Floating sensor option
This option can be used if the surface of the reservoir is smooth, there is no current, and a rowing boat is used that does not have a transom. In this case, a do-it-yourself device for an echo sounder sensor can be used as a budget option.
Sequence of installation and manufacturing of a floating transducer:
- The echo sounder body is fixed on the stand.
- In the central part, a plastic half-liter bottle is intercepted with adhesive tape, attaching the sensor, and the sensor wire is fixed on the neck.
- The hand-made device is lowered into the water on a wire.
- To adjust the depth of the sensor, add water to the bottle.
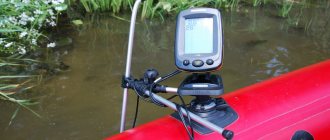
Bracket for echo sounder on transom
For cases where permanent installation of the echo sounder is not suitable, you can use special brackets.
Various types of products can be used to mount the sensor:
- it is possible to independently set the immersion depth of the sensor;
- with a rod that folds back (can be used to temporarily remove the sensor);
- with long-term or temporary installation.
The bracket is made of stainless steel, which allows the product to be used for a long time. Depending on a person’s personal preferences, the fastener can be installed for a long time or be removable.
Most often, the echo sounder sensor is attached using a suction cup, which allows you to use the gadget for fishing at any convenient time.
Advantages and disadvantages
When using the bracket, the following advantages should be highlighted:
- the product can be easily removed and mounted in the required position;
- the bracket securely holds the sensor;
- easy to install on a boat;
- can be adjusted not only in height, but also set the desired angle of inclination;
- metal products will last a long time;
- You can install the bracket in any convenient place.
Flaws:
- must be removed constantly when the device is not in use;
- may cause some discomfort during transportation;
- high cost of the product.
Note! However, despite all the advantages and disadvantages, brackets are popular products for professional fishing.
Correct installation and fastening of the echo sounder on a PVC boat
The echo sounder was created for ships, helping to avoid shallow water and underwater obstacles. But with the development of microelectronics, it became possible to create compact devices for fishing enthusiasts. Modern products can show the bottom topography, depth, water temperature and even schools of fish.
Since an echo sounder is not a cheap product, let’s figure out why a fisherman needs it. So:
- Determines the depth. Large specimens are always near the bottom, so choosing the right spinning rod parameters or choosing the optimal bait weight is the key to successful fishing;
- Shows the bottom topography. This is especially important when catching predatory representatives of a reservoir. Knowing the habits of a fish, you can quickly determine its habitat;
- Indicates the places of accumulation and the size of the fish. This makes choosing the optimal place for casting much easier;
- Temperature and atmospheric conditions are constantly monitored. The activity of underwater inhabitants mainly depends on these factors;
- GPS function. It is especially helpful when traveling to a large body of water. The successful location is marked and the device saves the coordinates.
A good PVC boat is indispensable for fishing, but an echo sounder requires several conditions to be met to obtain adequate readings:
- The transom is the most commonly used mounting location on all types of PVC boats
The signal from the sensor (transducer) is perpendicular to the water surface. This is the only way to achieve the correct bottom picture;
How to make a mount yourself?
Fishing professionals use special fasteners to install an echo sounder, which they make themselves using available tools, this allows them to make the necessary adjustments and save money.
For manufacturing, you need to prepare the following materials:
- metal-plastic pipe up to 1 meter;
- stainless steel pipe up to 1.5 meters long;
- clamp;
- bolts with washers and rubber bands.
To design, you need to perform the following algorithm of actions:
- attach a metal pipe to a clamp; clamps can be used; they can be purchased at a construction retail outlet;
- a metal-plastic one must be inserted into a metal pipe, the lower end of which must be flattened;
- in the upper part it is necessary to drill two holes for mounting the fastener;
- secure the transducer so that the wires are lowered inside the pipe;
- install the clamp in the place intended for installation and fix the monitor.
This type of installation allows you to quickly remove the gadget and control the immersion depth of the sensor.
Echo sounder mount
Each device is equipped with a fastening system; in addition, you can choose the fasteners for yourself; they are available for sale separately. But our people are not used to entrusting important matters to manufacturers, so there are several options for self-production.
Factory method
The most common mount is the option of rigid installation on the transom using the following devices:
- Clamp. Usually made of stainless material with a rubber layer, which allows the product to be tightly and reliably fastened to the hard surface of the boat;
- Bracket. A tube that makes it possible to adjust the sensor in depth, and in expensive models, the angle of rotation;
- Mounting unit for transducer. This device presses the sensor to the bracket.
Operating procedure:
- The clamp is pressed tightly against the transom. If there is an engine, the position of the product is selected so as to eliminate inconvenience during maneuvering. The mounting location is usually moved to the right or left closer to the side;
- The sensor is rigidly attached to the bracket and lowered to the required depth;
- is pressed against the clamp using a special bolt
- Adjustments are made to the depth and angle to the surface. To do this, the clamp on the clamp is slightly released and the bracket moves in the required direction. After this, the entire structure is rigidly fixed.
- The echo sounder screen is placed on the bench or bottom. An option with a suction cup on the rubber side is possible.
Advantages:
- Possibility of quick installation and dismantling. This is important for a PVC boat, since it is usually deflated and folded after finishing fishing;
- Reliability of fastening , correct location of the sensor, easy adjustment.
Flaws:
- relatively high price;
- the rigidity of the structure can lead to serious damage to the transom when hitting an obstacle, so the boat must be operated with extreme caution.
The bracket is pressed against the clamp using a special bolt
Homemade mount
Option 1
It is much cheaper to make the structure yourself. For this you will need:
- An ordinary metal-plastic pipe is about a meter long;
- A tube made of stainless material, the diameter of which will be slightly larger than the metal-plastic one;
- Clamp. Easily found in hardware stores;
- Bolts with washers, rubber gaskets (you can use old bicycle inner tubes), clamps, cotter pin.
Procedure:
- Using clamps and gaskets, we attach a metal pipe about 0.4 meters long to the clamp;
- We insert metal-plastic inside, the lower end of which is flattened. We drill 2 holes for mounting the sensor using bolts and nuts. The use of washers is mandatory;
- The transducer is fixed , and the wire from it is passed inside the pipe;
- The clamp is placed in its place (transom), and the length of the metal-plastic pipe is adjusted using a cotter pin and pre-drilled holes;
- to the end of the metal-plastic protruding at the top in any convenient way.
Option 2
This method is suitable for people who constantly use the same boat
Another way to mount the sensor once and for all is to glue it into the housing. How it's done:
- Near the keel, all layers on the bottom are removed, right down to the outer layer;
- Using epoxy glue, the sensor is glued to the surface. The small thickness of the rubber cannot interfere with the normal operation of the transducer;
- The remaining space from the cutout is filled with the same composition.
This method is suitable for people who constantly use the same boat, and if stored rolled up, there will be no harm to the sensor.
Option 3
Removing the sensor outside the watercraft. Simple instructions:
- The transducer is attached with adhesive tape or tape to the middle of a plastic bottle with a volume of 0.5 to liter;
- the wire from the sensor is secured to the neck using the same means;
- the screen is placed on the bench, a wire is connected to it;
- Water is poured into the bottle until the required immersion depth of the sensor is reached.
Suitable for reservoirs without current or creeks.
Don't have a fish finder? Garmin Striker Plus 4CV Editor's Choice
The Garmin STRIKER PLUS 4CV fish finder has won many international awards. He received an award at CES 2021, won at the European fishing exhibition EFTEX 2021 and the Asian China Fish 2021 Deeper. The smart fish finder has been named an Editor's Choice by Fish Alaska, Anglers Mail and PC Magazine.
- For fishing at any time of the year and in any conditions.
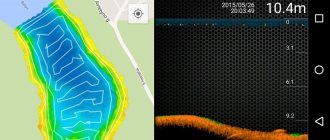
- Creates a map of a body of water in the built-in Garmin Quickdraw Contours program.
- High accuracy of showing the depth of the reservoir and the location of the fish (its size, depth).
- Emits a beep when a fish is detected.
| Clear CHIRP ClearVü scanning sonar images. The STRIKER Plus 4cv fishfinder includes Garmin CHIRP technology that, when combined with Garmin ClearVü scanning sonar, provides nearly photographic images of what's beneath your boat. You will get a clear picture of underwater terrain, objects and fish. Traditional Garmin CHIRP sonar provides excellent target separation. Thus, this transducer will help you catch more fish. |
| Garmin Quickdraw Contours program. No one knows a body of water better than the one who fishes in it. While you cruise the shores and deep waters, Quickdraw Contours creates HD fishing maps for the areas you've visited. Users do not require special knowledge. The STRIKER Plus 4CV can store up to 2 million acres of Quickdraw Contours maps with 30cm contours. |
Buy on the official website with delivery. Price 5800 rub. There are seasonal discounts .
How to install the holder on a boat?
In order to mount the holder to the boat, you must perform the following steps:
- press the clamp to the transom. Using the bolt that comes complete with rubber pads, the device is firmly fixed;
- The gadget sensor must be firmly fixed to the bracket;
- edit the required angle and depth of immersion, and fix it in the desired position;
- after all the necessary settings are set, the bracket is additionally fixed to prevent failures and deviations in the displayed data;
- The gadget screen is installed in a convenient place. Most often this is the bottom of a boat or a bench. Special suction cups can be used for fixation;
- To protect the screen from precipitation, a special canopy made of plastic or oilcloth material can be mounted.
In the case when you need to adjust the degree of immersion of the sensor, you should loosen the bolt that secures the fastener and change the settings, and then secure the device tightly again.
Special mounts for echo sounders allow you to use the devices in any conditions for a long time. Properly installed echo sounders not only help you catch big trophies, but also allow you to display the bottom with all possible obstacles on the gadget screen.
Good to know! In almost any store that sells echo sounders, you can purchase a special bracket. However, if necessary, such fixation can be done with your own hands, and it does not require large expenses, experience or lengthy work.
Making your own echo sounder sensor
In order to make an echo sounder sensor with your own hands, you need the following materials:
- Polypropylene pipe with a diameter of 32 mm;
- G – shaped clamp;
- The counterpart of the standard fastener included with the echo sounder sensor;
- Epoxy resin;
- Heat-shrink tubing;
- 3 bolts 8x40;
- 2 hex nuts M8;
- 1 M8 wing nut.
The process of assembling a homemade echo sounder sensor bracket consists of the following steps:
- A piece of 0.4-0.5 meters is cut from a standard pipe 2 or 3 meters long;
- The free end of the clamp bracket is inserted into the upper passage hole;
- A through hole is drilled through the pipe and clamp bracket with a drill with a diameter of 8 mm;
- The clamp is fixed in the pipe with an 8×40 bolt with a hex nut;
- To strengthen the junction of the clamp and pipe, waterproof epoxy resin and large-diameter heat-shrinkable tubing are used. The resin is carefully poured inside the pipe, and the heat shrink reliably closes the attachment point of the end of the clamp in the pipe from moisture;
- At the opposite end of the pipe, a standard mount from the echo sounder sensor is fixed using two bolts and nuts.
Such a simple and cheap homemade mount for an echo sounder on a PVC boat, boat, or cauldron is suitable.
Mounting bracket
Mounting the sensor using a bracket with a clamp is the optimal and widespread option for installing the sensor on the transom. The design is a rod with a clamp installed at one end, and at the other end there is a place for attaching a transducer.
Using a clamp, the bracket is attached to the top of the transom away from the outboard motor or inboard propulsion unit. The bracket rod is adjustable in length, which allows you to lower the sensor to the required depth to avoid radar interference from air bubbles formed from turbulence under the bottom of the boat.
The bracket has advantages:
- Mobility. The bracket is easy to remove and install. The fish finder can be used on different boats.
- Reliable rigid mounting of the sensor relative to the vessel.
- Simple mounting.
- The presence of many adjustments (height, tilt angle, tilting capability).
- Durability (in the case of a metal rod).
- Possibility of installing the sensor on a transom of any thickness.
Disadvantages of the bracket.
- The need for constant removal and installation.
- Occupies a certain volume during transportation.
- High cost (from 1200 to 3000 rubles depending on the design).
The simplest option for making a bracket yourself is to use a regular clamp and a wooden strip as a rod. The sensor is attached to a rail of the required length. The rail is attached to the transom by clamping it with a clamp.
Mounting options
Attaching the echo sounder sensor to the transom can be done in two ways. In the first case, the equipment is installed using a factory bracket. It should be noted that most often it is not included in the delivery package of the echo sounder. The mount provided by the manufacturer is intended for the main unit of the device.
When choosing a factory bracket in a fishing store, it is necessary to take into account the design features of the boat and the installation location. In this case, you need to buy a metal holder. It is most often made of stainless steel. The material must be well processed. Otherwise, it quickly collapses under the influence of water.
The second option when installing a transducer is to create a bracket yourself. In this case, the owner of the boat can take into account the features of his boat. In this case, the sensor will be installed in a suitable area. Homemade mounts will save you money on buying a factory bracket.
Brief overview of popular models
The appearance of universal mounts for echo sounder sensors did not go unnoticed and fishermen began to actively use them.
Moreover, the most successful designs of some options have gained great popularity.
Aluminum Boat Transom Sonar Sensor Mount (TK-550)
A universal set of parts allows you to quickly attach the echo sounder sensor to the transom board of any small craft.
The kit includes:
- Two attachments (plastic and metal), allowing the installation of sensors of various designs.
- Aluminum bracket with clamp.
- Movable tube.
- A set of necessary fasteners (screws, nuts, washers).
- Open-end wrench.
Assembling the device and installing the sensor on it is carried out in the manner specified in the attached instructions. The assembled device is attached to the transom anywhere using a clamp.
The immersion depth is ensured using a movable connection and is fixed using a handwheel.
Once assembled, the quick-release telescopic mount allows you to:
- without performing preliminary mechanical operations or using a special tool, fix the sensor in the place where it is possible to obtain optimal characteristics;
- install the sensor on a transom of any thickness;
- smoothly adjust the sensor immersion depth in accordance with operating conditions;
- use a sensor of any design.
Echo sounder sensor holder with angle adjustment (stainless) DT-150H
The holder is attached to the transom of a boat or boat using a clamp. The thickness of the transom does not matter. All parts included in the device are made of stainless steel and are characterized by high strength.
This kit also includes two connectors with which you can install ultrasonic sensors of various designs.
The holder differs from similar devices by the presence of a mechanism that allows you to adjust the angle of the tube (with fixed positions) and the ability to adjust the height (immersion depth).
New: Humminbird MHX XNPT Portable Hardware
The Humminbird company, while producing the popular TK-550 type mounts for transducers, simultaneously released a number of original suction cup mounts onto the fishing accessories market.
They are designed to mount Humminbird branded XNT transducers on the transom board of any craft.
The mount allows you to easily install the sensor on the boat, and if necessary, easily dismantle it.
Mounting an echo sounder sensor on board a rubber boat KRL-300
The installation kit for mounting the KRL-300 echo sounder sensor is an upgrade of the TK-550 type mount and is intended for installing almost any ultrasonic sensor on the sides of inflatable rubber or PVC boats that do not have a transom in their design.
To do this, the bracket with a clamp included in the TK-550 device kit was replaced with a special support part made of high-strength plastic.
This support piece is glued to the side of the boat with the glue included in the device.
In order to ensure the necessary perpendicularity, it is recommended to first insert the movable tube into the hole of the supporting part and secure it with a handwheel.
The entire process of assembling the device and attaching the sensor is described in detail in the attached instructions.
Important for all fastening devices: to avoid damage to the echo sounder sensor (or the fastening device as a whole) in the event of an accidental collision with an underwater obstacle, the movable tube should not protrude beyond the line of the bottom of the floating craft.