Having bought a PVC boat, sooner or later every owner thinks about improving the technical and functional characteristics of the boat. Tuning can be ordered from trusted masters who, for a fee, are able to realize any client’s wishes. However, the most interesting process is the process of tuning yourself, which will not only improve the performance of the boat, but will also bring a lot of positive emotions.
Strengthening the boat structure
Tuning should begin with strengthening the bottom surface. Despite the fact that manufacturers pay increased attention to materials for the bottom, it wears out over time. Actively using a swimming device or carelessly bumping into stones can seriously damage the bottom.
Gluing a PVC-based profile can help in this situation. However, when improving the bottom surface, it is worth remembering that the profile will increase the weight of the vessel. It is recommended to strengthen the bottom as much as possible only in cases of constant use of the craft on fast rivers with a rocky bottom. If fishing is done in a quiet body of water, then the strengthening of the bottom surface can be minimized.
What may be required to strengthen the bottom:
- PVC membrane or corresponding profile;
- PVC adhesive base "Vinicol" or "Uran".
If desired, you can reinforce it using a membrane without using an adhesive base.
Step by step process:
- The surface of the floating craft is washed from sand.
- Degrease the clean surface.
- After removing the valve, disconnect the transom wheels.
- On the flotation device (inflated), paper is laid out and 2 patterns are cut out , according to the dimensions of the bottom surface (the area between the location of the cylinders and the keel).
- According to the received patterns, we carefully cut out the elements from the membrane. The mass of one part is usually slightly less than 2 kg, and the thickness exceeds 1.5 cm.
- The cut material is laid out in an open place where the sun's rays fall until the desired shape of the product is completely taken.
- Turning on the hairdryer, heat up all the parts and squeeze out the air using a roller.
- We work very well on the extreme areas. Bonding of materials is carried out by heating the membrane material from exposure to high temperatures.
- We glue the PVC profile onto the keel on both sides. This will protect the keelson.
- The boat is also strengthened using cylinders (a quarter of their length).
- If desired, you can strengthen the boat along the transom (it is covered only with a layer of bottom woven base).
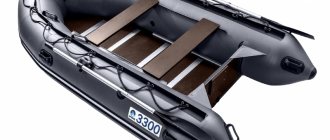
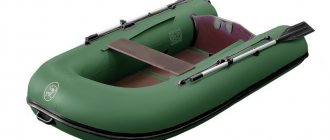
Tuning PVC boats
This watercraft is the best-selling and easy to use. This can be due to the fact that:
- the boat is easy to transport, no need to buy any trailers;
- it is easy to repair;
- There are many gadgets for it.
But even taking into account all these positive aspects, it is in its “raw” form, rather impractical. The functionality of such a tool is very small, which means that it needs to be improved.
There are services where you can implement your idea, but it is quite expensive. Tuning a PVC boat with your own hands will be cheaper and more correct.
Of course, this does not mean that all the parts must be made with your own hands; some of them can be purchased in the store.
So, let's look at what can be completed:
Reinforcement of the bottom and cylinders. Experienced fishermen always carry out such tuning, regardless of the conditions. It is proposed to glue an additional layer of rubberized fabric or membrane to the bottom and sides of the cylinders.
Read here - Do-it-yourself fishing gear: making equipment, catchy models and practical advice from experts (105 photos and videos)«>
Initially, with the boat inflated, measurements are taken and the places where the patches will be glued are marked. After this, the boat is deflated, the gluing areas are degreased, and the selected material is glued on top.
If necessary, at the end they are also heated with a hair dryer (construction hair dryer). With such tuning, it is worth considering that the weight of the boat will increase by an average of 5 kg.
Anchor. A very convenient thing when fishing in one place. A special anchor eye is sold in stores; it is installed at the stern.
Check it out here too!
How to make a fishing screen: description and step-by-step instructionsFishing knots diagrams: the best fishing knots for all occasions
How to make a fishing hook at home: master class with photos
Sealing of seams. When buying a cheap boat, you can’t rely on quality. Therefore, many owners additionally seal the seams.
You can also decorate the boat around the perimeter with various stickers, etc. To get inspired, you can look at a photo of such tuning on a boat with your own hands.
Rod holder. It is also an indispensable thing if fishing takes place with several spinning rods at once.
The list of things that can be added to a swimming device is endless. For example, you can install seats, a table, a steering wheel, build wheels and much, much more.
To learn more, we suggest watching a video of tuning boats with your own hands.How to glue a fender yourself
Reinforcement with timber can be done with your own hands according to the instructions below:
- We wash the surface of the bottom of the swimming device. Remove sand deposits and dry.
- Degrease the dried surface with vodka, alcohol or gasoline.
- Using a brush, apply a thin layer of adhesive base to the surface of the timber and the vessel.
- Leave for 20 minutes, after which we apply the second layer in the same way.
- We wait for the material to dry completely (it should not stick to your hands).
- We press the applied beam tightly to the surface with extreme precision.
- To ensure maximum adhesion, you should preheat the surface with a hairdryer.
- Again, squeeze the gluing area and roll a round, weighty object over it.
Bottom
A worn or punctured bottom is not only a sign of an imminent leak, but also a high risk of a sudden leak when going out on the water.
In this case, it is necessary to strengthen and seal the bottom of the boat with PVC. Let's look at how to repair the bottom of a flat-bottomed rowing or motor boat.
Read about how to seal a boat with a low-pressure inflatable bottom here.
Important! Use special rubberized tapes to strengthen the bottom and cylinders. They will increase the durability of the boat.
To repair the bottom you will need:
- PVC patches;
- Brush;
- Glue;
- Hair dryer.
Sequencing:
- Cut strips of the required width and length from PVC material.
- Apply glue to the strips with a brush and leave for 20 minutes.
- Apply glue to the wiped bottom of the boat and leave for up to 20 minutes.
- Press the patch firmly onto the repair area, while simultaneously heating everything with a hairdryer for better adhesion.
- If necessary, repeat the procedure from the inside.
- Leave the work to dry for 12 hours.
Installation of stringers
Before installing the stringers, markings should be made:
- By placing the set of floorboards on the floor, we ensure that the order is exactly copied as they are placed in the cockpit.
- The stringer is applied to one side of the floorboard , while ensuring that its length overlaps three adjacent floorboards.
- It is not recommended to install stringers in the bow of the vessel. When planing, the main load falls on the floors of the third rear area of the body of the PVC product. Based on this, it is more advisable to install the stringer on the outer floors from the transom part of the boat.
- It is very important that when installing stringers, the pajolines do not protrude beyond the edges. To ensure this condition, you should mark the depth of the cut, which will ensure that the stringer is placed on the outermost area of the plywood.
- To make markings, we apply a stringer and align it with the plane of the outer parts of the floorboards. Observing the dimensions of the profile, we draw a contour for the cut (on both edges of the stringer).
- We connect the markings with one line and get the desired most accurate marking of one side.
- When marking the cuts for the stringer, you should add an extra length of about 4 cm (on each side). This will allow you to comfortably put on and take off the stringer if necessary.
- When marking, the middle payolina moves slightly to the opposite side from the marked area. After this, markings should be made on the second side of the floor.
- Having finished marking and taking a jigsaw, we begin cutting out pockets along the markings (for installing stringers). You can prevent the appearance of chips on plywood if you use nail files “for wooden materials” that have fine teeth. When working, you should act slowly so as not to make mistakes.
- Having completed all the steps, we slightly round the edges of the payolin and treat them with a water-repellent impregnation. Pinotex Focus, which contains a sufficient amount of wax, is perfect in this case. If desired, the outer sections can be treated with drying oil (well heated) or yacht varnish (waterproof). Following these recommendations will prevent the swelling of the pajoline.
By equipping the craft with redans, you can increase the level of stability of the boat on planing
Stringer functions
The role of stringers in the design of an inflatable PVC boat is quite large. They:
- increase the stability of the boat, which makes it much safer;
- reduce the range of vibrations when walking on the bottom;
- increase structural rigidity, thereby improving driving performance.
The most noticeable positive changes are when operating large boats with stringers. But when choosing an aluminum profile, you need to be careful: it must match the thickness of the plywood from which the floorboard is made. Only in this case will stringers be truly effective.
Aluminum is best suited for the production of stringers, as it has the necessary strength and at the same time light weight. The ends of the metal parts are protected with plastic plugs to prevent tears in the PVC material of the sides. The edges of the sections are tightly secured in the grooves of the stringer. For all bottom thicknesses, the same profile configuration is used, which differ only in the dimensions of the section and the opening left for securing the plywood inserts. Typically, when moving along the water surface, the main load falls on the stern and the middle of the bottom. This is where stringers are usually installed. There is no particular need to use them in the bow.
Hard floor
When making a hard floor you cannot do without:
- sheet of plywood (10 mm);
- loops - about 20 pcs.;
- bolts;
- nut;
- yacht varnish;
- impregnation;
- washers
Step by step process:
- a linoleum pattern suitable for the dimensional characteristics
- The widths (taking into account the rectangular part of the bottom) should be 1.5 cm larger to ensure normal gaps.
- Having cut out the linoleum, we will mark the hard floor. It will be placed between the floor (hard type) and the PVC coating of the bottom, which will prevent the fittings from damaging the existing bottom.
- The pattern is folded in half and its symmetry is achieved by cutting .
- Putting a sheet of plywood in front of you , carefully cut out six floors (80 cm wide).
- The square remaining after cutting can, if desired, become a foot rest.
- We round the long sides of the pajoline using a file. Impregnate with protective impregnation.
- From payolin we assemble an accordion on loops for the bottom surface.
- Be sure to use a bolt (the side where the hinges are located) with a countersunk head. Otherwise, the floor will not be foldable.
- The part of the bolts that looks out from the back side is carefully cut off using a grinder. We sharpen the nuts. To ensure the maximum level of rigidity, 3-4 loops should be placed per connection.
- The resulting structure is covered on top with a piece of linoleum and outlined with a felt-tip pen.
- Cut off the excess parts using a jigsaw.
- We round the edges along the entire contour using a file.
- Taking sandpaper, sand the entire surface , cover it with 3-4 layers of varnish (yacht look).
Boat anchor
There are a large number of models of anchors for swimming craft. Most fishermen often use any iron device of suitable weight as an anchor. Some fishermen prefer to buy collapsible models.
When choosing an anchor, you should take into account certain requirements:
- The weight should be at least 5-6 kg (depending on the strength of wind gusts and current speed, the windage of the vessel also has a great influence);
- Possibility of lifting and lowering from the place where the boat is controlled. Boats whose length reaches 4 meters must be equipped with an anchor eye and a roller (optional). This will ensure the safety of the cord in areas of friction with metal.
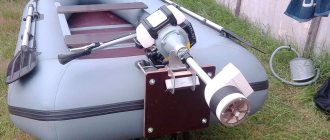
Echo sounder sensor
The echo sounder sensor can be fixed using a suction cup, but in most cases it does not hold well on PVC boats. As a solution to the problem, you can purchase an aluminum tube with a square cross-section. We drill holes in the tube (through holes) intended for the pin.
We make an eye-egg and fix it with glue in the upper side area of the balloon. You can adjust the immersion depth of the sensor by lightly moving the pin. We equip the lower part of the tube with a bracket for the sensor. By rotating it vertically, you can achieve the required level of inclination. Horizontal rotation is impossible due to the profile pipe.
Accessories
There may be a need to install new fittings on a PVC boat.
Boat fittings include
- Pens;
- Guard washers;
- Rym;
- Self-adhesive numbers;
- Oarlocks;
- Fender beam.
To install the accessories you will need:
- Glue;
- Brush;
- Gel pen.
Important! Install fittings only after preliminary fitting to the boat, taking into account further practical use.
Sequence of installation of railing accessories:
- Railing fittings are installed on the boat according to the workpiece. You need to arm yourself with a gel pen and carefully trace the contour of the fittings attached to the boat.
- Apply glue to the fittings and where it connects to the boat.
- Wait a few minutes.
- Press the fittings firmly.
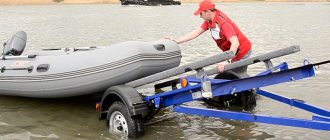
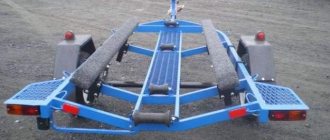
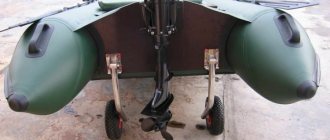
Transom wheels
There are a lot of options for creating transom wheels. The main purpose of wheels is to transport a loaded boat from the trailer to the aquatic environment.
Step-by-step process for making wheels:
- We prepare inflatable wheels with a diameter of 300-400 mm and a width of more than 100 mm. It is very important to select the largest possible diameters, which will prevent it from getting stuck in the ground.
- The wheel hub is connected to it as tightly as possible.
- The chassis can be made on the basis of channels or pipes. The simplest way to attach the transom to the chassis is to use a metal plate welded to a section of pipe that will accommodate the upper area of the chassis without play.
- All chassis mounts must have at least 3-4 points and plates (clamp type) located on the inside of the transom. They will provide the maximum level of fastening strength.
- The chassis is fixed to the fasteners using bolts. If desired, the wheels can be raised along the cylinders.
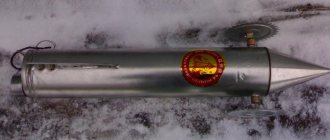
Inflatable keel
Not every PVC boat is equipped with a keel. Its presence is especially important for boats with a motor. Keel has the following functions:
- can ensure the vessel is kept on course;
- prevents the bow area of the boat from tearing off the surface of the water surface when moving with the engine running.
You can also make a keel with your own hands:
- with a diameter of 100 mm and a valve is glued together from waterproof materials
- The required length of the tube is usually calculated by measuring the distance from the stern to the bow.
- We glue the tube to the bottom surface in the inner part of the vessel in the place of the keel , using transverse strips of PVC.
- It is advisable to first pour mustard solution into the pipe , which will provide the necessary level of tightness.
- , air necessarily escapes from the keel
The keel prevents the bow area of the boat from tearing off the surface of the water surface when moving with the engine running
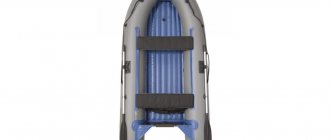
How to strengthen the bottom of an inflatable boat
Manufacturers often make the bottom of the boat from PVC fabric, which is very uncomfortable to walk on. A non-hard bottom provides the fisherman with a number of inconveniences while moving around the boat. Therefore, when tuning a PVC boat with your own hands, you need to strengthen the bottom first. And if you damage it, you will have to repair it with reinforcement, not the bottom itself, which is much cheaper and simpler. The bottom of the boat can be reinforced completely or partially.
A special PVC tape does the job perfectly. This tape is also called a fender and is used to cover the bottom of the boat completely or partially. Typically, the thickness of such a tape is from 1 to 3 millimeters, and the width is from 60 to 230 mm. You can glue the fender using two-component glue. This simple operation stiffens the bottom and also provides additional protection from underwater obstacles.
Seats
The majority of store-bought PVC boat models are equipped with hard seats, which deprive the fisherman of comfort and do not allow him to sit comfortably for a long time. To ensure your own comfort on board the ship, you can install soft seats on board, having previously covered them with leatherette.
As an option, you can purchase inflatable chairs. If desired, the soft seat is complemented by a bag located underneath it that serves as storage for small parts. The size of the bag should be proportional to the size of the chair.
Engine insurance
Unfortunately, it is impossible to predict what may happen to the boat after entering open water. Unexpected collisions with obstacles are considered to be quite common troubles for fishermen. In this case, poor tightening of the clamps can cause the outboard motor to fall from its location. Very often it simply sinks to the bottom of the reservoir.
To eliminate this kind of misunderstanding, you should strengthen the motor. To do this, a cable (synthetic or steel) is pulled along the transom, bypassing the eye rings that are located on the transom. In simple terms, the motor is securely tied up and it becomes impossible to lose it.
Installing an anchor mount
Setting an anchor will help you stay in one place. It should be understood that the mass of this device must be at least ten percent of the total weight of the vessel.
The design of the anchor should be as compact as possible so as not to cause unnecessary discomfort during its use.
The anchor installation process is as follows:
- For convenience, inflate the boat with air.
- Decide on the location of the anchor device and circle this location with a marker.
- Heat the working surface of the eye with a hairdryer and clean it with sandpaper, then remove grease from its surface with alcohol or solvent.
- Apply glue to the surfaces and glue them together.
- Wait until the glue dries (about one day).
It is worth noting that it is best to purchase a mount for an anchor eye in a special store, choosing the highest quality and durable product.
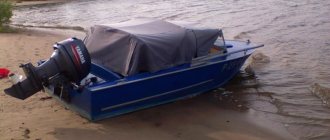
Awning
When tuning a boat, fishermen often install an awning on it. Awnings are available in a variety of varieties and can be designed for certain models of vessels. For small boats, umbrella awnings are usually used to protect a person from rain and sun.
Boats equipped with a motor are often equipped with:
- The nose cone is based on PVC material. Some models are equipped with a viewing window. The awnings can easily be thrown over a special arc, protecting people from splashes and preventing high waves from getting inside the boat. When planing, the nose cone acts as a wing, which prevents the craft from jumping in the air during strong gusts of headwind. The presence of a small pocket allows you to store a copy of the board number.
- The transformable awning is attached to the board with aluminum arches. The design is able to shelter people from raindrops and gusts of wind. Windows located on the awning product make it possible to move under the motor (in light winds). The side parts of the PVC material are movable and can be zipped and raised when fixed with slings. By changing the position of the side parts of the awning, you can comfortably spend the night on the water, fish in rainy weather, or get out onto land. Most models are equipped with ventilation devices.
Installing stringers
A duralumin profile is a mandatory element for a boat with a rigid bottom. The process of friction between hard floors and PVC material while moving across a pond simply cannot be avoided. This friction is caused by subsequent deformation of the fabric during contact with water.
There can be quite a lot of consequences from such a process, ranging from partial damage to the PVC fabric and ending with deformation of the boat itself. Stringers do not need to be installed in the bow of the boat, and they will not interfere with water in places where the bottom is flat.
Before installing the profiles, you must carefully mark the boat and its bottom. Marking and installation is carried out according to the following algorithm:
Additional options
As an additional tuning, fishermen attach a gas tank and equip the boat with a spinning rod.
Fastening the gas tank is a very important procedure, which will allow you not to lose it during sharp turns or strong currents. Usually the tank is tied up using a strong rope passed through the half rings.
You can fix the half rings in the following ways:
- by gluing to the bottom (in cases where the floor is inflatable);
- if the floor is hard, it is more expedient to screw the half rings with screws to the pajoline.
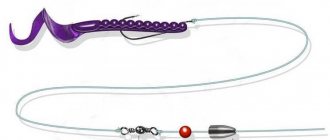
Anglers call the spinning rod a tarka among themselves. As a rule, it is performed on the basis of a pipe, with a glass securely attached to install the gear. The container is installed in the transom part of the vessel or in the middle.