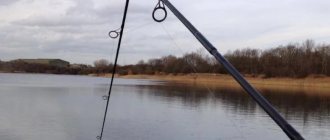
The topic is intended for fishermen who want to start making lead jig blanks of various shapes using a cold method, followed by soldering a hook.
To do this, we need to make bait bodies from forged lead and bring them to perfection. You can see the vibrations of my homemade lead jigs in the short video below.
We will analyze the production of a lead bait of an inclined action from start to finish using the example of forming the body of a popular jig called “Ant”. At the end of the topic, we will start painting a batch of jigs made from lead rod.
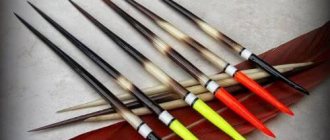
Lead jig blank shape
These are the blanks with different shapes of homemade lead jigs that I made in just a quarter of an hour from lead, taking time away from writing.
In principle, by soldering hooks into the lead jig blanks shown in the photograph and piercing holes in the bodies for winding fishing lines, the manufactured baits can be used for fishing without further processing.
And it is unlikely that cold-blooded prey caught with jigs will make any complaints about the external presentation or shape of the homemade lead.
On the contrary, a too sleek bright color of a homemade jig blank made of lead of any shape can cause a certain mistrust in the fish.
And all the fine-tuning of corners, spheres, edges in order to give this or that homemade jig some kind of finished shape and presentation, you must agree, we do more for ourselves.
To be honest, for a long time (I don’t even remember since when) I have been using my own forged homemade jigs made of lead in only three classic shapes or their small modifications when fishing. These are homemade products called ant, pellet, droplet, uralochka.
All other exotic things are a thing of the past. In my deep conviction, the first place is still not so much the shape of the lead jig, but the method of its wiring and the balance of the gear for certain fishing conditions.
How to make jigs with a crown
Now when fishing for bloodworms I have completely switched to tungsten, fortunately there is enough of this stuff in stores, I only always change the hooks on them to high-quality ones, but before I used to catch quite well with jigs with a crown of my own making. Making them is quite simple, first you need to pick up a nut and a ball from bearing of the size we need, then we take foil (copper, brass, etc.) and anneal it over a candle until it turns blue.
Place a piece of foil on the nut and press it lightly with a ball to create a small indentation.
Then we gently tap the ball with a hammer, giving the scale the desired shape, and this is what we get.
We cut off all excess, the crown is ready.
We use a regular sewing needle to pierce a hole, it is advisable to make it exactly in the center
clean the insides of the scales with a file
We put the scale on a regular pin, insert it into a wooden block, lubricate it with acid and substitute a pre-cleaned and tinned hook.
Solder with tin or any other solder
We remove it from the pin and use a file to clean the sharp edges of the crown, and if there are any, smooth out any unevenness.
We clean the hole for the fishing line and polish the jig with a needle, then polish it on a piece of felt with goya paste, the jig with a crown is ready
It’s even easier to make the next jig: cut a strip of the required width from a piece of annealed foil,
we bend it on a match and cut off all the excess to get something like this
Use a needle to pierce a hole for the fishing line and clean out the insides
Using a needle, press the crown against a wooden block, insert the tinned hook and lubricate everything with acid.
Solder with tin or other solder. Remove the jig from the needle and sharpen it with a file,
to get this shape
We smooth the crown with a needle and polish it, the jig is ready.
It’s quite simple, you can make working jigs yourself, and of any size. Now on sale there are lead pellets with a cut, of different sizes, for loading float rods, sold in sets. You can also make jigs from them, which work very well and pull no worse than tungsten ones.
I usually immediately punch or scroll a hole in the pellet for the fishing line, insert a needle into the hole, and a tin-plated hook into the cut, lubricate it with acid and solder it with tin. The resulting pellets are a natural lead color; you can paint them black.
Previously, I always fished with my own jigs, now tungsten is in use, but the hooks are usually store-bought tungsten, too large and often of poor quality. You can change the hooks on them yourself, although you need to do this quickly and preferably the first time.
Since pure tungsten cannot be soldered, a copper film is usually applied to it so that the hook can be soldered; if the tungsten is overheated when soldering the hooks, then this film will burn out. So everything needs to be done very quickly, apply a soldering iron, pull out the old hook, smear it with acid, insert a new hook, solder
Maybe someone will find my advice useful. No tail, no scales! Best regards, Snyper.
Author: Evgeny Kasimov aka snayper, Leninsk-Kuznetsky
We clean the hole for the fishing line and polish the jig with a needle, then polish it on a piece of felt with goya paste, the jig with a crown is ready
According to the manufacturing method, jigs can be divided into:
- cast,
- soldered,
- made by instrumental means.
Casting in a mold allows you to obtain a jig according to a given template. However, making the sprue itself is a rather complicated process. It’s easier to buy an aluminum mold or order it from a professional mechanic. At home, you can make molds from plaster or liquid glass, but they will not be durable. The template for making the sprue should be a ready-made catch jig.
Making a forged jig blank from lead
A cold forged blank of a homemade jig, for example called “ant”, can have any weight, shape and inclination in space.
The density of a jig made from forged lead is 20 percent greater than that of a cast bait, which makes it possible to use homemade lead jigs for fishing not only of different shapes, but also of smaller sizes.
The initial shape of most homemade forged jigs according to my method is given by rolling out one common lead blank under a metal plate.
Next, to make each bait, we separate a jig blank of the required length from a long round lead rod.
For example: if you separate a short stump from a lead rod and roll it out on a plate under a metal plate, then the output will be a jig blank called a “shot”.
If you solder a crown hemisphere onto a pellet made from a stump of lead, and solder a hook into the body, then at the end you will get a homemade forged lead jig of a round shape, capable of holding a considerable pressure of water flow.
From the oblongs of a round lead billet, during the manufacturing process from a lead rod, you can get jig bodies called droplet, rocker, crescent, ant.
You can evaluate the vibrations of homemade reelless jigs of various shapes, made of forged lead, while watching the video at the end of the page.
Shape of a homemade lead jig
If you have not yet decided on the shapes of your homemade lead jigs, you can borrow them from the website or in the videos.
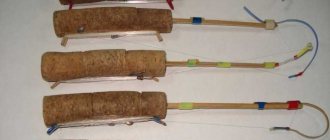
I demonstrate some forms of my homemade lead products in the photograph. By the way, two forged, hand-made lead jigs - oblong and round - have crowns soldered on top. The jigs called Ant and Uralochka are painted in different colors.
The sizes of homemade lead jigs for fishing at different depths and low pressure of the river flow can be compared with the length of the match in the photo below in the text, where jigs called pellet, uralochka and ant predominate in the scattering of lead baits.
But no one is stopping us from making baits with the same body shapes, but with larger volume and weight for catching fish at deeper horizons or in strong river currents.
In addition, using the forging method proposed in the topic, it is easier to make homemade jigs of different shapes, volumes, and weights than two identical lead baits.
As a last resort, if you didn’t like something in the shape of a homemade bait (the angle of inclination on the fishing line), then any lead jig, whether purchased or made by yourself, can always be improved using the advice in the article “Eliminating defects, adjusting jigs” "
Characteristics of the Volnushka jig:
- Weight – 2-4 grams.
- Size – 0.5-0.7 cm.
- The game is a good immersion in water, it does not have a particularly bright game, however, with a bloodworm or “sandwich” bait, a bloodworm + boiled egg white shows excellent results when fishing for bream in winter, including at night.
Undoubtedly, as a result of simple actions, high-quality tackle is obtained that can take its place in fishing lures. It is already possible to make several versions of such a jig and, after covering the rivers with ice, test them in practice.
You can make “waves” not only in a round shape, using ingenuity, it is possible to make jigs by winding wire on two tubes, or using a thin tube, wind the wire in 5-6 rings and get a wavy nail.
The time of winter coolness is just around the corner, so use your imagination, stock up on the necessary materials and feel free to prepare for a wonderful pastime - ice fishing. There is no doubt that by making your own tackle with your own hands, you can catch a lot of bream and bream. The main thing is not to be lazy and everything will work out!
Belikov A.A. ,Russia,Volgograd - Especially for the site Homemade FISH
- How to make a tungsten jig
- Homemade bream devils
Lead jig blank rod
At the initial stage of making a homemade jig, we will make a lead rod of the workpiece, the dimensions of which will be adjusted to the cross section or profiles of the necessary baits.
If you came to the site page via a direct link, then to cut out the rod, first melt lead waste according to the recommendations of the article entitled Lead for homemade jigs.
Next, use a chisel - hammer; knife - hammer; metal scissors, etc., we will separate the oblong rod shown in the figure under the title of the article from the casting or thick sheet lead. It is clear that the side edges of the lead blank will turn out uneven.
The shape of the manufactured lead rod is not critical; in the end, we will end up with lead blanks of homemade jigs of the required shape. And if you wish, you can make the jigs shown in the video from a rod with your own hands.
Photos of jigs with your own hands
Read here - DIY fishing tent: diagrams, designs, patterns, tailoring and design features (120 photos and videos)
Lead for a round jig
To make homemade round-shaped lead jigs, such as “droplet”, “pellet”, “ovsinka”, “uralochka”, “ant” and others, we will give the lead rod a perfectly round shape in cross section.
From a round lead rod it is possible to produce in a cold way, without the use of a soldering iron, such reelless jigs of a vertical action, such as the devil and the fool.
To roll out lead, the rod is covered with a flat metal plate (like a cutter for a plane) and with forward and backward movements the jig blank is rolled out on a plate (an inverted frying pan).
As a result, the block unevenly cut from the lead pancake will be aligned in length, and the blanks of homemade jigs in the form of a lead rod that has not yet been cut along the length will take on a round shape in cross section. See the picture.
If the resulting lead rod is rolled out at a certain angle (with great force towards one side), it will take the shape of a truncated cone. That is, one side of the lead rod will have a slightly larger diameter than the other.
Thanks to this simple operation, you can cut blanks for homemade lead jigs of different sizes, shapes and weights from the same round lead rod. To begin with, we need to make two such rods.
If you have both round lead rods rolled out, then let’s figure out which homemade jigs are easiest to make from lead blanks.
Making a jig from a lead rod
Making jigs by pressing and cold forging lead is a much less labor-intensive process than casting molten lead into molds. But at the end we will get homemade jigs with the necessary shapes and sizes.
All jigs shown in the photo with shapes similar to bugs and ants, thanks to the narrowed nose ends of the baits, have a good hook hook rating.
In addition, jigs made from lead acquire a significantly higher density during the forging process. This means that the size (volume) of a forged lead jig will be noticeably smaller than that of the same cast lead bait with the same weight.
I propose to start getting acquainted with the technical process using the example of making a not very simple jig from lead, shaped like an ant, shown in the photo. Making a jig of simple shape from malleable lead is not at all difficult.
First of all, decide on the shape of the finished jig and the position it occupies in the water space during fishing. Some shapes can be selected from the photographs embedded in the material on the topic called Homemade Lead Jigs.
Making a lead jig ant
Let's look at the production of a forged jig using the example of forming the body of an artificial lead ant. Position “a” shows the profile of a flattened cone-shaped lead rod.
Position “b” shows how you can use a knife or a file to make links of a lead jig called “ant” or similar baits.
Then we leave the lead jig blank in the form shown in position “b”, or we process it with sandpaper, smoothing the edges of the ant’s body links, giving the homemade product a marketable appearance.
As a result, from a small part of a lead rod we obtain a finished jig body called an “ant” (c).
This will be the first way to make ant-like lead jigs with your own hands.
According to the second method, the lead blank “a” is given a rounded shape along its entire length using sandpaper. Then, using a file or the edge of a bent piece of sandpaper on the body of a homemade jig, we form three grooves in the ant’s body “in”.
After this, in the end cut of the lead - the “head” of the jig called “ant” we pierce a blind hole for soldering the hook. The hole for the hook shank in position “b” is shown in blue.
Before continuing work related to the production of lead jigs, I would like to draw your attention to such an indicator as the grip of the jig hook.
Homemade jig "Cone"
A. Lakhtionov suggested making a homemade jig “cone” with his own hands.
“To make the jig shape, I make three cylindrical oak sticks 30 mm long and 3, 4 and 5 mm in diameter (can be made of wood or other hardwoods). I sharpen one end of each stick into a cone, the height of which is related to its base as 2:1 (in the figure, indicated by the letter A).
For the frame of the bait, silver-plated, brass or red copper wire with a diameter of 0.2 to 0.5 mm is suitable. It must be sanded, etched with hydrochloric acid and tinned (rosin can be used instead of hydrochloric acid).
I tin the wire like this: I pour a drop of acid onto a plywood board measuring 10x10 mm, put a piece of solder in it and lower the wire into this mixture, one end of which I clamp with pliers. I press the wire at the solder site with a hot fifty-watt electric soldering iron and, using pliers, slowly pull it under it.
I wind the tinned wire around the cone of the stick that will correspond to the desired jig. I wind it turn to turn or with gaps between them - it depends on what kind of jig I need. I leave the ends of the wire at the top and base of the cone (10-15 and 5-6 mm in size, respectively). After winding, I remove the frame of the future jig and put it aside. Next, I take a hook No. 2.5-4 (its size depends on the bait and the future fish), I check its quality, especially the tip, I cut off the ring (spatula), I treat the fore-end at the edge with sandpaper and tin it. I insert this end into the top of the frame, wrap it with the end of the wire so that the hook holds well until the jig shape is filled with solder.
Then I take a sewing needle of a suitable diameter (it must be smoked with a lit match so that the solder does not stick) and insert it between the turns so that between it and the upper plane of the spiral there is an angle of about 1200 (B in the picture). This angle will ensure good grip of the jig.
Now I take a cork 30-35 mm long and 15-20 mm in diameter, cut it in half lengthwise, make a pyramidal groove in the upper part of both halves and process it with a round needle file so that when connecting the cut cork, I get a cone corresponding to the cone on the stick of the largest diameter This plug will be a mold for the jig.
I insert the frame of the jig, along with the hook and needle, into a cutout in the cork, the halves of which I then clamp with my fingers or a vice; I bend the end of the wire left at the base of the frame, as shown in Figure (B), and clamp it in the cork. This end of the wire and the needle must be parallel (the end of the wire is needed so that the frame in the cork is stable). Next, the cavity of the spiral is filled with solder, which I melt with an electric soldering iron.
When the solder has cooled, that is, after one or two minutes, I separate the halves of the plug; All that remains is to process the jig with needle files and fine sandpaper. This treatment is necessary in order to remove solder from the outside and bring the color and shape of the jig to the intended option.
In order not to dull the edge of the hook when processing the jig, I put a piece of cambric on its tip.
Before placing the jig frame in it, I moisten the cork with water. If the mold is still burnt, I make a groove at the other end of the cork or replace it.
To fill the frame of the jig, you can use lead, POS-18 solder or other low-melting material.
After mechanical processing, I dip the jig, well washed in soapy water, into a 3% solution of chromium for 30 minutes (you need to know that this solution is poisonous and requires special care).
If you want to make a striped jig, the winding turns must have certain distances, and all subsequent technology is the same as described above. By the way, such jigs have fully justified themselves when fishing with a float rod in the summer.”
Hook quality of the ant jig
In my understanding, the hookiness of a jig is characterized by the ability of the bait hook to more or less reliably hook into the mouth of a fish when hooking it.
The picture shows three different positions of the end of the hook tip in relation to the body of the “ant”.
When making lead jigs, we ourselves can worsen the grip of the hook if it has too little hook - for hooks of small numbers - or the point of the hook is located too close to the body of the jig with a thickened nose end.
But it is also undesirable to solder large hooks, which have better grip, but sharply worsen the oscillatory properties of small lead jigs, into baits.
Therefore, when making jigs with your own hands that have a thickened shape in the area where the hook is soldered, such as “pellet”, “ant”, “bug” and some others, to improve the grip, the hooks of the jigs before soldering (possibly after) are slightly unbent in the area of the prying transition hook in the fore-end "g".
If the critical hardening of the hook, which breaks when unbending, does not allow the ant to improve the grip of the lead jig in this way, then another method is used.
The hook will hook better in the mouth of the fish if, when soldering, the end of its tip is moved 2-3 mm from the head cut of the lead jig. In position “d” on the right there is an incorrectly sealed hook in the jig, and on the left - correctly.
It is clear that this rule should be followed if we solder the hook into a lead jig with a wide nose end. Hooks on jigs with a thin “nose”, such as the uralochka, will still have good grip without any improvement.
Soldering the hook of a lead jig ant
There are certain rules for soldering a hook into an ant lead jig (and any other). I will list the main ones:
For balanced jigs tied to a fishing line, the shank of the hook, after soldering the lead jig into the body, should be located parallel to the horizon or tilted down. See the picture.
The angle of inclination given to the lead jig in space depends on the shape (class) of the homemade product. We will deal with adjusting the angle of inclination of the body of the jig called “ant” later.
When soldering a hook into a lead jig, you will need the same consumables - solder and fluxes - as when soldering jigs with crowns.
After soldering the hook in the back of the lead jig, you should pierce a through hole through which the fishing line is passed under fishing conditions.
This operation can be carried out before soldering the hook. But you should keep in mind: the angle of inclination of the lead jig in space will depend on the place in the jig where the hole for passing the line is pierced.
If in an ant jig the puncture of the channel for passing the fishing line begins in the rear part, then the bait acquires a greater angle of inclination, characteristic of reelless jigs made from a lead rod.
Changing the angle of the jig
The incorrect angle of inclination of a manufactured jig can be changed either by changing the shape of the bait or by changing the point of suspension to the fishing line.
For a jig with a crown, I know of two ways to change the angle of the bait.
In the picture drawn to explain the material in position “c” after soldering, the finished jig will acquire an incorrect angle of inclination with the back part lowered and the hook pulled up, which will increase the number of fish landings.
The angle of inclination of this jig can be changed and brought to zero or even negative by moving the point of suspension of the jig to the fishing line.
To do this, drill a new hole for passing the fishing line along the dotted line. Here, changing the angle of the jig will cost us little, but the shape of the jig will not change. Typically, large angles of inclination in space are assigned to reelless jigs.
The closer to the rear end of the jig the hole is pierced, the greater the positive angle of inclination relative to the point of suspension to the fishing line the jig receives.
In position “g” after soldering the jig, nothing will have to be changed, since the position of the puncture point in the crown of the jig is chosen correctly, the angle of inclination of the jig is set to negative. From an aesthetic point of view, before filling the crown with solder, it is better to stick the needle along the dotted line.
The angle of inclination of any jig can be slightly changed by removing some of the solder from the nose or rear end of the bait. Then her weight will decrease. But solder can be added in the right place to change the angle of inclination of a homemade jig.
If you increase the layer of solder at the head end of a homemade jig, the angle of inclination of the bait will increase. When the thickness of the fill in the rear of the jig changes upward, the angle of inclination decreases.
Using the same principle, you can change the angle of inclination of the lead jig.
Adjusting the angle of the lead jig
Before you start adjusting the angle of inclination of the lead “ant” in the area of the 2nd groove from the soldered hook, you should slightly bend the body of the bait (position “d”), cut off the jig from the rod, and perform finishing.
To roughly adjust the angle of inclination of a lead jig in oblong-shaped baits, as a rule, I pierce two holes at different angles: one - approximately in the middle and perpendicular to the direction of the longitudinal axis of the bait. (see the top position in the drawing).
For the second puncture, the channel begins in the back of the lead jig body and runs through it at an angle closer to the center of the homemade product. In this way, balanced jigs are usually used to catch fish without a bloodworm attachment. You can appreciate the vibrations of my reelless homemade lead jigs when watching the video.
In the second case, the hook soldered into the lead jig turns out to be much lower than the body of the bait suspended on the fishing line, the angle of inclination of which is about 60-70 degrees to the horizon.
The angle of inclination of any homemade lead jig can be adjusted within small limits by soldering a thin layer of solder or grinding off part of the lead at the head or rear end of the jig.
Painting a lead jig
After soldering the hook, before painting, the homemade lead jig is treated with sandpaper (optional).
I paint the finished jig with acrylic paint, then coat it with colorless varnish to strengthen the painted surface.
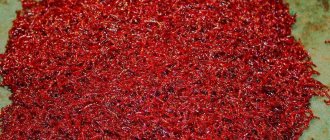
Instead of painting, you can solder or simply glue a piece of non-ferrous sheet metal onto the top surface of the homemade product. The lead jig can be completely wrapped in thin multi-colored foil from chocolates, etc.
I usually paint my homemade lead jigs in dark colors. Although, if you choose the right game for the bait, it happens that the fish bites better on an unpainted dark lead-colored jig. I usually paint ant-like jigs in two contrasting colors.
For methods of painting jigs in pictures, see the topic Drying painted jigs.
If you have made a batch of large reelless baits with eyelets with your own hands, then before finishing processing I recommend paying attention to the balancing of the jigs. That is, the symmetry of their sides relative to the suspension point.
On the next page, those who wish, together with me, can start making popular lead jigs called Uralochkas.
But first, when watching the video, evaluate the vibrations of reelless jigs in conditions close to real fishing.
Tungsten jigs
The shelves of fishing stores are simply bursting with a huge assortment of all kinds of jigs. Often a fisherman manages to find exactly what he needs, but, alas, not always. In general, I believe that in every body of water the fish have their own preferences in terms of bait.
In winter, I usually fish on the Gorky Reservoir, so I want to share with readers the technology for making a very successful jig specifically for this reservoir.
Why exactly “ant”? Everything is very simple. When spring comes, and the small rivers flowing into the reservoir overflow their banks, they flood with their waters numerous anthills, of which there are a great many along the shores of the Gorky Sea. At this moment, sorog, perch, bream, silver bream, roaches feed exclusively on this delicacy.
Having visited almost all the stores in our city and markets, I had difficulty finding the type of bait I needed. Unfortunately, upon closer examination, they had to be rejected - either the wrong size, or too bizarre a shape, or too light, or with a weak hook.
In general, I had to learn how to make jigs myself.
Through trial and error I finally achieved my goal.
The jigs began to turn out exactly the way I wanted them to be, and the fish confirmed their catchability. Now I myself can tell readers how to make a tungsten jig.
First you need to get the source material. The remains of 3 mm tungsten electrodes (photo 1) are quite suitable for us; you can ask them from welders who weld with argon.
I place the workpiece - a tungsten electrode - in a drill chuck to make a groove about 10 mm long (the exact length depends on the size of the jig needed). As a cutting tool I use an old dental drill and clamp a small diamond wheel in it.
Having made a cut, I do not remove the rod from the chuck, but give it the shape of an ant, using an abrasive wheel sharpened to a cone (photo 2). This form of sharpening is very convenient for manipulating the rod.
When performing all these actions, be careful, tungsten is a heavy metal, so when working with it you need a hood; in extreme cases, you can wear a respirator.
Instead of a drill, you can use a regular drill, or, in the absence of an abrasive wheel, a diamond dental bur. Diamond bits can be purchased without any problems at a specialized store.
After the body of the future “ant” has been safely carved, we cut the workpiece from the main rod using a hand drill with a diamond wheel clamped in it.
Now you need to solder the hook. Regular tin-lead solder, which is used for soldering wires, etc., will not work for tungsten. First, you will have to resort to galvanizing - using an electrochemical method, we cover the jig with a thin layer of metal, preferably copper. The shape of the bait will remain almost unchanged (photo 3). After galvanic treatment, soldering the hook will become much easier.
Electroplating is not the only option; there are others. For example, tungsten can be tinned with silver or brass using an acetylene gas torch. We use borax as a flux for these coating methods.
When servicing, you must be extremely careful, otherwise you will simply fill the jig with solder, and it is unlikely to resemble an ant.
Finally, our jig is coated with metal, we can start soldering the hook. For tungsten "ants" I use Cobra hooks No. 14-16. Firstly, for all the time that I have been using them, they have never let me down, and secondly, they bend perfectly without heat treatment - just take small pliers and bend the ring! I use POS-60 brand solder or similar commercially available solder.
Using a sharpened match or a thin brush, apply a small drop of ordinary soldering acid into the groove of our jig. Holding the previously bent hook with tweezers, solder it to the body of the workpiece (photo 4). In this case, you should not apply too much tin, since you can fill not only the shape of the jig itself, but also the ring of the hook.
If the shape of the bait is nevertheless damaged, then this defect can be corrected with a thin round file, fortunately the solder is not as hard as tungsten. We remove the excess tin, and our jig takes on its original shape. A finely sharpened knitting needle is perfect for cleaning a tin-filled ring.
To neutralize the acid remaining on the jig, place the workpiece in a solution of table soda of arbitrary concentration, then rinse the bait in running, preferably warm, water.
The dried jig must be primed and painted. For painting you will need a thin brush, then the bait will turn out neat and without smudges. If you don’t have time for such delights or there are a lot of jigs, then you can just carefully dip them into a jar of liquid paint.
To paint my lures, I usually use black nitro paint, which dries in literally a matter of minutes.
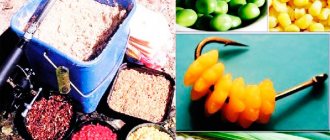
At the final stage, we equip the hook of the jig with beads (photo 5), and to prevent it from flying off, you can stop the bead with a small cambric.
Tungsten jigs, made from a solid rod using the method described above, are small in size and have sufficient weight to allow them to fish at depths of up to 3 m.
Having made a cut, I do not remove the rod from the chuck, but give it the shape of an ant, using an abrasive wheel sharpened to a cone (photo 2). This form of sharpening is very convenient for manipulating the rod.