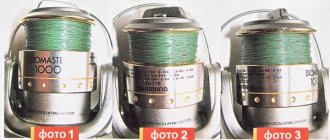
What is backing on a reel and how to wind it?
An active fisherman knows how important it is to carefully prepare for a trip so that you have a set of equipment at hand, then the result will be positive. An integral part of a fisherman’s equipment is reel backing, but not all beginners are familiar with this device. First, you need to familiarize yourself with its characteristics and advantages, then learn how to reel in the fishing line yourself, collecting all the gear, after which you can go fishing. In this article, we’ll take a closer look at what reel backing is and how to wind it.
Backing and coil connection
What is backing? This is a cable or cord that is made of synthetic materials. It is wound directly onto the reel under the fly line itself. To properly attach it in the right place, you need to take the following few steps.
- First you need to take the end of the backing and tie a regular single knot on it.
- The next step is to thread the synthetic cable onto the spool of the reel. In this case, the tip with the knot must be at the bottom.
- Next, the entire main part of the backing is tied with a cable. At the same time, you need to make a tightening loop, in which the main cord will be able to slide freely. The knot will be tightened with a small knot, and the entire loop will then be tightened. Fly tying in this case should end with the knot tied at the very beginning remaining outside. Its role is as a stopper to prevent the loop from unwinding.
What it is?
Fishing is one of the most popular pastimes among men. Everyone knows how important it is to have tackle, bait and a host of other devices at your disposal. The fishing rod must be ready for use. Correctly wound fishing line plays an important role here. This part of the device is most subject to load when casting bait, as well as when fishing for prey. Backing is undoubtedly one of the most necessary elements of gear, as experienced anglers know.
To understand the purpose of using this device, it should be noted that backing is a special lining that increases the diameter of the reel spool. It is needed in order to increase the length of the fishing line, which is often not enough to fill the spool, and thanks to backing, consumption is saved.
It is worth noting that the use of such a device will greatly facilitate the winding process to a certain level, and you can verify this from your own experience.
Backing reduces the weight of the reel, and this is an important aspect, especially when it comes to using light tackle. It is important to use it together with an inertia-free type device. With low profile spools that have a shallow lip, the use of backing is not necessary. But if we are talking about deep fishing, you cannot do without such a device, since it will reduce the friction of the fishing line on the side.
What are they made of?
If previously the use of traditional electrical tape or nylon cord was common for winding fishing line, today anglers are convinced that the material matters. Since backing is an important device in fishing, it is necessary to understand what it is made of. Thanks to modern technologies, even the thinnest fishing lines are highly durable, so you can use them to catch big fish.
There should be no differences or irregularities on the spool, because the fishing line will repeat them, and this will have a negative impact during fishing, especially when there is a high load, which will only increase the defects. To produce high-quality backing, materials such as sewing nylon thread No. 40 or ordinary monofilament with a small diameter are used. Nylon thread has its advantages - it fits perfectly on the spool due to its softness, winding from it will not scroll at the base under heavy load, and it is also lightweight. Backing under braid is best done with this material, but it all depends on personal preferences and wishes.
How to wind?
Just because a fisherman has everything he needs at his disposal, this does not mean that he will return home with a good catch. Having equipment only makes it possible to get a good result, but you also need to learn how to work with it. It is important to understand how to use good tackle correctly, so beginners often have the question of how to wind a cord or fishing line. Unfortunately, the quality of the winding sometimes depends on the manufacturer, so it does not always meet the standards, and every angler encounters loose windings at least once. Therefore, it is better to study the methods yourself and get maximum pleasure from the process itself. One of the methods is more suitable for adjusting fishing rods.
How to tie to a cord?
Experienced fishermen already know how to do this correctly, but beginners should better study the instructions in order to achieve a positive result. It is useful to know the various knots so that you can apply them in practice, especially if you want to become a professional in this matter. First you need to make a self-tightening loop; the greater the reinforcement, the stronger the knot will become. One of the most popular in the fishing industry is a method that uses reels with a large diameter. This will allow you to have a sufficient amount of fishing line in reserve, which will be needed when casting far.
The knot must be knitted as follows:
The self-tightening knot has a number of advantages. Despite the fact that it is considered primitive and the simplest, it is capable of tightening itself with greater traction. To avoid slipping of the running end, it is necessary to apply constant tension. For beginners, this is the best option, and winding will not take much time.
If you want to become a good fisherman who returns home with a rich catch, you need not only to purchase gear, but to know how to tie a knot from a fishing line, and learn how to properly use backing, attach a spool, and so on.
To learn how to properly wind backing onto a reel, watch the following video.
Source
How to wind fishing line on a spinning reel
You can correctly wind the fishing line onto a spinning reel using several methods. The principle of the winding approach should include its density. It is worth winding fishing line onto a spinning reel based on the shape of the spool. The spools can be factory-made, which will allow you to make winding forms without resorting to special techniques. The winding can be in the form of a cylindrical shape, in the form of a cone, in the form of an inverted or reverse cone.
Arbitrary winding is in no way allowed, and the randomness of such manipulation in a low-quality mechanism will cause inevitable failure of the braid or fishing line as a result of its tangling. Pre-moistening the fishing line will allow you to correctly wind the fishing line onto the reel , so the fishing line will receive the necessary qualities that improve its elasticity and ability to twist. It is better to wind the fishing line onto a spinning reel by spreading out the tackle over its entire working length.
The meat grinder is tightly inserted into the saddles of the reel seat and clamped until there is no play. Having passed the tip of the fishing line through the rings of the rod, starting from the very top, the fishing line is tied to the spool and, closing the line guide, they begin to wind. To add tension to the line, you can use a heavy book by passing the cord between the pages. But the best option would be to be able to stretch the fishing line to its full length and wind it under natural tension.
In practice, you need to carry out this method on the street, unwinding the required cut to its entire length and tying one end to the bobbin and the other to a stationary object. Then tension is applied and, as the line is wound up, the rope is approached to the fixed end of the cord. The presence of a comrade in such a case, as a static object, is only beneficial. Having started winding, check the correct placement of the first turns. Their direction will determine the course of the rest of the operation. The braided line should be wound onto the reel using exactly the same principle as the fishing line, only without resorting to wetting.
Correctly winding a cord onto an inertia-free reel is much more difficult than performing the same operation on an inertial reel. Winding on an inertial mechanism consists of uniformly distributing turns across the width of the coil and placing layer on layer without crossing the rings. The methods described above for creating tension will help you wind the line correctly, as well as the braided line. Here, unlike inertialess meat grinders, there are no options for a variety of winding shapes.
The design of this type of mechanism itself will tell you how to properly wind braided wire onto a multiplier reel. Having tied the cord to the spool and moving according to the further algorithm of the spinning reel, having previously created tension in the cord, turning the handle will begin to lay the braid evenly and consistently along the horizontal axis of the spool. In this case, laying the braid on the reel occurs under the full influence of the design features of the mechanism and requires the least control on the part of the angler.
iarybak.ru
How to wind backing for a reel
Backing is a lining or winding on the spool that increases its outer diameter. Used in all fishing directions where reels and a large amount of fishing line are used. Its winding is an important nuance that determines the subsequent performance of the tackle and the productivity of fishing.
In this article, we will consider all the issues related to preparing a fishing reel before going to a pond, how to wind the backing on a reel, what methods exist, depending on the situation. We will describe the best materials for reeling under the main line and some secrets used by experienced fishermen.
How to tie fishing line to the spool of a reel
At this point it is worth dwelling in more detail. Incorrect methods of attaching fishing line or braid subsequently violate the entire principle of laying the cord and its rational distribution on the base of the spool. Depending on the design features of the reel and its type, the methods by which you should tie the fishing line to the spool also differ.
There are two methods for tying fishing line to the spool of a reel in its inertia-free design. One of them is the method of knitting using a special knot, like a clinch. Such a knot has advantages in its ability to resist stretching. The second method of effectively performing the operation is to use a self-tightening knot. This knot stretches a little, but during the operation of the reel, the tension of the cord prevents this shortcoming from fully manifesting itself.
Let's look at how to tie a fishing line to an inertial reel. In this case, the location of the winding changes. If in the inertia-free version the cord winds along the spool across its axis, then in the inertia version - along. It is more effective to secure the fishing line on the reel with this winding method if you tie a knot with a double loop or a regular figure eight.
You need to secure the fishing line to the spool of the multiplier reel by tying its beginning to one of the holes structurally made on its base. Here the angler has the right to use any reliable type of knot that prevents its relaxation and subsequent loss of fastening ability. The principle of cord slipping does not apply to the multiplier reel, since it is attached to a blind one. In inertial and non-inertial versions of the mechanism, slipping of the cord along the spool should be prevented by the optimal tightening force of the knot.
Backing purpose
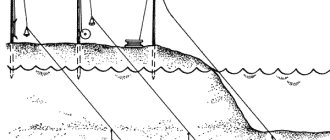
It is known that a properly assembled reel should have a completely filled spool. The line may not reach the side of the spool by 2–4 mm. An underfilled spool reduces the casting distance of the bait. This occurs due to increased friction of the thread on the side. Such a situation can steal up to half the maximum range of the tackle.
An overfilled spool causes loops to drop and beards to form. The line flies off at the moment of casting the spoon and braking before it splashes down. Entanglement occurs during jerky animation techniques, when there is an inconsistent tension of the thread along the length of the wiring.
The backing for the reel has the following meaning:
Experienced fishermen always wind backing on the reel. We recommend that beginners make it a rule to use winding under the main line, regardless of the model of the reel, its line capacity, type, diameter and performance characteristics of the thread used.
What to use for backing?
What is the backing for the reel made of? Recently, for these purposes, fishermen used electrical tape, a cloth patch, or a piece of rubber cut from a bicycle tire. Now these options are rarely used for several reasons:
The main materials used for backing are monofilament or multifilament fishing line.
The backing should have a diameter close to the thickness of the main line. This will allow you to wind it as efficiently as possible, the lower layers of the main thread will not cut into the winding, the casting range will be maintained, and the laying will be even. With this approach, the reel will not fail at a crucial moment and will not ruin your fishing.
When fishing with monofilament line, the backing should also be made of monofilament. Angling with a cord requires the use of braid of the same thickness; nylon can be used.
In order to save on the purchase of a separate reel of line for backing, it is advisable not to throw away the worn-out warp thread at the end of the season. After drying it, it must be wound from a reel onto a reel, saving it for next year. Before the first foray to the river bank in the new season, the remaining section will certainly come in handy as a basic winding for the spool.
Some fishermen wind a nylon thread under the main line. Its main advantage is its low cost. However, this backing has more disadvantages:
Therefore, it is better to refuse to use nylon. Or you can look for a specialized fishing thread with water-repellent impregnation, but the price is not comparable to monofilament or budget braid.
Winding
Let's move on to the most crucial moment - winding the fishing line. Place the reel on the rod, and then thread the line through the guides and tie it to the spool.
We tie the fishing line to the spool
The most correct option would be to use a self-tightening knot. In order not to learn a new knot, we use the same gripping knot:
- First we form a loop
- Next, we bend the line around the free end and begin to form a gripping knot
- Now all that remains is to thread the short end of the fishing line into the loop under the twist and tighten the knot
- All that remains is to put the loop on the spool and tighten
At this point the knot is ready, do not forget that the knot should be at the bottom of the spool! If for some reason you do not want to use this knot, you can read the article about how to tie a fishing line to a reel, there you will definitely find an option to your liking.
Creating tension
In the section on backing, I already mentioned stringing methods, here we will look at these options in more detail.
The first simple way is to lower the spool of fishing line into a bucket of water; for this you need:
- Pour a little less than half of the water into the bucket (no matter what splashes fly)
- Place the bobbin in the bucket
- Move 1-1.5 meters away so that the line runs smoother
- Start winding
Due to the resistance of the water, tension is created, and the fishing line lies flat. I always use this method.
The second option would be to ask another person to create tension; for this you need:
- Give a friend a pencil (pen, stick, etc.)
- Place a reel of fishing line on a pencil
- A friend must slow down the reel with his finger to create tension.
- Start winding
This method is not very effective, since a person may be distracted and the tension during the winding process will not be uniform. This may cause extra loops to come off when casting.
Third, let's consider using a special winding machine. It looks like this:
It is used quite simply:
- We put a bobbin on the working part
- Using cones we fix it
- Use the nut to adjust the tension force
- We reel in
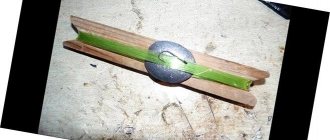
Well, the fourth option to create tension is to use a book. Be careful, this method is not suitable for winding braid, as it will tear the book and collect pieces of paper on itself. Winding is done like this:
- Take a book at least a centimeter thick
- Open the book in the middle and pass the fishing line there
- All that remains is to close the book and start winding
All these methods are just insurance for the first cast, and there is no point in saying which is better. After the first cast and reeling out the fishing line on the pond, the fishing line will take on the necessary tension. It depends on the weight of the equipment, casting distance, and many other small factors.
However, you should not ignore this stage; here is an example of winding with and without tension:
As you can see in the photo, on one spool the braid is laid turn to turn, on the other the turns overlap each other. From this we can conclude that without tension there is a possibility of excess (loose) loops coming off, and this will lead to the formation of a “beard”.
Let's start winding
Now we just have to choose the method of tensioning the fishing line and wind the entire reel equipment. As I said above, I use a bucket of water.
Thanks to these simple manipulations, we correctly wound the fishing line onto the spool and ended up with something like this:
Friends, since I gave an example on an old reel, the photo turned out unattractive. Don't worry, if you do it right it will turn out great.
How to wind backing?
Winding backing on a spinning reel or multiplier is not a difficult task, requiring extensive experience, knowledge and dexterity. The main thing is to correctly determine the amount of fishing line to be reeled in in order to ensure the required height of the main thread from the side of the spool.
There is one simple way to accurately determine the required backing length. To do this, you will need a spare spool of the same capacity as the main one. The gear assembly operation itself looks like this:
If there is no spare spool of similar line capacity, you will have to spend a little more effort. For this we need several empty spools of fishing line. You can use reels, suitable thread cassettes and similar containers.
The backing on the reel spool is wound according to the following algorithm:
That's it, the reel is loaded with fishing line and is ready for use on the pond.
Winding
Let's move on to the most crucial moment - winding the fishing line. Place the reel on the rod, and then thread the line through the guides and tie it to the spool.
We tie the fishing line to the spool
The most correct option would be to use a self-tightening knot. In order not to learn a new knot, we use the same gripping knot:
- First we form a loop
- Next, we bend the line around the free end and begin to form a gripping knot
- Now all that remains is to thread the short end of the fishing line into the loop under the twist and tighten the knot
- All that remains is to put the loop on the spool and tighten
At this point the knot is ready, do not forget that the knot should be at the bottom of the spool! If for some reason you do not want to use this knot, you can read the article about how to tie a fishing line to a reel, there you will definitely find an option to your liking.
Creating tension
In the section on backing, I already mentioned stringing methods, here we will look at these options in more detail.
The first simple way is to lower the spool of fishing line into a bucket of water; for this you need:
- Pour a little less than half of the water into the bucket (no matter what splashes fly)
- Place the bobbin in the bucket
- Move 1-1.5 meters away so that the line runs smoother
- Start winding
Due to the resistance of the water, tension is created, and the fishing line lies flat. I always use this method.
The second option would be to ask another person to create tension; for this you need:
- Give a friend a pencil (pen, stick, etc.)
- Place a reel of fishing line on a pencil
- A friend must slow down the reel with his finger to create tension.
- Start winding
This method is not very effective, since a person may be distracted and the tension during the winding process will not be uniform. This may cause extra loops to come off when casting.
Third, let's consider using a special winding machine. It looks like this:
It is used quite simply:
- We put a bobbin on the working part
- Using cones we fix it
- Use the nut to adjust the tension force
- We reel in
Well, the fourth option to create tension is to use a book. Be careful, this method is not suitable for winding braid, as it will tear the book and collect pieces of paper on itself. Winding is done like this:
- Take a book at least a centimeter thick
- Open the book in the middle and pass the fishing line there
- All that remains is to close the book and start winding
All these methods are just insurance for the first cast, and there is no point in saying which is better. After the first cast and reeling out the fishing line on the pond, the fishing line will take on the necessary tension. It depends on the weight of the equipment, casting distance, and many other small factors.
However, you should not ignore this stage; here is an example of winding with and without tension:
As you can see in the photo, on one spool the braid is laid turn to turn, on the other the turns overlap each other. From this we can conclude that without tension there is a possibility of excess (loose) loops coming off, and this will lead to the formation of a “beard”.
Let's start winding
Now we just have to choose the method of tensioning the fishing line and wind the entire reel equipment. As I said above, I use a bucket of water.
Thanks to these simple manipulations, we correctly wound the fishing line onto the spool and ended up with something like this:
Friends, since I gave an example on an old reel, the photo turned out unattractive. Don't worry, if you do it right it will turn out great.
Secrets of experienced fishermen
Despite the simplicity of the described operation, there are some secrets and subtleties that allow you to optimize the process and guarantee high-quality winding of fishing line onto the reel spool:
If the reel lays the line unevenly with dips or bumps, then independent winding of the backing is allowed in a certain area of the spool. Such handbiking will ensure subsequent even winding of the main cord.
The Albright knot is knitted according to the following pattern:
All that remains is to trim off the excess ends of the fishing line with scissors. That's it, the Albright node is ready.
What is backing on a reel spool and why is it needed?
Backing is a winding line that is wound onto the reel spool, before the main line. That is, this is a preliminary winding of the fishing line, the task of which is to reduce the depth of the spool. It is worth noting that not all spools require backing.
Low-profile spools, which have a shallow side, do not require backing, as they are designed specifically for thin cords of small diameter.
The backing is wound into deep spools so that the quality of the line winding is higher and the friction of the line on the side of the spool is less. This allows you to make longer casts, which are especially important when choosing spinning reels, feeder and carp.
If you want to purchase spinning reels, we recommend that you familiarize yourself with the arsenal of models in this online store using the green link.
Assembling fly fishing gear
Let's start installation.
First, we need to figure out how much backing we need to wind.
This can be found in the instructions for the reel; it usually looks like this (example): Hardy Ultralite CC 4000 DT4 + 70M 20lb/WF5 + 75M 20lb reel. This means that the reel will fit a double-cone cord of class 4 and 70 meters of backing of size 20lb or a torpedo-shaped cord of class 5 and 75 meters of backing of size 20lb. Another way to find out how much backing is required is as follows: you first wind the cord on the spool, and then the backing, until 3-5 mm remains to the edges, after which you wind it in the reverse order. This method will help to most accurately determine the exact amount of backing, but it is also more labor-intensive.
Then lay out all the components on a flat surface in a well-lit place and have scissors or wire cutters ready to trim off the excess that will remain during installation and tying knots.
If you have not assembled fly fishing tackle before, then it is advisable to practice performing some knots on anything, and then move on to the tackle itself.
And one more thing: reels from the factory are produced mainly for the left hand, and if you are not very comfortable, then most reels are reconfigured for the right hand. Take a look at the instructions, everything is probably written there =)
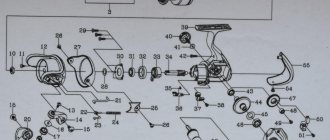
Next, the most common fly fishing units used when installing gear will be clearly described in illustrations.
Main nodes
The figure schematically shows the main connection points of the equipment.
Arbor Knot - Used to attach the backing to the reel.
The most basic or most common knot for attaching backing (fly line) to a reel is the Arbor Knot.
Tie a regular knot at the very end of the backing (fly line) and tighten it tightly. Next, pull the backing (cord) through the reels, so that the end with the knot is at the bottom of the spool, and tie the backing with this end, all using the same regular knot. Then you need to tighten the second knot tightly and then tighten the loop on the spool by pulling the free end of the backing.
The next step is to connect the cord to the backing and wind it onto a reel.
Albright Knot - used to connect the backing to the fly line.
Unwind 1-2 meters of cord from the factory plastic cord (make sure you take exactly the right end. Usually it is marked “End line” or “Flyline end”).
Fold 5-7 cm of the cord in half and hold the loop with the thumb and index finger of your left hand. With your right hand, thread about 30 cm of backing into the loop and also pinch it with the thumb and index finger of your left hand.
Next, with the free end of the backing using your right hand, make 7-12 tight turns in the direction: from the fingers to the end of the loop, and at the same time, grabbing the cord loop and the backing.
Thread the remaining end of the backing back into the loop in the opposite direction to which you threaded it at the beginning. It is necessary that both ends of the backing be on the same side of the loop.
Gently pull both ends of the cord with your left hand, after first holding the knot with your right hand and pulling out the excess loop, then do the same, but changing hands and tightening the backing on the loop. Make sure that the backing winding does not come off the loop. After this, pinch both ends of the cord with the fingers of your left hand and pull strongly on the backing, tightening the knot after wetting it.
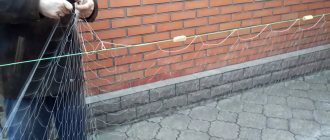
Now you are ready to wind the cord onto the spool. Place a factory-made spool, for example, on a pencil, and ask someone to hold this structure while you wind the cord onto the reel. Wind the cord with slight tension, distributing it evenly over the entire area of the spool. After all this, you should still have those 3-5 mm. to the edge of the spool, where the leader with the leash will be placed, but more on that later =)
Some manufacturers put a sticker marking the type and class of the cord; you can stick it on the spool of the reel, and then you will not forget what kind of cord you have wound.
Nail Knot - used to connect the fly line to the leader.
Nowadays, most cords at the end of the cord and leader have special loops for connecting these elements according to the loop-to-loop principle. But if suddenly you don’t have such conveniences, then the Nail knot will come to the rescue.
You can also use an Albright knot to connect the cord and leader, but it is better to use a Nail Knot for a smoother transition. The whole catch is that this assembly requires a small tube, similar to the refill of a ballpoint pen, or a special tool.
With the thumb and index finger of your left hand, pinch the cord (on the left), the tube and the thick end of the leader (on the right) so that there is a free end of 4-5 cm.
With your right hand, take the free (thick) end of the leader and wrap the cord, tube and leader in five neat turns, tightly adjacent to each other. Then grab the thumb and forefinger of your left hand so as to grasp the coils and prevent them from unwinding while you thread the thick end of the leader into the tube, from right to left, as shown in the figure. Carefully remove the tube by pulling it to the left. Tighten the knot halfway, carefully pulling both ends of the leader, but do not pull the cord!
Check that the coils are snug and even against each other, then wet the knot and tighten it by pulling on both ends of the leader. When tightened, such a knot tightly compresses the outer braid of the cord, cutting into it. To finally secure the knot, pull the cord and the undergrowth in different directions.
Trim off excess cord and undergrowth.
The method described above is now outdated and fly fishermen and the fly fishing industry have come up with many ways to connect the line to the leader, which I will talk about in another article.
Double Surgeon's Knot - used to connect the leader to the leader.
This is the simplest knot for connecting the undergrowth with the leash and in Russian it is called double surgical.
Place the ends of the leader and the reins over each other with an overlap of 10-15 cm so that they point in different directions.
Make one regular knot, threading the entire leash with the thin end of the leader into the loop, but do not tighten it.
Repeat the above again.
Now do not completely tighten the resulting knot, wet it and only then tighten it completely by pulling all 4 ends. Trim off excess undergrowth and leader.
This method, when the leash is directly tied to the underbrush, has one drawback and it is as follows: sooner or later the leash will run out and you will have to tie a new one, each time shortening the underbrush, which in turn is not cheap.
But fortunately for us, there is one German fly fisherman on earth, the author of articles about fly fishing, Edgar Pitzenbauer, he invented small rings with the help of which the leader and leash are connected. In this case, both the leader and the leash are tied to the ring using an improved clinch. These rings have a lot of advantages:
- there is no need to shorten the undergrowth when changing leads;
- the connection is compact and reliable;
- when fluorocarbon is combined with nylon fishing lines, the situation in which the stiffer fluorocarbon cuts the nylon disappears;
- It becomes possible to connect undergrowth and leashes that differ greatly in diameter.
Currently, they are used by almost all fly fishermen, because nothing better has yet been invented, and the rings have acquired a common name - Pitzenbauer rings
Improved Clinch Knot - used to connect the leader to the fly.
Improved Clinch Knot or, in our opinion, an improved clinch knot. The most suitable knot for connecting the leader to the front sight and there are several reasons for this:
- it knits quickly, literally in a few seconds;
- it also unties quickly, but only when you want it, for example to change the front sight;
- When performed correctly, it holds tightly, and there are practically no cases of untying.
Thread the leash into the ring of the hook, approximately 5-7 cm, and make 4-5 turns of this end around itself.
Next, this end should be threaded into the loop near the ring of the hook, formed by the first turn, and then passed into the resulting loop from the last turn, as shown in the figure.
Wet the knot and tighten it by pulling on the leash. Trim off any excess leash.
So, now you have securely connected all the elements of your tackle: backing, line, leader, leader and fly. The most important of all these units is the improved chlinch , the one that you will use every time you change the front sight, and therefore most often. Practice tying it to ensure you tie the fly securely in all conditions, be it wind, low light or precipitation.
Most likely, the first time the knots will not be perfect or will not work at all, but with practice you will be able to knit them with ease and teach them to your friends and colleagues.
Backing winding process
It is very convenient when a spare spool is included with the reel, this simplifies the task. After all, we need to choose a winding such that the wound main line is hidden under the side by only 1-2 mm.
In order not to guess with the number of turns, you first need to wind the main line onto a spare spool, and tie backing to its end, the winding of which should be 1-2 mm from the side. Next you need to rewind the whole thing from the spare spool to the main one. When rewinding, the backing will be on the inside and the main line on the outside. That's the whole process.
It is recommended to wind the line under tension, or even better, soaked in water, this ensures better laying.
It is worth noting that if your line from the box has a large diameter and length, backing may not be needed at all. You can check this on the spool; the capacities of fishing lines of different diameters should be written there.
You can clearly see the process of backing a spinning reel onto the spool in this video. Dmitry Salapin explains everything in detail and shows every nuance of this case.
We also advise you to familiarize yourself with the process of clipping with and without an elastic band. Clipping on the reel spool is a way to fix the fishing distance, which allows you to cast feeders or baits at the same distance. You can learn about fishing line clipping here.
Definition of "backing"
Not everyone knows and understands what backing is. In simple words, backing is a special lining made on the reel spool, which serves to increase its diameter . This is primarily necessary when the amount of main line is not enough to completely fill the spool, as well as to use it more economically. If you use backing for the reel, it will be much easier for you to wind it exactly to the desired level.
In addition to saving money, this element allows you to slightly reduce the weight of the loaded reel , which is especially important when fishing with light and ultra-light gear. This is especially true when working with spinning-type reels, since the quality of the line coming off the spool very much depends on the distance at which its upper layer is located from the upper border of the side. It is believed that this value should be within 1-2 mm .
If this parameter exceeds 4 mm , long-distance casting will be difficult , and when the cord is wound flush with the sides, there is a high probability of it getting tangled. Therefore, experienced spinning players who know what backing is on a reel always monitor this indicator.
Despite the apparent simplicity of this element, to achieve maximum efficiency when using it, backing on a spinning reel must be carried out in accordance with certain rules, using suitable materials.