Spider fishing is not clearly perceived by fishermen and, given some parameters of the device, is considered a purely poaching method of catching fish, which has nothing in common with sport fishing. But in some cases, fishing tackle is permitted for use under legitimate conditions and is an excellent help for anglers hunting for predatory fish and constantly in need of live bait. Such a tool can be purchased without any problems in a network of fishing stores and, equipped with a lightweight pole and a ten-meter piece of strong, small-diameter rope, can be used to ensure fishing with fresh live bait.
The article presented to the reader will help to understand the types of spiders for fishing, understand its operating principle and how to make it yourself. The fisherman will be given recommendations for choosing promising fishing spots with this tool, and the nuances of the geometric characteristics and devices permitted for its legal use will be discussed.
What is a spider fishing tackle?
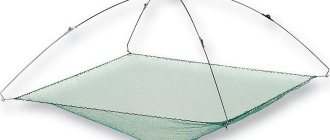
A fishing spider, or also a product called a lift in the fishing community, is a fishing tool consisting of a square piece of mesh stretched between rigid metal rods of a frame, the upper part of which is connected to a specially designed device for this purpose, called a cross. Depending on the purpose of the spiders, they can have mesh fabrics of different sizes, which in turn can have different cell sizes. Spider fishing is done blind.
The gear is installed on the bottom at a point in the reservoir chosen by the fisherman and raised by means of a pole after a certain time interval, which is also arbitrary and depends only on the decision of the fisherman. The lift is convenient to use from bridges, or other building structures and objects of natural origin overhanging the water and convenient for the angler’s location. In this case, the net is lifted without a pole, using only a rope. When the device is lifted from the water, the fish swimming above the mesh sheet falls into a slug of gear formed from the water pressure and is taken to the shore. With this method of fishing, the caught fish has absolutely no damage, and can remain viable for a long time, kept in water under optimal temperature conditions.
How to make a fishing spider
The dimensions of this gear can be different, most often with an area of one square meter or more (sometimes up to nine). The small-sized spider is used to catch fry and then use them as live bait for larger prey. It is typical that the larger the size of the selected gear, the easier it will be to catch large fish. However, there is no need to increase the dimensions in vain more than is dictated by objective reasons, because then the ascent speed will drop, the advantage of a large spider will be lost, and the prey will simply swim out of the trap.
Another subtlety - the larger the spider used, the more physical strength will be required from the fisherman himself, because it is not easy to drag a large catch, lifting it quickly enough through the water column.
Types of spiders
The spider tackle, having a general principle of its operation, differs only in the size, shape and design of the cross. Otherwise, the composition of the tackle remains unchanged, consisting of a mesh fabric, a rod frame and a cross-lock. In appearance, a fishing lifting net can be a classic tetrahedral shape, a modernized hexagonal variation and separated into a separate direction and type of tackle - spider-shell. The shells are small in size and can be round in shape, in the form of four or six sides. Fishing for spiders can be carried out at different times of the year, and for these purposes, fishermen have developed structures that can sink under the ice. In continuation of the article, we will dwell in more detail on the most popular models of the device.
Important! But I would definitely like to note that the legal fishing tool is a spider with a web size of 100x100 cm and a cell size of 1x1 cm, called by fishermen a little spider.
Description of appearance
Fishing with a spider is quite simple to implement. What is a simple trap? This is a square-shaped network consisting of cells of various sizes, which are stretched towards each other proportionally into the four corners of the arc. Moreover, each of them is inserted into the cross at one of the ends. The crosspiece itself is attached to a pole (with or without a rope and a block) or simply to a rope, in the case of spider fishing, for example, from a bridge, when there is no need for a pole, and the tackle is lifted by the cord. The guide pole must be movable and act as a lever.
Common for summer fishing
A fishing spider in a classic design is a little spider . It is with its help that fishermen catch the lion's share of live bait in the summer. The design of the tackle is quite simple and consists of a square mesh, a blind cross and four rods. On the crosspiece in its upper part there is a fastening ring for winding the lifting rope.
A wooden or aluminum pole for this small spider for catching live bait, as a rule, does not exceed four meters, and a seven-meter piece of rope or cord 6–8 mm thick is sufficient for most conditions for conducting the preparatory part of the main live bait fishing. Some models of the dwarf are equipped with side wing-aprons that rise 5–10 cm up along the perimeter of the mesh fabric. Their purpose is to serve to keep small fish in the mesh fabric, from rolling outside its boundaries at the moment when the tackle rises from the water.
For winter fishing
The design of the fishing gear for the peculiarities of winter fishing during the freeze-up period should allow the rods to fold freely when lowering and pulling the spider from the drilled hole. If the mesh fabric and rods of the winter version of the tackle are identical in appearance to the summer version, then the cross has a number of differences, which, first of all, lie in the spring mechanism that works to transform the product.
The stiffness of the spring is adjusted in such a way that it makes it possible to fold the rods and allow the angler to push the tackle through the hole, where, once in the water, it will open into working condition. When making a lift, resting the cross against the ice, the springs of the mechanism will work in the opposite direction and make it possible to lift into the hole a net folded into a bag with fish caught in it. To make it easier to feed the frame of this tackle, fishermen use ice drills of the largest diameters.
Large spiders
Fishing with spiders in excess of the size standards specified in the previous sections of the article in the vast majority of regions of our country is poaching. But large lifts are used in industrial fishing by fishing teams and even vessels specialized for such a device. Of course, due to their large mass, such spiders cannot be lifted by hand and electric winches with metal cables are used for this. For fishing, the poacher uses an elongated and durable pole, but made of lightweight materials, and a reliable synthetic rope.
Important! It is tempting to catch unsuspecting migrating or roosting fish in large quantities in large quantities, but do not forget that for violations of the law there are now quite significant fines, for which it is better to acquire legal and high-quality fishing equipment for legal sport and amateur fishing.
How to make a fishing spider with your own hands
A fishing spider is a fairly elementary piece of equipment in its structure and composition of elements, and it can be made at home, with your own hands, without much difficulty. The basis of the equipment is the net; all other parts of the equipment can be adapted from available means, which makes it possible to assemble a spider even in the field. For the base of the lift, a network woven from synthetic threads, which are least susceptible to rotting, is suitable. You can use vine or willow twigs as arches, and equip the crosspiece with a strong joint knitting of four frame elements. Self-production of even such a primitive spider for fishing can allow you to catch a certain amount of fish in an extreme situation. But then we will discuss the possibility of manufacturing gear at home using the industrial method, giving not only the algorithm for assembling the gear itself, but also determining the list of materials and tools necessary for the production of the product.
Required materials and tools
Before starting the manufacture of the lift, you need to decide on the dimensions of the final product in order to correctly select the mesh fabric required in terms of area, and also purchase a sufficient amount of metal rod for the arcs of the device. As we have already mentioned, it is best to purchase a mesh made of nylon fishing line for lifts, which is a fairly durable synthetic material that does not require special care after using it in a damp environment. To stretch and attach the net to the arcs, you will need to purchase a polymer thread with a diameter of 2–3 mm, slightly larger than the length of the perimeter of the net. To make arcs, you need a rigid metal rod or reinforcement not exceeding 3 mm in diameter.
The fisherman will also need tubes for making a cross, the diameter of which should be comparable to the diameter of the metal rod that fits tightly into the hole of the pipe blank. Under the pole, wooden stakes or duralumin pipes up to six meters long and not exceeding 40 mm in thickness are used. To ensure the spider rises from the water, you will need about 10 meters of nylon cord no thicker than 8 mm.
Of the tools, the most complex equipment will be the welding machine, which will be needed to assemble the cross. In addition to welding equipment, you should have a small cutting machine or a hacksaw for metal, as well as pliers and a hammer for arranging hooks on metal rods for fastening the net. A sharp knife would be useful for working with nylon twine and tension threads.
Instructions for making a spider for fishing
Having decided on the size of the future lift, cut out the mesh fabric of the required perimeter and stretch a tension thread along its edges, which is tightly attached to the corners of the mesh, leaving loops. The next step is to prepare the crosspiece by welding its frame from tubes pre-cut to size. In the upper part of the cross, exactly in the center of the product, a fastening ring for winding the rope is mounted. Hooks are placed on four cut rods and loops made from thread drawn into the fabric are attached to them.
Next, the rods are tried on the crosspiece in such a way that when installing the rod into the hole of the tube on the canvas, a small sack is obtained, otherwise there is a sag of the mesh visible to the eye. The rods are cut to the required size and inserted into the crosspiece, completing the main assembly of the lift with your own hands with this operation. Now all that remains is to tie the fastening cord to the loop of the cross, connecting it to a pole selected for the fishing conditions, and you can go fishing.
How to make it yourself: instructions
Despite the fact that any type of equipment can be purchased in a store at a fairly low price, many people prefer to make a lift with their own hands. Often fishermen, hoping for a richer catch, decide to make a trap whose size exceeds the legal requirements. It is worth remembering that such fishing is carried out at your own peril and risk and may result in a fine.
Step-by-step instructions for making a lift with your own hands:
Self-expanding spider lift
You will need tools and components:
- aluminum tubes for arcs;
- metal tubes for the cross;
- nylon mesh;
- handle pole and rope;
- hammer;
- hacksaw;
- welding machine.
Assembly instructions:
- They start by assembling the cross. The tubes must be flattened with a hammer. The goal is to make them flat, without holes. Using welding, the flattened tubes are connected at right angles. A ring is welded in the center, to which a rope can later be attached.
- Make shallow notches at the ends of the aluminum tubes. This will help secure the mesh more securely. Use a hacksaw.
- Attach the mesh to the tubes.
- A rope is attached to the ring on the crosspiece. The other end is secured to a stick.
The mesh must be attached to the tubes in such a way that there is a slight sag visible to the eye. A base that is too tight will give the fish the opportunity to jump out of the trap as it is being lifted.
Umbrella
Another name for equipment, which is mainly used in winter, is “grabber”. The process of making it yourself will require patience, some effort and knowledge from the fisherman.
Tools and elements:
- frame - knitting needles (4 pieces);
- bottom - mesh made of nylon;
- 4 springs;
- main weight made of lead;
- fishing line and 4 rods;
- float;
- nylon cord;
- copper wire;
- insulating tape.
Algorithm:
- The mass of the central sinker is calculated based on the speed of the current, the depth of fishing and the size of the gear itself. Springs must be inserted into the sinker. They are responsible for the trouble-free operation of the lift, allowing it to fold and open automatically like an umbrella.
- Rods are inserted into the springs. The coils are protected from snagging on the net using PVC tape.
- The fishing line is attached to a sinker and a float that extends the vertical part of the umbrella.
- The fishing line is attached to one of the rods, at the bottom.
- The rod is pulled to the spoke, pulling through the cells. At the end of the knitting needle there is a ring of wire through which the fishing line is threaded.
- Then the line is pulled through the wing cell and the float ring.
- The 4 ends of the fishing line must be secured in the ring above the float. Secure with lace.
- The central line is secured with a float, but the fastening is not reinforced with a cord.
Expert opinion Knipovich Nikolai Mikhailovich Zoologist, hydrobiologist. I am interested in fishing at a professional level.
A properly assembled umbrella will function flawlessly.
The photo shows a clear example of the gear:
The video shows how to make a grabber with your own hands:
Big size
Despite the legal ban, many fishermen make larger lifts. Huge spiders use fishing boats, but they are equipped with technical equipment for lifting - powerful winches.
When making such enlarged gear, a mesh with an increased cell size and stronger arcs for the frame are chosen. The materials chosen must be able to withstand the weight of the catch. It is worth remembering that large equipment is prohibited by law. Employees of regulatory authorities will confiscate accessories and take administrative measures against violators.
Best places to catch spiders
Spider fishing requires the angler to know places with clean bottoms that are free of snags, aquatic vegetation and construction debris that can get caught on the installed net. Reservoirs with a strong current, which can carry away a net with their flow, are not always convenient for fishing with a lift. Most suitable for fishing with this type of device are flat or slightly sloped bottoms next to underwater anomalies in the form of the same snags, massive stones, bushes of vegetation or reed walls.
Fishing is promising at the bottom of the pit, where the fish likes to hide during dangers, or after having fed during daylight hours, take refuge for the night. They always catch fish in water areas near bridges and directly under the structures themselves, where fish find secluded corners in parts of the reservoir shaded by the structure. Small fish, live bait, are caught on coastal shallows and sandy approaches to beaches, as well as in quiet creeks and backwaters, installing a lift near the boundaries of clear water and surface algae, mud collected in the quiet waters, or duckweed covering the reservoir.
Features of fishing with a spider
Having decided on a suitable place on the pond, spider fishing begins with installing the gear. They try to silently lower the fishing device to the surface of the water at a promising point and let it sink deeper, settling on the bottom. The pole rope, attached to the handle, remains in the hands of the fisherman. After installing the spider, they wait for a certain period of time, which is initially set arbitrarily, finding out the density of fish in the fished area of the reservoir. After waiting time, they smoothly lift the net and, if there are fish, pull the device ashore, collecting the catch.
Important! If there are no results after a couple of lifts of the fishing gear, you need to increase the time you wait for the trophies to arrive.
Also, success can be brought by feeding the net installation area, when after casting, a portion of bait is fed into the lift, thus attracting live bait to the fishing site. Another effective method of fishing is to install a metal plate in the net that is different in color from the bottom, which attracts fish and also serves as a weight that allows you to install the net faster and improves its stability when fishing in currents.
Spider fishing
When a fisherman has chosen a fishing spot, the following rules must be followed:
- Tie a rope to the tackle, thanks to which you can pull out the prey. The other end can be tied to the pier so that the “spider” does not float away. You can also put a wooden stake and attach a rope to it.
- You should wear gloves to avoid damaging your hands with the rope when you have to handle it with your catch.
- If you use a spider from the shore, then you need to tie a pole to it, with the help of which it will be convenient to throw and pull this tackle out of the water.
- A familiar fishing spot will be a plus, especially if it has a horizontal bottom. If there are circular current movements in the reservoir, then the chance of catching more fish may increase.
- Night fishing will give better results than daytime fishing. All that remains is to periodically raise the “spider” to the surface and check for the presence of a catch.
Selecting a location
Before you start fishing with a spider, you first need to check the fishing spot.
To do this you will need to do the following:
- Check the bottom of the river or reservoir: there should be no periodic slopes there.
- It is worth fishing where the fish linger for spawning.
- You should look for a fishing spot where there is: a narrowing river bed;
- backwater with a circular current;
- near the snag;
- at the bottom of the pit;
- near the reeds;
- at inactive structures.
Usually fishing with a “spider” is done blindly. You just need to check the tackle frequently for the presence of caught fish. If you didn’t manage to catch something right away, you can make a few more attempts and move to another place. However, if the fish swims in a school, then fishing with a “spider” will pay off.
Experts note that large fish often avoid the spider. To lure her into a trap, smart people came up with a method of “fishing with iron.”
To do this you need to do the following:
- take a large sheet of tin;
- paint the sheet with white waterproof paint;
- press it tightly with stones at the corners and secure with a rope;
- lower the “spider” into the water so that the net is on the painted surface.
At shallow depths, you can see the silhouette of a large fish, and when the prey swims into the trap, you can close the trap and take out the catch. Thus, fishing will become more exciting, and it will be possible to catch even the most cautious fish, like trout.
Fishing for young fish using a small “spider” is based on a similar principle. Only in this case, instead of a net, they take homemade tulle, and at the moment when the fish swims into the center of the trap, all that remains is to pull the rope and pull out the prey.
You can choose a place for fishing among the spawning grounds, but only use a smaller “spider”. The lifting here will be carried out using a regular pole, without a winch.
The following are most often caught with this type of gear:
- carp;
- crucian carp;
- perch;
- pike, etc.
