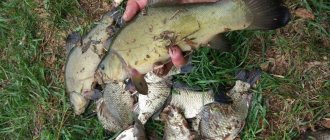
There is a wise fishing proverb: “May has come - catch a fish, don’t yawn!” All this is true. The second half of the calendar spring is an amazing time in terms of fishing. It is at this time of year that a fisherman’s wildest dreams come true. Spawned fish are actively feeding, which means they can and should be caught. However, by May the first fishing famine of open water fishing has already passed, and it becomes uninteresting to hunt for roach or bleak. I would like to compete with bream, ide, large crucian carp, tench and even carp. In May it is very possible to do this, you just need to find a fish site and present it with the bait correctly.
Photo by Anatoly Dribas
When the feeder is not a leader
The first task - finding a fish site - is much easier to cope with.
At the end of spring, almost all the fish are still close to the spawning grounds, and you can even find their camp visually: by the splashes and waves with which the fish feeding in the shallows reveal themselves. But the second task, concerning the competent presentation of the nozzle, turns out to be much more difficult. For the majority of fish living in our area, the spawning ground is, as a rule, shallow water overgrown with grass, far from the shore. And the more grass at the bottom, the better. What tackle should I choose to make the bait look attractive in such conditions? Feeder? But in such conditions, this folk tackle is a weak assistant. A dense carpet of grass and small tree branches tangled in it poses a mortal danger not only to the hooks, but to the entire equipment. And the main feature of the feeder - the ability to create a compact feeding spot on the bottom - almost does not work in the grass. Together with the feeder, the bait quickly falls under the grass and becomes inaccessible to the fish. By the way, the same thing happens with the nozzle. Even if you feed the point with a slingshot and put a sinker instead of a feeder, after casting after the sinker the nozzle quickly sinks under the grass.
An ideal option for such conditions would be float gear. But both fly rods and even Bolognese fishing rods turn out to be useless in such conditions. The swing is not long enough, and the Bolognese rig in reservoirs without a current (and even if there is a side wind) becomes uncontrollable. The float always strives to move the rig away from the baited point, and “upward” bites are almost invisible at such a distance. In general, sheer torment.
Not held in high esteem, but in vain
But there is one tackle that copes with all the problems listed above very easily.
I mean the now unfashionable match fishing rod. Even before, it was not in particular demand in amateur fishing, but with the advent of the feeder it became a rarity altogether. And completely in vain. A match fishing rod makes it possible to fish without problems both at 15 and 30 m from the shore. The design of the rod and the presence of the reel allow you to fish out even quite large prey on a thin line. And the small length of the rod (and the same light weight), a large number of guides on a high leg, together with sinking lines and heavy floats with one attachment point guarantee fishing in almost any weather. Even in strong winds, the match equipment remains at the point where the angler placed it. In spring, when the weather can change several times a day, these qualities of match gear turn out to be the most valuable. Agree, this fishing rod really has a lot of advantages. However, many of my colleagues are afraid to use match gear only because they consider it too complicated to use and expensive to purchase. Let me disagree. Now that match fishing rods are out of fashion, the price of a basic match set - a rod, reel, fishing line, several floats and a set of sinkers - is even lower than the price of a basic feeder set. If you don't believe me, you can check it yourself. And there is nothing difficult in handling match tackle. If you wish, after a few fishing trips you will forget about what rig tangles are, and you will learn to accurately cast bait from a slingshot. But the sensations you get when fishing for a weighty trophy on thin tackle are difficult to describe in words. I will only say one thing: the feeder with its heavy and rather rough equipment is much inferior to the match in the pleasure you get when landing fish.
Fishing with a match rod
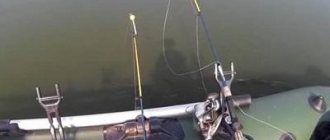
First. What is needed here is the correct choice of fishing location. After this, you need to mix in complementary foods - this is an integral part of any fishing. While it is infusing, you need to start assembling the gear. The best option would be to have the equipment already assembled in advance using a shock leader and wound on a reel.
As a result, on the reservoir you will only need to tie it to the main fishing line and finally unload the float so that only a small tip of the antenna peeks out of the water. After this you can start fishing.
It is very important that the clutch be adjusted first. To do this, you need to cast the tackle, pull the fishing line, the tip thereby sinks into the pond and drowns the monofit, which helps protect the equipment from outside influences (wind, waves)
When mounting the equipment, you also need to take into account the sinkers. The fewer of them there are on the line, the more stable the equipment will work. You need to increase the weights after you have fully mastered all the techniques of fishing with a match fishing rod.
Having chosen a fishing point, you need to cast 5-10 meters further from it. This will prevent you from spooking the feeding fish. But the main thing is that with such a cast you will not drown the line when you perform the technique of reeling and twitching. The cast is done from behind the head. When you move the tip back, the butt will indicate the direction of the cast itself.
Before lifting the rod, it is recommended to slightly pull the line with your finger, making sure that it passes freely through the ring and there is no tangle. To prevent the tackle from getting tangled after you cast, you need to slightly slow down the line with your fingers. The equipment will straighten and lower into the water.
The selected fishing distance is marked with a white marker on the fishing line. The tip of the fishing rod should be approximately 15-40 cm under water. If the mass of the float is more than 20 grams, it is recommended to use a shock leader. If you don't need to use less.
Feeding occurs with balls, which it is advisable to place at the same point. In order for the force and maneuver of the hook to be correct, it is very important to take into account the distance of the fishing itself and how much free line you have left in the water. If the distance is relatively short, the hook should be straight and neat
The best way is to hook on the side where your leading hand is and move the rod itself low so that the line moves underwater.
If a large fish is caught or you need to put more effort into hooking, the spool is used as a compensator. Small fish are caught only by rotating one reel, without lifting the rod. Fish that provide resistance are best fished with slight lifts of the rod.
If the fish is brought to the surface prematurely, then in case of sudden movements there is a possibility of disappearance.
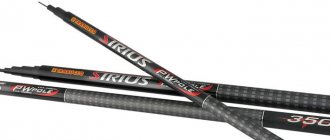
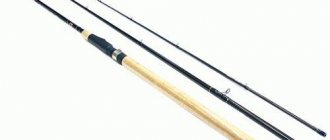
Rod
I also have expensive models in my arsenal that I competed with. But these rods are usually highly specialized. And they need careful care. For amateur fishing, I bought myself a “universal soldier” Blaxter Match from Stinger - an inexpensive but fairly high-quality rod that satisfies all my needs for amateur fishing. The length of the blank is 4.2 m, and the test is 5-20 g. This means that this rod works best with the most common equipment weighing 8-16 g. 13 rings on high legs, a reel seat and a combined handle are almost the same in quality from the fittings that are installed on top models. The blank material - T30 carbon from the Japanese company Toray - also indicates the high quality of the product. Except that this rod is not as colorful as fashionable sports models, but, you see, this is not the most important thing for amateur fishing.
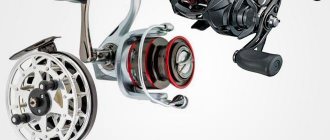
Coil
As a reel for recreational fishing with a match fishing rod, I would recommend purchasing a high-speed reel. The reason is simple: the faster it reels out the line, the more time you have for fishing. Recently, match reels have been produced with a larger spool. This allows you to achieve a high speed of line reeling with average gear ratios. I most often use the Browning Xitan Master Match FD 940 reel. Distinctive features of this model are an exceptionally soft brake, a reliable clip, which, thanks to the presence of an additional gasket, does not injure the fishing line at all, and an aluminum spool of increased diameter. This reel is high-speed: the main gear ratio is 6.0:1. The high gear ratio and wide spool allow it to reel in 105 cm of line per turn of the handle.
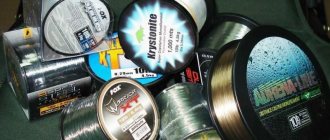
fishing line
As practice has shown, for amateur fishing with a match fishing rod, I would recommend a main line no thinner than 0.2 mm, or even 0.22 mm. Such a significant thickness is necessary both for effectively landing large fish and for combating floating grass, which every now and then appears in the fishing sector. In addition, the additional rigidity of a thick fishing line ensures that the float does not twist around the main load when casting. It’s good if the main line slowly sinks in the water. This greatly reduces the effect of wind currents on the equipment. For anglers who have decided to master match fishing gear, I would recommend the Ultron Match fishing line. This is an inexpensive, but quite high-quality, sinking fishing line that has been tested in practice, with which you can master long-cast fishing without any problems.
Match fishing. Elements of match equipment and their selection
Match fishing, or “long casting,” is one of the most interesting types of float fishing, which is applicable throughout the open water season, both in still water bodies and in the current. Match fishing or, as fishermen also say, “long-range” fishing is especially relevant when there is a need for long-distance casting of equipment (more than 20 m from the shore), where fish, especially large ones, take the bait actively and fearlessly.
With match gear you can feel confident in most bodies of water, both stationary and moving fishing. But for novice fishermen, this type of float fishing at first acquaintance may seem too complicated, accessible only to professionals. Therefore, for those who have decided to master match fishing, this material offers several tips on preparing and equipping a match fishing rod.
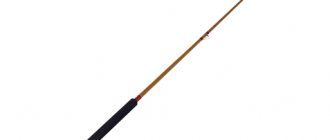
Which rod to choose for match fishing?
The answer is simple, just a match. You can, of course, try to attach match equipment to a cheap Chinese “telescope” and catch some fish. But it is guaranteed that you will not get the full sensations and pleasure from such fishing and will end up disappointed in the effectiveness of match fishing. More details about match rods in the material “Match rods. Selection and classification of match rods."
It remains to add that when choosing a match rod of one class or another, you should decide what kind of fish and at what distances you intend to catch. If it is rudd, roach and crucian carp at a maximum of 30 m from the shore, a light class rod is quite suitable, but if the stake is large carp, at a distance of 50-70 m from the shore, a medium or even heavy class is needed. But considering that good match rods are not cheap, and not everyone can afford to buy several blanks at once, we can recommend a middle-class rod with a length of 3.9-4.2 m, which is suitable for match fishing in most of our reservoirs.
What kind of reel is needed for match fishing?
Ideally, long-casting reels should meet the following requirements:
- finely and smoothly adjusted friction brake;
- high-quality laying (without hills, dips and loops) of thin fishing line;
- high gear ratio - from 5.7:1;
- shallow large spools (conditional size 3000-4000);
- large line roller with built-in bearing.
All of the above requirements are fully met by special match reels, which are available from almost every manufacturer. Match series reels are fast reels with small spools, since for long casting it is very important that the spool on the reel is filled as much as possible with fishing line. However, to begin with, you can use any spinning reel with a deep spool, having previously wound the backing under the fishing line.
The high gear ratio of the coil also, one might say, is not of fundamental importance. It is much more important to have a reliable friction brake, since match fishing involves the use of fairly thin fishing lines. Therefore, a finely and smoothly adjustable drag on the reel is a prerequisite and the key to success when fishing for trophy specimens. Front or rear location of the clutch - whichever is more convenient for you. It is also important to ensure high-quality laying of the line from side to side of the spool without hills or dips. This will save you from unpleasant situations with tangling and beards on the line when casting.
What fishing line is needed for match fishing?
First of all, the requirements that the fishing line in a match rod must meet are softness, strength, low elongation, wear resistance and minimal memory. It is advisable to use a dark-colored fishing line so that the marker marks are clearly visible. And also the fishing line for the match should be sinking - at long distances, the fishing line floating on the surface, even in a light breeze, will carry the equipment away from the baited place.
Nowadays, buying Match series fishing line is not a problem; it is better if it is from a well-known manufacturer, albeit more expensive, but in the end it justifies itself in the future during match fishing. The O on the package means the line is sinking. As a rule, these are monofilament lines of dark colors (brown, black, dark gray) with minimal memory, which allows them to straighten well and not gather in rings after casting.
In order for the fishing line to unwind better from the reel spool and sink after casting, it is recommended to degrease it from time to time. To do this, use a special spray that does not spoil the fishing line, which is generously sprayed onto the fishing line, directly on the reel spool. But if there is no special spray, then a soapy solution of dishwashing detergent is quite suitable.
As for the diameter of the match line, the opinions of anglers vary somewhat. On bodies of water that are close to ideal, athletes use a fishing line of 0.1-0.12 mm, which allows them to make fairly long casts. Some advise using a main line with a diameter of 0.14-0.16 mm. with a shock leader to prevent the heavy float from shooting out. When casting, the entire load falls only on the shock leader made of thick fishing line, therefore the thin main fishing line does not suffer from overloads.
For amateur match fishing, a main line of 0.16-0.18 mm, and in some cases even 0.2 mm, is quite suitable. And as practice has shown, the use of a thicker main line in the equipment of a match rod, even if it affects the casting distance, is not so critical. But with such a fishing line you can perfectly catch roach and trophy carp, especially if you don’t have enough fishing experience. When winding the fishing line onto the reel, do not forget - it is better to underwind 2-3 mm to the side of the spool than to rewind it, because the excess fishing line will sooner or later get tangled when the loops self-reset and come off, and it’s a waste of time and nerves.
Float
This detail of the match equipment undoubtedly attracts the most attention.
Beautiful match floats evoke some additional respect and admiration. And their price is rather high, which is another limiting factor for mastering the technique of match fishing. Although if you compare the cost of a match float with a wobbler, it will often turn out cheaper. And they break much less often than wobblers come off on snags. There are a great many models of match floats in the world, but for amateur fishing I would advise choosing one with an increased reliability resource: a plastic body and a plastic antenna. Balsa floats with a peacock feather antenna are elegant, fly well, register excellent bites, but are very gentle to use. Their varnish coating is very resistant to impacts on the rod blank. And as soon as cracks appear on it, the float begins to “drink” water and loses its original settings.
So that fishing from the very first steps does not turn into torture for you, I recommend paying attention to Cralusso floats. The design allows them to be used in the most severe conditions, and in terms of sensitivity they are in no way inferior to more expensive balsa models. Another undeniable advantage of Cralusso floats is that they always have spare parts.
Mounting methods
There are two types of attachment of match floats to fishing line: fixed or sliding.
In the fishing literature you can most often find this division: a fixed float mount is better suited for shallow depths (up to 3.5 m), and a sliding one is more convenient to use at depths exceeding the length of the rod. This is all true, and the fixed float mount settings are much closer in spirit to beginners. But the sliding method also has a number of undeniable advantages. A rig with a sliding float flies much better than one with a fixed float. And breaking through a layer of ever-hungry little things with a sliding float is much easier than with a fixed one. In the spring, these qualities of a sliding rig are most useful. So I strongly recommend starting to master match fishing in the spring with it. And learning how to tie a locking knot correctly takes just a few minutes.
Float mount
Attaching a movable float when fishing with a match fishing rod can be different: from using a simple swivel for this to rather complex designs with a bearing. But in practice, the simplest method is most often used - using a small swivel. A small glass bead is placed above; It’s just important to check that the locking assembly does not get stuck in its hole, much less pass through it. Or you can simply tighten the swivel ring with pliers to create a gap about 0.2-0.3 mm wide, through which the locking unit will not pass. Both options are great for any float. However, it is still better to attach heavy (weighing more than 10-12 g) floats, especially if long-distance power casts are required, to the fishing line via an adapter, which reduces the bending of the fishing line in the fastening unit, which means the possibility of its chafing and breakage.
Read! Goose feather float for bream
Since the float in match fishing moves freely along the line, you need to monitor the surfaces in contact with the line. Burrs on metal parts interfere with free movement and damage the fishing line.
Sliding equipment
The match float is a very sensitive instrument and takes time to set correctly.
Doing this while fishing is inconvenient, and it doesn’t always work out correctly. It is much easier to calibrate the float at home, and bring a set of weights on a piece of the main fishing line to the reservoir in finished form. I wind them on small reels and sign them. When fishing, all I have to do is tie this insert to the main fishing line and mount a leash of the required length. Match fishing experts recommend making such inserts approximately 2 m long (about half the length of the rod), but in my experience of spring fishing with a match rod, this is a lot. The length of my inserts for spring ranges from 1 to 1.5 m. The entire weight of the float is located on the insert, that is, the main sinker - the olive and the subsink. For catching the same bream or silver bream, the best option is when the load consists of one massive olive sinker and a catcher. The weight of the assistant shepherd is envy for many reasons. First of all, these are the physical characteristics of the float itself. With seemingly identical parameters, floats made of different materials react differently to the weight of the underpass. For the Cralusso floats described above, I always hang several pellets on the fishing line, which during fishing I can spread along the fishing line or group at one point. This makes it much easier for me to adapt to the mood of the fish.
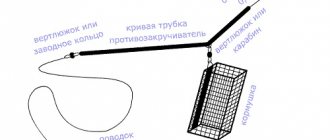
The insert ends with swivels on both sides. When fishing, all that remains is to tie a leash with a hook to the lower swivel, and to the upper one - the main fishing line, having first put on it a fastener for attaching the float, and a damper in the form of a silicone tube or shock absorber. Why such difficulties? After all, sliding equipment can be made in a matter of minutes on a pond. But, firstly, the presence of an insert greatly saves time on fishing. Secondly, now the float cannot lower to the sinker itself - the upper swivel is in the way. This means that the likelihood of overlap when casting will be minimal. Thirdly, thanks to the insert, the path of the float up the main line is shortened by the length of the insert. And this saves time on fishing.
Float fasteners are another very important element of match equipment. Having learned from bitter experience, I recommend not skimping on this element of equipment. The best fasteners consist of a carabiner, a swivel and a coupling, which, in fact, will slide along the fishing line. Serious manufacturers of fasteners have couplings calibrated for a certain fishing line diameter. This provides an additional guarantee that during fishing the float will not slip through the locking assembly. If you can’t buy such fasteners, don’t worry. You can fish quite well with a regular clasp (swivel + carabiner). You just need to provide it with additional beads at the top and bottom, the diameter of the holes matched to the diameter of the main fishing line. Of course, with such a fastener the float will float up a little slower, but this design will work.
As you can see, you don’t need too many additional equipment for this type of fishing. All of them can easily fit into one box with compartments. For feeder fishing you have to carry a lot more. The feeders alone make about two kilograms. The only condition: it is advisable to store delicate and expensive match floats separately from the sinkers. This way they will be preserved better.
Photo by the author
Technology for creating equipment with a sliding float
Installation of the equipment begins with winding the main fishing line onto a reel. Before this, secure the reel in the reel seat and attach several rod bends to the handle. The line is fed to the reel from the end of the fishing rod through the guide rings and secured to it. It is advisable to use a shock leader - a piece of fishing line 5-7 m, several positions thicker than the main one. One end of it is tied to its beginning, and the other to the coil.
This element is designed to reduce the likelihood of the main line breaking when casting heavy equipment. But its use is advisable only when using floats weighing more than 20 g. When the fishing line is attached to the reel, it is wound.
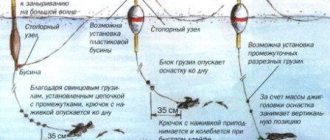
The free end of the fishing line is passed through the float mount, and then through the axial hole of the main weight. Rubber beads (shock absorbers) are installed at both ends of the load. At a distance of about 40 cm from the end of the fishing line, a silicone stopper is installed on it (the lowest point of the float). An upper float stop should be made approximately 70 cm up from this point.
To do this, a locking knot is knitted. To tie it, take 10 cm of fishing line (can be of the same cross-section as the main one) and apply it to the main fishing line at the point of attachment. One of the free ends of this segment is wrapped in several (6-9) turns of the main fishing line along with the attached fishing line. After this, the end is threaded through these turns and tightened. The long ends of the fishing line are cut off. This node will be the top point of the float.
The end of the main line is knitted into a loop. After this, a leash with a hook is tied to it. It is better to fasten the leash through a small swivel - this will save you from unnecessary hassle when replacing it.
Next, you should load the gear. To do this, it is better to use a set of small lead pellets that will complement the main load.
It is better to load the gear at the fishing spot, taking into account the current and depth.
On the pond
At the beginning of fishing, all I have to do is put a fastener on the main line to attach the float and tie an insert prepared at home to it.
Before tying it, do not forget to place a piece of silicone tube on the main line below the fastener - this is a damper that will not allow the float to stick during vigorous casting and will also help keep the knot intact. When the float is mounted in a sliding manner, its movement up the line is limited by a stopper knot. It is knitted very simply from a piece of main fishing line. And in order for the equipment to easily pass through the rings of the rod, do not forget to leave small tendrils on the locking knot. Careful depth measurements on spring fishing, as a rule, are not necessary. I roughly set the float release and immediately start fishing. If the hook lands on the grass, the float release is slightly adjusted. In spring, fish, as a rule, are not picky, and the first bites will not take long to arrive. Sometimes no bait is required. But I still recommend periodically throwing one or two loose balls of bait at the fishing point. This makes it easier to hold the fish.
Casting technique
Casting with a short line on a long match rod is not difficult and can be easily accomplished even by inexperienced anglers. However, sometimes problems arise with splashing down the equipment. To avoid this, you need to slow it down at the last moment of the flight, then the rig will straighten out in a line and lie flat and quietly on the water. Without braking, all the sinkers and float will literally gather at one point and can get mixed up.
Read! Catching silver bream with a float rod
In order to slow down the equipment in time, you need to visually track its flight, and keep your finger on the spool, always ready to slow down the release of the fishing line.
It is absolutely necessary when match fishing (and Bolognese fishing too) to control the free passage of the line through the guides immediately before casting, when the rod is already pulled back. The frequent occurrence of the line overlapping the “tulip” means, at best, a crumpled cast and a tangled rig, often – shooting off the float, and sometimes even breaking the rod tip.
To prevent this from happening, when retracting the equipment with your finger holding the fishing line, you need to check the free play, and in case of any doubt, find out the reason.
Useful little things
In order for the equipment to become less tangled during the fishing process, you need to correctly distribute all its components on the fishing line.
It is especially important to maintain the correct distance between the float and the main sinker. Through trial and error, I found that it should not exceed 50 cm. But the distance from the main sinker to the sub-sink, as well as the mass of the sub-sink itself, can vary. To catch roach, bream and silver bream, I most often place one, or less often two, sinkers at a distance of 40-60 cm from the main load. But for catching crucian carp or crucian carp, both the bait itself and the distance from it to the main sinker can be increased to 80 cm. This way, the phlegmatic but cautious carp will be more confident in swallowing the bait on the hook. Of course, the above parameters are not dogma, and depending on the fishing conditions, they can and should be changed. This, in fact, is the beauty of fishing. It's always nice to see the results of your experiments in the form of bonus bream, crucian carp or carp. So feel free to experiment, and I told you about my favorite gear for fishing in spring floods.
Have fun fishing!