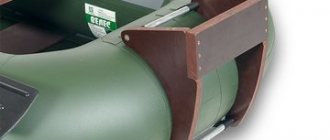
Do-it-yourself PVC boat mounted transom
The transom is a full-fledged PVC boat motor mount; of course, if you make it yourself, it can be unstable and flimsy, although it all depends on how the transom was made.
When making this device for mounting a motor, you should follow all the recommendations and take into account the technical characteristics of the PVC boat and the motor itself, which will be attached to it using a transom.
https://youtube.com/watch?v=eCnzhf0hemI
Transom and motor
It is important to take into account that such a device as a transom for an inflatable boat is not suitable for mounting a high-power engine. D
The engine installed on a PVC boat should not have more than three and a half horsepower, which allows the boat to reach a speed of about ten kilometers per hour. The fact is that the boat and the transom itself have a limit on the weight of the motor.
When purchasing a motor, PVC boat and transom, you must carefully study the technical specifications.
The fact is that the boat has a weight limit, and the transom, which has a reinforced structure, has a fairly large weight, which increases the load on the fastenings, and, accordingly, on the relatively thin polyvinyl chloride.
Such a transom is capable of supporting a powerful engine of up to three and a half horsepower, but it can only be used on a large inflatable boat.
In addition, the power of the motor puts pressure on the transom plate and the stern of the boat: the more power, the greater the pressure.
Design
The design of such a device as a hinged transom for a PVC boat is extremely simple and includes:
- plate;
- Mounting arc;
- Eyes, which are sometimes called bubyshki.
The plate can be square or rectangular and is made of plywood. The fastening arc is a bracket that is put on the plate, after which its ends are secured to the boat using eyelets.
Eyes or lugs are staples whose ends extend into a flat base.
Materials for production
Moisture-resistant plywood is used as the material for the plate.
This material is quite thin and light, and also has a smooth coating, which protects the plate from exposure to adverse environmental factors.
Staples in most cases are made of metal, in particular rolled metal, bent in a certain way.
It is best if it is stainless steel or steel with a protective coating.
Steel is a strong enough material so that the bracket does not deform under the influence of the load exerted when the boat engine is running.
And the resistance to aggressive environments that stainless steel or coating has protects the metal from corrosion.
For the manufacture of eyes, in most cases, plastic is used, since it is a lightweight material that is resistant to environmental influences, in particular moisture. In addition, plastic can be easily fixed to polyvinyl chloride film using glue.
Manufacturing
In order to make a transom for a PVC inflatable boat, you will need a drawing. You should not choose a device for securing the motor of the most complex design.
For self-production, it is best to take a transom of a simple design, especially if you plan to attach a relatively low-power motor using this device.
To make the plate, plywood with a protective plywood coating is suitable. The thickness of the plywood must be at least ten millimeters. After cutting off the required piece of material, you need to sand the edges of the plate, since the PVC film is easily damaged. Special loops are attached to the plate, with the help of which the plate will subsequently be connected to a metal bracket.
Fastening arches are made of rolled metal. You need to take a metal rod of small diameter, about ten to fifteen millimeters, and bend it in a certain way. You can bend the rod using a special machine or using a workbench and hammer.
Frames can be purchased separately.
The entire structure is assembled immediately before installation on the inflatable boat.
Making a hinged transom for a PVC boat
Today, the transom has become an integral part of boats, motor and rowing inflatable boats, the carrying capacity of which exceeds 220-250 kg.
Depending on the type of boat, there are two main types of transom: stationary (fixed) and mounted (removable).
Many lovers of outdoor activities on the water, who have a rubber or PVC boat at their disposal, want to increase the speed of movement on the water by installing a motor - gasoline or electric. The stationary rigid element is tightly glued into the stern of the vessel by the manufacturer. As a rule, it is made of multi-layer waterproof bakelite plywood.
Many manufacturers include a hinged transom in the package. Each of them has its own fastening elements and is designed to install a low-power motor (up to 3 hp). In addition, a rigid element at the stern of a PVC vessel is often used for attaching additional equipment, for example, an echo sounder sensor.
In the case where the hinged transom is provided by the manufacturer and is included in the delivery package, no special problems arise - it is necessary to secure it in accordance with the instructions and use it for its intended purpose.
But lovers of fishing and other types of water recreation, who have boats of sufficient carrying capacity and, for various reasons, are not equipped with a rigid element for mounting the motor, have to buy it or make it themselves.
Actions before installing transom wheels on a PVC boat.
Before you begin installing the transom wheels, you must study the instructions for installing transom wheels on a boat. After studying the instructions, you must prepare the necessary tools and materials in advance:
- level;
- electric drill with wood drills with a diameter of 4 mm and 10 mm (diameter required for holes for fasteners);
- screwdriver and keys for fasteners;
- silicone sealant;
- pencil, marker.
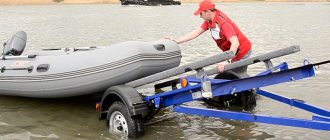
The transom wheels must be installed on the boat inflated. If the boat is a floorboard, then the floorboards can not be assembled, but only all the compartments except the keel can be inflated. Instructions for installing transom wheels on a PVC boat.
The inflated boat is placed on stands 40-50 cm high, which allow the wheels to pass freely between the lower edge of the transom and the surface on which you are working (ground, floor).
Options for attaching the wheel strut to the transom depend on the design of the struts and the mechanism for attaching to the transom. The most convenient to use and widely used are folding, removable transom wheels, which are attached to the transom using a special bracket. The stand is attached to the bracket using a bolt, which acts as an axis around which the stand is tilted upward or installed in the working position.
Required tools and materials
To make a transom with your own hands, you will need a minimum set of tools and a list of suitable materials.
Tools:
- devices for sawing metal: grinder (angle grinder) or hand saw for metal;
- electric drill or screwdriver;
- devices for sawing wood: hacksaw or electric jigsaw;
- welding inverter (depending on the model design);
- pipe bender (depending on the model or the presence/absence of a welding inverter);
- spanners.
Consumables:
- self-tapping screws;
- trimming discs for an angle grinder or blades for a metal saw;
- drills and bits;
- saw blades for electric jigsaw;
- electrodes (when using a welding machine);
- yacht varnish;
- paint brush;
- hammer paint;
- specialized glue for boats.
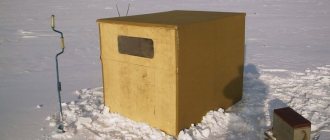
Read Fishing box for winter fishing with your own hands
Materials:
- iron pipe up to 20 mm in diameter (preferably round);
- plywood. 30-40 mm thick (can be used in 2 layers of 1.5 or 2 mm).
- nuts;
- factory adapters-mounts (glued to the hull of the boat), it is advisable to purchase them in a store, since making them yourself is difficult.
How to choose a PVC boat with a hinged transom
The aluminum version is much heavier, but it is much easier to stand on such a bottom in the water.
When choosing a PVC boat, you need to follow a number of tips that will help make the task easier:
Decide what you need a boat for: if for walking along the river along the shore, and for swimming short distances, a boat made of unreinforced PVC, which is also used for mattresses, children's inflatable balls and armbands, is perfect. If the purpose of buying a boat is to travel on the open sea, hunting, fishing, then it is better to choose a boat made of reinforced PVC
This material is much stronger and will be more susceptible to holes when colliding with stones.
It is important to assume in advance how many people the boat will carry. Based on this, the following criteria can be distinguished: for one person a boat up to 3.3 m in length is suitable, for two – from 3.3 to 4.2 m, for a trip of three – over 4.2 m.
Decide what is more important: ease of transportation or quality and comfort while sailing
This is due to the fairly large weight of the boats, to which, in addition to the main elements, the bottom is added. In turn, it can be either inflatable (light enough, but not stable during swimming), or aluminum or made of waterproof plywood.
How to install a transom
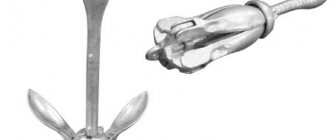
Installing a transom on a rubber boat is the most difficult operation. The design of such a craft itself does not allow the use of the simplest and most reliable connections - with bolts, welding, etc., so a glue connection is used.
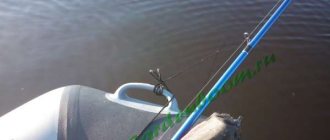
The transom is installed in eyelets, which must be glued to the boat cylinder with glue intended for its repair. A type of eyelet is, for example, a handrail or a handle for carrying a boat (convenient as a support for the lower part of the transom). It is recommended to use purchased parts, since it is difficult to make eyelets yourself (but it is possible, for example, from vulcanized fabric or from material intended for gluing patches to a boat).
First, the flotation device must be fully inflated. Lightly sand the previously marked areas for mounting handrails with fine sandpaper, degrease with a solvent and apply the first portion of PVC glue. Wait a while for the first layer of glue to partially harden, apply a second one, attach a plastic eye and press down firmly. Place all the bosses in this way, make sure that setting has occurred, and deflate the boat halfway.
At the last stage of fastening, it is necessary to install the transom with its lower end into the support eye, insert the upper brackets into the corresponding rails, and inflate the boat completely
Please note that in this design, the transom is held on the cylinder due to elastic forces
Source
Hinged transom - how to make it yourself
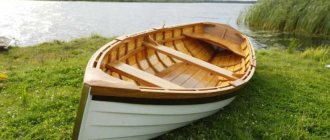
Many of the fishermen who have inflatable rowing boats at their disposal sooner or later think about installing a boat motor. This is an obvious solution that allows you to save a lot of effort and time, especially after a long spinning fishing, when your hands feel like stone from many dozens of casts. But the installation of a motor is implied by the design of not every watercraft - for example, the popular small bark boats, according to the manufacturer’s logic, are designed to be moved only with the help of oars. Therefore, to install the engine on such a craft, a special device is used - a hinged transom for a boat.
DIY hinged transom
The distinguishing feature of the mounted trans is its ease of use and manufacture.
In order to make the design yourself, you need to purchase the following components:
In order for the fastening to be most reliable, the cable must be pulled tight enough.
The best option is a handrail.
In order to make a transom, you must perform the following steps:
- Mark the location of the latch with a waterproof pencil.
- Secure the weight latch.
- Inflate the boat.
- Select the optimal location of the latch.
- The latch on the fastened oars should be in a place so as not to interfere with the motor operating in the required mode.
- You need to fix the latch in such a way that, if necessary, you can remove the oar and continue moving manually.
- Bring the ship to its original position, that is, deflate, and find the mark area.
- Straighten the boat on a smooth area so as not to damage the surface and eliminate any remaining air.
- Clean the fastening area with a degreaser.
- Apply a thin layer of high-quality glue to the surface using a brush.
- Give the glue time to dry for 15-20 minutes.
- Repeat the process and leave to dry for 10 minutes.
- After this, fold both sections, straightening them to remove bubbles.
- Place a heavy object on the folded areas.
- Leave this structure to dry overnight.
DIY transom
If you don’t have a suitable one, as you know, you can make a transom for a boat yourself.
Transoms vary depending on the mounting: mounted (used for low-power motors, otherwise they will not withstand heavy loads) and stationary (for mounting more powerful engines, the height of the transom must be taken into account).
Requirements for transoms
Both a purchased and a homemade transom for an inflatable boat must meet the following mandatory requirements:
- Strength. This applies to both the choice of manufacturing materials and the method of fastening.
- Water resistance. Both wooden and metal parts should not be affected by moisture - the plywood should not swell and the frame should not rust.
- Correct choice of plate thickness. The more powerful and heavy the motor, the thicker the plate should be.
Important! The most durable transoms are installed to use a motor with a maximum power of 10 hp. They are designed for boats up to 3.5 m in length with a cylinder diameter of approximately 0.44 m.
Multi-layer plywood and chrome-plated metal will provide adequate moisture resistance and guarantee durability.
What types of mounted transoms are there?
When choosing a mounted dance, you should be guided by several aspects:
- the quality of the transom must be at a high level, which will increase its reliability;
- correct fixation of the motor in the working position;
- affordable price category.
There is no division of transoms into specific types; the distinction between them occurs due to the price category, the materials from which they are made and the manufacturer. You need to choose a transom very carefully, without being tempted by the low cost.
Read Fishing in Molchanovo: catchable places
If the transom or fasteners break, you can lose the motor, put a hole in the boat with its propeller, and get injured. In order to extend the life of the transom and the safety of boat passengers, it is worth choosing the right motor, the power of which will not exceed the permissible norm (5 l/s).
There are a few important things to keep in mind when attaching the canopy transom:
- the stern of the boat should be shaped like a trapezoid;
- There should be a straight section at the end of the boat.
Mounted transoms are made of special plywood with a special waterproof coating. If you choose the wrong transom, it can lead to disastrous consequences.
Reinforcement of the hinged transom
To strengthen the transom and add rigidity to the structure, fishermen sometimes resort to non-standard solutions - strengthening the transom with side rods to additionally installed rail fastenings along the sides of the boat, or making a rigid base of the boat and rigidly attaching the transom to it.
In any case, as practice shows, even the most ideal technical solution, sooner or later during operation, will require additional improvement and modernization. So there is practically no limit to perfection here.
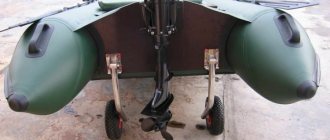
Features of installing transom wheels on a PVC Solar boat
The boats have a low pressure inflatable bottom. The transom sits on top of an inflatable bottom that protrudes beyond the transom. At the bottom of the boat along the entire length between the cylinders there is a special apron made of PVC fabric, which allows you to go on planing. This explains the use of transom wheels with an extended post and a curved design (or installing the post in the working position at an angle to the transom) to avoid bending the apron.
When marking the installation of the bracket on the transom, it is necessary to take into account the thickness of the inflatable bottom. You can use wheels with an extended stand of a straight design, but in this case you will have to insert spacers (plywood, textolite) between the bracket and the transom, and also use bolts of increased length.
Boat mounting
Before carrying out installation work, it is necessary to provide a place for a convenient location of the oars for the period when they will not be used. Fully inflate the boat with air and, placing the oars against the sides, determine the optimal place where they will not interfere with the placement of the transom and engine. Use a marker to mark the places where the latches should be to secure the oar (on both sides of the boat).
In the aft part we outline the places where the boat rails will be attached. To do this, we attach the transom to the boat and make marks in the places where the fasteners will be made.
When the marking is ready, you can proceed to the remaining stages of installation work:
- Attach the oar latches and rails to the marked areas and trace them with a marker to determine where to apply the glue.
- Completely bleed the boat.
- Treat the areas where the elements are glued with sandpaper to create a rough surface in order to improve adhesive properties.
- Apply the first layer of glue to the treated areas and elements that you will glue and leave to dry for the time indicated on the glue packaging (usually no more than 15 minutes). After this, apply a second layer of glue and leave for another 5 minutes.
- Apply the latches and rails to the sides and stern exactly according to the mark, press tightly, place under the press and leave until completely dry.
If the mounting points are chosen correctly, the transom will rest securely on the stern. Important! To speed up the gluing process, you can use a hair dryer with hot air. To do this, you need to connect the glued surfaces and expose them to hot air, while smoothing/sealing the connection. To complete the installation and install the transom, inflate the boat to half its total volume and insert the transom fasteners into the rails
After this, fill the boat completely with air.
To complete the installation and install the transom, inflate the boat to half its full capacity and insert the transom fasteners into the rails. After this, fill the boat completely with air.
How to make a hinged transom for a PVC boat?
To form the hinged element, you must use the following materials:
- A reliable plate, the size of which is 18-24 millimeters.
- The base is in the form of a metal section.
- Latch in the amount of 2 pieces.
- Fasteners in the amount of 4 pieces.
- Petrol.
- Practical adhesive with a plastic base.
Do-it-yourself PVC boat mounted transom
After purchasing all the necessary components, you should begin manufacturing the structure:
- Get the boat in working condition.
- Select an area to secure the oar latch.
- Mark the area with a waterproof pencil.
- Lower the ship.
- Use sandpaper to remove dirt from the marked areas.
- Treat with a degreaser (thinner or gasoline).
- Apply the adhesive to the prepared area using a brush.
- Wait 10-15 minutes.
- Repeat the procedure.
- Wait 5-7 minutes.
- Install the latch.
- Press down the area where the glue sticks with a heavy object.
After all the steps are completed, it is necessary to leave the structure for a day to dry completely.
Design
The transom consists of the following elements:
- Plate (square or rectangular plywood).
- Lugs, or eyelets.
- An arc, or bracket, with the help of which the structure is fastened.
During the installation of the structure, the bracket is fixed on the base of the plate, the ends of which are attached using bosses on the sides of the boat.
Materials for production
As a base, a material is used that complies with certain standards:
- Waterproof.
- It looks like thin and light plywood.
- Smooth surface that can protect from negative influences.
- The fastening arch is made of rolled material.
- The bosses are made using plastic.
Manufacturing
To make the transom you will need the following components:
- Drawing.
- The design of the motor mount should be as simple as possible.
- To begin with, you should use an engine whose power is minimal.
- The plate consists of plywood with a protective coating.
- The minimum thickness of plywood is 10 millimeters.
- Smooth plywood edge for boat film safety.
- Fixation of special loops that will connect the plate and the metal bracket.
- The main component of the fastening arch is rolled metal.
- The diameter of the fastening arc is 10-15 millimeters.
All necessary elements are fixed and installed on the vessel.
Transom height
The level of the element depends on the size of the base, which is determined by the volume of the vessel. The height of the transom should not interfere with fixing the motor.
Reinforcement of the hinged transom
The universal design consists of two brackets and four bosses. In order to strengthen the engine fixation, it is necessary to increase the number of fasteners and eyelets.
In this case, it is necessary to take into account the weight of the transom in order to avoid maximum load on the boat.
Installing a transom on a rubber boat
It is preferable to install a transom on a boat made of PVC material as follows:
- First of all, inflate the boat and, using glue, attach the eyelets. Moreover, it is very important that they are glued exactly in those places where they can be useful.
- The base of the eyelets is covered with adhesive, after which they are attached to the boat. The rest of the eyelets are attached in the same way. Depending on the size of the fastening arcs, the required number of these fastening elements is installed. When the glue is completely dry, the air should be bled from the boat and the mounting arcs should be connected to the plate.
- After this, the boat is filled with air again, but not completely, but half. The fastening arches are installed so that they can be secured using eyelets. Finally, the boat is fully inflated and the entire structure is held securely on the boat.
Transom height
The height of the transom, or in other words the size of the plate, depends on the height of the sides of the boat in the inflated position. The transom may be equal to the height of the sides or may be larger, or smaller, but not by much. The main condition is that the motor is securely and firmly held on the transom, and is also safe during operation.
Reinforcement of the hinged transom
The classic transom consists of two brackets and four eyes. If you need to strengthen the transom, you can increase the number of brackets, and therefore the number of eyelets. At the same time, we should not forget that additional fasteners increase the weight of the structure, which is an additional load on the boat, including the material from which the boat is made.
Manufacturing
As already mentioned, the board is made of plywood or plastic.
For this:
- a rectangle or rectangles of the required size are cut out;
- gluing is performed;
- after drying, the corners are processed - cleaned of chips and burrs, rubbed with sandpaper, and impregnated with water-repellent varnish;
- joints with arcs are marked, holes are drilled;
- additional processing of the internal surfaces of the holes is carried out - the holes are ground and impregnated with varnish;
- Final painting with varnish or paint is carried out and dried until completely dry.
The production of arcs is carried out as follows:
- cut to size of the workpiece;
- the arcs are welded together to obtain a rigid structure;
- plates with holes for fastening bolts or rivets are welded;
- ends are processed, welding seams are processed, metal is cleaned for painting;
- priming and final painting are carried out.
Read Tackle for catching pike perch and preparing equipment for fishing
Advice: it is recommended to prime the metal frame with red lead and paint with hammer enamel.
Gluing of rails or eyelets is carried out at pre-marked places in accordance with the technology for repairing PVC boats:
- the attachment points on the boat are marked;
- the surfaces to be bonded are degreased;
- a small layer of glue is applied to both surfaces, and after a short drying time, the glued surfaces are pressed against each other;
- the resulting compound is placed under a press and kept until completely dry.
How to strengthen the transom yourself
A classic hinged transom implies the presence of two brackets and 4 eyes. A strengthened version is an increase in the number of these elements.
It is important to remember that any additional part on the hull of the watercraft increases its weight and the load on the PVC material. Attention! Reinforcement is carried out in order to safely use the engine at full power, so that the engine does not wrap under the vessel and the cylinders do not bend
A budget solution is the installation of additional guy wires made from stainless steel rods. Rails are glued to the sides, and metal guy wires are inserted into their holes. The option of fastening guy wires to the bottom or can of the vessel is allowed.
How to make a transom with your own hands
Knowing what a transom is and what criteria it must meet, you can begin manufacturing. The design of the device will depend on the chosen method of mounting the device. If the watercraft is equipped with fastening elements, then only the suspended transom needs to be made, otherwise fastening elements (bosses) will have to be installed. You can buy them in the store and glue them to the feed cylinder.
With this fastening method, the load from the engine will be transferred pointwise, and a lot of stress will arise in the gluing areas, which can lead to damage. Therefore, some fishermen prefer to attach the device to the elements of the boat’s hull.
Drawings and tools
Before starting work, you need to calculate the weight and strength characteristics of the device and draw up a drawing of the board and a diagram of fastening to the watercraft. To make a transom you will need:
- a set of locksmith tools;
- welding machine;
- Bulgarian;
- electric drill;
- wood saw or jigsaw.
If you do not have or do not know how to use a welding machine, you should contact a specialist. The list of tools may vary depending on the chosen design and method of fastening the product.
Materials
A homemade transom for a rubber boat is made from multi-layer waterproof laminated plywood, metal or durable plastic (getinax, textolite, etc.). You can also use a wooden board, but it must be treated with antifungal impregnation and painted with at least 3 layers of yacht enamel or varnish.
Manufacturing instructions
The size of the manufactured device depends on the model of the boat and the power of the outboard motor. For a homemade transom, you should not choose a complex design. In some cases, a simple device turns out to be much more reliable than a complex one.
Work order:
- Making a plate. Material that is resistant to water is suitable. The thickness of the plywood must be at least 18 mm, and the thickness of the steel sheet - 3-4 mm. The shape and size of the transom board depend on the engine power. At the mounting location, under the motor, an additional block is installed to improve the fixation of the equipment.
- Manufacturing of fastenings. It is best to use steel tubes with a diameter of 6-10 mm. The fastening arcs are bent manually, and the transverse reinforcing tube is welded by electric welding. This method of installing the transom is used when there are bosses.
- Fastening the transom board. This element must have holes for attaching bolts to the amplifiers or to the mounting arches.
The entire kit is assembled immediately before the craft is launched into the water.
External transom, do it yourself, for PLM 20-50 horsepower.
Moderator: Valery
External transom, do it yourself, for PLM 20-50 horsepower.
I made a drawing of an external transom for Slava from Berlin. For a motor of 20-50 horsepower (up to 80kg), leg length L-508mm. It is necessary to decide on the amount of inclination of the stern of boats with an angular column, sizes 6-8m. On my Bowliner 245, this is about 12 -14 degrees, I measured it from a photo, side view, in Photoshop, when I made my transom
There is no way to find out this information from the boat manufacturer.
What is the typical stern angle for these boats?
I am attaching a drawing and a photo, if anyone adds or corrects anything, I will be grateful, well, the drawing itself may be useful to others.
I have selected similar topics for you, take a look:
Re: Remote transom, do-it-yourself, for PLM 20-50 horsepower.
Post by Savage » 04/17/2014 11:50
Re: Remote transom, do-it-yourself, for PLM 20-50 horsepower.
In my opinion, the correct trim/inner (in the photo) is for engines of 150-250 horsepower.
But for Slava, there is no point in strengthening the inside, the feed is as much as 10 cm thick, and the motor is small and relatively light.
Re: Remote transom, do-it-yourself, for PLM 20-50 horsepower.
Post by GALL » 04/17/2014 12:35
Re: Remote transom, do-it-yourself, for PLM 20-50 horsepower.
Real bakelite plywood is very expensive, who knows where you can buy it, in Moscow you can buy narrow strips of plywood in an aircraft modeling store. And Bakelized plywood is called plywood that has been glued and impregnated with phenol-formaldehyde (bakelite) varnish. For the transom of a PVC boat, or for a boat that is stored on the shore, it will do. Don't stay in the water all the time. Slava keeps the boat on the water and the platform is always 2/3 immersed in water (during the season)
And it’s so simple and cheap: buy in any building materials store, one step for a staircase made of larch, cut it to length with a hacksaw and the platform is ready, and the thickness is immediately good 40mm, and the price is 950 rubles.
Transom installation
After the fastenings have completely dried, it is better to lower the boat completely. In this position, the arc is connected to the plate. Next, the boat is inflated approximately halfway, and the ends of the arc are inserted into the holes of the four fasteners. The boat is inflated to the required size, which ensures the final fastening of the transom.
It is important to note that the height of the transom should be approximately equal to the height of the boat in the inflated position. This maneuver will allow you to correctly and conveniently attach the motor to the hull of the vessel.
This maneuver will allow you to correctly and conveniently attach the motor to the hull of the vessel.
Transom and motor power
When undertaking the installation of such a device, you need to remember that it is better not to overload vessels that are not adapted to high speed.
When choosing an engine, you need to know that:
- maximum engine power should be no more than 3.5 horsepower;
- accordingly, the highest speed of the vessel is 10 km per hour;
- the weight of the motor must correspond to the capabilities of the vessel;
- The boat must always be maximally inflated, otherwise the engine will change the angle of inclination. And this is a significant obstacle and hindrance to safe movement on water transport;
- the more powerful the motor, the more pressure it exerts on the stern of the boat;
- The transom of the reinforced structure has quite a lot of weight, which significantly increases the load both on the boat itself and on the fastenings.
Not all motors can be mounted on the transom. It is necessary that the motor power does not exceed 3.5 hp, and the weight is 15 kg.
What material and fastening method to choose is up to each fisherman to decide for himself based on his financial capabilities and skills. The main thing is that after attaching the transom to the boat, movement on it remains comfortable and safe for passengers.
Hinged Transom Mount
To do this, you need to know how to attach a hinged transom to a boat:
- with special brackets for the cylinder at the stern. The fastenings are installed while the boat is not inflated; only after installing the transom are the cylinders inflated and the transom held firmly. As the pressure in the cylinder decreases, the transom mount loses its rigidity;
- with reinforced PVC tapes provided for this purpose. Fastening is carried out through the holes available in them (popular with boat manufacturers);
- in special plastic mounts glued to the stern (simple and reliable, deservedly popular among manufacturers).