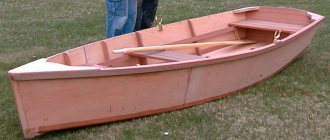
How to anchor a boat
Incorrect placement of an inflatable boat can ruin the entire fishing trip, and instead of active recreation, you can end up in a bad mood and disappointment with the fishing process. If you anchor incorrectly, you may end up with a real “bump,” which will throw a light boat in different directions, depending on the direction of the waves and gusts of wind. To avoid such troubles and ensure that the process of fishing from a boat brings only pleasure, it is necessary to anchor the boat correctly.
Putting the boat on guy ropes is quite simple. In order for the boat to stand in any acceptable wave and wind, it is necessary to select the right loads, not too heavy and not too light. For example, for a common inflatable PVC boat about 3 meters long, with a side height of about 40 cm, loads from 12 to 15 kg are suitable. If the bottom is muddy, then the load can be reduced by 10-20%, but on a sandy bottom with a strong wind, such a load can pull off. To install the boat, you must have two identical weights.
Anchor ropes need to be long, with minimal stretch, made of synthetic material that does not rot or deteriorate in water from a long stay. With the help of which it is easy to pull cargo from the side of the boat. At a depth of 7-10 meters, the first load requires approximately 25-30 meters of rope, the second load is half as much, that is, 12-15 meters. When placing the boat in deeper places, you will have to proportionally increase the length of the rope. From my own experience, I can say the following: the further the boat is from the anchor, and the greater the angle of inclination of the rope to the bottom of the lake, the more securely the boat will stand even in large waves and strong winds. The anchors will firmly dig into the bottom and prevent the boat from moving. To anchor your boat in good weather, simply follow standard anchoring guidelines.
Installation on guy wires
The method of securing a boat to guy ropes is to construct a geometric trapezoidal figure. In this case, the boat is parallel to the bottom, and the ropes go to the loads. The ropes from the boat are stretched and arranged in a line, the boat does not turn around, and the incoming load on the cargo is distributed evenly when a wave or wind hits the side of the boat. And even if the boat is hit by strong enough shock waves, the load will still be the same on both weights, and it becomes very difficult to pull it off the weights.
To set the boat up, you need to determine the direction of the wind, or even better, look at the weather forecast in advance, check the speed and direction of the wind during the time allotted for fishing. Quite often, in the morning there may be one wind direction, and in the afternoon or evening another. With this information, it will be much easier to navigate around, and much easier to figure out how to properly anchor the boat in the direction of the wind.
After arriving at the fishing spot, you need to complete a number of steps to install and stretch the inflatable boat:
- Set the boat perpendicular to the wind and sail from the desired fishing spot at a distance of 5-6 meters (depending on the depth) and drop the first load with a long rope to the bottom.
- Next, float the boat perpendicular to the wind, using the entire remaining rope and pull it, tug the rope a little 2-3 times so that the load silts up and holds well to the bottom. The wind should also hit the side.
- Drop the second load so that the first rope is not tight, but with some slack.
- Now, taking hold of the first long rope, pull the boat, which will begin to move backward. As soon as you realize that the boat has stalled, attach a long cord to the boat.
You need to fish from the back side of the board in the stern part in the direction of the wind. The wind should blow to the side and to the back, and the load will be distributed equally to both ropes and weights at the same time. This design allows the boat to stand in a stretch and be securely anchored. With this setup, both weights will be at the same distance from the boat and will not interfere with fishing from the side.
If algae protruding to the surface grows abundantly at the place where the boat is placed, long ropes are not necessary. It is enough to lower them vertically down. The algae will become entangled in the ropes of the load and will not allow it to move even in strong winds.
TEST METHODS
4.1. The dimensions of anchors should be checked by comparing them with the drawings. The check should be carried out using measuring instruments that provide the accuracy required by the technical documentation.
4.2. Material grades must be confirmed by relevant documents.
4.3. Appearance, quality of coating and markings should be checked visually.
4.4. The weight of anchors should be checked by weighing with an error of no more than 1%.
4.5. Testing castings of claws and spindles of anchors weighing 75 kg or more should be carried out by dropping them onto a steel plate with dimensions of at least 100x1300x1300 mm, laid on compacted soil at a casting temperature of at least 0°C; castings of claws and spindles are dropped from a height of 4.5 m from the bottom edge parts, and for anchors weighing 750 kg or more - from a height of 4 m. The arm of the anchor should be dropped onto the plate with the heel, and the spindle should be in a horizontal position.
Then the legs and spindles are suspended and tapped with a hammer weighing at least 3 kg in order to identify cracks and voids, and a clear metallic sound should be obtained. Otherwise, the test must be repeated, the result of the repeated test being considered final.
4.6. When testing anchors for strength, test load P
should be applied on one side to the standard anchor shackle, and on the other to the jointly secured anchor arms, as indicated in Figure 10.
Damn.10
The anchor must be tested with two positions of the legs: turned in one direction from the spindle and in the other.
4.7. The test load must correspond to that specified in Table 10.
4.8. Before applying the test load, control points must be marked on the anchor spindle at the bracket and on the toe of the paw using a center punch.
When testing, the anchor must be pre-loaded for 5 minutes with a load equal to 50% of the test load; then the load is reduced to 10% of the test load and the distance between the control points is measured.
Table 10
| Anchor weight, kg | Test load, kN (gs)* |
| 5 | 2,9 (0,3) |
| 10 | 5,9 (0,6) |
| 15 | 8,8 (0,9) |
| 25 | 14,7 (1,5) |
| 35 | 20,6 (2,1) |
| 50 | 29,4 (3,0) |
| 75 | 35,3 (3,6) |
| 100 | 41,2 (4,2) |
| 125 | 46,1 (4,7) |
| 150 | 52,0 (5,3) |
| 200 | 63,8 (6,5) |
| 250 | 75,5 (7,7) |
| 300 | 87,4 (8,9) |
| 400 | 110,8 (11,3) |
| 500 | 134,4 (13,7) |
| 750 | 193,2 (19,7) |
| 1000 | 240,3 (24,5) |
| 1250 | 299,2 (30,5) |
| 1500 | 358,0 (36,5) |
________________
* The text of the document corresponds to the original. — Note from the database manufacturer.
After this, the load on the anchor is brought to a test load and maintained for 5 minutes; then the load is reduced to 10% of the test load and the distance between the control points is measured again. The increase in the distance between test points after testing should not exceed 0.5% of the original measurement.
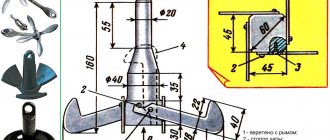
Homemade anchor for boats made of PVC and rubber
In 1985, he purchased his first two-seater inflatable boat. At first I used it only on the nearest lake - I caught pike and crucian carp. When I bought a motorcycle, I began to travel to the Ob River often. Back then, everyone was basically catching fish using pull-ups and rings on the river. But for this we needed an anchor. Somehow, a welded one made from reinforcement was not suitable for an inflatable boat and we had to come up with a compact design so that it would hold the boat in the current and would not take up much space. It was difficult to place all this equipment on a Java motorcycle alone. In the end, I decided to make an anchor for a PVC boat with my own hands.
Assembled:
In working order:
I’ll tell you how to do this, and how I personally came to this. Then everything was made from scrap materials; there was no shortage of metal and machines.
After suffering a little, I was able to make an anchor for a PVC boat with my own hands without drawings or photos. The manufacturing technology is simple if you have a lathe.
A blank about 30 cm long is cut out of 40-50 mm round timber on a machine, holes for bolts are drilled at the ends, and threads are cut. Next, take a suitable strip of metal 5-6 cm wide and cut two pieces of 25 cm each. We grind the ends as in the photo. We put them together and drill a hole in the middle for the bolt.
We screw a bolt onto the blank onto the paint after the strip of metal - a nut that will clamp the strips and weld a loop to the end. On the other side, I have a hinge welded, but you can screw in a bolt tightly with a hole or a ready-made one with a ring head, which greatly simplifies the design.
The result was a small but catchy homemade PVC boat anchor. It holds the two-seater in any current and depth, it holds any soil, due to its wide lugs. It is not subject to snags due to the fastening of the anchor rope - it clings to the bottom of the anchor, and the upper loop holds the rope with a small piece of aluminum wire. When hooked, it is enough to pull the halyard firmly - the wire unwinds, and the anchor turns over and is released. I have been using this anchor on the Ob for more than 20 years, and the fact that I still have it speaks volumes.
I don’t have a drawing of the anchor, but I have photos of it from different angles. I'll tell you a little about its performance characteristics. The weight of the anchor is only 2.5 kg, length is 30 cm. If you use a bolt with a ring head in the lower part, it will be completely dismountable and take up even less space. And an addition to it was made by a frame for the halyard. When you choose a rope, there is always water in the boat from it, sometimes it gets tangled. It is much easier to release the anchor from the frame and when retrieving, the halyard is wound around the frame and does not get tangled under your feet. It's a small thing, but it's convenient.
PS They made a similar design for my friend’s “Crimea” - he kept it everywhere.
He also used it for many years. Therefore, we can safely say that such an anchor is suitable not only for inflatable boats made of PVC and rubber, but also for “pans”.
Types of anchors
This device was invented many years ago, and during its existence people have come up with thousands of possible variations on how to build an anchor. But not all of the invented designs are popular.
In the world, only a small part of them have become used. There are these types of anchors:
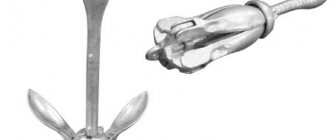
Cat. Is a frequently used option. Great for inflatable boats. The design resembles tee hooks.
Pyramidal. We also use it quite widely on inflatable boats. You can easily build it at home with your own hands. The advantage is that weight can be controlled.Folding. Convenient to transport, which is good for PVC water transport.
Mushroom-shaped. These can be said to be separate models of anchors. They are the easiest to make, because they represent the most common load (stone, bottle of concrete, etc.) to which a rope is attached.
Read here - DIY winter tent: construction, arrangement, insulation and placement rules. 120 photos of the best models for making your own
One of the disadvantages is the lack of engagement. The structure does not sink into the ground and in the event of a strong current, the boat will simply slowly move from its place.
Dunford anchor. Quite a heavy design, but has very good gripping properties. The rod is located at the bottom of the device itself, which prevents the anchor from turning over in the water.
It performs well in areas with pebble bottoms. Before the invention, you need to draw drawings of a Dunford anchor for a boat, and then get to work.Check it out here too!
How to make a fishing screen: description and step-by-step instructionsFishing knots diagrams: the best fishing knots for all occasions
How to make a fishing hook at home: master class with photos
There are some other options, but they are mainly installed on boats with a displacement weight of more than 500 kg.
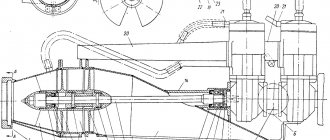
Drawing of a homemade boat anchor
Dear fishermen, for easier and more convenient work with this idea, we suggest using this simple drawing - a diagram on which all the parts of a homemade anchor are numbered and, most importantly, their parameters are labeled.
As you already understand, the main difficulty in creating this homemade product is working on a lathe, since without it creating this anchor is difficult. But if you have one, then we really hope that our mini-drawing of an anchor and photographs of the author of the article will only help you.
What are they and what are they for?
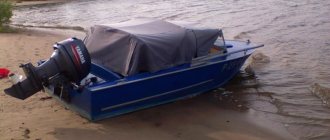
Carrying a two- or three-seater rubber boat in an inflated state is quite easy - a man of average build can easily carry it several tens of meters, separating the car and the shore of a river or lake.
It is much more difficult to do this if the cockpit is filled with fishing gear and equipment, and an outboard motor is already attached to the transom. What to do?
Should I remove the motor and carry all the equipment separately if I need to cross a small sandbank where there is a danger of damaging the bottom of the boat? This is extremely difficult to do.
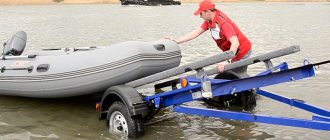
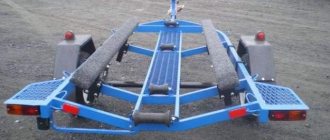
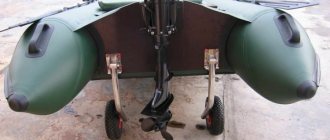
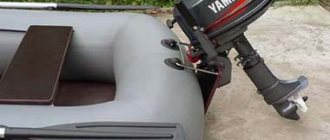
This is why many fishermen use special transom wheels. They allow you to transport even a heavily loaded inflatable boat with minimal effort.
Today you can find various wheels on sale.
First of all, they differ in size and width. Experienced fishermen advise choosing wide, medium-sized wheels. Thanks to them, you can easily cross both areas with dense soil and sandy beaches - the wide wheels will not get bogged down.
It is important that both the wheels and mounts are made of materials that are not afraid of moisture. After all, they will be in the water most of the time.
DIY making
How to make an anchor for a rubber boat? Every fisherman asks this question after purchasing his first boat. Let's consider the manufacturing technology of two types: “cat” and Kurbatov.
Kurbatova
The product is compact, so you should choose heavier and denser grades of steel and cast iron.
You will need the following materials:
steel wire with a diameter of 7-10 millimeters;
stainless steel sheet three millimeters thick;
steel rod with a central part diameter of 13-15 millimeters.
A welding machine is also needed to connect the parts of the structure together.
Where can I buy?
Many boat owners prefer to buy removable wheels for their boat, thereby saving their time and effort. Moreover, this is extremely easy to do - they are sold in almost any store specializing in the sale of boats, motors and related accessories.
But some, looking at the prices, wonder – is it worth buying them at all? Oddly enough, with maximum simplicity of design and the use of fairly cheap materials (stainless steel and polyurethane are very inexpensive), the price of wheels is set quite high - on average from 4 to 10 thousand rubles, depending on the model and store.
People are simply surprised that the cost of wheels is approximately the same as the cost of their inflatable boats. As a result, many people find their way out of the situation - they decide to make wheels with their own hands.
Kurbatov system and pyramidal anchor
The Kurbatov system is a device that works perfectly on two-seater boats with low currents and wind strengths of up to 6 m/s. The design is a forked clamp made of strong wire and one paw with an inclination of 45º. The extended rod ensures the penetration of the paw into the soil bottom, regardless of the angle of incidence. This product is compact and light weight. For manufacturing you will need the following materials:
- steel wire with a diameter of 7-8 mm;
- steel sheet 3 mm thick;
- steel rod with a diameter of 13-15 mm.
Having drawings and a welding machine, it is not difficult to make such a structure with your own hands:
- the wire is bent into the shape of a spindle, to the top of which a bar is welded;
- washers and a bar for fixing the paw in the open position are welded to the rod;
- a strip of metal is welded to the ends of the spindle, connecting them together.
Kurbatov’s system is perfect for PVC boats up to 5 m long. Its weight is 2-3 kg, so when fishing in bodies of water with a noticeable current, you should consider the possibility of attaching an additional load weighing 4-5 kg. It is advisable to make tarpaulin covers for the weighting material and the anchor itself, so as not to damage the material of the rubber boat.
We collect the necessary material and tools
So, have you decided to make the wheels that will be installed on the hinged transom yourself? Quite commendable. Thus, you can save not only several thousand rubles, but also make wheels with mounts exactly what you need - length, width and wheel size.
All you need to get the job done is:
- A pair of wheels with a diameter of about 35-35 centimeters and a width of 60-80 millimeters;
- Square profile with a cross section of 25x25 millimeters;
- Tube of diameter suitable for wheel mounting;
- Set of bolts, washers, nuts, cotter pins.
Of course, both the profile and fasteners must be made of stainless steel. You will have to overpay a little, but the wheels will last for many years, not just one season. In addition, you will need a hacksaw, an electric drill, and pliers or wrenches.
It will also not be possible without the help of a welder - but the work here is only for a few minutes, so you will have to pay at most a hundred rubles. The total cost of materials is unlikely to exceed 1-1.5 thousand rubles.
Proper use of an anchor
It’s not enough to choose an anchor correctly – you also need to know how to use it. For example, when using a grapple anchor, professionals recommend tying such anchors to the lower part of the loop, and not to the usual upper part. In this case, if you get caught on a snag or stone, you can break off the upper fastening and release the anchor.
The most competent positioning of the boat is with the flow. To do this, you should go a little higher than the parking lot and lower the anchor. The release of the anchor cable depends on the strength of the current and the size of the anchor (usually from 3 to 8 meters). In strong currents, it is recommended to install the boat on two anchors: one at the stern, the other at the bow. Here we first lower the anchor from the bow, and then - after the current has leveled the boat - we install a second anchor from the stern. You can also place the boat on two anchors, lowering them from both sides.
Let's work with our hands a little
When all the materials have been collected, you can start working - the instructions are relatively simple.
First of all, we will determine the place where the wheel profile will be attached to the hinged transom. We remember that in no case should they interfere with the motor, even if the fasteners become loose and the fasteners dangle freely. Otherwise, you can say goodbye to the screw.
Putting the wheels in place
Attaching wheels to the transom is a much more complex process than it might seem at first glance. So, you should approach this stage seriously. This is why this instruction was written.
First of all, you need to attach the wheel mounts to the wooden transom. Make marks along the holes located at the top of the fasteners. Using a drill, drill holes of the desired diameter in the transom.
After this, take a small textolite, duralumin or aluminum sheet (the size of 2 matchboxes) and make exactly the same holes in it.
Place the resulting perforated sheet on the inside of the transom and thread the bolts through the holes in it and the wood - the cap should be located on the side of the boat.
This metal sheet will allow you to evenly distribute the load over a large area. And the location of the bolts with their heads facing inward ensures that the rubber side of the boat will not be damaged by a sharp protrusion.
Place washers of the appropriate size on the protruding bolts. All that remains is to place the wheels with the holes on these bolts and secure with a nut and another washer.
Of course, do not forget to make sure that the wheels are under the transom (if you are using an angled wheel mounting system).
Repeat the procedure with the second wheel. The work is completed. You can safely install a hinged transom on your rubber boat and comfortably roll it to the shore - over stones, sand and mud.
Danforth anchor
The Danforth anchor is an invention of the American R. Danforth, which has excellent holding power. The main difference from other products is the elongated lower crossbar, which prevents the product from tipping over when it comes into contact with the bottom. The flat feet of the device are triangular in shape and located close to each other, which provides additional stability in the working position. The main advantage of the Danforth anchor is also its disadvantage - in some cases it buries itself so deeply into the bottom that it is extremely difficult or impossible to pull it out.
The homemade product will require the following materials:
- steel tube with a diameter of 30 mm and a length of 600 mm;
- sheet steel 3-4 mm thick;
- 2 M5 nuts;
- 3 M8 nuts;
- bolt 8 x 60;
- 2 washers D8;
- 2 bolts 5 x 35;
- eye nut and bolt for it;
- metal ring.
Two triangular legs with beveled corners are cut out of sheet steel using a stencil. The steel tube is cut into two parts - 400 mm and 200 mm. In a shorter section, 2 cuts are made, suitable in size for the paws. A section 34 mm long and slightly more than half the diameter of the tube is cut out in the center. 5 holes are drilled - 1 for the ring nut in the center of the workpiece, 4 for mounting the paws (2 on each side). The paws are inserted into the slots and drilled coaxially with the holes in the tube.
Danforth anchor - an invention of the American R. Danforth, which has excellent holding power
On the second section, holes for the ring are drilled on one side, and oblique cuts are made on the other side in such a way as to ensure rotation of a relatively short (200 mm) piece of tube. Holes for an M8 bolt are drilled in the remaining ears.
The assembly diagram looks like this:
- A ring nut is screwed to a short section; a rope will be attached to it to remove the device from the ground.
- A bolt, washer and nut are connected - this is a blank for the axis of rotation.
- A longer piece of tube is inserted into a shorter one, and the rotation axis is threaded through the holes on it and secured with a nut. The washer is then applied and the axle is finally tightened with another nut.
- The paws are mounted using bolts, and to eliminate play, wooden plugs are driven into the ends of the tube.
- A ring for the main anchor rope is inserted into the upper end of the long tube.
If the device requires weighting, then lead is poured into the hollow tube. Among the minuses, one property of the anchor can be highlighted - it is poorly suited for a bottom strewn with pebbles.
Let's sum it up
As you can see, making transom wheels is not difficult.
Any person with at least a minimum of skills in working with tools, wood and iron can easily cope with all the work in a matter of hours. Moreover, as a result, the price of new wheels will be at least 2-3 times lower than those purchased in a specialized store.
Perhaps some people found the instructions quite complicated. In fact, everything is much more complicated than it seems at first glance. So, you just need to get started and you won’t notice how time flies.
Well, after completion, you can rightfully boast to your friends about your skills in manufacturing and installing transom wheels.
ACCEPTANCE
3.1. Anchors are accepted in batches or individually. Anchors of the same standard size are accepted per batch, but not less than 5 pieces.
3.2. To verify compliance of anchors with the requirements of this standard, the manufacturer must carry out operational control and acceptance tests.
3.3. During operational control, all anchor parts are checked for compliance with the requirements of paragraphs. 2.3 - 2.7, 2.9.
Cast arms and spindles of anchors are additionally subjected to a throwing test.
3.4. Each anchor (in case of piece production) or 5% of the anchors from the batch, but not less than 2 pieces that have passed operational control, must be subjected to acceptance tests.
During acceptance tests, the anchors are checked:
for compliance with the requirements of paragraphs. 1.2 (weight, dimensions A
1,
B
,
H
,
L
and paw rotation angle); 2.1; 2.8; 2.9 (regarding electrodes); 2.10;
for strength by test load:
cast - 5% of the lot, but not less than 2 pieces;
welded - 100%.
After the strength test, a test load is used to check the rotation of the paws through a full angle in both directions.
3.5. If during acceptance tests anchors are found that do not meet the requirements of this standard, the entire batch is returned for sorting and measures to eliminate defects.
If it is impossible (inexpedient) to eliminate defects, the armatures are finally rejected and isolated from suitable ones.
After eliminating the defects, repeat tests are carried out on a doubled number of anchors.
The results of repeated tests are considered final.
(Changed edition, Amendment No. 4).
3.6. The anchor is considered accepted after the acceptance stamp is applied.