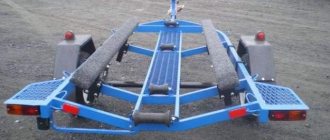
This is a fascinating process and only those fishermen who are in constant creative search can do it. In addition, building a boat is a factor of self-affirmation. But if you look at the process seriously, then there is nothing complicated.
DIY boat made of plywood
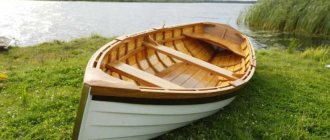
A small watercraft that can carry 2-3 anglers on board and is not heavy in weight can easily be made from plywood, as one of the most affordable building materials. Moreover, the boat can move both with the help of oars and with the help of a boat motor or sail. This does not require special professional training, which is quite feasible even for beginners.
Plywood is a strong enough material to build a small boat, not to mention expensive yachts, where plywood is also widely used in their manufacture. In addition, it is easy to process using electrical or manual tools.
In addition, if you install a motor on such a boat, it can develop a respectable speed with good performance characteristics. In addition, a plywood boat is much more reliable than an inflatable boat.
Building a boat in 2 weeks.
Materials and tools
Firstly, you will have to select an appropriately sized room where the boat could freely fit. It is advisable that the room be heated, since all work can take place in winter. In the summer, it’s unlikely that anyone will start building a boat: in the summer you already need to sail on it. Moreover, the room must be ventilated, with the ability to maintain optimal temperature conditions. Since you will have to work with wood, the humidity must be optimal.
To draw a diagram, you need to have:
- drawing supplies;
- pencils;
- elastic bands;
- patterns;
- rulers and triangles;
- line;
- cardboard and drawing paper;
- paper glue;
- calculator.
At the construction stage you will need:
- jigsaw;
- hammer;
- axe;
- clamps (up to 10 pieces, no less);
- brushes, spatulas (metal and rubber);
- screwdriver;
- electric and manual plane;
- screwdrivers;
- chisels;
- stapler;
- circular and hand saw.
Materials for manufacturing can be:
- plywood (sheet 1.5x1.5 meters), thickness 4-5 mm;
- pine or oak boards;
- fiberglass for covering the boat hull;
- putty for filling cracks;
- waterproof glue;
- drying oil or water-repellent impregnation for wood;
- oil paint or waterproof enamel;
- nails, screws, self-tapping screws;
- metal strip, metal for various fasteners.
What is the boat made of?
The boat consists of a key element - the keel, which serves as the base and to which other elements of the boat are attached. The bow of the boat is called the stem and on the reverse side is the sternpost. With the help of these components, the boat is given longitudinal rigidity. Such structural parts can be made from a single piece of wood or individual components connected by gluing, as well as nailed or twisted with screws.
The shape of the hull is determined by the presence of transverse load-bearing elements called frames. The planks connected to the frames, stem and stern post form the sides of the boat.
If you cover this frame with plywood, you will get a boat. A deck is laid inside the boat - a slant, which is the lower deck to protect the bottom of the boat.
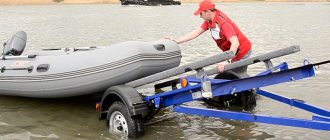
Plywood boats for motors
Motor boats are not particularly different in their design considerations compared to boats designed to be propelled by oars or sail. The only difference is in the organization of the place for mounting the engine. As a rule, a transom board is attached to the stern, where the outboard motor is installed.
Certain designs of small vessels are equipped with other elements, such as a cockpit, deck stringers, side stringers, etc. To improve stability and unsinkability, special gaps are provided in the watercraft, which are filled with polyurethane foam. This approach eliminates the possibility of flooding the boat if it capsizes.
Working drawings of the boat
All work on building a boat begins with drawings, which must be drawn up professionally. If this is not possible, then you can turn to the Internet for help, where you can find ready-made drawings. The main thing is that they correspond to the basic imaginations. But even here you need to be careful not to miss the main stages of assembling the boat and making additional components.
As a rule, most drawings are drawn on graph paper. This will make it possible to calculate in detail all the structural components.
A large sketch of the drawing can be drawn using the following algorithm:
- A line is drawn that conditionally divides the boat into two parts. This takes into account the fact that the two parts, left and right, must be symmetrical and absolutely identical.
- The drawn line is divided into several equal segments. Subsequently, frames will be installed in these areas.
- Both a vertical display and a top projection are drawn.
- The shapes of the frames are drawn using the transverse marks.
- The main dimensions of all components are checked to scale.
- The shape of the frames is drawn on a scale of 1:1 on cardboard or thick paper.
- Flexible lines of the boat shape are drawn using a ruler or pattern.
The resulting drawing is folded along the drawn line to check for symmetry. Both parts must flawlessly repeat each other.
How to make a boat?
In projects of cartop dinghy and skiff boats, patterns of their parts are often given. In this case, the boat is assembled by sewing (stitching) on keel blocks or trestles, see fig. The dry-sewn body is aligned along the contours using templates and temporary mounting spacers. The seams of the sheets, being the most durable, are placed closer to the nose, as it is the most loaded and susceptible to damage.
Assembling a plywood boat by stitching on keel blocks. K. p.136
We are building
The construction of a sharp-chine boat of greater than sewn capacity with single-curvature contours begins with the manufacture of the stem (see below) and the assembly of frame frames. The frames of sewn boats are often simply cut out of plywood (there are only 2-3 of them), but in this case it is uneconomical - too much of the rather expensive material will go to waste. The frames are assembled on the plaza, i.e. on a flat plane onto which the projections of the theoretical drawing on a scale of 1:1 are transferred. If the contours of the boat are simple and there is little space, only the hull projection can be transferred to the plaza. Methods for assembling frame frames, as strength, complexity and weight increase, are given in Fig. The grooves for the keel and stringers are selected in advance.
Assembly of frame frames. K. p.126
Next, the frame frames are placed on the frame (item a in the next figure), aligned vertically, along the contours, and the keel beam, stem (see below), fender beam and stringers are attached. After this, the body set is closed with a flat strip (pos. b). The purpose of the malkovka is, firstly, to create cuts in the keel beam, along which it will be planed to a given deadrise; secondly, check whether a section of double curvature has been tucked in somewhere, etc. trim the bottom edges of the floortimbers. Then the skin is applied, starting from the keel (below in the figure). After this, the body is removed from the frame, completed and equipped.
Assembly and assembly of a boat hull kit on a frame. K. pp. 129, 130, 144
Forteven is the most loaded and important part of the hull set. One of the immutable rules of navigation safety says: if danger cannot be avoided, it must be taken on board. Therefore, the manufacture of a boat stem should be taken with full responsibility.
Boat stem structures. K. p.146-148
The designs of boat stems are shown in Fig. Waterstop plugs made of solid, non-rotting wood prevent water from seeping into the housing. In terms of reliability, all these designs are approximately the same. A stem with a false bow is used in cartop boats with a narrow stem.
In rough seas and when hitting obstacles, the stem experiences large dynamic loads that tend to push the hull apart, so it is reinforced with a bridge insert. Amateur shipbuilders often neglect it or do not even know what it is; This is one of the significant reasons that homemade boats last much less than the terms stated in the projects.
The design of the transom of a boat with an outboard motor. K. p.151
Stern
Another rather important part of the set, especially for a boat designed for a motor, is the transom. Transom design for motors up to 10-12 hp. is given in Fig. on right. The total thickness of the transom, with reinforcement, is from 40 mm. Perhaps more: the mounting clamps on some outboard motors do not converge by less than 50-60 mm.
Unsinkability
A radical way to avoid the serious consequences of accidents on the water is an unsinkable boat. It is quite easy to make an undecked vessel with a displacement of up to 0.5 tons unsinkable: foam blocks are glued under the cans and along the sides from the inside; then, in the bow and stern, you can fence off the corresponding. forepeak and afterpeak and fill them with foam. Volume of unsinkable blocks in cubic meters. m is calculated by the formula V=1.2W(1+?), where W is the displacement in tons, 1 is the density of fresh water, ? – mass density of foam plastic. For example, if ?=0.08 tf/cubic. m, then for a boat with a displacement of 0.25 tons you will need 0.324 cubic meters. m or 324 cu.m. dm foam plastic. It seems like a lot, but in a dinghy boat 3 m long, such a quantity can be accommodated without any noticeable deterioration in habitability.
Transferring a design to a wooden piece
After once again checking the drawings for correctness, they are transferred to cardboard. Thick and rigid paper will make it easier to transfer the drawings to the workpieces. The drawing is transferred to the workpiece, taking into account all the contours and contours exactly as it was drawn, without all kinds of overlaps, reductions and increases in size.
When copying designs, take into account the direction of the wood grain. In this case, it all depends on the design of the boat elements. If the element is made of plywood, then the layers of plywood themselves are arranged in such a way that the fibers of each subsequent layer are perpendicular to the previous layer.
As for making futoxas, they can be made larger in height, since they can then be trimmed.
Plywood
The most common material for making boats today is, of course, carbon fiber. But this material is the domain of industry. When it comes to independent creativity, such “folk” material as plywood comes to the fore.
Plywood, or in other words, wood-laminated board, is a building material created by gluing together specially produced veneer. Usually the number of veneer layers is odd and, in any case, more than 3. To increase the strength of plywood, each subsequent layer of veneer with its wood fibers is perpendicular to the fibers of the previous layer.
Frames are the basis of any floating craft. Drawings of plywood boats that claim to be something more than the title of punt must have a separate option - the location of the frames
Characteristics of plywood
When choosing plywood for boat construction, it is very important to choose the right type.
Based on the arrangement of wood fibers on the outer layers, plywood is distinguished:
- Longitudinal, when the fibers are directed along the long side, and,
- Transverse - along the short one.
To build a boat, it is better to choose a longitudinal one.
Of course, such an isometric drawing is also possible, but this is the simplest option for the “free plywood boat drawings” section - there are no frames, and the work is in many ways similar to assembling a children's construction set, except that the parts are tens of times larger
By purpose, plywood is divided into:
- construction,
- industrial,
- packaging,
- furniture, and
- structural – this is exactly what we choose for our purposes.
There is a classification of plywood in relation to the effects of moisture, which is fundamentally important for a boat:
- FBA - this type of plywood is considered the most environmentally friendly, but it is not worth choosing, it does not meet stringent requirements for moisture resistance;
- FC – this is the designation for plywood that is sufficiently resistant to moisture;
- FSF - and so, with increased moisture resistance;
- FB – impregnated with bakelite varnish, such plywood is considered the most resistant and can be used even in aggressive environments, which is important in our case, and under water;
- BS - this one is simply impregnated with bakelite glue. Consider that if you have such plywood at your disposal, then the success of the whole business is 50% guaranteed. This type of plywood has been specifically used in aircraft and shipbuilding for quite a long time. It happily combines all the qualities necessary for a boat craftsman - excellent flexibility, highest strength, complete waterproofness, and also resistance to rotting and deterioration;
- BV - but don’t be fooled by this one, it is in many ways similar to BS, but does not have moisture resistance.
You can think about the superstructure later, but first the main thing is a reliable body. The first test of buoyancy and waterline alignment occurs without a superstructure
Helpful advice! When choosing plywood for boat construction, we recommend paying attention to laminated plywood. At the very least, it will be just great if you use one as tongue and groove belts or on the outside of the case if it is single-layer. This will greatly improve the driving performance of your creation, because water is a medium in which frictional force plays a significant role. On the other hand, you should not use laminated plywood inside the boat. Its slippery surface itself, and even wetted with water, can cause a lot of trouble.
Principal characteristics
When it comes to using plywood to build a boat, it is important to choose plywood based on its quality, determined by the number of knots per square meter of the outer layer.
There are 5 quality levels here:
- E – so-called elite quality, when there are no knots at all. It is probably unnecessary to say that it is always necessary to strive to choose just such plywood;
- Well, then, a simple classification of quality - I, II, III and IV. In the latter case, the number of knots is not controlled.
- I – maximum length of knots and warping does not exceed 20 mm;
- II - cracks no more than 200 mm, wood inserts are permissible, and glue leakage is permissible only on an area of 2% of the total sheet area;
- III – no more than 10 pieces of knots with a diameter of no more than 6 mm. There is even a limit on the total number of deficiencies - no more than 9;
- IV – this is the worst quality with even fallen knots and edge defects of up to 5 mm.
Reliable tools are the key to the success of all work. The instructions for each tool used must clearly indicate the ability to work with plywood.
Technological stages of production
To build a plywood boat with your own hands, you need to follow these steps:
- transfer the drawing to the template;
- transfer drawings from templates to wood;
- install the keel and secure the stem;
- secure the frames;
- secure the sternpost and transom board (for the motor);
- cover the bottom with plywood;
- trim the sides;
- seal joints and stringers;
- putty and paint the boat hull.
Operating conditions requirements
Most likely, to build a boat you will choose softwood plywood as the most common one. There is also birch plywood, but its use is limited by too high a price.
Another thing is very important here - the quality of processing of the outer surface of the plywood sheet.
Based on this indicator, plywood is distinguished:
- NS – unpolished;
- Ш1 – polished on one side;
- Ш2 - polished on both sides.
Here it is fundamental and mandatory to use the sanded side of the plywood on the outside of the body. It is advisable, for safety reasons, not to use the polished side on the inside.
Drawings of homemade plywood boats for a motor must accurately specify the permissible load on the motor side - a discrepancy can have a very negative impact on the performance of the boat
Dimensions
A natural characteristic of any sheet of plywood is its size.
The industry, according to standards, produces sheets of the following four sizes:
- 1525 x 1525 mm;
- 1220 x 2440 mm;
- 1500 x 3000 mm;
- 1525 x 3050 mm.
Your choice will largely depend on the size of the boat.
Helpful advice! All the given characteristics of plywood must be indicated in the specification of the boat drawings. Under no circumstances agree to purchase the proposed boat drawings if they are not accompanied by a detailed explanatory note describing all the nuances of manufacturing, and most importantly, the choice of type of plywood. The drawings must indicate the degree of processing of the external sides of the housing. In this regard, the grinding machine will be one of the most in demand in your work.
Not every motor is suitable for flat-bottomed models, so be sure to test several before settling on a specific propulsion model.
Boat hull
The frame of the boat and its hull are assembled from prepared parts. The assembly process must be carried out carefully and carefully, in all planes.
The frames are first pre-attached to the keel and only after the next inspection are they finally secured. Moreover, the fastening must be reliable, since the boat will have to be turned over before covering it with plywood.
Assembling the inner contour of the futox
The strength of the structure, including the sides, depends on how securely the footoxes are fastened. Futoxes are an integral part of the frame structure, which consists of a floor timber and two futoxes.
Floor timber is the lower part of the frame, which is designed to be attached to the keel. Futoxes are the side parts of the frames to which the sides of the boat are attached. The places where the futox and flortimber are attached are structurally made somewhat wider, which increases the stability of the entire structure. This is especially important for watercraft where engines will be installed, which increase the load on the structure in general and during movement in particular.
Material for stem
The stem has a complex shape, which is due to the loads acting on it during the movement of the boat. One of the most suitable materials for its manufacture can be oak, but, in extreme cases, elm can also be used.
You will be lucky if you can find a piece of suitable wood that has a natural bend. If this is not possible, then the stem can be made from individual elements using the gluing method. If you want to have a solid structure, then you need to take an ax and other tools and cut it out according to the shape of the boat.
Materials for making a boat
The Internet is teeming with a variety of creative ideas that can easily be brought to life. By entering any query into a search engine, a person quickly receives the answer he is interested in.
And having decided to build a means of floating on the water, you will easily find a lot of ideas that, if desired, can be brought to life. So, what can you make a boat from? It can be made from:
Each listed material is difficult to use, because the density is different, and therefore the quality is different. But it is worth remembering that each material has its pros and cons. Therefore, the choice of material directly depends on the service life of the product:
- For example, the most durable material is wood. It is more suitable for long-term swimming on the water and can last for seven years. It is worth remembering that you need to take a durable tree. It is best to use oak. So there is a high probability of high-quality production.
- Plywood is no longer as reliable as wood. This will be determined in its subtlety. But, if you don’t go fishing very often and want to save money on manufacturing, then plywood is an excellent choice.
- As for bottles, many people ask a very logical question: how to make a boat out of bottles? Many will think that this is not real at all. But despite all the doubts, the result will be amazing. It will be easy. But in the case of manufacturing, you need to make every effort to ensure that the result of your work does not fall apart while climbing onto the water.
- Aluminum is also an excellent material. It is reliable and can last a long time. But production from such material will take a lot of time and effort. Therefore, many people prefer a wooden base.
The last material is very common. After all, all purchased swimming equipment is made from rubber. It floats well and can withstand a lot of weight.
But you need to be careful during production, because one puncture will ruin it. Time, effort, money will be wasted. The process requires complete concentration and maximum attention.
Making a transom
The transom is intended for mounting a boat motor. The transom board should be 25 mm thick. If plywood is used, it is better to glue several layers together so that you end up with a suitable thickness (20-25 mm). The base for mounting the motor must be rigid, so its thickness should not be less than 20 mm. If necessary, the transom board is reinforced on top with a wooden block. In this case, it all depends on the method of mounting the outboard motor.
What do we need
Set of tools
When starting work, we should make sure that we have all the necessary tools.
In principle, you will need a simple set:
The most convenient way to cut out workpieces is with a circular saw.
- wood saw (circular or reciprocating);
- jigsaw with a set of blades;
- sanding machine with attachments for processing plywood;
- drill and drill bits of different diameters;
- screwdriver;
- clamps for fixing parts to be glued;
Instead of clamps, in some cases paper clips are suitable
- hand tools - hammers, pliers, chisels, etc.
- measuring tool - tape measure and level.
It is better to carry out the work in a spare garage or workshop. In principle, the parts can be assembled on the floor, but it will be much more convenient to work if we construct special trestles from timber and thick boards, on which all the elements of our future boat will be placed.
Selection of materials
Projects for plywood boats, presented in abundance on the Internet, involve the use of a variety of materials. We will consider one of the simplest modifications, since it is better for beginners to practice the techniques on simple samples.
Blanks for work
To build the ship we will need:
| Design element | Features of the material |
| Sides and bottom | We use plywood sheets as the main material for making the bottom and sides. Plywood for a boat must meet a number of requirements:
|
| Inner frame | Supporting structures - frames, keel, struts, as well as seats and transoms are made from more durable materials:
|
| Connecting elements | Very often, only glue is used to connect parts into a single structure. At the same time, some methods involve stitching plywood sheets together using thin steel wire, nylon cord, thick fishing line, etc. As additional reinforcement of the seams, strips of fiberglass impregnated with epoxy resins are used. |
| Exterior decoration | No matter how high-quality the plywood is, it will swell with prolonged contact with water. That is why, both outside and inside, all wooden parts are treated with special compounds. These include:
|
Boat drawings and transferring them to material
Before we start purchasing materials, we will need drawings of plywood boats. It’s worth building a plan for a punt or tourist kayak yourself only if you have sufficient experience and you clearly understand what size boat you need and what design it must have. For a beginner, it’s better to use a ready-made project - fortunately, it won’t be difficult to find it on the Internet.
Drawings of a plywood boat with large diagrams of the main components
So, before making a boat out of plywood, we proceed as follows:
- Based on the drawings, we make templates of the desired shape and size from wrapping paper or old wallpaper.
- A plywood boat pattern is applied to a wooden panel and traced along the contour.
- In the same way, templates are used to mark the boards and beams from which the internal frame will be made.
Another scheme: a punt with plywood sides and a plank bottom
When transferring dimensions to workpieces, we are likely to encounter difficulties. This is due to the fact that the standard size of a plywood sheet (maximum 3000 mm in length) is often smaller than the planned dimensions of the boat. In this case, we need to master the technique of gluing plywood:
Read How to make a spinner with your own hands at home
We adjust the ends of the two parts to each other.
- Carefully cut off the edges to a length exceeding the thickness of the sheet by about 7 - 8 times.
- Lubricate the resulting bevels with carpentry or polymer glue and securely clamp them with clamps.
- After complete polymerization of the glue, we obtain a fairly long sheet with a strong miter joint.
Scheme for gluing plywood sheets
Making a boat frame
The frame is assembled in the following sequence:
- the keel is installed;
- stems are installed;
- the installation locations of the frames are marked;
- installation of frames;
- fastening frames, stems and transom to the side boards;
- checking the correct installation of all elements before their final fastening;
- It is advisable to treat the joints of structural elements with a waterproof compound or drying oil.
Sheathing a boat with plywood
According to the working drawing, blanks are cut out of plywood for sheathing the boat's hull.
Subsequently:
- the frame of the boat capsizes upside down;
- all surfaces of the keel and frames are treated with emery cloth and made absolutely smooth;
- the parts of the bottom of the boat are installed in their place and secured with a stapler, after which the fastening points are pierced with nails;
- The side skin elements are first tried on, and then fastened in the same way as when fastening the bottom;
- When gluing workpieces, you should pay attention to the direction of the fibers of the outer layer of plywood. They should be located along, not across, the boat.
Working method
Boat hull assembly
In this section we will tell you how to make a boat from plywood yourself, using blanks, drawings and templates prepared as indicated above.
The instructions involve performing work according to the following scheme:
- First, using a jigsaw or reciprocating saw, we cut out all the parts from plywood. When cutting, we try to act extremely carefully, strictly observing the dimensions - even a discrepancy of 1 mm can lead to large gaps forming when assembling the sides, and we will have to perform labor-intensive adjustments.
Before making a boat from plywood, be sure to check the accuracy of the fit of the parts
- We cut the frames from thicker boards, or glue them together from several layers of plywood. When gluing, the mass of the part will naturally increase, but this will not greatly affect the buoyancy of the structure.
- Rowing boats made of plywood are made with a standard stern board (transom), but for a motorboat you need to install a more durable part. Quite often, the aft transom is made multi-layered: plywood 8-10 mm + fiberglass + oak board about 15 mm.
Advice! Multilayer parts are sometimes additionally tightened with self-tapping screws. In this case, the length of the fasteners is selected so that the caps are recessed by approximately 0.5 mm, and the sharp edges do not protrude outward.
Stern transom
- We install the glued or solid transom on trestles or a workbench and attach wooden side blanks to it. After this, we fix the parts with clamps and bring the plywood sheets together on the bow, forming the outline of the boat.
Initial assembly stage
- Let's start assembling the case. We fasten the parts either using suture material (wire, fishing line) or using glue. When gluing, we cut the ends of the joined plywood sheets at the desired angle and carefully ensure that there is no divergence of the sides in the keel part.
- At this stage, we install frames inside the hull. Using these parts as spacers, we finally shape the sides.
Gluing parts with clamps
- Additionally, we strengthen the frame with cross members - some of them will be used as temporary struts, and some can be left to form the flooring.
- After completing the rough assembly, we carefully inspect the structure, checking how accurately the seams fit together and whether there is a need to trim the frame.
Taping seams and installing additional parts
When making a plywood boat with your own hands, the stage of gluing the elements and sealing all the seams is one of the most critical.
The reliability and durability of our watercraft directly depends on the quality of all operations, so we act very carefully:
- First we prepare the adhesive composition. We will need quite a lot of it, and the price of specialized adhesives is very high, so craftsmen prefer to use a homemade product based on epoxy resin and silicon dioxide (the so-called aerosil). Mix the components in a 1:1 ratio, and then use a drill attachment to bring it to the consistency of thick sour cream.
Advice! The composition contains a large number of volatile toxic components, therefore both the process of its preparation and the sizing itself should be carried out in a well-ventilated area with the mandatory use of respiratory protection.
- Use the resulting adhesive mixture to coat all the joints between the wooden parts. We remove the frames and struts before doing this.
Almost any technology for making a plywood boat involves gluing the seams to seal them
- Along each seam inside the body we lay a strip of fiberglass about 100 mm wide. Apply another layer of epoxy-silicon glue on top of the strip.
- When the taped seams are completely dry, we install the frames in place. We fix them on the bottom and sides with glue, further strengthening the fastening with overlapping fiberglass strips.
When the structure is completely fixed, we proceed to equipping the boat:
- We lay flooring boards at the bottom, placing them on the frames.
- We reinforce the sides with additional upper beams, on which we separately fasten the oarlocks.
Advice! We fix each oarlock using a wide plywood plate, which is designed to evenly distribute the load when rowing.
- We install several cross members in the bow. On top of them we lay a triangular shield made of moisture-resistant plywood, forming a cockpit - an enclosed space at the bow of the boat.
Photo of an almost finished boat with glued sides, installed frames and a frame for the cockpit
- After the glue has completely dried, remove the boat from the trestles and place it on the base, bottom up.
- We sand and degrease the seams, after which we coat them on the outside with the same adhesive composition that was used for internal processing.
External seam taping
Finishing of the boat
All we have to do is give our boat an attractive appearance while protecting its wooden parts from moisture.
For this:
- Using a sander, we carefully sand all surfaces, removing protruding wood fibers.
Advice! If sanded plywood was used for work, then only the glued seams are processed.
- We degrease the wood by applying a solvent to the material. At the same time, we make sure that the composition does not damage the adhesive joints.
- We treat wooden parts with moisture-proof impregnation. Complex products from Tikkurila are best suited here - they protect plywood and wood equally well from both fresh and salt water.
Paint for bottom and sides
- After the wood impregnation has dried, we putty all the seams and irregularities, and then prime the boat.
- We paint the sides and bottom with moisture-resistant paint in two or three layers. The optimal consumption in this case is from 1 to 1.5 liters per 1 m2 of surface.
- The inside of the boat can either be painted with the same composition, or treated with a varnish that is resistant to abrasion and moisture.
Appearance of the product ready for use
After the paint and varnish are completely dry, we can begin testing the performance of our vessel!
Working with glue
Work with glue is aimed at obtaining a durable structure, and, if necessary, filling seams or cracks with it. When working with plywood, all joints between the workpiece and the keel and frames are glued. After punching with nails, the areas connecting the plywood with the load-bearing elements are filled with glue if they do not fit tightly.
To improve the strength and performance of the craft, the plywood sheathing is covered with fiberglass. Such protection of the wooden structure increases the durability of the boat. The fiberglass fabric is evenly distributed along the plane of the skin, while folds or the appearance of bubbles are not desirable, which indicates poor quality of work. The fabric is glued from the keel, towards the side boards.
Terminology
Therefore, understand these terms very carefully; they literally permeate any worthwhile drawing of a boat made of any material.
Side view
In the side view we note the following structural elements of the boat, and it is impossible to say which of them is most important, which is less important, all elements are required to be used:
- A – frame. You can choose the option of an ordinary punt, without frames, but when it comes to such an aspiration thrown on the Internet as “do-it-yourself plywood boat drawings”, the reliability and strength of the structure comes to the fore, which means frames are required;
- Spacing is the distance between two frames. The most important characteristic of the design of any boat;
- B - sternpost;
- C - stem;
- D – timber
- E – keelson. A very desirable design element, which, however, is often discarded for boats;
- F – fender. You cannot do without this element if you are going to add a superstructure to the boat. For open models, the fender is not used.
- I – breshtuk. We strongly advise you not to neglect this element; the strength of the entire structure greatly depends on it.
- J – book. The bracket is also extremely important in ensuring the strength of the boat.
- K – stringer. It is also an indispensable element if you approach construction with the utmost care.
Top view
Top view introduces a few more important terms:
- A – beam;
- B – half beam. Goes into a full beam if you do not build a superstructure on the boat;
- C – karengs;
- D – midsection.
View from the forecastle
View from the forecastle introduces terms that will be fundamentally important at a more advanced stage of construction, when it becomes necessary to strengthen the hull of the boat and install a sail and keel, also improving sailing performance:
- A – tongue and groove belts;
- B – keel. By ensuring the keel weight is 50 percent of the weight of the entire boat, you significantly increase its stability. After all, you never know how the rolling will affect you or future passengers, and a solid supply of sucking sweets and even ginger can do little to prolong the pleasure of being on the water, except to quickly get to the shore;
- C – steps. Mandatory if you are putting up a mast;
- D – tongue and groove;
- E – partners. This is the name of the hole in the superstructure for the passage of the mast. Of course, if you don’t have an add-on, then you can forget about partners for now;
- F – velhout. A very important sheet pile belt at the level of the waterline, water;
- H – shearstrek. The topmost tongue and groove belt.
- G – water level;
- I – waterweiss. This element is already an element of the add-in.
It can be said without exaggeration that the more accurately and meticulously the drawings of a plywood boat are made, the more successful its sailing will be in the future after construction