A kayak is not that difficult to make with your own hands, so there is no need to buy one, although this option can also be considered. The information in this article is aimed at at least somehow helping those who decided to make a kayak with their own hands.
Necessity of a kayak for a fisherman
Fishermen need boats to move around bodies of water in search of promising places, as well as to catch fish from these vessels. Having a boat makes the fishing process more dynamic and productive. This is due to the fact that the fishing area is expanding and the most inaccessible areas of the reservoir are becoming accessible. Kayaks are much more popular among fishermen, compared to other types of similar watercraft, due to their better technical characteristics.
This is associated with a number of advantages that make sense to talk about. For example:
- They are easy to use, which is associated with the safety of both being in the boat and when moving inside it.
- The stability of the boat plays a very important role, especially when you need to pull a large specimen out of the water or leave the boat by moving into the water. You can just as easily climb into the boat from the water at any time.
- There is no need to bail water out of it, since it will flow out of the boat itself through holes that are located above the bottom level.
- A properly made structure will never sink, even if it capsizes for some reason, thanks to the presence of special partitions.
- The kayak is easy to transport over any distance because it does not affect the aerodynamic properties of the car.
- This watercraft does not require special storage conditions. It is enough to hang it as high as possible in a garage or other room.
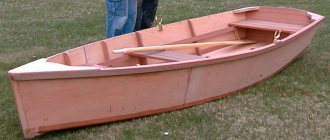
Photo of the canoe - construction process:
| To make a canoe on your own, you need to have a dry, heated room with an area sufficient to assemble a frame of the dimensions you have chosen, a drawing of the boat and materials for the slipway, casting and hull plating. | Using the table of plaza ordinates, it is necessary to draw the frames-patterns and stems in full size. Using carbon paper placed under the drawing, their contours are transferred to 15 mm thick plywood. The drawing and carbon copy are attached to the plywood with small nails. |
| The frames are cut along the contour using a jigsaw. Frames of the same shape are drawn using the first one as a template. | Inside the pattern frames, plywood is cut out so that the frames can be tightly placed on the load-bearing beams of the slipway, where they are precisely positioned in place and fixed with wooden plates on nails or screws. |
| To finalize the outer contours of frames of the same shape, they are fastened together with dowels and in this position pressed against the workbench. Traces from a jigsaw file are removed with a belt sander. | The stems are installed in the desired position, checking the drawing, and attached to the slipway with strong plywood pads with screws. The keel and both fender beams are laid out in the cutouts of the frames and cut to the required length, without connecting them to the stems and transverse frame. |
What is better: buy a kayak or make it yourself?
If funds allow, then it is better to buy it. Unfortunately, not all fishermen are capable of this due to lack of funds. Many of them start making their own purely out of interest. Besides the fact that the boat will cost less, it’s fun, and it gives you a feeling of pride in your work. And although it will require a lot of money and time, it is still a very real and feasible activity. Do-it-yourself production always comes with a number of advantages. In addition to the fact that it is very interesting and instructive, you can always count on receiving a high-quality product that meets the stated requirements. The task is greatly simplified by the fact that it is not difficult to find the necessary diagram, the necessary material, and also acquire the necessary tools.
Homemade transparent kayak from branches and film Homemade stretch wrap kayak
CANOE IN 3 DAYS
This homemade project began a long time ago, with the book “Canoe in 6 Hours,” which I have never read. Intriguing, isn't it? The point is to build a boat from simple materials and in a short time, maybe even in a foreign country. Having scoured the Internet on this topic, I was surprised by the large amount of information, advice, opinions, and began to create this adventurous homemade product.
I “infected” my friend with this idea, who wanted to see what would come of all this and offered to help create the drawing.
Step 1: Marking and cutting
Based on the dimensions of the drawing from my friend, I marked and cut out the canoe parts from plywood with a handsaw. The saw is hand-held, as this is part of the conditions for creating a homemade product, but it works great, doesn’t make noise, doesn’t generate dust, the main thing is that it doesn’t get pinched.
Step 2: Butt Joints
At the joints, I tried 4 brands of epoxy resin and 3 brands of reinforcing tape instead of fiberglass, I tried wood putty and reinforcing tape instead of joint fittings. I used cling film to protect the table and plywood from resin.
As a result, at the joints, instead of various joining fittings, I applied three layers of epoxy resin on both sides and temporarily reinforced it with tape, the connection turned out to be very strong.
Step 3: Gluing
At the beginning, to assemble the structure, as a temporary element, I used adhesive tape, but I had to abandon it in favor of copper wires. The voids in the joints were filled with putty made from wood dust and epoxy resin.
Step 4: Tricks Discovered
When assembling the parts of the craft, I used reinforcing tape not as a reinforcing element, but to prevent the epoxy from spreading. Once dry, the tape was removed.
Step 5: Seats
The photo shows how I made the seats. Pay attention to the foam and bolts for securing the seat back.
Step 6: Compartment Cover
Using cords and wooden blocks, I made a fastening for the aft compartment lid.
Step 7: Buoyancy Test
The water test of the canoe went well, even the boat was afloat when filled with water.
Step 8: Canoe 2. Chile
I started building the second canoe at the invitation of my second friend, who kindly provided his tools and a shed.
Step 9: Screed
Using my existing knowledge and experience, I created canoes in Chile. This time I used clamps for temporary ties; they are easier to remove. And the adhesive tape kept the putty from leaking out.
Step 10: Finishing the Case
In the photo, a friend is removing the clamps and cleaning the seams for the subsequent application of epoxy resin, which I am already applying. The reinforcing tape is a temporary element here to keep the resin from spreading.
DIY fishing kayak
What do you need to have?
First of all, you should determine the availability of tools and materials. For such work you need to have the following tools and materials:
- Electric jigsaw.
- Electric belt sander.
- Electric drill and electric screwdriver.
- Construction hairdryer.
- Scissors of various sizes with a good sharpening of the cutting edge.
- Construction knife with a sharp blade.
- Pliers and wire cutters.
- About 4 sheets of plywood, at least 4 mm thick, of appropriate quality.
- Fiberglass, up to 20 square meters in size.
- Waterproof varnish – up to 1.5 liters.
- Aerosil A300 – about 120 grams. It must be added to the epoxy resin a day before using it.
- Epoxy resin – up to 10 kg.
- Flexible rubber spatula for working with epoxy resin.
- Durable connecting wire.
- Disposable plastic cups.
- Brushes of various sizes - up to 5 pieces.
- Solvent up to 0.5 liters.
- Hardener for epoxy – up to 5 kg.
- Disposable rubber gloves.
- Several pieces of wooden sticks, similar to those used for ice cream.
- Cargo.
- Masking tape.
- Working drawings that are needed to build a boat. They can be found on the Internet and downloaded, and then redrawn on a 1:1 scale, which will greatly simplify the construction process. It will be enough to transfer the design to plywood and cut out the blanks with an electric jigsaw.
Procurement of materials
The main materials are plywood, epoxy resin and fiberglass. When purchasing, you should pay attention to their quality. The features of these materials are indicated below in the text.
Plywood
To make a kayak, you need plywood, which has the appropriate dimensions (2240x1120mm) and is not sold in our stores. Therefore, you will have to turn to the Internet for help and place an appropriate order through it, although this does not provide any guarantees.
Even through the Internet, such sheets are difficult to purchase, since not all organizations carry out such trade. This is due to the fact that plywood of similar sizes is not in great demand due to transportation problems.
Despite this, there are companies that sell these types of goods online.
An example would be . There are 2 types of plywood suitable for making a kayak. For example:
- "LauroVermelho", which is produced in Brazil. It is considered a very high-quality material on which you will hardly find defects or knots. Plywood is particularly durable, and its thickness is almost the same over the entire plane.
- "Amesklao", which is an analogue of the Chinese manufacturer. The price of plywood is slightly lower, but the quality is also slightly worse.
At the same time, it does not matter what color the plywood is, since this will not affect the construction process. After construction is completed, the kayak can be painted in any most attractive color. The color “Zhotoba” is suitable for making a boat.
Fiberglass
Kayak matrix
DIY kayak
A little kayak or determining the type of fabric by smell
The quality of this material also plays a significant role in the process of self-manufacturing such a watercraft. When choosing a material, the main criteria are:
- The manufacturing process requires the use of fiberglass with a specific gravity of about 130 grams per square meter.
- Much more common is material with a specific gravity of 100 or 200 grams per square meter. In this case, you should opt for a material with a specific gravity of 200 grams per square meter. As a result, you can actually get a high-quality and durable product.
- To obtain a high-quality final result, you should take those pieces of fabric that do not have bends, as they will interfere with obtaining a flat surface. Fabric with cross-bend marks will cause a lot of problems when opening it with epoxy resin.
Epoxy resin
As stated above, you will need about 10 kg of epoxy resin, although many instructions indicate less material consumption. In this case, it is better to rely on the results obtained practically, and they indicate that the consumption will be about 10 kilograms. If there is any left, it will not be much, and if there is not enough, this may affect the quality of the product, since epoxy resin hardens quite quickly. It is better if the entire surface of the boat is covered in one go, without stopping the epoxy resin application process.
Etal-370 epoxy, for which Etal-47F5 hardener is suitable, is suitable for the job. If we evaluate the price-quality ratio and its basic technical data, then this is the most suitable technical product.
Construction stages
First you need to start preparing the workplace, materials and tools. Given the size of the boat, a car garage is suitable for its construction. In any case, there must be enough space, and working with epoxy resin requires special conditions.
The construction of such a watercraft consists of the following technological stages:
- Based on the available drawings, they manufacture all components. An electric jigsaw and other tools are used for this.
- The individual parts of the parts are assembled using masking tape.
- First of all, the decks and lower part of the future kayak are assembled.
- After both parts of the product are ready, they are connected together and assessed how well they fit one another.
- A layer of epoxy resin is applied to the internal surfaces of both parts.
- An unsinkable compartment is formed at the bottom of the boat, which consists of several partitions. They should also be treated with epoxy.
- After this, the deck and lower part of the structure are adjusted again. As a result, they should fit together perfectly.
- If everything is fine, then both parts are glued together and the joints are treated with epoxy. After this, the entire surface of the boat is covered with a layer of epoxy resin.
- At this stage, hatches are formed.
- The final stage is gluing fiberglass to the entire surface of the craft. At the same time, you need to monitor the quality of the fiberglass gluing. After the epoxy resin has hardened, it is advisable to sand the building and then paint it in any color.
Description of the design and basics of boat design
The canoe is one of the most comfortable and practical small vessels. Its tare weight to load capacity ratio is very high, as is its driving performance. The vessel has exactly the same contours of the bow and stern, the bottom is flat, which determines the low draft and the ability to sail in shallow water.
The elongated hull, widened amidships, gives the boat greater capacity.
You can find drawings of a plywood canoe on the Internet or in specialized literature. Descriptions and sketches of individual parts will allow you to correctly cut the material. The proposed project has a number of improvements that make it possible to correct certain shortcomings and features of the boat.
Shifting the maximum expansion of the hull contours towards the stern will compensate for some of its instability when sailing alone.
One of the boat design schemes
The method of manufacturing a watercraft is adhesive on a longitudinal strength set, which is called a matrix. Individual parts in the form of strips create permanent connections with the base and give the structure the necessary rigidity against bending and torsion.
This technology makes it possible to create durable hulls of complex shapes, for example, the sides can be convex with their upper part inclined inward.
Conclusion
You don't have to be a ship's master, but you should have skills in working with tools. For inspiration, you can familiarize yourself with the works of craftsmen.
Looking at photographs of models assembled by hand, it is difficult to believe that they were made by hand.
In reality, the list of complexities and nuances should be longer, but it is difficult to foresee everything. After the first boat, assembled with your own hands, improvements and ideas will definitely appear that can be implemented on the next one.