Among the commercially available spinners, not all are catchy. The reason for this is most often a negligent approach in the production of manufactured models of spinners. Such negligence leads to the fact that over time, with repeated and careless copying, the spinner is modified so much that it has nothing in common with its original good example. Such distorted spoons, not consistent in thickness and shape, and even having incorrect equipment, do not meet their purpose and cannot serve as bait. At best, predatory fish remain indifferent to such baits, and at worst, they run away from them. In addition, it is often necessary to improve existing commercially available spinner baits for specific fishing conditions.
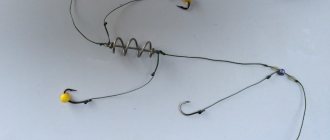
Experienced fishermen who use spoons (including homemade ones) to catch fish can talk about frequent cases of them breaking due to hooks. After all, as a rule, there is only one option in this case: grab the line as close to the spoon as possible and pull it until it comes off, which naturally leads to the loss of the spoon. And it can be very disappointing if the lost lure was made with your own hands at home and had good “catchability”. In order to reduce the percentage of lost spinners, you need to slightly improve their design as described and shown in the drawing of a homemade spinner below.
Read more about oscillating spoons at the link
There are several ways to make loaded spinners. The simplest is to add lead to the inside of the petal. But the spinner has an untidy appearance. It is better to cast spinners in special molds. For this purpose, gypsum, cement, graphite (the inner surface of the latter is metalized with copper), and metal forms are used.
Materials for making spinners
For the manufacture of spinners, sheet metal with a thickness of 0.5-3.5 mm is most often used.
The best metal for making spinners is copper and its alloys: brass, tempah (golden color) and cupronickel (silver-white color). Tombak and cupronickel are especially good.
In addition, a bimetal, which is soft iron coated with a layer of copper, or less often tin and zinc, can be successfully used.
Elastic grades of stainless steel are less suitable. Soft varieties are quite acceptable, but require processing. At an annealing temperature of 200-250° C, stainless steel acquires quite a variety of colors.
Aluminum and its alloys are unsuitable materials due to their lightness.
For casting spinners, it is most advantageous to use lead, adding tin or zinc to it if necessary. Lead is first poured into the mold, and then, when the lead has cooled, tin is poured, or vice versa. To increase the strength of the junction, the mold is additionally heated to the melting temperature of lead. Since lead spoons fade quickly, there are the following methods for finishing their surface.
The easiest way is to paint the lure “gold” or “silver” using the so-called “serebryanka”. There are sets on sale with varnish and bags of bronze or aluminum powder; After painting, it is advisable to sprinkle the spoon with mica crumbs.
Another method is galvanic tinning with the composition (in grams per liter of water): tin sulfate - 40-60 g/l, sulfuric acid - 45-90 g/l. First, tin sulfate is diluted in acidified water, and then the remaining acid is added. Treatment is carried out at room temperature of the solution. Power: coin cell or two coin cell batteries for flashlight; plus - tin plate, minus - bait.
There are other methods for finishing the surface of spinners.
Spinner thickness
The thickness of the spoon is closely related to its size and purpose. The thicker the spoon, the less mobile it is and vice versa. Thin spinners have easy mobility, while thick oscillating ones have good, stable movement.
The division of spinners into light, medium and heavy is determined by the degree of their mobility, depending on the thickness and regardless of their weight.
As a general rule, it is recommended to make spinners from thin sheet metal, ranging from 0.5 to 1.2 mm, and oscillating ones from thick metal, ranging from 1.2 to 3 mm.
As already mentioned, the thickness of the spoon is closely related to its size and stamping shape. Therefore, although changing the thickness is acceptable, it must be approached with great caution, since with a change in the thickness of the spoon, the nature of its play also changes.
It is not recommended to use spinners with a thickness of less than 0.5 mm, since very thin spinners, especially small ones, work unreliably and often “stick”, that is, they do not give play, and large and thin ones flutter a lot when casting. Likewise, small but thick spoons perform poorly, while large and thick ones will be too heavy to cast.
If it is necessary to have spinners weighing 40-45 g, their thickness should be in the range of 2.2-2.3 mm. It is best to take the thickness of the spinners according to a well-tested sample. If you have a good sample of a spoon and it is desirable to build the same spoon, but of a larger or smaller size, then their thickness should be taken in direct proportion to the area, i.e., how many times the area of one spoon is smaller than the other, the same number of times its thickness should be be smaller. In the case of using dissimilar materials, an amendment is made to the thickness of the spoon: by how many times the specific gravity of one metal is less than the other, the thickness of the spoon should be greater by the same amount and vice versa. If this rule is not followed, the spinners will differ in the degree of ease of their play.
Which is better: store-bought or homemade?
Before you plan a trip to the store for lures, you need to familiarize yourself with the advantages and disadvantages of homemade bait. In some cases, a homemade element outright outperforms branded products.
Important! The optimal size for a spinner is 3–5 cm.
Experienced fishermen say that the material from which the bait is made is not important. The main thing is the shape, and fishing with store-bought bait is recommended only if the bite is stable. If the fish is capricious, then it is better to use good quality homemade spoons.
- Homemade baits have the following advantages:
- low cost;
- easy to make;
- any size and shape can be used;
- high catch rate;
- possibility of manufacturing for specific conditions;
- the number of baits is unlimited.
- However, homemade products also have disadvantages:
- high labor costs for the manufacture of high-quality tools;
- instability of the functioning of hastily made baits.
Of course, buying bait in a store is much easier. You won’t spend a lot of time on manufacturing or searching for materials for this, because at home you may not have the necessary tools and elements to build a spinner. You can choose the ones you need and take several different ones to try. However, the price will most likely be higher than the cost of making a spoon with your own hands.
Important! For the bait to work successfully, the angler must give it the necessary movements.
Making spinners is not an easy task and requires accuracy and patience. But a homemade bait will last a long time and provide entertaining fishing.
The procedure for making a homemade spinner with your own hands
From a large oscillating spoon, it is necessary to remove the winding ring connecting the spoon to the tee. Using a line of smaller diameter than the main line, tie the tee to the second winding ring. Attach the forend of the tee with soft copper wire (0.4-0.7 mm in diameter) to the spoon through the lower hole for the winding ring. Cut off the excess ends of the wire and separate them a little. The specified fastening will not affect the play of the spinner and will reliably ensure the integrity of the “tee-spoon” structure during casting and small efforts when hooking onto small and not very strong obstacles on the bottom, and at the same time, in the case of a “dead” hook, it will allow you to preserve the spinner, having lost only the tee.
You can read more about the equipment of spinners in the material “Equipment of scaffolds”
Recommendations for choosing the diameter of the main line and leader:
| Characteristic | Spinning reel type | Fish caught | ||
| pike | zander | perch | ||
| Line diameter, mm: main (leash) | Inertial Inertialess | 0,6-0,7 (0,5) 0,4-0,5 (0,35) | 0,5-0,6 (0,4) 0,4-0,5 (0,35) | 0,35-0,4 (0,3) 0,3-0,35 (0,25) |
| Lowest breaking load of fishing line, kg: | ||||
| basic (leash) | Inertial Inertialess | 10.5 (7.5) 5,3 (4,0) | 7,5 (5,3) 5,3 (4,0) | 4.0 (3.0) 3.0 (2.1) |
When using fishing lines and leashes according to this table, the safety margin of the main fishing line compared to the leash is on average 25-30%. This is quite enough to prevent the loss of the spinner when hooked, losing only the tee.
Making spinners with your own hands
Making spinners
The easiest option to make with your own hands is a spinner spoon, detailed instructions are given below:
- The contours of the bait are applied to the selected material; in appearance it will resemble a rhombus with predetermined parameters.
- Using metal scissors, you need to cut out the layout.
- The minor axis is calculated, which will be the bending boundary.
- Having given the workpiece a horizontal position, you will need to solder a small triangular copper plate to it.
- A hook is soldered to the copper plate.
- A winding ring is attached to the top of the workpiece; to do this, you will need to drill a hole in the plate.
- The finished vibrator is processed using sandpaper, after which it is completely suitable for use.
Making a spinner
The process of making a rotating spoon will look like this:
- At the initial stage, a suitable stainless steel base is selected: it should have a cylindrical shape and be immersed in water when casting. The selected material is tested for compliance with these requirements in a basin of water.
- Holes are drilled in the workpiece, the diameter of which should be sufficient for the passage of thick fishing line.
- A hook is soldered on the opposite end of the part, its tip should be directed towards the sinker.
- Additionally, the bait can be tied with bright colored threads or equipped with beads using waterproof glue. Such measures will make the spinner more noticeable and increase its catchability.
- At the final stage, the spinner is treated with a special GOI polishing paste.
Homemade spinner-balancer
Balancers can be made in different ways depending on the requirements placed on them and fishing conditions.
One option is described below:
- Using a file and a needle file, a stamp is made from a metal base; the most suitable material is a copper sheet 0.3 mm thick.
- You can use a birch log as a base for stamping. Using a heavy hammer, a workpiece is formed: with metal scissors you can cut off all its excess parts, and with a file and needle file you can correct the shape.
- A pendant will be installed in the upper part of the workpiece; in this place it is necessary to make a notch 0.3 cm long.
- A hanging loop is soldered into the workpiece, and then single hooks located on different sides.
- The cavity inside the workpiece is filled with tin until the balancer begins to take a horizontal position when it is hung.
- It is necessary to ensure that the inner surface maintains a concave shape: this feature is adjusted by changing the amount of tin during the soldering process; its excess can be removed using a grinder.
- Now you can move on to setting up the spinner. To do this, it is hung on a fishing rod, testing is carried out in the bathroom: the tail part can be bent and unbent until the desired game is obtained.
- All that remains is to provide the balancers with an appropriate design: it can be covered with automotive enamel and three-dimensional eyes removed from the wobblers can be attached. At the last stage, a layer of yacht varnish is applied, after drying the lure is ready for use for fishing.
Spinner for fishing in muddy water
In reservoirs with muddy water, fish bite worse due to poor visibility; they are unable to notice their potential prey at a great distance, so it is important to make a catchy and noticeable spoon with high-quality visualization.
This process is detailed below:
- As a base, you can use a small metal pipe cut in half. It will need to be given the required shape by bending, unbending and cutting in accordance with the existing layout.
- It is recommended to grind the workpiece in such a way that it bears at least a vague resemblance to a real fish.
- The hook is soldered to the wide side of the bait.
- A winding ring is attached to the opposite part.
- The spoon is subjected to grinding. The condition of the bait for fishing in muddy water must be monitored especially carefully, not allowing it to oxidize, fade or change color. To do this, it is periodically treated with sandpaper as changes occur.
Homemade babbitt spinners
It is problematic to stamp spinning lures at home; for this, at a minimum, you will need a press. Cast lead spoons are less complicated to manufacture, but require galvanic coating with copper or other metal to create the necessary rigidity, which is also impossible without the appropriate equipment. In addition, such spinners are heavier than factory ones and therefore unsuitable for light spinning reels.
However, at home you can make simple cast homemade spoons from babbitt - an anti-friction alloy based on tin or lead, intended for use in sliding bearings. Babbitt spinners are cast in the same way as those made from lead, and the model is taken from a factory spinner or a plasticine imitation of any design. The mold for casting the spinner is made of gypsum (withstands up to 50 castings) or cement (M400-M600, withstands several hundred castings). The surface of the finished product requires only minor processing and sanding.
How to make a homemade spinner from babbitt
- Take (or glue) a cardboard box 6-7 cm high (the dimensions of the box should exceed the dimensions of the model by 1-2 cm).
- Fill the box halfway with a solution of gypsum or cement (the consistency of sour cream).
- Cover the model with a thin layer of Vaseline and carefully lower it into the solution so that it lies at the same distance from the edges of the box (in a factory lure, you must first cover the holes with plasticine). Lightly tap the box until the model is immersed in the solution to the desired depth.
- After the solution has partially hardened (25-35 minutes for gypsum and 24 hours for cement), remove any streaks of solution from the surface of the model.
- After complete hardening (after 2 hours for gypsum or 3 days for cement), grease the upper surface of the mold and model with a thin layer of Vaseline, then pour a new portion of the solution to the top of the box.
- After the solution has completely hardened, divide the mold, remove the model, and use a file to make a channel for casting (sprue) and air outlet in each half.
- Dry the mold well (7-10 days), otherwise during casting the process of vaporization and eruption of metal through the sprue may begin.
- Melt the babbitt in a container with a narrow “spout” (in an aluminum tablespoon), remove carbon deposits during the melting process and lighten the surface by periodically adding powdered ammonia. Try to avoid overburning the babbitt (pronounced blue color of the melt), which makes the product brittle. It is preferable to use Babbitt-83, which contains 83% pure tin, which does not tarnish and always has a silver tint.
- Pour the melt into the mold, shaking it slightly so that the babbitt spreads evenly, and remove the finished spoons after cooling. In the resulting castings, drill holes for the winding rings. Smooth out any unevenness on the cast spoon with sandpaper or a file.
Spoons made in this way usually do not require silvering, but if the homemade spoon is dark in color, it can be silvered.
You can get a silver spinner if you immediately pour melted babbitt into the mold. If you keep it on the fire a little longer, it will become golden in color, and the spinner will take on this shade. Keep it on the fire even longer and you will see the babbitt turn blue; the spinner will be of a bluish-olive tone. This type of lure does not require a sinker; it can be quietly cast “under the nose” of a perch or pike.
Spoon spoon
One of the easiest ways to make a spoon with your own hands is to make it from an aluminum spoon. You can also use stainless steel spoons, but aluminum is much easier to process.
For production you will need:
- any tablespoon;
- needle file;
- hook;
- winding rings.
Manufacturing procedure:
- Cut the handle off the spoon. Carefully polish the cut area with sandpaper or a file.
- Make 2 holes at two opposite edges along the long axis.
- Install the winding rings into both holes.
- Attach a hook to one hole, and a fishing line through a swivel to the other.
According to experienced fishermen, this bait is perfect for catching pike. Moreover, many manage to catch even trophy specimens with a homemade spoon.
Oscillating spoon "Leningradka"
According to the dimensions indicated in the figure, cut a blank from sheet metal 3 mm thick, make two figured cutouts A and B with a depth of up to 4 mm in it. After this, stepping back 20 mm from the head part, use an emery wheel to grind the workpiece along its entire remaining surface so that its thickness towards the tail part reaches 1 mm. Next, bend the workpiece as shown in the figure, equip it with winding rings and a hook.
In addition to the holes in the head and tail parts, you need to punch a hole in the protrusion of the upper figured cutout (the diameter of all holes is 1.5-2 mm). It happens that it is useful to equip the spoon with an additional hook - then it is attached to the figured cutout.
For fishing at a depth of 1.5-2 m, the assembled weight of the spoon should not exceed 32-36 g.
Thanks to the bending of the spoon and the shift of the center of gravity to its head, the play of such a bait attracts a predator. If you attach red hairs to the tee and in the hole of the upper figured cutout, they prevent the spoon from quickly sinking to the bottom, which allows you to move the spoon slowly at the desired depth.
Good homemade spoon
V. Sadikov offered the following homemade spoon. What’s new about it is not so much the lure as the hook (it’s homemade, there are no such things on sale). It is made from a needle or steel wire.
A hook of this configuration (Fig. 1) is unnoticeable and tenacious. The spoon is easily grabbed by fish. Placed on a hook and pressed with an insulating tube (Fig. 2), the fish eye film is hardly noticeable and does not interfere with the play of the spinner. The hook is bent immediately from the end of the spoon or released 2-4 millimeters. The neck with the sting is retracted at an angle of 15-20 degrees. The back of the hook also has a characteristic shape (Fig. 3). For a large spoon, you can also use a factory hook with a barb, after first releasing it on the fire and giving it the desired shape.
All sizes of the spoon decrease in proportion to its length.
Hooks for such spinners are made from sewing needles. They can withstand large fish, do not bend or break, are unnoticeable, very sharp, and make it easy to remove fish, which is important in the cold.
To make such hooks, you need to have steel sewing needles of different numbers:
- for small perch, roach, grayling - No. 3-4, sometimes even No. 2;
- for large fish (whitefish, large perch, ide, etc.) - No. 5-6.
The needles must be driven, their length does not matter. Hooks are made using small pliers, one of the planes of which is rounded by 2-3 mm. A special bend made from the eye of a thick needle driven into a wooden handle is also suitable for this. Anneal the needles in the flame of a match or candle. Start annealing near the thick end of the needle and observe the color of the tarnish. Stop annealing when the blue stripe that appears when heated approaches the thin tip of the needle.
After this, the tip of the needle is clamped with tweezers to the required length of the sting and bent around their flat antennae. Using the rounded side of the tweezers, the fore-end is slightly bent and a hook blank is obtained. Then, along the required length of the hook, a hook ring is bent around the rounded tendril of the tweezers, which should be perpendicular to its plane. The hem is first made in the direction opposite to the future ring, and then it is completely bent around it.
It is very important to configure the hook exactly as shown in the picture, otherwise it will not work well. These hooks must be tied with the point up, so that the fishing line is located at a right angle to the hook.
Characteristics of spinners for perch
In order to lure any fish, specialized equipment is required. Some tips and knowledge will help you make the right bait.
For predatory fish, the most attractive thing about spoons is their game. They must exactly repeat the movements of the perch's most frequent food in order to attract its attention and provoke an attack.
It is precisely in order for the winter lure for perch to play correctly with your own hands that it is made of certain shapes, sizes and weights.
Read here - Do-it-yourself winter fishing rod - an overview of the best options. Instructions for creating an unusual winter fishing rod from different materials
They also use larger spoons to catch larger fish, so the outcome of the fishing depends on the size of the bait. But still, the parameters of ideal perch lures are limited and are within 5-10 centimeters.
In addition to its size and shape, fish are also attracted by their external similarity to the intended prey. If you draw a little eyes, scales or specks of blood on your spoon, then the perch will more effectively pay attention to it.
Please also note that the bait must be fully compatible with the size of the spoon.Check it out here too!
How to make a fishing screen: description and step-by-step instructionsFishing knots diagrams: the best fishing knots for all occasions
How to make a fishing hook at home: master class with photos
And don’t forget to prepare complementary food for the predator, otherwise everything will be useless. In order not to make mistakes when making bait, it is better to make drawings of a winter spinner.
Drawing of a homemade spinner “Norway”
, the lower half is slightly curved both in the longitudinal and transverse directions. The peculiarity of the transverse bend is that at first only its edges are bent - the back remains flat. The nature of the transverse bending is clearly visible in figure a, where the cross sections of the spoon are given every 5 mm. The dotted line in this figure indicates the beginning of the bend of the edges of the spoon. The bending of the edges of the edges starts from 30 mm. The width of the edge, barely noticeable at first, gradually increases towards the tail. The longitudinal bend begins at 40 mm (counting from the top edge of the spoon) and gradually and smoothly descends to the tail (Fig. c). “Norway” belongs to the group of spinners with a low vibration frequency; due to its slight convexity, it is inactive. To increase mobility, the spoon is made thin, no more than 1.2 mm thick. For fishing in fast currents, thicker lures will probably be suitable. The surface of the spoon is nickel-plated; on the concave side, half of the spoon in the longitudinal direction is painted red. The main color of the spoon and its coloring may be different. The spinner is equipped with an oscillating type: a winding ring and a swivel (carabiner) are placed in the head part, and a free-hanging tee hook is placed in the tail part. The weight of the spoon with equipment with a length of 66.5 and a thickness of 1 mm is 14 g. To build a spinner of a different size, you need to multiply all the dimensions indicated in the figure by any one constant number (more or less than one).")