Feeders for feeder fishing have long become a common accessory for bottom fishing, capable of making a decisive difference in the overall success of fishing. The combined functions of the equipment element, representing the load and the direct device for supplying bait to the fishing zone, put forward a number of serious requirements for the product that can increase the effect of the fishing session. Such criteria of a feeder for feeder fishing as weight, shape, material from which the fishing element is made, aerodynamics and buoyancy make it possible to cover various conditions of bottom fishing.
The correct selection of design in the installation of equipment guarantees greater catching opportunities and the very comfort of fishing. Many fishing equipment manufacturers have been producing high-quality products in this area for a long time, but a fisherman with practical experience and knowledge accumulated over time understands that some nuances of the device that can radically increase efficiency can only be improved by making the accessory yourself. You can assemble a feeder from scrap materials, thereby obtaining an inexpensive but high-quality product, which is not such a shame to lose compared to a branded and expensive product.
This article will help you understand the intricacies of choosing feeders for fishing conditions and will reveal certain secrets of independently designing this device.
Which form is better
The feeder feeder can be made in various geometric shapes, the main requirement is the possibility of a useful volume that can accommodate the amount of complementary food required for the conditions of introduction, the provision of aerodynamic qualities that allow you to feed the product over a long distance without any extra effort, and a shape that provides stability when the accessory is at the bottom of the reservoir with certain current forces. It is difficult to unequivocally answer the question about the best form of adaptation, since this parameter directly depends on the structure and type of the reservoir and its bottom, as well as the activity of the fish.
Products in the form of a parallelepiped and a cylinder are considered classic forms, but products in the form of a pyramid, cone, spherical shapes and a ball are also used. The advantages of cylindrical types are the speed of filling the accessory with a mixture of any fraction and high aerodynamic properties, but such forms are unstable in currents and are subject to rolling, which often frightens cautious fish approaching the bait. Rectangular types are more difficult to fill with bait, and their aerodynamics are much inferior to a cylinder, but they are much more stable on all types of soil and look more natural than other geometric shapes. The feeder method and similar products are natural in appearance, but due to their design features they do not allow delivering bulk mixtures to the fishing point.
Based on these considerations, we can confidently say that there is a variety of types of feeders, which allows you to cover any fishing conditions with one or another advantage in a certain current situation.
Fishing. Information portal "LANDFISH"
Bottom fishing enthusiasts lose a lot of fishing feeders during the season. This is especially offensive when the nearest fishing store is located tens or hundreds of kilometers from your place of residence. In this case, the ingenuity and skillful hands of the fisherman will come to the rescue. Using the tools at hand, you can make many samples of wire structures during the long winter.
What tasty things can you fill the feeder with? Read our article How to make bait for a feeder
Advantages of wire structures
- Currently, fishing feeders can be made from different materials. Wire models have a number of advantages.
- Wire is one of the most accessible materials for anglers. The feeder can be made from copper or brass wire, or from ordinary steel. A wide range of wire thicknesses can also be used.
- The manufacture of wire structures is simple and quick.
- The wire allows you to use different shapes and sizes of the container.
- The food is perfectly washed out of the wire feeder, allowing the angler to even make a mistake with the degree of moisture in the bait.
- Losing a feeder will not be a reason for sadness for an angler. The cost of manufacturing the product is close to zero.
- If you wish, you can make models for friends and acquaintances for a small fee.
Main types of wire feeders
Fishing in open water with bottom tackle can be carried out on a still body of water or on a river with a current. This factor becomes decisive when choosing a feeder model.
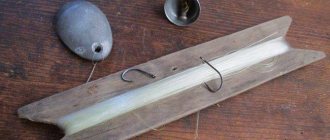
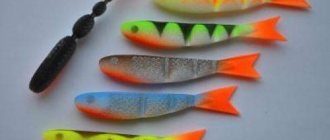
For fishing in still water, the easiest way is to make a twisted spiral feeder from soft metal (copper, brass). It will not be too heavy, will quickly float up when reeling in the fishing line, and will not require special devices during manufacture (photo 1, top row). River fishing requires heavy models of a special shape, which should not be carried away from the bait spot by the current. To make this version of a wire feeder, special molds are required (photo 1 bottom row).
River fishing requires heavy models of a special shape, which should not be carried away from the bait spot by the current. To make this version of a wire feeder, special molds are required (photo 1 bottom row)
Wire feeders can be made in different sizes and capacities. Everything will depend on the place and time of fishing.
Making lake models of feeders for bottom fishing rods
Most fishermen made wire spring feeders as children. They are still used today for catching carp and crucian carp, roach and bream. Structures are made from soft wire with a minimal set of tools (nippers, round nose pliers, pliers).
To make it easier to twist the wire (especially thick wire), you need to choose a suitable template. A large bolt or piece of pipe is suitable for such purposes. Holding the end of the wire with pliers, the wire is wound by hand according to the template. Having made a certain number of turns, the spring is removed from the device.
Using pliers, the middle turns increase in diameter, and the outer turns decrease. This is how the barrel-shaped shape of the model is achieved. If the donk is equipped with a sliding feeder, you need to insert a metal or plastic tube inside the feeder (along the axis). The tube is clamped with the outermost turns of the feeder using pliers. The inner diameter of the tube should be minimal so that a large stopper-limiter does not have to be mounted on the fishing line.
Making river feeders
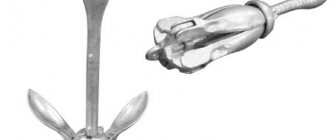
Before you start making a river feeder from wire, you will have to turn to a turner. He will make several mold elements to assemble the product. These are two tie rods and two conical bases that will be attached to a steel plate with holes (photo 2, 3).
You can make a spacer plate in the form of a square, oval or circle on your own.
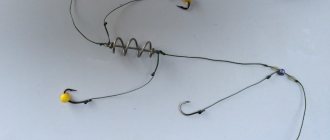
As a final result, the structure should take on a clear form (photo 4).
Now you need to carefully place the pieces of springy wire inside the mold. A wire, previously lubricated with oil or lard, is passed through the holes in the base of the mold and the spacer. The inner conical surface of the bases is treated with the same ingredients. The spacer is installed in the middle of the device, and 1 piece of wire is inserted into its grooves. As a result, the future feeder should be assembled in the form, both in shape and size (photo 5, 6).
All that remains is to first fill one base with lead or tin, and after drying, fill the opposite side as well. After cooling, the central wire must be pulled out with pliers. All that remains is to disassemble the mold and get the finished feeder.
Each angler has his own priorities in fishing methods, as well as in the use of feeders. Those fishing enthusiasts who like to make their own tackle and fishing accessories will be able to make a sufficient number of wire feeders in a short time. You just need to put a little effort into making the molds and prepare the necessary materials and tools.
What is the weight of the feeder for the river and for the lake
Weight is the main parameter of the feeder. It is this quality that provides the prerequisites for selecting gear. The required mass depends on the type of reservoir, or rather, on the strength of its flow.
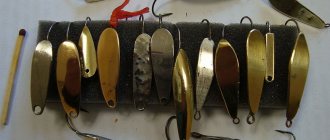
On rivers with moderate currents, massive types of bait devices are used, which make it possible to reliably hold the equipment at a certain fishing point without shifting or rolling along the stream. Preferred accessories are made in the shape of a parallelepiped with flat weights, the large area of which allows you to press more firmly to the bottom. The weight of such products is gained by lead plates and the weight of their own metal frame.
Feeder feeders for strong currents are made squat with a low edge, which makes it possible to more effectively prevent the forces acting on it. As a rule, heavy types include devices weighing 70 grams and above. All products with less weight can be successfully used in standing and weakly flowing reservoirs. In fishing practice in lakes, trapping and feeding troughs of various shapes are used. After all, here the accessory does not need to additionally ensure its stability, and the shape can provide advantages in casting range and exclusivity in the supply of complementary food, and the low weight contributes to the collection of a thinner and more sensitive rig, which directly affects the results of catches.
It is especially worth noting that the mass and volume of the device do not always correlate with each other. Homemade feeder feeders can be made of fairly light material and accommodate a large amount of complementary food, while their own weight will be of little importance. For currents, in special cases, they make an accessory that is miniature in size, but with a solid load, stable at the bottom and with high aerodynamic qualities.
Varieties and features of their manufacture
The classification of homemade feeders can be made according to several criteria, one of which is the fishing location:
- For fishing in still water. For this purpose, you can choose any shape and one of many materials. The main function of such models will be to deliver bait to the required location. If you need to throw over short distances, you can use lightweight materials. For long-distance casting, feeders must be large in size and heavy in weight;
For fishing in bodies of water with current.
Here the main function of the feeder will be to hold the bait point.To do this, they are made triangular, oval or rectangular. Sometimes, such devices are also equipped with special antennae that resist the flow.
In addition to their shape, these models are also distinguished by their significant weight. To fish on rivers with strong currents, you need a feeder weighing 100-140g. Accordingly, the fishing rod must withstand such a load;
In addition to purpose and shape, such gear can also be divided depending on the materials. Here even specialists and experienced fishermen cannot find a common opinion. Each fisherman has his own signature feeder.
You can construct such things from:
- Steel wire;
- Plastic bottle materials;
- bottle caps;
- Mesh devices;
- Tin and lead;
The choice of model should be made based on your own experience, and if this is not the case, then you need to read about each type of gear and then decide which do-it-yourself fishing feeder is best suited.
You can read about how to tie a leash to the main line here.
Closed or open
Feeder feeders, depending on the fishing technology, can be open or closed.
Important! The closed type is designed for feeding loose and less moistened types of bait, when it is necessary to create an extensive feeding spot, a feed trail or a column of nutrient turbidity that attracts fish to the bait.
A limited but leaky volume of the device is created by a mesh with a small cell size or by perforation in the body of the product. It is through these holes that the bait mixture in certain portions and consistencies is washed out, dissolving under the influence of water, and comes out.
Important! By changing the diameter of the holes, the angler can finely regulate the release of bait in the area where the trophy is attached.
Open types are used for hunting methods with the introduction of hooks into plastic and thick bait mixtures, and hooks are often placed on short leashes without the use of baits. The bait composition on the frame of the feeder is attached to special rigid ribs by squeezing the mass out of the matrix. The accessory in the form of a spring is filled by pressing the bait mixture into the volume of the device by hand. In such a densely compressed form, the bait is supplied to the hunting point, where the fish, having discovered the food, begins to eat it without any restrictions, while sucking up the hooks hidden in the mixture, becoming the fisherman’s prey.
Important! As a rule, open bait devices are used when fishing in standing and slow-flowing reservoirs. Closed accessories are universal and suitable for both standing and moderately flowing reservoirs. The only prerequisite for use is the technology of the fishing being carried out.
Types of feeders
The main advantage of fishing feeders is the ability to make them yourself, using improvised means.
Mesh feeders
Nowadays, mesh is the most common material for making feeders. Firstly, you can get it at any hardware store, both plastic and metal. Secondly, it is easy to work with, even while fishing.
- A fragment of approximately 4.5*10 cm is cut out of the mesh fabric. The dimensions may vary depending on what kind of fishing the feeder will be used for.
- A strip of 2*10 cm is cut out from a piece of lead plate.
- Now the mesh is rolled up to form a cone or cylinder. The joint line is crimped with a lead plate.
- The final touch in making a feeder with a net for catching fish is to use wire to make a fastening through which the fishing line will be connected to the feeder.
If there is a problem with the mesh, you can make it yourself from a plastic bottle, from which you cut out a rectangular piece of a suitable size, roll it into a cylinder and make holes using a hot nail.
Wire feeders
They are used for fishing on water with little current. Their sizes can be different, since it depends on what cross-section of the wire was taken for work. The larger the diameter of the wire, the more spacious the fishing feeder. The spring model is considered the simplest and looks like a spiral.
- Take brass and copper wire of small cross-section. You will also need a nut 1.5-2 cm in diameter (optionally, a steel rod).
- Using tools, wire is wound onto a rod; the number of turns should vary from 6 to 10 pieces, and the distance between them depends on what kind of food will then be placed in the feeder.
- The resulting spring is removed and using your fingers it is given a barrel shape.
- Next, a plastic or iron rod (tube) is installed inside the spring and the outer turns of the spiral are securely fastened to it.
For fishing on the river or at distances far from the shore, it is more rational to use a spring feeder made of rigid steel wire.
Plastic stopper in action
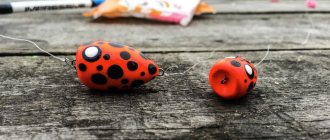
From available materials (an ordinary plastic bottle cap) you can prepare the simplest and fastest homemade fishing feeder, called a smoktukha or nipple. It is excellent for fishing for carp, carp, crucian carp, and bream.
- A round fragment with a diameter identical to the bottom of the plug is cut out of a piece of sheet lead.
- Using an awl (if you don’t have one, you can take a nail), two holes are made in the lead circle and the bottom of the lid.
- A soft wire is passed through the holes made so that the lead weight is on the outside, and the ends are twisted inside the plug.
- The next step is to use a nail to punch holes (3-4 are enough) on the side walls.
- A wire ring is attached to one of the holes, and leashes equipped with hooks are attached to the others.
- The final step is to prepare a dough of viscous consistency, which is used to fill the prepared teat feeder. Hooks are hidden in the dough. The point is that the fish, starting to suck the dough, will definitely swallow the hook with it and voila, your catch.
Now you know how to make a fishing feeder simply, quickly and using ordinary materials. But remember, they can get lost during fishing, so it’s better to prepare feeders for future use so as not to waste precious time.
How to make a feeder with your own hands
Knowing certain criteria for the planned fishing session, you can design and then build a feeder for the feeder with your own hands without much difficulty and expense. Fortunately, the material for making bait devices is in abundance nowadays and, to a large extent, you don’t even have to buy it. The main difficulty in production is the manufacture of cargo, which will require, albeit primitive, but still a certain metallurgical process associated with casting molten metal, mostly lead, into the form required by volume. The casting mold is prepared from gypsum, and the lead is melted on a gas stove, observing safety rules when working with hot processes.
All homemade feeders are distinguished by their exclusivity, and we will talk about some options for their production separately, focusing on the choice of material, its processing and the required technological operations for assembling a tool ready for a fishing session.
DIY feeder feeders made from a plastic bottle
This is one of the simplest and cheapest ways to quickly and efficiently make a feeder for a feeder. To work, you will need an ordinary plastic bottle, without any kind of imprint on its surface. The neck and bottom of the bottle are cut off. This produces a cylinder of pure plastic. Having decided on the size of the future accessory, we cut out a strip of plastic of the required size and twist it into a cylinder, connecting it with wire stitching, which is taken by straightening an ordinary paper clip. The next operation will be the installation of a load previously prepared from lead. It is more convenient to make weights in the form of a metal plate, which is bent in the shape of an arc along the surface of the cylinder and attached to a plastic blank by means of a rivet connection or twisted wire.
After manipulating the load, a hole is formed for the winding ring to be attached to the equipment and perforation is arranged. Perforation can be done by burning or drilling holes of the required diameter.
DIY bullet feeder
Such feeders are called “bullets” or “missiles”. They can be thrown over distances of close to 100 m with excellent accuracy (scatter of about 1 m). They enter the water quietly.
Materials:
- A 200 mm piece of high pressure polyethylene pipe with a diameter of 50 mm and a wall thickness of 4 mm.
- A piece of fine-grained foam.
Manufacturing instructions:
- Smooth out all burrs and sharp edges with sandpaper.
- Drill 16 holes Ø 10 mm in the tube, 4 in a row.
- A piece of foam is processed on an emery wheel. Finally, it is finished with No. 0 sandpaper. This will be the top of the float tackle.
- “Superglue” is used to connect the foam to the tube.
- Use a waterproof orange marker to paint the float and drill 5 mm Ø holes along the edge of the “bullet” body.
- Pass the winding rings and tie the slings to them. The ends of the slings are connected to a carabiner tied to them (withstanding 25 kg).
Recommendations:
- It is better to use monofilament line Ø 0.45 mm.
- By the way, fishermen call such feeders “rockets” because of the 4 stabilizers attached at the end. They can be either flat or slightly curved to the side. There is an opinion that the range of an accurate throw increases.
Metal feeder for feeder
Homemade feeder feeders made of metal mesh are also common in fishing. For the most part, accessories are made of parallelepiped geometry with open or closed ends. To produce such a homemade product, you will need to purchase a metal mesh and preferably a galvanized version with a cell no larger than 5x5 mm. To make a dozen products you will need no more than one square meter of mesh fabric.
Weights, as in the previous version, are used from a set of lead plates as needed for the conditions of the reservoir. From a canvas cut with metal scissors, a shape of the required size is formed by bending the sides of the figure using a mallet. The connection point is soldered with tin or fastened with a wire broach. The lead plate, processed over the area of one of the faces of the figure, is attached through a bolted connection and a spacer washer to the mesh base. A hole is formed on the plate for the fastening ring.
If necessary, the ends are sewn up with a mesh with a smaller cell or a solid sheet of tin. Burrs are ground along the edges of the mesh, preventing all kinds of tangling of the product with the cord, while eliminating its undercuts and deformations. The filed structure is ready for use in strong currents.
Do-it-yourself feeders for currents
Materials:
- Galvanized mesh, from a heavy equipment filter, with diamond-shaped holes measuring 11x6 mm.
- Wire Ø 1.5 mm.
- Swivel.
- Lead plate. Plate thickness 1-3 mm.
- 9 tin pimples.
Option 1
Manufacturing instructions:
- The feeder is manufactured using the technology described in the second version of casting a metal feeder for the feeder. The shape is hollowed out in the board, and the hardened wire is bent into a triangle.
- This technology successfully produces feeders weighing 70 grams. and more.
- A rectangular depression 4x2.5x0.4 cm is cut out of a birch board.
- Drill 9 shallow holes for the lugs. Drilling depth up to 3 mm. Drill Ø 3 mm.
- A swivel is passed into the frame frame.
- Stretch the frame into the mesh.
- A frame with a frame and a swivel is placed in the recess.
- Fill it with lead.
Option 2
Manufacturing instructions:
- Cut a blank into 3×12 cells from the mesh.
- Sharp edges must be blunted and bent into the body.
- The mesh must be bent into the shape of a cut French loaf of bread. With this shape, the feeder will fall quickly, but it will also rise better from the bottom with fast wiring. By the way, then when fishing, such a feeder can be changed a little. To do this, just slightly flatten or round the shape of the mesh. A flattened feeder will fall more slowly, while a cylindrical one will fall faster. The listed round shapes are used in weak currents. If you plan to fish in fast waters, then the net is bent into a pyramid.
- A frame is made from wire.
- Install the swivel.
- Now a base of 4.3 x 2.5 cm is cut out of the lead plate.
- The ends of the plate are bent outward. In other words, towards the shoe of the feeder.
- An awl is used to pierce holes for the frame.
- Pass the frame through the mesh.
- Place the ends of the frame along the base (bottom) of the feeder and use pliers to clamp the plate together with the frame.
- Solder the junction of the plate and the frame at the base of the feeder.
- Tin pimples are soldered on the back side of the base (shoe). They will be lugs. It is better to choose cylindrical pimples Ø 3 mm and 2-3 mm high for the role of lugs. By the way, tin lugs are more durable than lead lugs.
Recommendations:
- You need to work with liquid lead in a well-ventilated area.
- For feeders weighing 90 g. and more use feeder line Ø 0.3 mm. For light feeders (up to 45 g), a cord Ø 0.12 mm is also suitable.
- The cord must be new. Otherwise, a relatively large frictional force will act on it. This is due to the fact that due to long-term use, the cord will become frayed, twist around its longitudinal axis and be flattened.
- Additionally, you can equip the feeder with removable plugs at the ends. This regulates the speed of feed unloading. Also, to prolong the unloading of complementary foods, you can install a bandage with electrical tape or heat-shrink tubing in one or two rows.
- Some fishermen additionally secure the load in front of the feeder structure. This provides a good flight range when casting gear, as well as quick release of bait.
Homemade feeder for long casting
Long-range accessories are prepared according to the first or second principle in a purely cylindrical shape, which has great aerodynamic properties. Loading with a lead plate of a formed shape is not carried out; for this purpose, a rigid wire structure of three or four mustaches 2.5-3 cm long is installed at one of the ends of the cylinder, to which a lead weight cast in the form of a bullet is attached. The wire whiskers are attached to the mesh, soldered with tin solder. In the bullet itself, even when casting metal into the shell of the casting mold, antennae of the required size are inserted in advance, introducing them directly into the molten metal.
The fastening element, in the form of a winding ring with a swivel, is placed at the end of the workpiece opposite the bullet. Due to the center of gravity concentrated at a certain point, the bullet feeder for the feeder has a high degree of aerodynamic characteristics, which allows the tool to fly over particularly long distances, sometimes covering distances of more than a hundred meters.
Cork feeder feeder
This method of manufacturing a bait device can be confidently attributed to the field method of a quick and simply simple option for equipping a feeder rod. To organize the work you will need an awl or a sharp nail and a knife. The materials you need are a cork from a plastic bottle and pieces of tin, which you can get directly from a used tin can while fishing; the angler always has an option for canned sweet corn in stock. Tin is used to load the product, cutting round pieces with a knife to fit the size of the cork. A hole is pierced in the bottom of the cork and the tin circles required for shipment are mounted by stringing it on a wire, gaining the mass required for fishing conditions.
The workpiece is fastened by making a wire hook, attached to the edge of the cork in a hole pierced with an awl or nail. The grooves inside the cork, made to screw it onto the neck of the bottle, act as ribs that hold the bait inside. A simple, miniature, but quite effective device is capable of attracting fish at short fishing distances in slightly flowing reservoirs, and will also help out in moments of lack of bait devices or their loss, saving fishing from failures.
Assembling a floating feeder
This is one of the innovative solutions that allows you to use the device not only for complementary feeding, but also as a bite alarm when fishing in the surface layers of a reservoir. A do-it-yourself floating feeder for a feeder can be assembled from a woman's curler, which has a mesh cylindrical surface structure and is light in weight.
To impart a positive buoyancy property, a foam boss is built into the upper part of the curler, balanced with the workpiece in such a way that the upper part of the tool is kept above the surface of the water, and the lower section with bait is in the water, luring fish. Instead of a boss, it is possible to use the method of foaming the volume, followed by polishing the surface of the workpiece with sandpaper and painting it in a noticeable color.
DIY spring feeders
Designs in the form of springs will require for their manufacture a set of plastic tubes, which are similar in appearance to the used ballpoint pen, and steel wire with diameters from 1.5 to 3 mm. The wire is wound in even turns onto a cylindrical surface, placing the turns tightly together. Next, the body of the spring is formed from the wound coils according to the principle of symmetrically decreasing the diameter of the spiral from the center to the edges of the product. The shape of the workpiece should resemble contours similar to an egg. The formed body is threaded onto a plastic tube and secured with wire stoppers at both ends.
A hollow tube with a fixed spring is placed on the cord, ultimately forming a sliding mount. Leashes with hooks are attached to the coils of the spiral, and bait is tightly packed into the cavity of the spring. The spring, compressed before casting, weakens in the water, throwing out particles of bait and creating a cloudy spot around itself, and the remaining bait with hooks in the volume of the device will be sucked up by the fish that come up for the bait.
Do-it-yourself shooting feeder “Shotgun” under the feeder
Materials:
- Case for color film. It will serve as a housing for the feeder.
- Double strip spring.
- Helium pen.
Manufacturing instructions:
- Using round-nose pliers, bend the ends of the spring up to 6 mm.
- Remove the plastic spacer from the metal plug and vertically wedge and center the spring into the plug.
- Now lead is poured into the cork in a layer of 6-8 mm. The lead will firmly fix the spring, while the piston will slide freely inside the housing.
- Next, in the center of the piston, you need to drill a hole with the diameter of the handle rod.
- The tube is inserted into a spring with a piston.
- Melt the end of the tube on the back side of the piston.
- Clean the tube. After all, the fishing line will pass through it.
- At the bottom of the container, make a hole with a slightly larger diameter beyond the diameter of the tube.
- A piston is installed in the container so that the level of the piston coincides with the end of the container, and the tube protrudes at least 5 mm above the container. The excess is cut off.
- Press down on the piston and the tube comes out larger. After which the free end is melted. As a result, the roller should be equally distributed over the entire section of the tube.
- The piston is pressed into the container until it stops.
- To hold the spring compressed in the container, two holes Ø 7-8 mm are drilled on opposite sides of the piston.
Recommendations:
- You can make a “Shotagan” from a Kinder box, but such a feeder is enough for a couple of fishing trips.