Basic methods for determining depth
There is no doubt how important it is to find that treasured area among the bottom topography that can bring the desired prey. But there are often cases when inexperienced fishermen, unable to set the required depth on match equipment, abandon it forever
A completely opposite example, when it seems that in the middle of a flat bottom you can find a small depression that attracts fish. And then, to the envy of others, the bites come one after another.
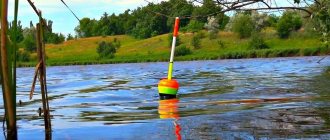
The line is passed through the marker weight ring and tied to the float. After the load falls on the ground, the float is attracted to it. By manually pulling the line from the reel to the marked mark or ring on the rod until the float floats up, we can easily calculate the depth.
It is worth noting that this method is not very suitable for fast currents, since the float is carried down. Due to the fastening at the bottom point, it floats up at an angle and is practically invisible. When the line is pulled up, it completely goes under water.
During the current, you can use another method for determining the depth. This is done like this:
- after throwing the load, we read the time it reaches the ground;
- make two turns with the reel, hook the cord to the clip;
- we wind up the tackle and throw it again to the clip, also counting the time;
- repeating the steps, we calculate the relief.
Unfortunately, using this method it is impossible to calculate which bottom is rocky, sandy, clayey, and so on. And it takes quite a lot of time to take measurements. For example, if you need to study the terrain at a distance of thirty meters, you need to make about fifteen measurements. If each one takes within a couple of minutes, it’s not difficult to calculate the time spent.
We set the Wagler to a maximum depth of 3 meters. We pull the line until the float floats up, and make a mark with a marker. We lower the waggler half a meter and again cast at the marker. The float, naturally, does not float up, so we pull up the line again. In this way you can measure the depth over the entire fishing distance.
We can agree that all of the above manipulations take a lot of time, sometimes at least an hour. The same distance has to be rechecked more than once, and in general more than a hundred meters have to be explored. But measuring the depth during match fishing will more than pay for all the costs if you find a catchable place, especially if you have to fish here more than once.
Measuring the depth with a marker float in feeder fishing
How the gear for measuring depth with a marker works. For these purposes, an inexpensive telescopic rod and a spinning reel are usually used. At the end of the main line, on a thinner leash, a sinker weighing 40-60 grams is attached - the leash, in case of a tight hook, will save the entire tackle, sacrificing only the sinker. Along the main line, on a ring with a swivel, a marker float moves freely.
When casting the tackle, the float moves directly to the sinker. Having cast in the chosen direction, we allow the marker to float to the surface by loosening the tension of the line. After the marker floats up, we begin to wind the fishing line onto the reel, counting the revolutions of the reel. Rotate the reel handle until the marker float hits the sinker. Different reels have different spool diameters, so the length of line wound in one turn of the reel is different for everyone. By multiplying the length of the line corresponding to one revolution of your reel by the number of revolutions of the reel before the marker reaches the sinker, we obtain the depth of the reservoir at the casting point.
After reaching the sinker marker and the calculations have been made, with the movement of the rod we move the weight along with the marker a meter closer to the shore. And again, loosening the line, we allow the marker to float to the surface. After the marker floats up, we rotate the reel handle, counting the revolutions until the marker hits the sinker - calculate the depth and again, using the rod, move the weight with the marker about one meter. And so on, all the way to the shore. Using similar casts, performed in a fan-shaped manner throughout the entire sector, we measure the depth of the selected place.
After a certain number of measurements taken, experience will come that will allow you to cope with this operation quite quickly.
Counting the depth
The simplest, but at the same time longer, is measuring the depth on the count. How to do it? In addition to the feeder and weight, we will also need a pen, paper and, possibly, a stopwatch. First, we throw the weight as far as possible. We cast and as soon as the weight touches the surface of the water we begin to count, making sure that the rod is pointing upward. We count and wait for the tip to play. At the moment the tip is played back, we finish counting. We write down the result on a piece of paper. Next, we make three turns of the coil and clip the fence. We begin to unwind the equipment and at the same time count the number of revolutions of the reel. Opposite the result that we wrote down at the beginning, we put the number of calculated revolutions. We make the next cast with such force that the fence is exhausted to the clip. The weight touches the bottom surface and we start counting again. The result was again written down on paper. We try to count once every half second. Some people think even faster. Let's just say that the faster the count, the more accurate the readings will be. As you might guess, the score means the depth at the point where the weight falls. The longer it falls, the greater the depth in this place. Again we make three turns of the reel after the weight lands and clip it. Yes, an important point. If we have braid on the reel, then the moment the tip is played back is more noticeable than if there was fishing line on the reel
And it is also very important to keep the rod parallel to the shore when casting, and when the weight touches the surface of the water, you need to slightly raise the rod. This process will take approximately 15-20 minutes, depending on how far you throw the weight
Experience suggests that we measure the depth until no more than 20 turns of the line remain on the reel. If there is no hole near the shore, then they usually do not catch at such a distance. We make notes in a column and then use them to create a graphic display of the depth. On the vertical axis we will have depth, and on the horizontal axis we will have the number of revolutions. We put points on the graph and connect them with a line. As a result, we get a bottom topography. In the figure it might look like this:
Counting was carried out twice per second. If it were done more often, then, for example, the beginning of the tables, channel edges would be clearly counted at 11, 13, or 14. If difficulties arise with the count, it is better to use a stopwatch on your mobile phone. Only in this case will you need a mount on the rod to securely fix the phone. What do we see in this image? We see sharp changes in depth from 4 to 5.5 and from 5.5 to 6.5, as well as from 7 to 5. In the first case there is a dump or the first edge, and in the second we have a classic channel edge. In areas with a sharp bottom drop, it sometimes makes sense to study the bottom in more detail. It makes sense to check the depth after each revolution. With the usual method, we check after three turns, and with a more detailed method, after one. Promising areas for fishing are indicated by arrows. This is a standard case when we have a pronounced coastal edge, in front of it there is a gradual decrease in the bottom and tables. The channel is located in the middle of the reservoir or a little closer to one of the banks. Returning to the topic, where is it better to cast, then in the morning and afternoon it is better to fish at the exit from the channel edge and on the second table behind the dump. And at night we catch on the first table. In general, this method of measuring the bottom can be called accurate, with some convention. What does it give? Firstly, you can get your own depth map for almost every body of water. Even if the river has a current, you will still get depth information if you use a heavy weight that will not be carried by the current. Secondly, you will always have at hand such visual drawings indicating perspective points. The next time you come to the reservoir, you will have basic information about the depth and you will only need to break through the main points and make sure that they have not changed. Thirdly, you can always measure the bottom when the fish are not biting. You can cast at different azimuths and deviations and get more detailed information about the depths. By compiling such maps for different places, you will fill your database with useful information. Upon arrival at the reservoir, you will not need to spend a lot of time scanning the bottom. Again, we take into account only the depth, without taking into account the structure of the bottom. We will look at how to read the bottom and identify shells, sand, silt and stones in another way - by dragging a weight along the bottom.
Why measure the depth?
Ask anyone who teaches newbies the basics of fishing what they teach them first, and the answer will most likely be how to study a fishing spot using a depth gauge. For most, this looks like a deceptively simple, elementary action that we do before every fishing trip, regardless of whether the place is familiar or not...
As for me, I find this process quite difficult. However, the result can be valuable information about your fishing spot... if, of course, you did everything right. The explanation for this finding consists of the following key points:
Choosing a fishing spot
First of all, you need to evaluate external signs, such as remains of traces of fishing by previous visitors:
- traces of the use of bait and lures;
- trampled grass;
- fire pits;
- remnants of bait and food packaging.
https://www.youtube.com/watch{q}v=5YFQNRXHTSY
Having chosen a place based on external features, you should find out the nature of the bottom and depth at the intended fishing site.
It is known that fish love exotic things. That is, those places that are somehow different from the surrounding reality. Since the feeder is primarily gear for the current, by “reality” we mean the river. It is impossible to list all possible options for all rivers and for all cases, so we will only indicate the path for “great thoughts”, and the rest is a matter of creativity.
Riverbed
The channel is easy to determine by the buoys marking the fairway. If the river is not navigable and there are no buoys, then the channel runs closer to the steep bank than to the flat one. If the banks are the same, then closer to the right bank (due to Coriolis acceleration for the northern hemisphere). In a river bend, the channel is closer to the outer bank of the bend. From the side of the gently sloping bank there may not be an edge of the channel; the depth will simply gradually increase.
Current speed
The speed of the current increases where the river narrows. If the current speed does not noticeably increase here, it means that the depth here is increasing. If the speed of the current increases without narrowing the river, it means that the depth here is decreasing. The faster surface current stripe on the surface of the river shows where the channel lies. In calm weather, an area with constant ripples in the water shows a sandbar. A section of the channel with a slower flow shows a hole.
Other signs
The clayey part of the bottom, as a rule, is deeper than the rocky one, and the sandy part is deeper than the clayey one. Below rifts, channel banks, artificial structures (bridge supports, stone embankments, etc.), as a rule, holes form. The turbulence of the current away from the channel also indicates a hole. Air bubbles coming to the surface in the same place indicate the presence of a spring. Promising places are also the mouths of flowing rivers and streams.
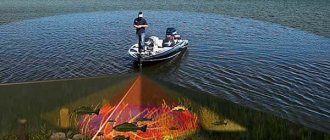
Having assessed the situation and made a decision, we begin to study the topography and bottom structure in the chosen location. The most accurate way to study the underwater environment is the method shown in photo 1. But in real life you have to be content with simpler, but also less accurate techniques.
It has been noticed that bottom fish prefer those areas of the bottom where there are some pronounced heterogeneities. These are holes, changes in depth, ledges on slopes, boundaries of a pebble bottom with a sedimentary bottom, a sedimentary bottom with algae, open areas of the bottom among algae, etc. In a word, everything that somehow contrasts with its surroundings. Our task is to find these areas (Fig. 1).
Measuring the depth and topography of the bottom before fishing with a feeder: where to start
Content
Correctly determining the nature of the bottom before fishing is an important component of a rich catch. An important question is of great importance, lies on the same plane in parallel with other aspects: how to find a promising place for fishing, know about the habits of fish, taste preferences in a specific period of time, standing on the shore. Scanning with a marker weight is relatively quick and quite simple. Any beginner in the field of fishing with a float or feeder can successfully cope with this task. There are no difficult moments in the process of determining the bottom topography.
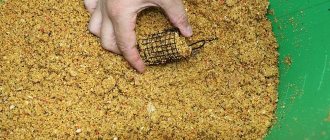
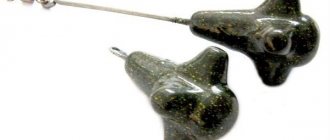
Before measuring the depth with a feeder or marker weight, you should carefully prepare for fishing at home. Experienced catchers make the device with their own hands, use their own know-how, and do not use the services of retail chains. Beginners can be advised to buy the necessary device, and when they gain experience, use it in practice. Usually such a load is a ball, a bullet, a bomb with stabilizers at the edges. A very good shape for studying the nature of the bottom with maximum sensitivity and great chances of long casting.
It has been noticed that bottom fish prefer those areas of the bottom where there are some pronounced heterogeneities
Measuring the depth with the feeder in the video. Tips from Vitaly Kolganov
: 21.01.2017
Vitaly Kolganov has released a good series of films about studying the bottom of various bodies of water. The bottom topography and methods for finding the best point differ in reservoirs without a current, rivers and artificial canals. With knowledge and experience, you can find the optimal fishing spot almost anywhere.
The correct feeding point is one of the basics of feeder fishing. Having several sinkers and different methods of using them, you can quite accurately understand what is on the bottom and choose the right feeding tactics.
How to measure the bottom with silt?
For the first video, Vitaly chose a small pond with standing water. In this video he explains the basics of measuring muddy bottoms. Uses different methods of studying with a sinker and using the Dipper Pro+ echo sounder. Muddy pond. Measuring the bottom with a feeder.
What weights are used for measuring the bottom?
Most often the shape is a drop, an olive or a marker weight. Their weight is 30, 56 and 112g. One weight is suitable for weak currents, the other for strong ones. In addition, weights of different weights signal differently the state of the bottom (silt, shell, sand, etc.).
What is the principle of bottom sounding?
Dragging We throw out the feeder and smoothly drag the weight along the bottom. As a rule, in a body of water with standing water, the bottom is smooth and covered with silt. The weight goes along the bottom with some effort and almost the same. The bottom of such reservoirs most often does not have sharp changes. It is covered with silt and carp and crucian carp live well on them.
In the case of a muddy bottom, is it difficult to find a good fishing spot by dragging a weight? Tapping the bottom is better for this.
Tapping the bottom Throw in the weight. When it touches the water, we begin to count until the weight falls to the bottom. Let's remember the score. We reel in the fishing line with 2 turns. We put the braid into the clip. We cast again and count. Etc.
This is how we see how the bottom depth behaves in a muddy reservoir. Decreases, increases or does not change (table). We have tightened the braid in the clip several times, and by releasing it, we can return to the desired depth.
So, by composing the bottom topography for yourself, you can decide on the best point and feed it. This could not be done by dragging a weight.
Where is the best place to fish if there is silt at the bottom?
As a rule, such reservoirs are of shallow depth. And with intensive feeding with a feeder feeder, the fish does not approach the equipment for some time. Therefore, it is better to come to such reservoirs and feed them early. It is better to choose a point for feeding on the table (a period of constant depth).
How to study the bottom of a river with a small current?
In the second video, Vitaly Kolganov studies the bottom with a feeder on the river. For this he chose the Moscow River in the upper reaches. River with a weak current
As a rule, it is easier to study the bottom on a river. For medium flow, a 56g weight is suitable. We make a long cast. And by dragging the load we look for a drop in the bottom (edge). The tip of the feeder gives a good indication of the bottom surface. Silt, shell, sand are clearly visible.
Most often, on a “classic” river, after the first casts you can find an edge and decide on the feeding point with a feeder feeder. On a familiar river, feeder lovers don’t even use a weight for tapping, but use a feeder to look for the edge and clip.
Determining the fishing point on a river with a medium current
The third video is about how to find a fishing point on a channel with a medium current. For practice, Vitaly chose the channel named after. Moscow.
Medium current
To begin with, we use a 56g weight. By simply dragging, you can roughly determine the characteristics of the bottom. If such weight is carried away by the current, then the load is placed more.
By dragging you can feel the bottom well. The tip of the feeder bends smoothly as the silt passes and “knocks” if there is a shell at the bottom.
On the river, they often feed not on the edge, but in front of it!
Such steps in front of the edge are not uncommon. And it is precisely feeding such a point that gives the best results.
Difficult bottom topography. How to decide on a feeding point if the bottom is flat?
For this video, Vitaly chose a complex body of water to study. Rowing channel. There is no bright edge or depth difference on it. The more interesting it is for learning.
A difficult bottom without significant changes in depth Vitaly clearly shows how, even under such conditions, you can find a suitable point for feeding fish. Muddy bottoms are always difficult to work with. The feeder does not register any special relief. In this case, a combination of different methods of studying the bottom is suitable.
Depth measurement options
There are several ways to study the topography of reservoirs, which are always used by experienced fishermen.
They use different methods and devices to help scan the bottom:
- combined;
- marker weight;
- jig wiring;
- drawing;
- measuring the depth with equipment.
This method is used on the current, mainly by beginners who do not know how to determine the topography and structure of the bottom by dragging or jigging.
Skills and auxiliary devices will allow you to find out a promising place for fishing:
- shell rock;
- seaweed;
- ledge;
- pit;
- lower, upper edge.
If the bottom is checked, the chances of a rich catch increase significantly. Beginners should not underestimate the use of marker weights.
What is an "edge"
Those who are not familiar with the terminology and have not encountered the concept of a river edge should figure out what it is.
In places where fast currents or strong turbulences of the flow wash away soil from the bottom, the depth of the river changes. Sometimes the bottom goes down slowly, almost imperceptibly, sometimes it ends abruptly. The slope is called a slope, the flat parts are called a table, and the places where the breaks are called edges. Some call the entire slope the edges, but this is incorrect.
Eyebrows are distinguished according to the following main characteristics:
By location relative to the water surface:
- The upper one is closer to the surface of the water, it marks the transition from a flat table to the beginning of the drop;
- The lower one, accordingly, is located lower, where the slope goes back into the table or shelf, if there are several height differences.
By distance from the coast:
- Beregovaya – located closest to the shore;
- Channel - frames the edges of the channel.
When the water is warm, fish accumulate near the shoreline. It is convenient because it has access from the shore. Later, with the arrival of cold weather, the fish go to feed deeper, to the riverbed edges.
Depending on whether it belongs to one of the elements of the bottom topography, the edge can be:
- part of a ditch;
- part of the pit.
Sometimes the current creates oblong depressions - ditches. Of these, the channel one, located in the center of the stream, is at the lowest point. In fact, this is an additional deepening in the riverbed. Those that appear closer to the banks are near the riverbed, higher. They are much smaller in size. A short riverbed ditch is often considered a pit. It is only possible to accurately determine the size using an echo sounder.
The edge of the river is not always a straight, even line. There are parts protruding into the channel. They are called "tongues". The bends towards the shore were given the nickname "pocket".
Rivers are mobile; currents, channel locations, and bank boundaries change over time. Consecutive depth differences are formed. Then you get whole ladders of steps, with horizontal sections - shelves. Medium-sized predators like pike, pike-perch or perch lurk here. The design of the shelves allows you to successfully lure fish onto the hook. But determining their location without available means is quite difficult.
Occasionally there are irrigations - smoothly rising wide areas between two edges or an edge and the shore.
Bottom irregularities are considered important for a reason. Small food accumulates on the sloped surface. It attracts small fish, which rush to collect food before it is carried away downstream. Small fish attract large predators. They hide in the depths and catch their food at the lower break. So, if a friend tells you that he caught a huge catfish on the edge, he is definitely talking about the bottom.
Much depends on the depth of the hole and the river itself. If the river itself is small, then you need to look for fish at the very bottom. If it is full-flowing, then the bends of the relief are interesting.
Catfish, bream, and large pike perch climb the lowest. Among the daredevils who get closer to the dump there are perch, pike, ide, roach, and small pike perch. Pike hunts at any time of the day; catfish and pike perch prefer the night. Good fishing spots are never empty, so there is often a queue.
How fish eat and behave
It may sound extremely ambitious to say that this can be found out by sounding the depth, but I believe it is no less important if you want to get the most out of it. When you carefully measure and mark the depth in each part of the area where you are going to fish, you have a “standard” for explaining and understanding what happened during and after the fishing is completed. For example, you cannot say that the fish wanted to bite 5 centimeters above the bottom if your depth measurement was not accurate enough