Deciding what kind of fish will be hunted
Before you start making a fishing net, it is important to decide on its exact purpose. Recommended cell sizes for different types of fish:
- roach, carp, perch – 3 cm;
- bream, crucian carp – 4.5 cm;
- pike – 1.5 cm.
Attention!
The thinner the thread, the less noticeable it is to fish. A light weight net is easier for fishermen to cast over long distances.
The meshes of the net are determined depending on the type of fish
What is the best material to knit a net from?
Before tying the tackle yourself, it is important to decide on the material underlying the mesh.
There are few common varieties, we can consider the advantages and disadvantages of all materials:
- fishing line network. Many fishermen prefer to weave a net from a fishing line, since the material is almost invisible in the water and is characterized by high strength, elasticity, and pliability during the knitting process. Fishing line is an accessible, inexpensive material with sufficient strength. Disadvantage: fishing line is not always appropriate for making large nets;
The net, which is popular among fishermen, is a catching tackle
- rope network. Less often, fishermen want to knit a net from a rope and only if they want to catch large species of fish. Rope is a dense, durable material that is easy to use in the weaving process. The main disadvantage is the fragility of the net; with frequent use, the rope will fray. Time has a negative impact, the material gradually deteriorates;
- nylon net. Nowadays it is popular to weave a net from nylon thread, which has durability, ease of repair work, resistance to high and low temperatures, strength and wear resistance. If desired, it is easy to dye the thread in a suitable color. The disadvantage of the design is that the capronka gets very tangled, and it takes a long time to get the catch.
Today, nylon nets and fishing line models in private fishing are the most common and effective. The fishing net is easier and faster to disassemble, but breaks more often, while the nylon variety is more durable, but more difficult to operate.
It is better to use nylon when fishing to catch trophy crucian carp, bream and silver carp. Strong fish are capable of damaging the fishing line and leaving, but they will become thoroughly entangled in the nylon thread and will not be able to get out.
Important! Choosing the right section is an art; a fishing line that is too thick will strengthen the net, but will turn out to be too noticeable; a cautious fish will notice the weaving points and move away. An excessively thin thread is unable to hold back the catch and is often destroyed when caught by large, fast fish. You need to find the perfect balance.
Overview of network types
Fishing gear comes in a variety of materials. Each of them has its own advantages and disadvantages and is suitable for a specific purpose. Therefore, it is recommended to independently weave nets only after becoming familiar with the characteristics and basic properties of the selected fiber.
From fishing line
Most often, fishermen knit a fishing net from fishing line. This synthetic material is inexpensive, strong, and quite light. Tackle made from it is almost invisible in the water column, which under favorable circumstances guarantees a rich catch.
During use, such a net rarely gets twisted, and it is easy to remove prey from it. However, with all the advantages, there is an important disadvantage: the net is not suitable for large fish, since the latter can damage it.
A fishing line net is suitable for fishing for small fish
From nylon thread
Nylon mesh, according to fishermen, is the strongest and most durable. It withstands temperature fluctuations well without losing its characteristics. If a hole forms in the product, it is eliminated with special weaving.
If necessary, a net made of nylon thread can be painted in the desired color. The most suitable shade will make it invisible in river or sea water. Typically, such gear is woven on machines, since the thread easily gets tangled and complicates manual work. Because of this, fishing enthusiasts often refuse nylon gear: they quickly get tangled, which prevents the catch from being retrieved.
Nylon thread net is more durable
From the rope
Fishing nets knitted from ropes are used occasionally, often in industrial fishing. This is explained by the fact that rope nets are only suitable for catching heavy fish. In addition, they are highly visible within the water column. Therefore, it is advisable to use such products when the boat comes across a huge school of fish, which means it will be easy to get a rich catch.
You can weave a net from a rope either with a hook specially designed for this purpose or by hand. This material is strong and durable, but during prolonged use it often wears out. In addition, it is worth remembering: it is difficult to pull out the dimensional net with a catch by hand. On fishing vessels, as a rule, auxiliary devices are provided for this purpose.
Tackle made from ropes and cables is rarely used
Step-by-step instructions on how to knit a net
Initially, it was customary to knit the net by hand. Of course, this process takes a lot of time and requires perseverance, but many fishermen prefer homemade fishing nets, since with some effort they will turn out to be very strong.
Each material has its pros and cons. For example, a fishing net made of nylon thread is much stronger, but it gets tangled very easily and it is difficult to get the catch out of it. Fishing line gear is lightweight and easy to deploy, but is only suitable for fishing for small species of fish. Large and strong specimens can easily make a hole in the net and swim to freedom (Figure 1).
Figure 1. You can tie a fishing net with your own hands
The cross-section of the thread should also be taken into account. The higher this indicator, the stronger the gear. But in this case, you need to stick to the golden mean, since a net that is too large and thick will be noticeable in the water, especially in the area of nodal connections, and the catch will simply go away. A net made of rope that is too thin breaks easily and is not suitable for catching large species.
Shape and size
Based on their appearance, networks are divided into:
- Single-walled. The simplest ones contain rebounds (lower, upper). The latter are attached to the veins located on both sides of the tackle.
- Three- or double-walled (putanki). They have a more complex mesh shape; fish caught in them often get entangled.
The length of the nets varies: starting from several meters and more, the height reaches 2 m. The sizes of the cells depend on the size of the fish, they are found in the range of 2-14 cm.
Landing
First, it is important to tie the main part of the tackle - the del. A huge mesh is assembled from several individual products. Then it is attached to a stable base: usually a braided cord. The described process is called “planting”. To carry out such a procedure, you first need to mark the cable and determine the cells for fastening.
Step-by-step instructions:
- Securely fasten the fishing line to the shuttle.
- Tie the end of the thread to the far cell, which in turn is attached to the picking cord.
- Then pass the shuttle through the required number of cells.
- On the rope, at the mark, make a connection.
- Repeat the described process until all the cells are attached to the lace.
The net must be equipped with weights and floats. Otherwise, it will lie at the bottom of the reservoir and lie there uselessly.
The network is placed on the cord manually
Tips for use
And finally, a few tips:
- the tackle is effectively used in the summer, in places where there are no obstacles for installing the screen;
- the screen is convenient to use in still water, but in currents the design is not very stable;
- It is better to attach the bait in the center of the screen or fix it next to the sinker;
- It is worth throwing bait periodically; careless fish will get caught in the net while collecting food;
- You cannot overdo it with bait, otherwise the fed fish will swim away;
- Some fishermen treat their nets with scents that attract fish from distant parts of the reservoir.
There are very two opinions about fishing “TVs”: some people love them because of the ease of manufacture and the passive method of obtaining a catch, but many people “cannot stand them” because the tackle is not sporty and of little interest. Regardless of opinions, the tackle shows good results, so it will be relevant for a long time.
Read Homemade sleds for fishing in winter
Originally posted 2018-08-15 13:32:22.
Chinese networks
Nets made in China are very popular among fishing enthusiasts. The low cost of such gear allows you to leave it in case of a snag, and if damaged, throw it away. Problems often arise due to the low quality of products. For example, saving on sinkers prevents gear from sinking into the water column; simple knots get untied during fishing. Therefore, when purchasing Chinese nets, fishermen with experience first improve them, eliminate shortcomings, and then use them for their intended purpose.
Self-weaving "American"
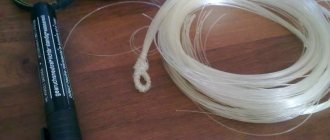
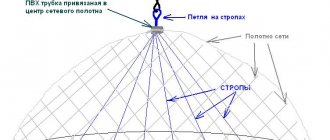
The fishing tackle is a round mesh with a weight cord stitched along the edge. The latter contains many small weights. Directly attached to the rope are slings of fishing line that pass under the net, extending upward through one opening. Collected in a bundle, they are attached to the rope. With the help of the latter, throwing is performed. The length of the rope can be up to 7 m. Such tackle is thrown into a reservoir, and after a while it is removed with the fish.
The main difficulty of the “American” lies in the technique of application. Mastering the process of casting this net requires a lot of practice.
The principle of operation of the “American” tackle is quite simple
Photo tips on how to weave nets
Read here Casting net - fishing methods, casting options, application features, pros and cons (120 photos)
Help the project, share on social networks 
0
Twisted mesh fabric
The Japanese made a huge contribution to the creation of innovative materials for fishing. As you know, they invented the mesh fabric. The panels created from twisted fishing line have extraordinary properties. A thread consisting of fibers (from 3 to 12) is called multimonofilament.
Mesh fabrics have the following properties:
- invisibility;
- high elasticity, softness;
- resistance to ultraviolet radiation and sea water.
When weaving such material, a double knot is used, and nylon fiber is used for tying.
Twisted fishing line mesh fabrics are made from multifilament thread
How to make it yourself
The mesh fabric is formed by crossing threads. They are securely linked with knots. Meshes are knitted from all kinds of fibers (silk, linen, nylon) with the same thickness and strength along the entire length. The raw materials used must be elastic and resistant to environmental influences.
The cells of the mesh are multiple quadrangles, their equal sides are fastened with nodal connections. The size of the cells is equal to the distance between the nodes.
How to knit correctly:
- It is recommended to start knitting with a row of loops. The number of the latter will directly depend on the size of the cell and the width of the product.
- Next, the half-cells are tied to obtain a panel of the required footage.
- The tackle is made using a template and a shuttle.
Important!
You can learn how to qualitatively and intensively form a fishing net with your own hands only after mastering various methods of tying knots.
Weaving nets for beginners will not be difficult
How to learn to knit a fishing net
Fishing with nets has been known since ancient times as a very effective, mass catch of fish. There are many varieties of nets, but the main ones are simple single-walled nets in an “oblique” cell. Weaving fishing nets is an ancient craft that is still alive today, since Fishing is still practiced today, but now factory nets are mainly used, and only a few are engaged in knitting nets.
Basically, fishermen are only engaged in repairing and re-equipping nets, improving factory nets for certain fishing conditions, this is mainly adding weights and floats for installing nets in various reservoirs with different currents and depths.
For a hermit, knitting nets, scarves, can be an excellent replacement for factory nets, since knitting is much cheaper than buying new nets, and knitting is also a useful pastime on long winter evenings. Knitting nets is a fairly simple craft that does not require any special knowledge or special means for knitting, the costs are only for thread or forest, which means they are minimal. The simplest method of knitting a fishing net is described in detail below.
INDEPENDENT KNITTING AND EQUIPING A FISHING NET
To weave a net, in addition to fishing line and special threads, in the absence of them, you can also use ordinary sewing thread, which is found in every home (if you use it, then black is better - it is stronger). A hook for knitting can be purchased in fishing stores, but in a hermitage these are the possibilities It may not be, and I gave a couple of ways to make your own shuttle for knitting a fishing net.
MANUFACTURING THE SHUTTLE
The dimensions of the shuttle are 3 cm wide and about 20-25 cm long. The width of the shuttle should be slightly less than the bar in order to pass freely between the mesh cells; if you need to knit a network with small cells, then you need a smaller shuttle, for example a 25mm mesh .,and the shuttle is 20-18mm.
After the workpiece has been sanded, it must be carefully sanded to remove any irregularities and snags so that the fishing line does not cling to the edges of the shuttle; this can be done with sandpaper, a file, a knife, etc. After the shuttle is ready, you need to wind a supply of fishing line onto it, winding alternately several turns on each side of the shuttle, placing the thread on the middle protrusions of the shuttle.
Knitting a knot
Often, the production of nets at home is carried out using simple but reliable ties.
Little finger knot
It is possible to achieve a high-quality result in the formation of a special unit if the actions are performed in the following order:
- With your left hand, squeeze the template (ring finger, thumb), insert the middle one into the cell located at the top, and pull it tight.
- Draw the thread from the last knot around the instrument, the ring finger, then hook it onto the index, middle, and little fingers.
- Press your little finger to your palm and, holding the thread tension, pass the shuttle from below into the 1st buttonhole.
- Make a lower overlap into the cell under the middle finger.
- Place the thread on top of the template and pull it to the top cell. At the same time, release all fingers, with the exception of the little finger, from the loops.
- When the plexus of fibers moves to the top of the instrument, pinch it with your index finger and thumb.
- Release your little finger from the loop and completely tighten the knot connection.
Such a knot does not move along the thread of the upper cell, so its sides will remain the same. If you have certain skills, it is possible to form this ligament even blindly, which is important for people with poor vision.
A knot through the little finger does not allow you to weave meshes with a cell size of less than 1 cm.
Tying a simple knot through the little finger
Knot with overlap at top
The knot knitting pattern includes two operations:
- Wrap the thread coming from the previous bundle around the template, insert the shuttle into the upper cell, then pull the last one to the edge of the tool (at the top). Hold this place, together with the small loop formed below, firmly with your middle and thumb.
- Draw a thread around your thumb and index finger. Pass the shuttle under the cell threads located below, over the fiber above the thumb and forefinger. Finally, tighten the knot tightly.
When tightening the knot, the thread should cover the loop of the upper cell. To do this, you need to move your thumb up a little. Moreover, the thread tightening the knot will be directed down and slightly to the right.
This knot is knitted in two steps
Knot with overlap at the bottom
The knotting procedure consists of two stages:
- Draw the thread around the template, pull the shuttle into the top cell from below, and pull the thread to the edge. Pinch the place where the fibers are intertwined with your fingers.
- The next operation is the same as when forming a knot with an overlap at the top.
Attention!
Simple knot connections (properly formed, tightly tightened) should be immovable.
Cellular nodes with double overlap
It is possible to prevent the upper cell from moving along the thread using a double-overlapping tie. Its difference from simple knots is that an additional overlap is made after tightening a regular knot or while knitting it. After the initial overlap and subsequent pulling of the shuttle under the fibers of the upper mesh, a second one is performed (below by the right thread). This knot is considered more compact and is excellent for knitting gear from 1-strand fibers.
How to weave a fishing net yourself at home?
Initially, networks were made manually. Despite the fact that now you can buy ready-made nets in specialized stores, many fishermen prefer to make them themselves. With certain information and enough free time, it is quite possible to create a network yourself. This is quite a painstaking job, but nevertheless it is definitely worth the time and effort.
Weaving methods
There are two most common ways to weave a fishing net:
- manual;
- mechanical (using a knitting machine).
Manual method
In this case, it is recommended to use a knitting shuttle as an auxiliary tool suitable for weaving a fishing net. Suitable options can be purchased in specialized stores, but if you wish, you can make them yourself from a thin aluminum plate. A fishing line or thread is wound onto the shuttle (it is used as a needle). The shuttle is a small tool, 10 to 15 cm long and half the width of the mesh, made of durable material. One end of the shuttle is pointed. It has a slot with a rod on which the working thread is wound, then fixing it at the second end of the shuttle, made in the form of a double-arm. In addition to such a tool, to make a network with even cells, a die is used - a plate several mm thick made of plastic, metal or textolite of the same length as the shuttle. This is a kind of template, a turn of rope around which is twice the size of the cell.
Weaving using a shuttle is performed as follows:
- A self-tightening loop of fishing line or rope should be put on the sharp end, which must then be pulled and pressed against the second part of the shuttle, and then wound, turning the machine relative to the plane in the process, so that the result is a kind of figure eight.
- You need to make a ring and pull the thread through it, forming a loop with a diameter of 5 cm.
- A bar should be attached to the knot formed below. The shuttle needs to be placed under the template and the thread pulled out through the formed ring. Then the thread should be tightened, held with your finger and a loop tied in a knot. Knots can be used with single or double overlap, which is formed in the process of connecting the lower and upper cells. The width and height of the future network directly depend on the number of connected cells.
- After completing the first row, you need to thread a tourniquet or tight cord through the cells. It then needs to be tied to a pipe or other fixed object.
- Now you can start weaving in length, which is similar to weaving in width. The difference is that the template in this case should be applied to adjacent cells instead of the bottom ones.
- When ready, the cells must be removed from the template, which must be located perpendicular to the network. In the same order, you need to continue weaving the next rows, each of which should start from the left edge.
- After the net is completely ready, it needs to be immersed in hot water to tighten the knots. It is necessary to attach sinkers to the lower edge, and floats to the upper edge.
In the manufacture of such fishing gear, various knot tying methods are used. It depends on how well the fishing knots were made. The strength and duration of use of homemade networks depends. When making such knots, fishermen use different tightening techniques. Knots made from fishing line differ in a certain way from the knots used in the manufacture of fishing gear from nylon threads.
Technique for performing knots:
- in your left hand you need to hold the template with your thumb and forefinger, onto which you must first put 1 loop;
- the working thread should be placed on top of the template and described in a full circle, capturing the ring and middle fingers in the process;
- holding the thread with your thumb, make a full turn around your index finger;
- pass the thread behind the little finger, then place the shuttle between the template and the palm and thread it through the loop on the index finger;
- from all fingers (except for the little finger) you need to release the fishing line and tighten the knot by pulling the main thread;
- The resulting knot must be held with the ring finger, then the line is dropped from the little finger and the knot is completely tightened.
Such nodes are considered an ideal option for self-manufacturing networks. They retain their tightness well and do not come undone, saving the fisherman from the need to repair this fishing gear for a long period.
For those who are accustomed to using nylon thread instead of fishing line, this method of tying fishing knots may seem quite difficult at first, however, over time, this process can be brought to automaticity.
Mechanical method
To weave a net in this way, you will need special equipment - a machine for knitting fishing nets, consisting of a body, a shuttle, a bobbin, an aluminum plug and a shuttle movement limiter.
Technique:
- It is necessary to wind the thread onto the bobbin, insert it into the shuttle and close it with a stopper. Then you should assemble the shuttle and install it all the way in the machine body with the plug facing forward. There should be a gap (approximately 3 mm) between the hook and the stopper. The thread will pass through it during weaving.
- The dimensions of the cells of the future tackle are determined by the shuttle on which the thread is wound. The cell includes the lower part of the machine. The thread enters under the shuttle and exits from above.
- The thread needs to be pulled to the template, pressing it with your finger, then throw it to the left in a half ring. Then you need to grab two cells so that the thread passes from the bottom of the machine, and tighten the knot.
During the weaving process, you can try different options or even use a method invented by yourself. The main advantage of using such a machine is that knots are knitted on it much faster than by hand.
Climb
As you know, a fishing net is not a simple connection of cells, but a continuous weave with a predetermined length. During its manufacture, it is important to take into account the size of the mesh and the length of the future product. The fishermen called the process of formation of the latter a gain in altitude.
In fact, the rope is knitted further so that a mesh is formed on both sides of the cells. The number of rows will depend on the desired dimensions of the future product.
It is much more convenient to gain height in the lower direction. When the initial row of cells is ready, the fishing line should be pulled through the outer loops. The mesh itself is attached to a pipe or other suitable support. Then, using a shuttle, they continue to knit the product of the required length.
All knots of the first row are knitted in the same sequence
Weaving
The main difference between the above and the following procedure: the template is applied to adjacent cells, while the finished ones are gradually removed (during accumulation). It is important to monitor the position of the tool relative to the grid: it should be approximately perpendicular. The latter greatly influences the shape and neatness of the finished product. Similarly, the tackle is woven along its entire length. It is worth noting that after finishing the weaving of the current row, the next one begins on the left.
It is recommended to temporarily immerse the finished tackle in hot water with a temperature of about 90°C. This will allow the knots to tighten completely. The upper edge of the knitted mesh is equipped with floats, but sinkers are tied to the lower edge.
How to weave on a loom
It is possible to weave a network by hand, but it will take a lot of time. Under such circumstances, much experience will not help much. Therefore, it is better to knit a fishing net using special equipment. If necessary, you can do it yourself.
The machine for knitting fishing nets consists of parts:
- The body is made from a pipe.
- Shuttle - contains a cut at an angle of 45°, small side openings for moving the thread (on the back side there should be a cone-shaped recess, approximately 2.5 mm, for attaching the bobbin).
- The bobbin is a part that moves freely in the shuttle.
- Offset limiter.
- Aluminum plug - designed to securely hold the end of the bobbin (placed in the hook, should not change its position when knitting).
It is not difficult to understand how to weave a fishing net on a loom. The main thing is to study the design of the device and follow the recommendations of fishermen experienced in this matter.
You can make the machine yourself
Preparatory actions
Before starting the process of knitting a fishing net, it is important to complete the following preparation:
- Carefully wind the thread onto the bobbin, insert the part into the place intended for it, and cover with the aluminum stopper.
- Insert the assembled shuttle into the device.
Attention!
The gap between the hook and the stopper should be about 3 mm. A thread passes through it when forming a mesh.
Knitting nets
The dimensions of the cell of the future fishing tackle are determined by a shuttle with a wound thread. The latter is fed under the shuttle and comes out at the top.
Sequencing:
- Press the thread with your finger, pull it to the template, throw it in a half ring to the left.
- Grab a couple of cells so that the thread passes through the bottom of the device, and carefully tighten the knot.
Using the machine, every master can practice all kinds of weaving methods and improve their skills.
Using a homemade device, knots are knitted much faster than by hand, and the finished product will be neater.
Weaving on a machine requires certain skills
Weaving fishing nets with your own hands
Initially, the net was woven by hand. It took a lot of time and required perseverance and concentration. However, with some information and patience, it is quite possible to weave a network yourself at home. An avid fisherman will only enjoy making his own tackle.
First, you need to acquire a tool and decide what material the network will be made of. To do this, you can use either nylon thread or fishing line.
The choice of a suitable thread depends on the purpose of the net (what kind of fish it will mainly catch), its parameters (length, height and mesh size) and personal preferences.
The “rag” is used when catching species such as silver carp, bream, and large crucian carp is expected. These representatives of the ichthyofauna can easily damage a fishing line net, but if they get caught in a nylon fishing line, they will become thoroughly entangled in it and will not escape.
It is important to choose the correct thread section. Naturally, the thicker it is, the stronger the network. However, here you need to follow the rule of the golden mean. Tackle that is too thick is very noticeable (especially knots) and scares away fish, while gear that is too thin is easily damaged and does not hold the catch.
Tools and accessories
You will need a knitting shuttle and a template. You can make them yourself. The shuttle is made from a thin piece of aluminum or getinax. The thickness varies between 3-5 mm. One edge of the shuttle is pointed and has a slot in the form of a rod on which the thread will be wound. The other end looks like a bicorne that secures the thread.
The thread is wound as follows: A loop is knitted and put on the rod at the top of the shuttle. Then the thread is pressed under tension to the lower edge, where the double horn prevents it from breaking, and the consumable material is wound, alternately turning the shuttle relative to the plane.
The amount of thread will depend on the length of the shuttle, the height of the rod and the depth of the double horn. As a rule, the dimensions of the shuttle are slightly larger than the size of the knitter's wrist.
The template is often made of plastic. It determines the size of the network cell and plays an important final role, so it must be done accurately and accurately. It is important that its edges are parallel and smooth.
A tourniquet will be useful to secure the beginning of the network, as well as a fixed support. As a rule, this is a gas pipe or battery. A thread is attached to it, from which the height of the net is gained, and then the finished tackle is knitted.
Knitting a knot
The strongest and most immovable knot is performed as follows. A template is brought to the finished loop (the first one knitted by hand), and the shuttle is threaded into it.
The thread passed through the loop is attracted to the edge of the template (it should pass from above) and is fixed with the thumb. Now the shuttle can be moved freely.
Possible difficulties
As practice shows, any difficulties with weaving mesh cells arise only at first. In the process of work, it is important to understand well how to knit a network (properly form knots, gain height). Provided that all the necessary skills have already been acquired, knitting fishing tackle will take place automatically. This means that a working person can even watch a movie at the same time.
Homemade tackle, knitted according to basic requirements, is much more convenient to use than a similar store-bought product. This is due to the fact that the fisherman can choose not only the material, but also the thickness of the fishing line and the type of knot for forming cells. The most important thing is that if the network breaks during intensive, long-term operation, it can be easily repaired and all damage eliminated. It would not be amiss to mention that the cost of self-tied gear is significantly lower than the price of a similar factory product.
It is possible to make a high-quality fishing net even at home. To do this, you need to decide on the dimensions of the cells of the future product, purchase suitable material, and prepare convenient tools. While knitting, you can experiment with different types of simple and complex knots. If the weaving process seems too slow, it is recommended to make a machine yourself. With its help, the knitting speed will certainly increase, and the finished product will look much better.
Did you learn something new? Share it in the comments!
Read
Knitting nets.
A practical guide for the fisherman.
DEAR READERS!
The brochure you purchased is a unique publication. For decades, anglers have been unable to obtain the most basic information about netting. This is how they “prevented” poaching, while at the same time depriving thousands of true nature lovers the opportunity to make with their own hands a cage, hatchery or landing net necessary for fishing.
Today, when store shelves are emptying as quickly as prices are rising, the ability to make your own fishing gear and accessories has acquired particular importance. The proposed guide will allow everyone to acquire the practical skill of knitting mesh fabric from available materials.
But don’t forget: your gear and fishing methods must strictly comply with the rules of recreational fishing adopted in the given region.
We wish you successful fishing!
KNITTING NETS
In the practice of sport and recreational fishing, net products are widely used: for nets, cages, lifts, etc. In addition, recently in some regions the use of net fishing gear has been permitted under licenses.
If you can't buy a net or a product made from it in a store, don't be upset. If desired, they are easy to make at home.
The mesh fabric consists of intersecting threads fastened with knots. Nets are knitted from linen, cotton, nylon, silk and other threads that have the same thickness along the entire length and tensile strength corresponding to the future product. The thread must be smooth, elastic, resistant to environmental influences.
In the extended position, the cells of the network (Fig. 1) are equilateral quadrangles, the sides of which (threads) are connected by knots. The cell size is determined by the distance between nodes.
Rice. 1. Mesh fabric:
1 - thread; 2 - node; I am a cell; P—cell size;
P - row of cells; P/2 - row of half-cells; W—network width; V is the number of cells in a row of network width; D is the length of the network; n is the number of rows of the network length.
The mesh fabric begins to be knitted from the first row of cells. The number of them in a row depends on the width of the network and the size of the cell. The required number of half-cells is tied to the first row of cells to obtain a fabric of the required length.
The net is knitted using a shuttle and a template.