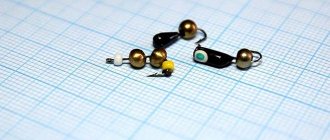
Fishing is a hobby that requires considerable financial costs, and many of us reduce them whenever possible by making bait and consumables with our own hands. In addition to saving, a significant role is played by the pleasure that the fisherman receives from catching fish with gear made with his own hands. For jig fishing enthusiasts, weights are one of the main expense items. It’s especially a pity to lose weights on a microjig, since with a weight of 1-7 grams their cost is comparable to weights for a heavy jig.
So, like many of us, I cast weights myself and tried many different methods of making molds, from the classics - plaster to aluminum.
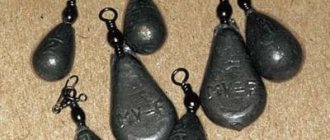
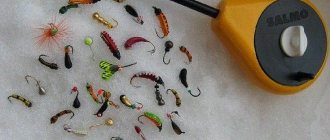
I don’t think it’s worth writing much about plaster molds. Everyone who tried to cast anything from easily fusible metals used it to make molds. What can I say about plaster molds; So this is that their production is quite simple, low-cost, allowing you to copy any complex shapes, that is, to make shapes not of simple Cheburashkas, but also of cargo with a more complex geometric shape. For example, a weight in the shape of a fish head, where the mouth, gills and eyes are visible. Which, of course, will not increase your catch, but, you see, when choosing baits, the fisherman takes what he likes and only then what he thinks the fish will like.
The above are inherent huge advantages of gypsum forms, but one huge disadvantage, which often outweighs all the advantages, is the service life. That is, one mold is enough for one, two - maximum five castings of good quality. Afterwards, the mold begins to crumble, crack, and the quality of the casting results in sagging and roughness, which, of course, does not affect the quality of fishing, but it all looks ugly and sometimes you have to spend time and effort removing excess sagging, which is also a huge minus. In general, it is possible and even necessary to make plaster molds, but only if you need to make one or two copies.
As for aluminum molds, of course, these molds are durable - they are enough for at least a couple of thousand high-quality castings, but there is a huge “but”, they are quite expensive, and making them yourself without access to sophisticated metalworking equipment is quite difficult, and sometimes not even possible. And it’s quite difficult to find the material from which the molds are made.
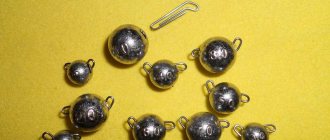
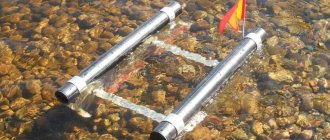
I made molds for casting eared Cheburashkas in the following way, which can be used in garage conditions. I took two aluminum plates with a thickness exceeding the radius of the Cheburashka by at least 4 mm, cut out two equal pieces, then drilled holes with different diameters and different depths, increasing the depth while decreasing the diameter of the drill so as not to exceed the size of the hemisphere of the required load. For greater clarity, see the diagram.
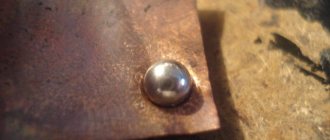
Then two half-forms are connected between them into drilled recesses, a ball from a bearing of the appropriate diameter is inserted and pressed in order to smooth out the steps formed during drilling. Then we process the mating plane of the half-forms with a file, press again and repeat this action until the two halves of the form fit perfectly against each other. After this, without removing the metal ball from the mating forms, we use a drill to make holes for the centering holes. Only then do we drill holes for the sprue and gas outlet.
At the moment, I have found for myself one method of making molds for casting sinkers, which, in my opinion, ideally combines two important factors: ease of manufacture and durability of the mold. In addition, my forms (like plaster ones) are easy to make and copy even small details, such as numbers indicating weight, eyes, mouth, gills on fish head weights. Along with the above qualities, these forms are durable and cost little more than plaster forms.
And so I make my forms from heat-resistant sealant.
Figure No. 1
I use this sealant because it is freely available.
And plaster. Figure No. 2
You can use any silicone heat-resistant sealant, any automotive or instant sealant.
Figure No. 3
So, we take a container (I use a plastic jar as a container) and pour a handful of plaster into it. Add a small amount of sealant to the plaster and stir with a wooden ice cream stick until all the sealant is mixed with the plaster.
Figure No. 4
Then pour the resulting mass onto a plastic bag and knead it like dough, adding gypsum if necessary. Knead until you get a homogeneous elastic mass with the consistency of dumpling dough.
Figure No. 5
After this, the mass is placed in the formwork. It must first be sprinkled with gypsum, which acts as a separator and prevents the mass from sticking to the formwork. For me, the function of formwork is performed by a container for bait. Then we put our dough into the formwork, press it tightly and level the top plane.
Figure No. 6
We half press the weight into the resulting workpiece, a copy of which we want to make, having previously coated the surface of the workpiece and the template itself with plaster. We trim the plane so that the mass fits tightly around the template. As a template, you can use not only ready-made weights, but also original forms made, for example, from polymer clay.
Figure No. 7
After the first half-mold has dried, make at least a recess in the free space on its plane for centering the forms. Then we make a new batch, coat the first half of the template with dry plaster (don’t forget about the separator) and place the second portion of dough on the first half of the tuyere, pressing it tightly to avoid the formation of voids.
Figure No. 8
We wait for it to dry, remove the mold from the formwork, cut out the sprue with a utility knife and wait for complete polymerization. Usually, this is 12 hours and the form is ready for use.
Figure No. 9
Figure No. 10
Figure No. 11
Figure No. 12
If anyone has any questions, write. There is a little video - I filmed it for a friend - but the quality is not very good, since I filmed it on my phone. If anyone needs it, I can send it to you via email or messenger.
Source: fMagazin.ru
Form for sealant weights
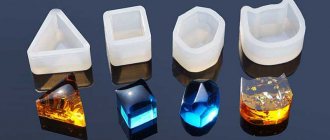
You can make a mold for making sinkers or spinning baits yourself without much difficulty, using plaster or silicone sealant, as well as a ready-made sample. For example, it is easy and also very unusual to make a mold from a sealant like “Hermesil” and the like. The main factor when choosing a sealant is its ability not to change physical properties when exposed to high temperatures.
The upper permissible temperature limits for most common sealants range from 150 to 180°C.
In this regard, the use of pure lead for casting sinkers is not very appropriate, since its melting point reaches 350°C. But you can take some alloys, namely printing alloy, Wood or Rose alloys. Their melting point ranges from 60-110°, and therefore, when using such alloys, the silicone mold will serve you for a long time and the sinker castings will be of high quality.
If lead is used as the material for the sinkers, the manufactured casting mold will withstand approximately 8-10 castings. It is also worth noting that each time the lead sinker will move further and further away from the original ideal due to the gradual burnout of the mold and sealant.
Silicone sealant can be purchased at specialized stores selling building materials or at auto stores.
Although such a mold for casting at first glance may seem completely unreliable, in fact it can withstand quite high temperatures, and thanks to its properties it will allow you to make a sinker or bait of almost any shape.
Making a mold for casting weights
Making a mold is not that difficult. First, we take a small box and completely fill it with high-quality sealant. When filling, be careful not to form bubbles.
Next, the original weight needs to be lubricated with a solution of wax or paraffin in gasoline. After drying, the sinker on a thin wire is completely lowered into the sealant, but it should not touch the walls of the box itself.
The weight sample should remain in this position until the sealant hardens. Due to the characteristics of the sealant, this process can last a couple of days or drag on for 5-6 days. Do not remove the weight until complete polymerization.
After the substance has hardened, we cut a small hole through which we extract a sample of the sinker. The elastic form is ready, which means you can try to make your own weight from lead or its alloy.
The metal is poured through the same hole that you made earlier to remove the original sample weight. Thanks to its unique physical properties, the silicone mold allows you to easily remove homemade sinkers or baits, after which it returns to its original form and is ready for use again.
Mold making
You need to prepare the gypsum mixture according to the “powder to water” rule, in a ratio of approximately 1:1, you need to focus on the consistency, it should be creamy.
Pre-lubricate our mold and samples with the prepared fatty cream.
Pour the mixed plaster into the container to fill exactly ½ of the container and tap it on the surface, expelling air bubbles. As soon as the gypsum begins to set, it is necessary to immerse our samples halfway in the hardening plaster. The setting time of the gypsum depends on the brand of the powder itself, the minimum time is 2 minutes, i.e. after 2 minutes we begin to carefully look at the surface of the plaster. As soon as it becomes matte, it’s time!
We insert guides along the edges of our form. It can be anything, I use pieces of wire, toothpicks, lollipop tubes.
Now we wait for complete hardening, 20-30 minutes is enough.
Then we lubricate the surface of the mold and the samples recessed in it with our rich cream.
We dilute the plaster again and fill the container to the top. We also remove air bubbles by tapping and leave to harden for the same 20-30 minutes.
After hardening, carefully remove the mold from the container and carefully separate it into two halves, removing the samples
That's it, the form is ready! We leave it to dry for a couple of days near the battery - the water should completely evaporate.
So I made 3 molds with different weights. Before the molds become unusable, the weights cast in them will last me for 2 or 3 seasons). The main disadvantage of such forms is their fragility. Gypsum is a fairly fragile material, so molds quickly crack, caverns and chips appear in them, especially for split molds. Bullet molds last much longer. For example, the uniform shown in the photo in the article is already in use for the second or even third season.
After the mold has completely dried, it is necessary to make sprues. To do this, mark the line of the sprue, connect the mold and drill out the sprue in the shape of a funnel using drills of different diameters. For the top point of the funnel I use a 10.1mm drill, for the bottom I use a 3.5mm drill.
Lead casting process
Lead alloys are multicomponent compositions that can contain up to 10% copper. Its presence significantly increases the melting point. The second most important component is antimony. The main advantage of lead alloys is that molds of almost any configuration can be used to work with them, at fairly low pressures. The melting point of lead is quite low - 325-350 degrees, and this allows you to cast lead parts at home.
For casting lead, injection molding technology is used. Melting furnaces use equipment that runs on various types of fuel - gas, fuel oil, coke and electrical energy. This equipment must ensure that the following requirements are met: 1. Minimum time spent on melting. 2. Minimal material loss. 3. Minimum fuel consumption. 4. Safe and comfortable work. To obtain molten lead and its alloy, the temperature provided in the furnaces is sufficient to melt the lead. Lead is processed in crucible furnaces. The main difference between this class of equipment is that the melt does not come into contact with fuel combustion products. Lead and its alloys are melted in furnaces with metal or graphite crucibles, which can operate on several types of fuel.
Crucible furnaces are produced in two versions: • stationary; • rotary. Furnaces with graphite crucibles for casting make it possible to melt various metals - lead, tin, and aluminum. Moreover, the transition from one metal to another occurs with minimal costs. But crucibles made of graphite have low durability and therefore crucibles made of cast iron are more often used.
The procedure for obtaining lead parts is as follows. Lead pigs or scrap are immersed, where the transition of lead from solid to liquid occurs. After this, the liquid material is poured into prepared models. The principle of castings in industry and households is the same, the key differences are only in scale.
Application area of lead casting
Lead is one of the top five non-ferrous metals used in everyday life and industry. It is second only to aluminum, copper and zinc. The properties of lead determined the scope of its application. The main consumer of this metal is the enterprise for the production of rechargeable batteries. This is because lead is highly resistant to alkalis. For installation in batteries, grids made of an alloy of lead and antimony are used. Certain volumes of lead are used for the needs of electrical engineering; it is used in the cable and wire industry. Fuel production also cannot be done without lead. It is used to produce tetraethyl lead, which is used to improve the performance characteristics of fuel.
The use of nuclear energy has given rise to many technical problems, and one of them is radiation protection. Lead absorbs gamma rays; it is this property that has made it possible to use lead for protection against radiation. The paint and varnish industry consumes large amounts of lead; lead oxide is used to produce red lead. Lead casting at home Lead casting at home is quite feasible. To obtain molten lead, it is enough to heat it to a temperature of 327 degrees. To do this, you can use a gas stove or burner. Some craftsmen manage to use industrial hair dryers that can heat the air up to 500 degrees.
As a rule, casting at home is carried out for the purpose of obtaining fishing equipment - sinkers, spinners. In addition, figurines of soldiers, parts of jewelry, etc. are cast from lead.
Fishing is a hobby that requires considerable financial costs, and many of us reduce them whenever possible by making bait and consumables with our own hands. In addition to saving, a significant role is played by the pleasure that the fisherman receives from catching fish with gear made with his own hands. For jig fishing enthusiasts, weights are one of the main expense items. It’s especially a pity to lose weights on a microjig, since with a weight of 1-7 grams their cost is comparable to weights for a heavy jig.
So, like many of us, I cast weights myself and tried many different methods of making molds, from the classics - plaster to aluminum.
I don’t think it’s worth writing much about plaster molds. Everyone who tried to cast anything from easily fusible metals used it to make molds. What can I say about plaster molds; So this is that their production is quite simple, low-cost, allowing you to copy any complex shapes, that is, to make shapes not of simple Cheburashkas, but also of cargo with a more complex geometric shape. For example, a weight in the shape of a fish head, where the mouth, gills and eyes are visible. Which, of course, will not increase your catch, but, you see, when choosing baits, the fisherman takes what he likes and only then what he thinks the fish will like. All of the above are inherent huge advantages of gypsum forms, but one huge disadvantage, which often outweighs all the advantages, is the service life. That is, one mold is enough for one, two - maximum five castings of good quality. Afterwards, the mold begins to crumble, crack, and the quality of the casting results in sagging and roughness, which, of course, does not affect the quality of fishing, but it all looks ugly and sometimes you have to spend time and effort removing excess sagging, which is also a huge minus. In general, it is possible and even necessary to make plaster molds, but only if you need to make one or two copies.
As for aluminum molds, of course, these molds are durable - they are enough for at least a couple of thousand high-quality castings, but there is a huge “but”, they are quite expensive, and making them yourself without access to sophisticated metalworking equipment is quite difficult, and sometimes not even possible. And it’s quite difficult to find the material from which the molds are made.
I made molds for casting eared Cheburashkas in the following way, which can be used in garage conditions. I took two aluminum plates with a thickness exceeding the radius of the Cheburashka by at least 4 mm, cut out two equal pieces, then drilled holes with different diameters and different depths, increasing the depth while decreasing the diameter of the drill so as not to exceed the size of the hemisphere of the required load. For greater clarity, see the diagram.
Then two half-forms are connected between them into drilled recesses, a ball from a bearing of the appropriate diameter is inserted and pressed in order to smooth out the steps formed during drilling. Then we process the mating plane of the half-forms with a file, press again and repeat this action until the two halves of the form fit perfectly against each other. After this, without removing the metal ball from the mating forms, we use a drill to make holes for the centering holes. Only then do we drill holes for the sprue and gas outlet.
At the moment, I have found for myself one method of making molds for casting sinkers, which, in my opinion, ideally combines two important factors: ease of manufacture and durability of the mold. In addition, my forms (like plaster ones) are easy to make and copy even small details, such as numbers indicating weight, eyes, mouth, gills on fish head weights. Along with the above qualities, these forms are durable and cost little more than plaster forms.
And so I make my forms from heat-resistant sealant.
I use this sealant because it is freely available.
And plaster. Figure No. 2
You can use any silicone heat-resistant sealant, any automotive or instant sealant.
So, we take a container (I use a plastic jar as a container) and pour a handful of plaster into it. Add a small amount of sealant to the plaster and stir with a wooden ice cream stick until all the sealant is mixed with the plaster.
Then pour the resulting mass onto a plastic bag and knead it like dough, adding gypsum if necessary. Knead until you get a homogeneous elastic mass with the consistency of dumpling dough.
After this, the mass is placed in the formwork. It must first be sprinkled with gypsum, which acts as a separator and prevents the mass from sticking to the formwork. For me, the function of formwork is performed by a container for bait. Then we put our dough into the formwork, press it tightly and level the top plane.
We half press the weight into the resulting workpiece, a copy of which we want to make, having previously coated the surface of the workpiece and the template itself with plaster. We trim the plane so that the mass fits tightly around the template. As a template, you can use not only ready-made weights, but also original forms made, for example, from polymer clay.
After the first half-mold has dried, make at least a recess in the free space on its plane for centering the forms. Then we make a new batch, coat the first half of the template with dry plaster (don’t forget about the separator) and place the second portion of dough on the first half of the tuyere, pressing it tightly to avoid the formation of voids.
We wait for it to dry, remove the mold from the formwork, cut out the sprue with a utility knife and wait for complete polymerization. Usually, this is 12 hours and the form is ready for use.
If anyone has any questions, write. There is a little video - I filmed it for a friend - but the quality is not very good, since I filmed it on my phone. If anyone needs it, I can send it to you via email or messenger.
Lead smelting molds
As noted earlier, lead is cast into molds to produce parts. Casting molds are made from different materials - steel, cast iron, graphite, and aluminum alloys are used in industry. At home, sand, gypsum, silicone and other materials are used. The lead casting mold can be made by hand, but mechanized equipment is most often used. Moreover, in many home workshops you can find hobby mechanical equipment.
Structurally, the mold for casting lead products consists of several parts: 1. The mold itself, as a rule, includes two parts. 2. Fusible or non-fusible rods, guides and locks. To make a plaster mold, you need to prepare two boxes made of wood. Then, gypsum, diluted to a creamy state, is poured into a wooden box. After some time, the plaster begins to harden, at which time the future product can be installed in it. In this case, it should be half immersed in plaster. This will form the first half of the mold. A similar operation must be performed to obtain the second form. After the plaster has dried, the form is ready. In order to be able to pour molten lead during the manufacture of the mold, it is necessary to form a casting hole.
Before pouring into the mold, its working surface must be greased with oil. This will make it easier to disassemble the mold later. After the workpiece is ready, it is taken out of the mold and subjected to mechanical processing. Parts can be produced using different types of materials to make molds. For example, casting into metal molds is the most common type used in production. Cast iron, steel and aluminum are used to make molds. On an industrial scale, the production of metal casting molds is not particularly difficult. All documentation necessary for the manufacture of molds is developed in the design bureau and transferred to production, where it is manufactured.
One way to make lead castings is to cast lead into a silicone mold. Making an injection mold from silicone is perhaps the longest time. The fact is that almost all operations to create a mold are done manually, applying silicone to the model in layers and carefully leveling it with your hands. In addition, it must be taken into account that the applied layer must dry, which takes 10–15 minutes. But in this case, the result lives up to expectations and the output will be a multi-turn form.
Lead casting
Lead and its alloys are widely used to make typefaces, plain bearings, and many small parts. In addition, lead is the main component of rechargeable batteries of different capacities.
Lead
In everyday life, lead is used to make fishing gear, weights for balancing wheels, etc. Most machine parts and components manufactured using lead are produced using foundry technologies.
Lead casting process
Lead alloys are multicomponent compositions that can contain up to 10% copper. Its presence significantly increases the melting point. The second most important component is antimony. The main advantage of lead alloys is that molds of almost any configuration can be used to work with them, at fairly low pressures. The melting point of lead is quite low - 325-350 degrees, and this allows you to cast lead parts at home.
For casting lead, injection molding technology is used. Melting furnaces use equipment that runs on various types of fuel - gas, fuel oil, coke and electrical energy. This equipment must meet the following requirements:1. Minimum time spent on melting.2. Minimal material loss.3. Minimum fuel consumption.4. Safe and comfortable work.
To obtain molten lead and its alloy, the temperature provided in the furnaces is sufficient to melt the lead.
Lead is processed in crucible furnaces. The main difference between this class of equipment is that the melt does not come into contact with fuel combustion products. Lead and its alloys are melted in furnaces with metal or graphite crucibles, which can operate on several types of fuel.
Crucible furnaces are produced in two versions: • stationary; • rotary.
Furnaces with graphite crucibles for casting make it possible to melt various metals - lead, tin, and aluminum. Moreover, the transition from one metal to another occurs with minimal costs. But crucibles made of graphite have low durability and therefore crucibles made of cast iron are more often used.
Lead casting process
The procedure for obtaining lead parts is as follows. Lead pigs or scrap are immersed, where the transition of lead from solid to liquid occurs. After this, the liquid material is poured into prepared models. The principle of castings in industry and households is the same, the key differences are only in scale.
Lead smelting molds
As noted earlier, lead is cast into molds to produce parts. Casting molds are made from different materials - steel, cast iron, graphite, and aluminum alloys are used in industry. At home, sand, gypsum, silicone and other materials are used. The lead casting mold can be made by hand, but mechanized equipment is most often used. Moreover, in many home workshops you can find hobby mechanical equipment.
Structurally, the mold for casting lead products consists of several parts: 1. The actual form, as a rule, includes two parts.2. Fusible or non-fusible rods, guides and locks.
To make a plaster mold, you need to prepare two boxes made of wood. Then, gypsum, diluted to a creamy state, is poured into a wooden box.
After some time, the plaster begins to harden, at which time the future product can be installed in it. In this case, it should be half immersed in plaster. This will form the first half of the mold. A similar operation must be performed to obtain the second form. After the plaster has dried, the form is ready.
In order to be able to pour molten lead during the manufacture of the mold, it is necessary to form a casting hole.
Molds for casting zinc products
Before pouring into the mold, its working surface must be greased with oil. This will make it easier to disassemble the mold later. After the workpiece is ready, it is taken out of the mold and subjected to mechanical processing. Parts can be produced using different types of materials to make molds.
For example, casting into metal molds is the most common type used in production. Cast iron, steel and aluminum are used to make molds. On an industrial scale, the production of metal casting molds is not particularly difficult.
All documentation necessary for the manufacture of molds is developed in the design bureau and transferred to production, where it is manufactured.
Silicone Lead Casting Mold
One way to make lead castings is to cast lead into a silicone mold. Making an injection mold from silicone is perhaps the longest time. The fact is that almost all operations to create a mold are done manually, applying silicone to the model in layers and carefully leveling it with your hands. In addition, it must be taken into account that the applied layer must dry, which takes 10–15 minutes. But in this case, the result lives up to expectations and the output will be a multi-turn form.
Lead Die Casting
Injection molding technology is used when the task is to produce small castings with thin walls.
This technology has certain advantages: 1. High precision castings.2. High surface quality.3. There is no need for further mechanical processing of cast products.4. Possibility of manufacturing workpieces with complex configurations.5. High productivity of the injection molding complex.6. Low number of substandard products.
7. Saving money and resources when producing large batches of castings.
Application area of lead casting
Lead is one of the top five non-ferrous metals used in everyday life and industry. It is second only to aluminum, copper and zinc. The properties of lead determine the scope of its application. The main consumer of this metal is the enterprise for the production of rechargeable batteries. This is because lead is highly resistant to alkalis.
For installation in batteries, grids made of an alloy of lead and antimony are used.
Certain volumes of lead are used for the needs of electrical engineering; it is used in the cable and wire industry. Fuel production also cannot be done without lead.
It is used to produce tetraethyl lead, which is used to improve the performance characteristics of fuel.
Application area of lead casting
The use of nuclear energy has given rise to many technical problems, and one of them is radiation protection. Lead absorbs gamma rays; it is this property that has made it possible to use lead for protection against radiation. The paint and varnish industry consumes large amounts of lead; lead is produced from its oxide.
Lead casting at home
Casting lead at home is quite feasible. To obtain molten lead, it is enough to heat it to a temperature of 327 degrees. To do this, you can use a gas stove or burner.
Some craftsmen manage to use industrial hair dryers that can heat the air up to 500 degrees.
Scope of lead in the home
Lead Die Casting
Injection molding technology is used when the task is to produce small castings with thin walls.
This technology has certain advantages: 1. High precision castings. 2. High quality surface. 3. There is no need for further mechanical processing of cast products. 4. Possibility of manufacturing blanks with complex configurations. 5. High productivity of the injection molding complex. 6. Low number of substandard products. 7. Saving money and resources when producing large batches of castings.