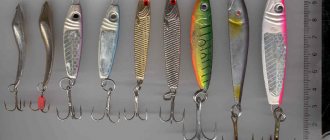
How to make a spinner at home
Catchy bait, which can be bought in a specialized store , is most often sold together with additional accessories that increase the cost of the bait several times.
It is quite possible to save money if you come up with your own version of producing “fast” and “slow” fishing gear. The amateur fisherman’s “secret weapon” does not have exact drawings; to manufacture the part, you can use your own designs with step-by-step instructions.
For experienced tinsmiths, it will not be difficult to use a strip of thin sheet steel , a file and a soldering iron. Making a spinner spoon will require attention and patience, because it must comply with the accepted standard and be made from environmentally friendly material. Before starting work you need to prepare:
- Soldering iron,
- Vise,
- Pliers,
- File,
- Metal scissors,
- Solder,
- FIM flux,
- Guitar string
- A strip of metal (copper, brass),
- Hook,
- Soldering acid.
Additional tools may also be required for ease of use. In the process of making “maropedka” the following may be useful:
- Protective glasses,
- Calipers,
- Flux brushes,
- Tweezers,
- Soldering iron stand,
- Polishing cloth.
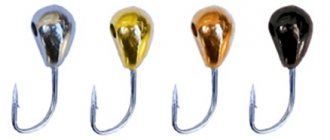
The thickness of the spinner material cannot be less than 0.1 mm. In principle, a catchable spoon model can be made from any metal, the main advantage of which is ductility and rust resistance.
Making a spoon
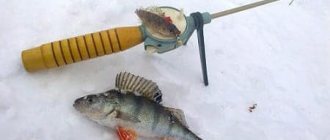
Winter fishing rod
If you have all the tools, let's start making the spoon. It is best to have a ready-made paper template with a life-size sketch of the spoon printed on it. I print the templates on special paper that has an adhesive backing. It’s convenient because you remove the protective layer and you can immediately glue the template onto the workpiece.
Download the template for the maropedka spinner:
- 35 mm long can be found here (link to template No. 1)
- 40 mm long can be found here (link to template No. 2)
We cut out a small plate from a sheet of copper or brass and glue a paper template onto it.
Then, using metal scissors, we carefully cut out the blank of the future spinner from the plate. This should be done with a small margin around the circumference; it is better to modify it later with a file than to accidentally cut out the working part of the workpiece. The excess can always be removed, but the missing part cannot be glued back.
We process the cut-out workpiece, giving it the desired shape of a paper template.
I don’t peel off the template, there is a center line on it, and I don’t need to draw it directly on the metal, it’s more convenient for me. We insert the workpiece into the vice so as to bend it along the longitudinal center line at an angle of 90 degrees.
Using a small hammer, bend the upper part of the workpiece. By the way, the bend angle does not have to be exactly 90 degrees. According to some unverified data, the same Technologist makes “maroped” spinners with different bend angles, from 90 to 120 degrees. I can’t say whether this is true or not, but no one forbids experimenting. We will not deviate from the parameters and bend it at 90 degrees.
If necessary, we once again go through the edges of the workpiece with a file, remove burrs and irregularities and tear off the paper template; it is no longer needed.
We clamp the workpiece again in a vice and alternately process both outer sides with a file. If the thickness of the metal is 0.4 mm or more, you can partially grind it off, thereby obtaining an even and sharp bending angle.
Now let's put the workpiece aside
And let's start making ears for tying the fishing line and tee. The material for the eyes can be the forend of a hook of suitable size, a thin guitar string, I use ordinary pins for this, using wire cutters to adjust the length in accordance with the size of the crown of the spoon. If necessary, I bend the eye of the pin with pliers so that there is no gap.
Everything is ready, let's move on to soldering. We treat the inside of the crown with soldering acid, and after tinning both ears with solder, we solder them one by one into the body of the spinner.
Then fill the crown with solder. Here it is necessary to observe the temperature regime and try not to overheat the crown, otherwise the solder will flow out of it along with the soldered ears, and you will have to start all over again.
We solder it with solder so that it completely fills the inside of the crown of the spinner and protrudes slightly with a hump upward, about 2 mm, then remove the excess solder with a file.
When everything is ready, we equip the spoon with a tee. If you like the tee to have colored decorations, then you need to do this before we put the winding ring on the tee. I buy ready-made tees with a drop, but you can make your own.
We cut cambrics from colored nipple elastic and equip the tee with them.
We attach the tee through a winding ring with a diameter of 4-5 mm to the spoon. All is ready.
I don’t polish the spinner; I consider excessive “store-bought” shine to be unnecessary and sometimes harmful. Therefore, sometimes I specially make such spinners, with camouflage colors, for this I use brass from old car radiators.
It should be understood that in artisanal manufacturing conditions it is difficult to achieve absolutely the same size and shape of the spoon. By the way, about the sizes, I already mentioned that I could not find a drawing with the dimensions of the “maropedka” on the Internet. Perhaps I didn't search well. So I made this drawing myself.
The distance from the eye where the tee is attached to the widest part of the spoon can be in the range from ¼ to ½ of its length. The closer to the middle of the spoon its widest part is, the better the spoon plans. I choose the golden mean - 1/3 of the length. The spinner game is simple and uncomplicated.
We lower it to a depth of one or two centimeters from the bottom and lift it with a sharp swing of the rod; when the spoon glides and goes down again, we pause for a few seconds. Then we repeat everything. This is the main way to play. The bite most often occurs during a pause. You can probably play it differently
Everything written above is the personal opinion of the author. Thank you for your attention.
Taran Sergey Nikolaevich - Specially for the site Homemade products for fishing, Novokuznetsk, Russia
Assembly of prepared parts
Before starting assembly, all structural elements must be tinned by applying acid to the work surface using a syringe with a thin needle. To ensure high-quality soldering of the ear, it is recommended to use a wooden block with a cut for homemade work as a supporting element. A small weight will help prevent the elements from moving. During the soldering process, the spinner must be held with pliers.
When soldering the central part of the part, it is recommended to control the degree of heating of the metal. Excess solder can be removed with a file, the finished bait is weighed, and the indicators are stamped on the body of the product. If there is excess weight, the part is rejected, and a new lure is made using the saved template. Damaged bait can be useful for catching other types of fish.
When the “maroped” is ready, the spoon is equipped with a tee. If the fisherman is a fan of “beauty,” then colored feathers, scraps of nipple elastic, plastic colored balls or other decorations should be attached to the winding ring of the tee.
There is no point in polishing the spoon to a mirror shine, as the fish are scared by flashes of light. Brass from a car radiator will help “dress up” the bait in camouflage.
Useful tips for fisherman
All parts of the structure are calculated according to the “golden ratio” rule with an approximate ratio of the longer length of the spoon in relation to the head part of 0.62 and the shorter length of the bait in relation to the head part - 0.38. Stable and smooth play with diving to the sides depends on the size of the wings and the weight of the bait.
For high-quality “work” in winter fishing, small-sized Maropedka spinners need an increase in the mass of solder; on large baits, purified tin is used for solder.
To protect the metal from oxidation, the spoon can be coated with a colorless waterproof varnish.
A home-made winter spinner “maroped”, the drawing of which you can draw up yourself, cannot have an ideal shape and size. A paper template will help you solve the problem.
Maropedka - a simple but catchy spoon
Do-it-yourself potato digger for a mini tractor, dimensions, drawing
As we have already said, the Maroped is an incredibly simple, but very catchy spinner that collects fish like a “vacuum cleaner.”
The author of the spinner and the very name “maropedka” is a fisherman-sportsman, the Champion of Russia in winter spinners - Alexander Vorobyov, aka “Technologist” on the Internet. Taking as a basis the spinner of Vladimir Matveychikov, the elements of the spinner “rhombus” and “torpedo”, and combining the names of these spinners, we got “MaRoPedka”.
Winter maropeds are made in sizes from 30 mm in length, with wings turned at angles from 90 to 120 degrees. For catching perch at shallow depths, the most catchy ones are 35 - 40 mm long with wings bent at an angle of 90 degrees. For fishing at greater depths, more weight of the spoon is required, and for this, the length of the spinner and some proportions must be changed.