Determining the depth of the reservoir
Fishermen use a variety of fishing methods in their practice, and each of them has its own specifics. Some of them are simpler, others are more complex, but all of them will require you to know the depth of the intended fishing spot. But to be called a versatile angler, you must learn all these methods.
Determining the depth using a fly rod
This tackle is considered the easiest to use and is used for fishing relatively small fish. It is with its study that fishermen begin their journey in fishing. Unfortunately, this method is not as effective as a plug, as this method requires time and several casts to one point to determine the depth.
The equipment consists of a regular float, sinker and hook, the only difference is that a depth gauge weight is fixed at the end. Under the weight of the sinker, the float will sink, i.e. if the depth is greater than that set by the float, then the float will sink, if on the contrary, it will lie down. And in order to achieve the desired result, you need to manually move the float along the fishing line and ensure that the float stands level, as with normal loading of equipment.
You can measure in the same way without this weight, but then the result will be less accurate. Also, using this method, the bait can be placed exactly on the bottom of the reservoir so that it does not lie or float above the bottom.
Plug as a depth gauge
Undoubtedly, a shortened plug is the most suitable gear for determining the thickness of the water layer and the bottom topography. To take measurements, you will need to equip your rod with a relatively heavy depth gauge sinker. And since the fishing line in this case will stand vertically along its entire length, the measurements will be jewelry-accurate. The length of the measurement will be limited only by the length of the gear. It is clear that if the plug is thirteen meters long, then it is unlikely that it will be possible to measure the reservoir beyond this distance. This, one might say, is the only disadvantage of this method.
You also don’t have to constantly re-cast the fishing rod: you only need to lift the depth gauge from the bottom and take it to another place. If the equipment comes off easily, the bottom is hard. In the case when the weight seems to get stuck in the ground and reluctantly comes out of it, then with a high degree of probability it can be assumed that the bottom of the reservoir is muddy.
Let's say a few words about the models of plug-in depth gauges. Their optimal weight ranges from 10-40 grams, and these indicators do not depend on their design. If you need to examine a closed body of water, then a device weighing up to ten grams will be enough, but for a fast river you will have to take a depth gauge with a maximum weight (otherwise the readings may be erroneous due to the windage of the fishing line).
Basically, a plug fishing rod is equipped with a conical depth gauge, on top of which there is a ring attached, and at the bottom there is a foam layer. This model is especially convenient if the fisherman needs to set the parameter “to the bottom”, or slightly above it. After this, the float moves upward along the main line so that a small piece of the leash is on the bottom relief.
You can also use the STONFO push-button depth gauge. When you press the button, a recess appears from the device into which the hook is inserted. When pressed again, the spring is activated and everything returns to its original place.
Another type of depth gauge is the so-called “toad”. These are lead rounds that open when pressed under the action of a small spring. An additional shed is placed inside the device. These models are used to determine the immersion depth of the tackle when fishing on a flat float (“lollipop”).
Task one: determine the “fishing spot”
First you should find places where there are irregularities, edges and leveled shelves. You should look for fish where you think they would like to be. Understanding at what point the fish congregate on the bottom is very important for fishing. On small bodies of water, pay attention to some external features: islands of vegetation, coastal thickets. On larger lakes, finding a suitable spot may take some time. And fishing in an unfamiliar place is always interesting!
You should definitely make sure that familiar and trusted places remain there. Even if you know that the two edges were located very close, it would be a good idea to check: you never know what has happened to the bottom since your last visit :-/! Sometimes you need to make sure that the shelf is within reach of the plug rod, because due to its length limitation, you may simply not reach the bottom! It makes sense to check a few meters from the main point - suddenly there will be an opportunity to put bait nearby. And, of course, carefully remember and study the surrounding area: you need to remember each planned fishing point. Now it's time to move on to the next stage.
Ways to measure the depth of a reservoir with float tackle
The easiest way to measure depth when fishing from the shore with a float (if long casting is not intended) and from a boat, when the depth is measured plumb. When float fishing there are two measurement methods:
1.
A sinker is tied directly to the hook.
2.
The measurement is carried out using gear configured for fishing, when the weights are at a certain distance from the hook.
In the first case,
Having moved the float a certain distance from the load, the tackle is thrown into the fishing spot. If the float has disappeared under the water, then you need to increase the depth (raise the float higher); if it lies on the surface of the water, the depth is reduced exactly until the float appears slightly out of the water. This is the depth in this area.
The second method already requires some logic.
So, if the float is lying on its side, it means that the weights are on the bottom, you should reduce the descent slightly - the float will take its working position.
At the same time, it should be understood that this is not the true depth yet - there are still leads. So, by reducing the depth by another length of the leads, you can get an accurate idea of the true depth, and the hooks will be located directly above the bottom.
On the current
To measure depth in currents
It is advisable to use a heavier sinker, and at the same time try to ensure that the line forms a smaller angle.
In still water
To determine the exact depth in a still body of water
You can use special marker floats, which can be purchased, or you can make it yourself, fortunately there is nothing complicated about it. Having thrown the tackle with a marker float to the fishing point, releasing the fishing line from the reel (you must remember the footage of the fishing line), you need to track the moment when the float emerges from the water. That length of the drawn line is the depth. To make it easier to measure the distance, you can pre-mark the length directly on the knee of the rod - a very simple and effective way that allows you to measure depth in still water at different distances.
Easy depth measurement in feeder fishing, a simple solution
When fishing on a feeder, the main thing is to choose the right fishing spot; in order to find one, you need to know the reservoir well and accurately measure the depth. In this article I will tell you how to find the optimal depth using simple means. Almost every feeder fisherman finds a fishing spot by chance, throws out the equipment, clamps the line on the reel and slowly drags the feeder to the shore; if the feeder was able to be dragged to the shore without hindrance, they think the whole place is real. And if you ask how deep it is, you won’t get an exact answer.
In this kind of fishing, even the slightest deviations in depth decide whether you will have fish today or just have a good time. Unevenness at the bottom of a reservoir attracts the attention of fish, such places decide the outcome of fishing, you need to be able to find such places to always please yourself and your loved ones with a catch.
Theory and practice
In theory, almost every fisherman knows how to measure depth, but in practice no one ever does this. They cast the feeder until the line is slowed down by the clip on the reel, and time the time the feeder hits the water and touches the bottom (some don’t even do this). The immersion time of the feeder is the depth of the reservoir; how to determine the duration of the fall is not important, you just need to measure it accurately, and here everyone does it in their own way.
One counts down evenly, the other turns on the stopwatch on the phone, now every mobile phone has an option. The first one has not planned it correctly, and the second one cannot decide on the start and when to press stop. In any case, the stopwatch is more accurate and you need to choose it, even if the fisherman makes a mistake in the calculations.
The error in measuring depth is 50-100 cm in a shallow body of water, where the fall time is not significant. In a shallow body of water, measurements are less accurate and the overall result is “vague.”
Also interesting: Bottom fishing rod
Measurement errors to a minimum
A more accurate depth measurement result can be obtained by attaching a light feeder weighing 20g; such a feeder falls more slowly than, for example, 60g. The longer the feeder is lowered (at the same depth), the smaller the measurement error. If possible, a light feeder can be thrown approximately 30 meters using the near zone. And if the distance is more than 30m, what is very important for the feeder?
Using heavier feeders will not solve the problem. Come to think of it! How can I make a heavy feeder fall more slowly? Yes, everything is simple, you need to lighten its weight at the moment of falling.
There's no place easier
Let's do this. From a piece of compressed foam plastic (not the white one that crumbles) we cut out a shape that will fit into the feeder, without changing the rest of the equipment. Before fishing, we insert the foam into the feeder and fix it with something so that it does not fly out of the feeder. As soon as we “catch” the depth, we take out the foam and start fishing. The weight of the feeder as well as its shape depends on how far from the shore you are going to fish; sometimes the distance requires the use of a 60g high-speed feeder; a large piece of foam will provide such a feeder with good buoyancy and will reduce the rate of fall.
When selecting polystyrene foam, you need to achieve the correct ratio of it to the feeder, this way you can reduce the speed of the fall, about 3 seconds per 1 meter of immersion. With such a speed of falling of the feeder, you can clearly “hear” its impact on the bottom if you use a braided line.
If the falling speed is lower, the result will of course be more accurate, but it will be difficult to determine the moment of impact; the bottom of the reservoir also determines a lot; with a muddy bottom it is difficult to determine the moment of touching the feeder, unlike a pebble bottom.
How the pros do it
We measure the fishing spot at 5-meter intervals and record the time the feeder falls in seconds.
Also interesting: How to choose a feeder rod and tackle for catching crucian carp
We measure the places we like, measure several times to get closer to the exact result.
The procedure may seem complicated to you, but after a little practice everything becomes easier. Step by step, recording the distance and time of the fall of the feeder, we will calculate the “hot spot”, and if the point also turns out to be in a depression (such places attract fish) that stands out on the monotonous bottom topography, then the fishing will definitely be successful. Thanks to those who read, good luck on the pond!
By the time of the drop of the load
You can approximately determine the depth by counting the time until the load reaches the bottom. The method is relatively accurate, especially in still water and if you know how long it takes your load to travel a certain distance in the water. I have two weights that I experimentally selected for myself: one of them travels a meter in 2 seconds, the other in one. Knowing this, I cast to the fishing point and mark the time until the weight reaches the bottom (this is marked by the sag of the line and the tip of the rod). For example, I counted 4 seconds using my weight, which sinks at a rate of 1 meter per second. Therefore, the depth is approximately 3.5-4.5 meters. Ideally, you should make several casts to improve accuracy.
As I already said, there are other methods, but I use the ones listed above. I hope the information was useful to you.
Methods for determining the depth of a reservoir from the shore
Correct depth measurement and choice of distance are the key to successful fishing. You can throw bait at a promising point, and then a rig with bait. And while it’s very easy to find interesting depth changes from a boat, doing this from the shore can be difficult. A depth meter and one of the measuring methods can come to the rescue. The choice of method depends on your fishing style.
- Since ancient times, fish have been caught using a fly rod. The fishing distance was limited to the coastline. It was possible to determine the nature of the bottom by shifting the sinker. If the float lies on the surface of the water, then the load is at the bottom. As soon as the displacement of the sinker causes the float to take its working position, the depth is set correctly. In this simple way you can measure the coastal waters and find an interesting place for fishing.
- But spinners know how to determine the depth at a long distance. During step-by-step retrieving, the bait sinks to the bottom, the moment of contact is transferred to the tip of the rod or transferred to the hand. By calculating the time the equipment falls, you can roughly determine where the deeper areas are and find exits from the pits.
Today, anglers have many ways to accurately study the topography of the bottom surface. After this, you can select the appropriate fishing distance and adjust the gear for the chosen location.
Determining the depth of the reservoir
Fishermen use a variety of fishing methods in their practice, and each of them has its own specifics. Some of them are simpler, others are more complex, but all of them will require you to know the depth of the intended fishing spot. But to be called a versatile angler, you must learn all these methods.
Determining the depth using a fly rod
You can measure in the same way without this weight, but then the result will be less accurate. Also, using this method, the bait can be placed exactly on the bottom of the reservoir so that it does not lie or float above the bottom.
Methods for determining the optimal depth for a well ↑
There are several methods for determining where water may be located on a site. However, most of them do not allow you to accurately measure the depth of the well, but only give a general idea of the location of the aquifer. Considering that the cost of drilling operations directly depends on the depth, it is advisable to initially know this parameter to form a budget. To do this, you can use one of the methods below.
- Get information from your neighbors.
If a natural source of water supply is already used in a neighboring area and the water quality there is quite acceptable, then you should ask your neighbors for a technical passport for the well. From this document you can find out not only the exact depth, but also other parameters, such as flow rate.
- Use a map of the geological section of the area.
Such a document is drawn up in the event of engineering and reconnaissance surveys in a given area. The structure and characteristics of the soil, as well as the location of groundwater, are plotted on the map. The presence of such documentation greatly simplifies drilling operations.
- Order exploration drilling.
This is the most accurate way to check the depth of a water well before organizing major work. However, for private needs it is used quite rarely, since the cost of exploration activities is not much different from the actual drilling of a well.
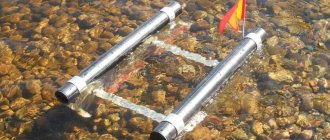
Determining the bottom topography and its structure
At the moment, the most common way to determine the relief and structure of the bottom is using marker equipment with a sinker. It can be made at home. You need to take a marker sinker with spikes or protrusions, a steel leash, a pass ring on the leg (preferably with a ceramic layer inside), a bottle cap, a swivel, a snap hook, and a special float. The leash will protect your equipment from mechanical damage, the cork will help it float, and the line will glide much better in a ring with ceramics.
Currently, to determine the bottom relief and its features, fishermen use several methods and their combinations. Let's take a closer look at them.
Jig wiring
This method is easy to perform and requires only basic knowledge of jig fishing from the fisherman. The main condition for this is the uniformity of the wiring and its pace. From the moment the jerk is made until the subsequent fall of the sinker to the bottom, the fisherman counts the time as quickly as possible. The relief of the reservoir (holes, edges, etc.) will depend on the difference in the count in different areas. It is clear that if the count increases, then the depth in this area is greater, and vice versa.
Broaching method (drawing)
If the tip of the tackle trembles and ringing movements are heard in your hand, then it is clear that the bottom of the reservoir is pebbly. If nothing interferes with the passage of the weight, then there is a sandy bottom below, and in the case where the movements are dull, it is shell rock. With long jerks of the rig, there is algae in front of you. If the movements are light, even with some slack - a slope, and if the movement is tight - an ascent. In the case of drawing equipment, you only need a cord. Please note that a lot depends on the action of the rod: the faster it is, the more effectively you can examine the selected bottom relief. In sport fishing, ultra-fast marker rods are used for these purposes. However, for experienced fishermen there are no problems in measuring using almost any gear.
Marker float tackle
The line is then manually released from the reel. In this case, the fisherman needs to control the mark on the fishing rod (if a marker is used), or monitor the first ring. It is imperative to count how many bleeds are made before the float floats to the surface.
You can do the opposite: make the float float up, then wind the main line onto the spool until it stops, while counting the revolutions of the reel. Now all that remains is to drag the weight along the bottom relief for a few meters (in order to determine its structure), and measure the depth again.
This method is used by matchmakers. When fishing with a feeder in fast rivers, it is of little use due to the drift of the float by the current, and, as a result, incorrect results of your research.
Along the shore and in the distance
If you need to measure the depth not far from the shore (3–5 meters from it), then this task can be easily accomplished with the help of an ordinary float rod. The depth at which the float begins to lie horizontally on the water is the depth of the reservoir in this place.
It is more difficult to determine the depth at a further distance - 25–35 meters from the shore. If you have a boat, then everything is simple: you drive up and measure using a depth gauge or echo sounder. There are methods using a marker float.
Counting method
But the easiest way to determine depth is the method used by many experienced spinners. This is a counting method: you need to count the seconds from the weight's contact with the water until it falls to the bottom in a given place. This is done simply: the weight is thrown into the point of the reservoir where you need to measure the depth. After touching the water surface (it is advisable that there is no slack on the line at this moment), you begin a second-by-second countdown: one, two, three, and so on. The end of the countdown is considered to be the moment when the line sag sharply. This means that the cargo has already landed on the bottom.
The best standard for such measurements is a weight or spoon weighing 17–22 grams, since in the water column they drop 1 meter in about 1 second. There will undoubtedly be an error with this method, but within 0.5 meters at a depth of 3 to 5 meters and about 1 meter at a depth of 6-10 meters.
§ 13. Measuring depths in the sea
Home / Publications / Literature / Bookshelf / G.G. Ermolaev, L.P. Andronov, E.S. Zoteev, Yu.P. Kirin, L.F. Cherniev. Maritime navigationClassification of lots. Navigation practice confirms the urgent need to have instruments on board the vessel that are always ready for action, allowing them to measure depths and take soil samples. Thus, careful measurement of depths at certain intervals makes it possible to thoroughly check the ship’s position in the fog and safely approach the anchorage. Depths at sea are measured with special instruments - lots.
Depending on the measured depth, lots are divided into deep-water and navigational. Navigation ones are intended for measuring relatively shallow depths. All sea vessels are equipped with them to ensure navigation safety. The design of navigation lots makes it possible to measure depths while the vessel is moving with sufficient accuracy for navigation.
Rice. 16.
Based on the principle of operation and design, navigation lots are divided into manual, mechanical and hydroacoustic.
Hand lot.
The main parts of a hand lot are lead (or cast iron) weight 1 and lotline 2 (Fig. 16). The weight has the shape of a truncated pyramid or cone, about 30 cm high and weighing from 3 to 5 kg. The upper part of the weight ends in an eyelet with a strap made of steel cable sheathed in leather threaded into it. A recess is made in the lower, wider part of the weight, into which a mixture of lard and crushed chalk is smeared before measuring the depth. When the weight is lowered to the bottom, soil particles stick to the putty. This allows you to determine the nature of the soil after the lot is lifted onto the deck. The weight is connected to a lotline, which is made from a line more than 50 m long and about 25 mm thick. Before breaking (marking), the lotline is pulled out well. When setting out, the place where the line and the weight connect is taken as zero, since when measuring the depth of the sea it usually rests on the ground. At a distance of 2-3 m from the weight, a brake-peg made of hard wood is thrown into the lotline, and then every 10 m - flags (multi-colored pieces of material) with the following sequence of colors: red - 10 m, blue - 20 m, white - 30 m , yellow - 40 m, white-red - 50 m. Each ten-meter section is divided in half with a leather mark with “hatchets”. A mark with one “hatchet” is inserted at the 5 m mark, with two – 15 m, etc. Each five-meter section is divided into five equal parts with leather marks in the form of teeth: a mark with one tooth is inserted in places corresponding to 1; 6; eleven; 16; 21; 26; 31 and 46 m; brand with two teeth - by 2; 7; 12; 17; 22; 27; 32; 37; 42 and 47 m, etc. Sometimes meter-long sections of the lotline are broken up into smaller divisions by small leather marks (for boat measurements).
The lotline is thrown from the windward side so that the lotline does not fall under the hull of the ship. A hand lot is used only at a vessel speed of up to 5 knots and a sea depth of no more than 50 m. At depths of up to 150 m, a diplot is used, the design of which is similar to that of a hand lot. You can only measure depths with a diplot while parked.
The hand lot and diplot are used not only for measuring depth. They determine the drift of a ship at anchor, the height of the tide at the anchorage site, etc.
Mechanical lot.
The action of a mechanical lot (Fig. 17, a) is based on the principle of hydrostatic pressure. The main parts of the mechanical lot are a bathometric tube, a weight 1 and a winch (Fig. 17, b) with a lotline 3, equipped with an automatic brake that is activated the moment the weight touches the ground. Using a weight, a copper pencil case 2 with a glass tube inserted into it (see Fig. 17, a), sealed at one end, is immersed in the sea.
Rice. 17.
As you dive, the air contained in the tube is compressed under the pressure of the water filling it. The immersion depth of the tube is determined by the formula where h is the height of the rise of water in the tube;
p0—atmospheric air pressure on the surface of the water;
b - weight per unit volume of sea water;
l is the length of the tube.
The inner walls of the tube are coated with a special paint that is washed off with sea water. This makes it easy to determine the value of h. Lot tubes have standard sizes. Therefore, the depth is determined using a special scale calculated according to formula (18). By placing the tube on scale 4, the depth is determined by a reading that coincides with the boundary of the washed-off paint in the tube.
The disadvantage of a mechanical lot is the labor-intensive process of measuring depth and the possibility of use only at a vessel speed of up to 12 knots.
Hydroacoustic lot.
Hydroacoustic surveys measure depths up to 2000 m at unlimited vessel speed. The lot's special instruments—recorders—give a visual representation of the topography of the seabed. The great advantages of sonar systems have contributed to their widespread use on sea vessels.
A detailed description of the principle of operation, design and operating rules of hydroacoustic lots is given in the fourth section of this textbook.
Forward Contents Back
Identifying stuck places
As for the snags of the bottom, to determine it, use the spoon you are going to fish with, which is not equipped with hooks. After casting, you also count down until the spoon reaches the bottom, then begin reeling. The characteristic blows and shocks transmitted along the fishing line from the contact of the spoon with snags and the bottom at a standard fishing speed will tell you almost everything about the topography and the snags of the bottom in a given place. Unexpected troubles during such a bottom check can be either a fish biting on a spoon that is not equipped with hooks, or the fishing line getting stuck between the knots of a snag.
After checking, you can start fishing, of course, equipping the lure with hooks. Taking into account the information received about the relief, after the spoon hits the water, count again, but start reeling in the line a little earlier than the bait hits the bottom. For example, if during the control cast you counted to ten, then start reeling the spoon at the count of eight or nine.