Most popular models
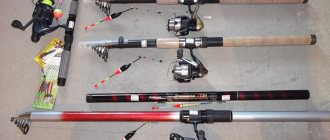
Many fishing companies produce fishing covers. But there are several companies that managed to create the most successful models that quickly gained popularity among fishermen:
- Aquatic Ch-39 - this model is designed for storing and transporting carp gear. This case has a tight-fitting valve that prevents your fishing rods from getting wet. The soft design has 6 compartments and a length of 210 cm.
- Aquatic Ch-30X is a hard case for fishing rods, made of high-quality nylon materials. The inner lining is made of soft fabric, which ensures better safety of gear. The strength of the structure is ensured by a two-millimeter plastic sheet. Ch-30X is equipped with two boxes for storing baits and a belt bag. Contains 3 spinning rods with reels.
- Aquatik Ch 63 - has a length of 80 cm and is designed for transporting fly fishing gear. You can simultaneously transport 4 fly fishing rods no longer than 3m.
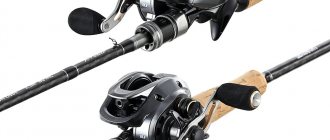
- Shimano HFG All Round Holdall - this case has 3 compartments in which you can carry spinning rods without removing the reels from them. The zipper opens along the entire length of the case, which makes removing gear from the case very convenient.
- Shimano Super Ultegra 4 Tube - has 2 hard compartments and is positioned as a model designed for storing telescopic fly fishing rods. The length of the product is 150 cm.
- Salmo 162 cm is a semi-rigid option for transporting Bolognese and match gear. Has 2 external pockets and a waterproof plastic bottom. Waterproof nylon with Rip-Stop technology will protect your fishing rods from moisture.
- Mikado 140 cm - this semi-hard case is quite versatile and suitable for various types of gear. It features camouflage colors and a rubberized top coating.
- Mifine KX-BE 150 is a spacious case with 3 small and 2 large pockets. It is popular among carp anglers and match tackle lovers. The one and a half meter length makes this model very versatile.
- Osprey 130 cm - this case is most often purchased by spinners. This model has 4 compartments that can accommodate 6 spinning rods. Osprey sets fairly reasonable prices for its products, while the quality of the product is at a high level.
The plastic bottom will protect the case from rubbing and increase its service life.
On the modern fishing market, covers for fishing rods are presented in a large assortment. A fisherman can purchase the model he likes at a specialized fishing store or order it online, for example, from Aliexpress.
Making a case for fishing rods and reels
Necessary materials
- 2 meters of raincoat fabric;
- Adhesive dublerin;
- Zippers – 1 piece 1.9 meters, 2 pieces 40-50 cm;
- Grosgrain ribbon – 3 meters;
- Sewing materials.
Step-by-step manufacturing process
First stage, pattern - From the middle of the fabric folded in half, measure and cut out 12 and 24 cm from one end and the other, after which we sew the pieces together. The length should be 1.7 meters. Pocket cutting was discussed earlier; Cutting out pockets – We sew 30 cm long locks to the pockets, zig-zag the edges and sew them to the workpiece; Spool compartment – We take measurements of the fabric to create a pattern that fits the size of the spool, and then glue the pattern onto the double sheet. The resulting blank should be sewn to the edge of the base, where the bottom of the case is located
Please note that the size of the fishing rod and reel fits exactly, take measurements very accurately; Handles - their manufacture was discussed earlier; Zippers – Sew a long zipper to the base, so that the cover is convex, leaving room for the spool. Sew the zipper along the edges, and then sew the base.
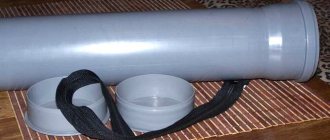
DIY hard case (tube) for fishing rods and spinning rods
A tube is a good option for protecting fisherman's fishing rods. This is a plastic pipe covered with thick fabric with a foam lining inside.
Necessary materials
- Pipes (Regular plumbing pipes or any other plastic pipe will do)
- Adhesive tape
- Belts
- Washers
- Stubs
- Bolts
Step-by-step manufacturing process
- Preparing the pipe - Before manufacturing, wrap the pipe with linoleum - it will protect it from the effects of water. Cut the pipe so that its size exceeds the length of the fishing rod by a couple of centimeters;
- Adhesive tape – Cover the pipe with tape, leaving the ends a few centimeters uncovered on both sides;
- Attaching the plugs – The plug must be firmly seated on one edge of the tube. If the plug is not tight, wrap the edges of the pipe with adhesive tape. The end with the plug will be the bottom;
- Drill holes and tighten the bolts – You need to drill a hole 19 centimeters from the bottom, then tighten the bolt. Near the other end you need to retreat 3 cm and drill two parallel holes. Screw the bolt into one of the holes with the thread facing outwards (this will be needed to fix the cover, use a smaller bolt);
- Belt and plug – Attach the belt holder and the belt itself. Before installing the top plug, you need to make holes that correspond to the tightened bolts;
Case for skewers
Many people love summer barbecue trips. If you make a case for skewers with your own hands, you can simplify the transportation of the tool and avoid unnecessary injuries. Other advantages of a homemade copy are low cost, efficiency, the ability to choose the size and shape, as well as the number of pockets and compartments.
If you do not have any special requirements, then it is advisable to focus on the simplest design - a case in the shape of a square or rectangle. This is the most practical option. Even a novice master can do it. A more complex model is the round barbecue bag.
Here are some important nuances:
- The handles must be made of dense, durable material - they must withstand significant loads.
- It’s better to also make a harness so that the bag can be hung on your shoulder.
Tube from a sewer pipe
It turns out that making a tube for a feeder with your own hands is quite simple. The mass of the resulting product will be about 450 grams . This means that such a case will not be an extra burden when traveling. Even a small child can carry a fishing rod in such a product.
The beauty of the case is that you don’t need to purchase anything to assemble it. You just need to carry out an inspection in your garage or your home. A homemade tube is a good replacement for factory-made cases, which rarely fit well with a single fishing rod.
DIY fishing rod and reel case
Every fisherman should have a case for a fishing rod and reel, since the reel is most often exposed to various dangers.
For example, dust or moisture may get into it, which will worsen the operation of this device, and what’s even worse - it may fall or hit something, and then it will definitely need to be replaced with another one.
And as you know, the cost of some reels can reach over $400, so experienced fishermen recommend using protective covers not only for fishing rods, but also for reels.
Necessary materials:
- zipper at least 20 cm long;
- strong threads;
- waterproof fabric material;
- a hard plastic shell with a lid (any strong box that can easily accommodate the reel is suitable for this);
- glue.
Manufacturing:
- First you need to fit the hard shell under the coil, because the device must be completely protected from external factors. If the height of the shell is too large and the coil sinks very deeply, then you can trim the edges of the box a little. In addition, the casing lid must close tightly.
- After this, you need to cover the entire surface of the protective box inside and out with thick fabric.
- Next you need to sew a zipper to the top side of the box and the lid so that you can easily open and close the case by opening the zipper.
- Using glue or thread, attach the pre-sheathed handle to one side of the spool case.
Do-it-yourself case for fishing rods and reels: pattern, how to sew a homemade bag-tube for fishing rods
Your favorite fishing rod can be damaged not only during transportation in a car or boat, but even during storage. Many fishermen keep their gear in closets, attics, and garages.
Dropping an object is enough to destroy the thin carbon blank. It is enough to simply damage the reel, which is comparable in cost to the fishing rod.
Depending on the accuracy of the fisherman, it is necessary to hide the gear in soft cases or hard tubes. They are widely represented in fishing stores, but are not always suitable for spinning or feeder masters.
Therefore, it makes sense to be smart and use scrap materials to make a case for your fishing rods. It will be as practical and convenient as possible, strong and durable. With such protection, the gear will always be in good condition.
Principles of making cases
Soft covers for fishing rods are made using simple technology. It is enough to plunge a little into the world of sewing to make your own reliable and convenient protection for gear. The entire manufacturing process can be divided into several stages. You should start making a cover for fishing rods with your own hands from a pattern.
To do this, just fold the fabric in half lengthwise and measure a width of 10-14 cm on one side and 22-24 cm on the other. By applying a ruler, the marks are connected into a line. The total length should be about 1.5 m. At the second stage, it is necessary to glue the fabric to the doubler. First, the pattern is applied to a piece of dublerin and the two materials are glued together with an iron.
For greater strength, the edges are stitched with thread. To make a zippered pocket, first cut out a piece of Bolognese fabric. It is better to glue the doublerin to it first. To connect the zipper to the pocket, a seam called “zig-zag” is used. After this, the pocket is sewn to the cover. Recommendation! It is better to place the pocket in the widest part of the case.
It is optimal to make 1-3 pockets. For ease of transportation, you need to sew on two handles made of thick fabric. The thread must be extremely strong. In order for the halves of the cover to be tightly connected, it is necessary to sew a zipper of a suitable length using a zig-zag stitch. This is done from the inside out side of the cover.
At the final stage, you should check the reliability of the connections and seal all corners and cracks near the zipper.
Covers made from denim pants
If you have old, worn-out jeans at home, they can serve as an excellent material for making simple, but strong and reliable covers for fishing rods.
Let's consider two options: • for transporting only fishing rods; • for transporting forms with reels. In the first case, we simply sew the legs together and sew up one of the ends, then attach elastic bands or rope straps.
Finally, attach a durable carrying strap. Here the seams from the same jeans served as a belt.
Then we put the rods in their original packaging into the denim case and tighten the rubber straps.
The second version of the denim cover can be carefully examined in the photo below, where you can see everything as in the pattern. The base is another pair of distressed jeans.
From the photo it is clear how to make a pattern and sew a cover. We also attach the straps, and sew the bottom of the trouser leg tightly. We insert the rods without removing the reels.
After this, we finally pack our fishing tools.
These types of cases are easy to manufacture and any fisherman can do them. After all, when making them, you don’t need to sew in a zipper, and in general everything is naively simple, you don’t need to use any sewing machines, you don’t need to use super materials..
Cover for case
To transport fishing rods, you need to equip the tube with a lid. A thick layer of leather can be used. It is necessary to measure the diameter of the plastic profile and add 3 mm to it. We cut out a circle of leather of this size. A slightly larger size will not allow the lid to fall inside the profile. We also cut out several more similar parts from leather, but this time they should be 1.5 mm smaller than the diameter of the tube.
All that remains is to glue the leather parts together. The lower part of the lid will fit tightly into the plastic pipe, and the larger upper element will prevent it from falling inside. The covers, which are made of leather, are practical.
How to make a cover for a fishing rod with your own hands
Making a case cover with your own hands is quite easy. To do this, you need to find a piece of high-quality leather and cut out a product from it the size of the profile of the case, only a few millimeters larger on both sides. This must be done so that the lid does not fall into the spinning tube.
Additionally, it is worth cutting out several more leather products using the same method. They should be 2 millimeters larger than the profile of the tube. After gluing these products together, their total thickness should be about 2 centimeters. It is allowed that the thickness of the cover for the case be a little larger, this will only improve its quality. When gluing layers of leather, it is better to make a small loop. With its help it will be much easier to remove the lid.
Types of cases
The rod cover not only performs a protective function, but also serves as storage for various fishing accessories. Covers can be divided into 3 main groups:
- soft;
- semi-rigid;
- hard.
A fisherman can choose any model based on his financial capabilities and required functional characteristics.
Soft option
Many fishermen use soft versions of cases to transport their gear, which are a long fabric bag with a zipper or riveted fasteners. Soft models usually have many spacious pockets that can accommodate not only boxes of bait, but also larger accessories:
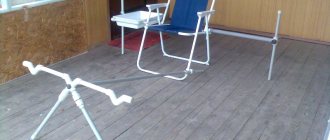
- folding chair;
- landing net;
- rod racks;
- umbrella.
The main disadvantage of soft cases is poor protection of fishing rods from shock loads. Such products can only protect gear from dust and dirt, as well as prevent the penetration of moisture, since in most cases they are made of water-repellent materials. The soft design can be used if the angler goes fishing in his own car, which has enough space to securely fix the cover.
In cases designed for carp tackle, rods are securely fixed in separate compartments.The height of soft products is usually from 1 to 1.8 m. The smallest options can be used for transporting and storing short telescopic fishing rods and stands. Long models accommodate several spinning rods or match rods.
The main advantage of soft cases is their low price, which can vary from 500 to 1500 rubles. It would be good if the lower part of the case, which often comes into contact with the ground, is reinforced with a leather lining, which will increase the service life of the product.
Soft designs are equipped with a shoulder strap and several portable handles. When purchasing, be sure to check the quality of the stitching and the serviceability of all locks.
Read: How to put live bait on a rod
Covers for spinning rods
Semi-rigid and rigid design
A semi-hard case is made of a denser material. In addition, most of the structure is reinforced with leather or polyester inserts. Such models can have from two to four compartments closed with zippers. Just like the soft version, the semi-rigid design has many pockets located on the sides. The shoulder straps are made more solidly than those of soft cases and have soft polyurethane foam inserts.
Special mention should be made of semi-rigid products that are intended for carp fishing rods. They are distinguished by a large number of compartments, each of which stores a separate fishing rod. In addition, these cases have a compartment for spools. Due to the fact that each fishing rod is in a separate compartment, the likelihood of breaking any element of the fishing rod is minimized.
Flying and Bolognese fishing rods are characterized by increased fragility, so it is better to transport them in hard cases.
The hard case provides absolute protection of the fishing rod from shock loads
The case of rigid models is made of hard plastic and is not damaged by careless handling or accidental falls. Such tubes usually have a sealed design that prevents dust and moisture from getting inside.
There is enough internal space to store 3-4 rods and reels. Some hard cases include a tripod stand that allows you to place the tube in a vertical position. The disadvantages of this option include the high cost.
When choosing a case, you should focus on the length of the fishing rod (assembled) that is supposed to be transported in it. The length of the case should be a little longer. The number of rods being transported should also be taken into account when purchasing a case. The portable shoulder strap must be adjustable in length.
Fishing tubes
Tubes are great for transporting spinning rods and feeder fishing rods. The tubes are made of hard plastic and covered with thick fabric. The length of these products rarely exceeds 150 cm. Such cases are popular among spinners who fish with fragile ultralight gear. The tube is equipped with a portable detachable strap.
Covers for fly fishing rods are compact in size and stylish in design.
In terms of capacity, this design is inferior to the case, but surpasses it in reliability and compactness. Recently, products have begun to appear that have 2 or even 3 compartments. Such models can be used not only for transporting spinning rods, but also as a case for feeder rods.
Tablet case
The fabric used must be strong and reliable. It is better to opt for synthetics. You can add leather inserts. It is advisable to choose dark shades of color.
A tablet is an expensive thing that requires careful handling. Therefore, he simply needs a cover. It's quite easy to make it yourself.
No special knowledge or tools are needed. The Internet is full of master classes on the topic “making a case for a tablet.” Look through a few, add something of your own to the selected option - and the original case for office equipment is ready.
Thus, you can make the case yourself. It is not at all necessary to spend money on buying template products. An exclusive case will become the subject of your pride and the envy of others.
DIY soft case for fishing rods
Soft cases for storing fishing rods are usually made of materials that do not allow moisture to pass through. They differ in that they have a large number of large and small pockets designed to store various fishing accessories. Soft cases are distinguished by the fact that they are multi-place and can accommodate several fishing rods at once. They are very convenient in cases where fishing is carried out in cultivated reservoirs.
At the same time, you can purchase a case for transportation and storage:
- Ordinary fishing rods.
- Spinning rods.
- Bottom gear.
- Feeder gear.
If you have to go fishing not over a long distance, then it will be enough to purchase a regular soft case without spending extra money on an expensive hard one. The main thing is to purchase a case that will accommodate fishing rods and reels and other accessories. It’s good when all the fishing rods are complete and upon arrival at the pond you just need to take them out of the case and they are ready for use. The fact is that if there is no high-quality case, then fishermen transport rods and reels separately. Therefore, they spend a lot of time installing reels on fishing rods, and this is not exactly conducive to fishing.
A soft case is not so difficult to sew at home from scrap materials.
To sew a soft cover you need to stock up on:
- Patience and free time.
- Non-wetting fabric, such as tarpaulin, 2x1.5 meters in size.
- Belt tape.
- Zipper fasteners – 4 pieces 70 cm long and 4 pieces 25 cm long.
- A good sewing machine, and if you don’t have one, you can sew it by hand.
- Step-by-step sewing instructions.
Sewing process
- A piece of fabric is laid out on a table or floor, after which half a meter of material is cut from it.
- This strip should be cut in half again. The result will be 2 pieces of fabric, measuring 75x150 cm.
- There is no need to throw away the trimmings. You can use them to make patch pockets measuring 35x35 cm.
- Pockets are formed like this:
- The folded side edges are simply stitched.
- To obtain the required volume, a z-like insert is placed on each sidewall.
- For secure fastening, the fold is sewn from the bottom.
- The bottom is turned up 3 cm, after which the side parts are sewn on without fixing the ends.
- After this, the pockets are attached to the base: first the lower part, then the side ones and finally the upper part.
- Then the belt tape is sewn on:
- First, a piece of the required length is cut from it to form handles.
- After this, find a place on the cover where the handles should be attached and mark this place with chalk.
- The handles are sewn on several times for reliability.
- The places where the handles are fixed should be at the top level of the pockets.
- At this stage the lock is sewn in.
- The sides are sewn together. The attachment points are sewn several times for reliability.
- We can assume that the work of making a fishing rod cover is completed.
Additional recommendations
The case can not only be decorated, but can be made quite noticeable against the background of nature
Sometimes this is very important, because in the turmoil you can simply step on it if it is unnoticed. In this case, it all depends on the level of your own imagination
What can be done:
- Embroider personal initials. This will allow him to be identified in any case.
- Decorate the case with some applique related to nature.
- Attach keychains to the clasps.
- Place boxes in the pockets to store small parts.
There is another option - making a cover from an old bag. This is one of the easiest and fastest options to have a fishing rod case.
What is needed for this:
- Find an old sports bag, up to one and a half meters long, and remove the excess width by cutting off all excess with scissors.
- After this, the cut area is connected and securely sewn a couple of times.
- Then you should sew on the handles of the desired size.
- You can leave the pockets that were on the bag, as they will come in handy.
- In some places, you can overlap and sew pieces of fabric for strength.
- The zipper is sewn in with several lines for reliability.
- The bag-case is ready for use: quite quickly and quite economically.
Regardless of the type of case or tube - homemade or purchased, the main thing is that it fulfills its protective functions, is easy to use and practical. Of course, purchased products do not always meet all the requirements: they are either too small or too large. This applies not only to covers, but also to other fishing accessories. Therefore, some fishermen practice self-production, which allows them to solve many problems.
DIY hard case for fishing rod
A tube is practically a hard case, which has both advantages and disadvantages. In some situations, a hard case is preferable to a soft product. In most cases, fishing rods suffer during transportation, as well as at the time of loading the fishing rods. Because the tips of fishing rods are quite fragile, their protection is necessary, otherwise fishing may not take place. In addition, there are times when you have to make your way through the thickets and there is basically nothing to do without a cover. If you use a tube, it will reliably protect the rods from any mechanical action because it has a solid structure.
Based on this, a hard case can solve many of the troubles associated with moving fishing equipment. In most cases, tubes are made of plastic, with subsequent lining on the outside of a dense, wear-resistant material.
It contains fastenings and a soft lining designed for various fishing accessories. Cases made in the shape of a pipe are called tubes.
The simplest hard case for storing fishing rods can be made from the most unexpected materials. In fact, in every house it is possible to find the remains of sewer pipes, since virtually everyone has repaired their own home, and especially the sewer system. Along with this, we mean a sewer pipe with a diameter of 100 mm. Also, in every home you can find an old briefcase, which you may also need to make. In this case, other options are likely, you just have to dig deep into your household trash.
Materials needed
- A sewer pipe made of plastic, up to 1.5 meters long and at least 100 mm thick.
- A pen from an old school backpack or a second item that has served its life.
- A plastic lid for a mayonnaise jar, despite the fact that you can make the lid yourself from plastic.
- Epoxy glue, despite the fact that it is better to glue plastic with a special glue.
- Tools for working with glue.
- Hacksaw for metal.
Manufacturing development
- The required section is cut from the plastic pipe, taking into account the length of the fishing rods. For this, a hacksaw is used. When cutting a workpiece, you need to control the evenness of the surface. If the work is not done well, then the surface should be leveled.
- Epoxy glue is prepared for work: - Epoxy resin is poured into a separate container, after which the hardener is added in the required proportion. — Increasing the dose of hardener activates the gluing process, but the strength decreases.
- The surfaces are prepared for the gluing stage: - The areas are cleaned with sandpaper. — Then, the places are degreased.
- Epoxy glue is applied to the cut of the pipe, after which a mayonnaise cap is placed in this place. The gluing areas are pressed well. After 24 hours the product can be used. The glue can be used for about one and a half hours. Based on this, it is possible for them to glue together some other details, but for this they need to be prepared in advance.
The process of making the tube is now complete
- The handle is cut off from a school (dilapidated) briefcase and glued to the finished tube. The handle is distinguished by the fact that it is ergonomic and soft, and it is also possible to adjust its length.
- The last stage boils down to the fact that the tube is refined. It is possible to glue some decorative overlays from the same unnecessary household elements to it. In this case, you will need some imagination.
Making a tube cap
The tube is actually ready, but it does not have a lid, so there is no way to securely store the fishing rods.
Development of lid manufacturing:
- To do this, take a piece of sheet plastic, from which a circle is cut out, the size of which is slightly larger than the diameter of the pipe.
- A strip of about 3 cm wide and a length equal to the circumference of the circle is cut out of plastic.
- The parts of the lid are glued together using the same glue and secured with tape.
- Glue a piece of foam rubber corresponding to the diameter of the pipe inside the lid.
Then, we can assume that the tube is ready for use. Along with this, you need to wait until the lid elements are securely glued together. It may turn out faster if you use a special glue for plastic in your work: diluting epoxy is not always convenient, and it hardens quickly.
Step-by-step manufacturing process
- We measure and cut a piece of plastic pipe of the required size, after carefully measuring the dimensions of your pet.
- Preparing epoxy glue for use:
- in a small container, mix the resin with the PEPA hardener in the proportion of 100 parts of resin to 10-12 parts of hardener;
- increasing the amount of hardener reduces gluing time, but reduces strength.
- Preparing surfaces for gluing:
- lightly sand with sandpaper;
- degrease the surfaces to be glued.
- Apply the prepared glue to the cut of the pipe, insert the plastic lid from the mayonnaise jar and press tightly. It sets very quickly, but maximum strength is achieved after 24 hours. The shelf life of the glue after mixing is 1.5-2 hours. By the way, a very convenient thing, you can even glue the bitten off tails of baits, the glue is quite stable in water. This completes the process of making the bottom of the tube.
- We cut off a strap from a school bag and glue it to the finished tube. It turns out to be a very soft and comfortable handle, and even with a length lock. Depending on how you want to transport the fishing rod in your homemade hard case, the length of the handle can be adjusted.
- If desired, our work of art can be decorated, for example, by gluing an applique with a favorite type of fish or a caught trophy to the junction of the handle and the case. As a result of such manipulations, the tube acquires a more noble appearance. In short, the flight of fancy is not limited.
Read Fishing in Omsk on the Irtysh
Sources
- https://bolshoyulov.ru/kak-sshit-chexol-dlya-udochek-i-spinningov-svoimi-rukami/
- https://ribaku.info/snasti/spinning/chehol-svoimi-rukami
- https://intellifishing.ru/snaryazhenie/izgotovlenie-chehla-udochek-svoimi-rukami
- https://fishelovka.com/equipment/osobennosti-samostojatelnogo-izgotovlenija-chehla-dlja-udochek
- https://ulov.guru/snasti/poplavochnaya-udochka/kak-svoimi-rukami-sshit-chehol-dlya-udochek.html
- https://FishingDay.org/chexol-dlya-udochek-svoimi-rukami/
- https://klevoklev.com/prinadlezhnosti-dlya-rybalki/izgotavlivaem-chexly-dlya-udochek-svoimi-rukami.html
- https://ribalka.guru/masterskaya/tubus-dlya-udochek-i-spinningov
- https://superulov.com/zametka/fishki/chexly-dlya-udochek.html
DIY case
If you don't want to purchase a separate reel case, you can easily make one yourself. To do this, prepare a piece of thin plastic pipe in advance. Its length and width must correspond to the dimensions of the coil. To cut such a product as accurately as possible, you can use a hacksaw. If necessary, it is better to trim the surface of the material at the end.
After this, you need to prepare the epoxy adhesive mass. It is poured into a separate clean container. Then the hardener is added there. In this case, all the necessary proportions must be strictly observed in order for the mixture to obtain the desired consistency. Later it is worth preparing the surface for gluing. To do this, you need to thoroughly clean the surface of the material; this can be done using sandpaper. Then you need to degrease all treated areas.
The epoxy mixture is applied to the cut of the pipe. An unnecessary small cylindrical lid is placed in this place. The gluing area is pressed as tightly as possible. This case will look like a durable tube for fishing reels. Separately, you can build a plastic lid or take a ready-made one. With its help the case will be closed. Such models are most often used to store fishing rods themselves, but they are also suitable for reels. These options differ from each other mainly in their dimensions.
If necessary, additional small compartments made of fabric or mesh can be glued to the surface of such a cylinder-shaped case to accommodate other parts. The inside of the finished case can be lined with soft fabric to provide additional protection. Sometimes the surface is also finished from the outside.
Types of covers for fishing rods
Covers for fishing rods are divided into soft, semi-rigid and hard. The simplest fishing rod cover is made of soft fabric and protects fishing rods from dirt and water. It can hold 3-4 rods with or without reels. Also, in such cases it is convenient to transport racks and stands for fishing rods, landing nets, a small folding chair and a small sun umbrella.
In soft cases, fishing rods will not be protected from shocks and other mechanical damage. They can be used in cases where you manage to secure and place the cover in transport so that the likelihood of damage to the fishing rods is minimal. The height of such covers can be from 1 m to 180 cm. Short covers can accommodate folding telespins and floats and a landing net with stands. Longer ones can accommodate feeder rods and spinning rods. The advantage of such products is their low cost. More advanced models have a leather lining at the bottom. It increases the life of the product. Models without such a lining wear out faster, since there is constant contact of the rods with the bottom, and the bottom, in turn, often touches the ground.
Such products have the usual accessories: a simple shoulder strap and handles, regular locks with a zipper. There is a partition for fishing rods inside. They are sewn from polyester fabric that does not allow water to pass through. If you handle locks, belts and other elements carefully, they will serve you for more than one season. When purchasing such a cover for fishing rods, be sure to check the reliability of the locks and the quality of the seams in various places.
The second type is semi-hard cases. They are made from rigid polyester with the addition of leather and rubber. These models have several compartments that are closed with zippers. There are pockets of different sizes on the sides. They are convenient for storing various fishing and related accessories.
The shoulder straps of these cases are made of reliable material and have soft inserts that do not put any strain on your shoulders when carried.
More expensive models have compartments for fishing rods inside. They are designed for carp rods. This is what they look like from the inside:
As you can see, inside the case there are compartments for reels and each rod is in a special compartment. With this placement, they will not touch each other and the likelihood of breakdowns will be minimized. Let us note the strength of the fabric from which these models are sewn. It can withstand heavy loads and after repeated use the fabric does not lose its properties and looks like new.
Such covers for rods can be purchased by both athletes and lovers of carp and bottom fishing. During long carp sessions it is often necessary to leave the covers out in the open air. During this time there is a large temperature difference and it may rain. Despite all these natural phenomena, the covers remain just as durable, functional and suitable for subsequent fishing trips.
Hard cases are best for keeping your fishing rods intact. They are also called coffers. Such models have a plastic frame that remains intact after falls. They do not allow moisture and water to pass through, and the rods will be absolutely safe during transportation.
The internal space is enough to accommodate up to 3-4 or more rods with or without reels. Some models are equipped with special stands that allow them to be placed in vertical or inclined positions:
For obvious reasons, the cost of hard cases is slightly higher than soft and semi-hard cases. However, if you have expensive rods and don't want the hassle of breaking them, then you're better off buying a hard rod case.
How to make a tube
Fishermen have found a new use for plumbing plastic pipes. It is enough to find a piece 1.5 m long with a diameter of 100 mm to make a spacious storage container. You can first place gear inside to make sure the pipe is suitable. 1. On one side you need to make a fixed plug, and on the other side you need a removable cover. 2. You can make a plug in different ways. Some craftsmen cut out a patch from plastic or other polymer with a diameter of 120-130 mm. Then, by attaching the pipe to the sheet polymer, a circle is drawn. All that remains is to heat the plug around the circumference with an industrial hair dryer and make a flange. 3. As an alternative, you can cut a round piece with a diameter of 100 mm, and glue a strip of plastic 20-30 mm wide to the end. 4. A layer of foam rubber is glued inside to the plug so that the fishing rods are not damaged when lowered. All that remains is to connect the plug to the body using glue. 5. The lid for the tube is made in the same way. To ensure that the lid is firmly attached to the pipe, you can make wire clamps or seal it around the circumference with some kind of window insulation. 6. To carry the tube, you must attach an adjustable strap. One end can be attached to a plug. Before gluing the plug, you should drill holes and make an eyelet or loop. The second end of the belt is attached to the pipe in the area of the lid.
How to sew it yourself: description and patterns
It's not always difficult. And you can find a lot of improvised materials at home - if you only have your imagination.
Tube
The following materials and tools will be required:
- PVC pipe;
- 2 lids from a mayonnaise jar as a plug and lid;
- foam;
- common hacksaw;
- several bolts;
- a belt from any cross-body bag;
- epoxy glue.
Manufacturing process:
- use a hacksaw to cut off a piece of pipe;
- glue the mayonnaise lid at one end as a plug;
- At the other, upper end, attach the second cover, but do not glue it;
- cover the inner surface with foam rubber;
- Attach a belt from the outside.
The lid can be tied to the body with a rope, making holes to secure it.
Expert opinion
Knipovich Nikolai Mikhailovich
Zoologist, hydrobiologist. I am interested in fishing at a professional level.
The length of the pipe should exceed the size of the fishing rods by approximately 20 cm. Then they will not be injured when carried.
The pipe can be covered with any self-adhesive material. You can take a suitable piece of special wallpaper.
Video on how to make a tube for storing winter fishing rods:
How to make a bag?
It can be done in two ways by using:
- two rectangles of wide soft fabric or foam rubber;
- nylon of appropriate size or any waterproof fabric;
- a strip of plastic or cardboard for the bottom of the bag;
- zippers for pockets or velcro tape;
- main zipper;
- two handles from an old sports bag;
- scissors;
- sewing machine;
- threads, glue.
Manufacturing:
- rectangles, which will be the basis of the sides of the bag, are glued to waterproof fabric;
- in the same way, plastic or cardboard is placed between them;
- on the outside it is all covered with fabric;
- pockets and Velcro for small parts are attached to the inside;
- The main zipper and handles are sewn on top.
You can even use an old sports bag by turning it inside out and cutting it to the desired size.
Soft twist
The pattern of the twisted cover is a truncated cone. But you can make lines on the fabric; this sewing is not difficult. The dimensions of the product depend on the number and length of fishing rods that you plan to regularly take with you. You will need to use:
- any water-permeable fabric;
- several sewing zippers for pockets and one main one;
- corsage ribbon;
- scissors, sewing machine;
- dense threads.
The further process is simple:
- Pockets are arranged, zippers are sewn in their place and the main one is sewn at the edges of the twist.
- The seams are sealed with grosgrain tape.
Let's compare all the pros and cons of a purchased and homemade case
The advantages of purchased products include:
- Big choice.
- Optimal quality.
- Ease of use.
The disadvantages include:
- High prices.
- You can't always find what you're looking for.
The advantages of homemade products include:
- Possibility of making a case of the required size.
- Possibility of manufacturing from unnecessary components, which saves money.
- Possibility of forming the required number of pockets and compartments.
- Make handles and secure them in a convenient place.
If you analyze everything, homemade production has more advantages, especially since the process is not at all complicated. Making fishing accessories at home is an opportunity to demonstrate your imagination and skills. As life shows, products made by handicraft are no worse than factory-made ones.
Case idea
The task of making convenient storage for large, albeit telescopic, gear did not arise immediately, but was formed gradually. When going on another fishing trip to a new body of water, each time I had to take into account the type of transport, the method of safely transporting fishing rods and a landing net.
Even a simple walk on foot is not convenient if you have to hold fishing gear in your hands. What can we say about a bicycle or scooter? Fishing rods must be protected from damage and at the same time securely located on the body.
A good solution to the problem was suggested by biathlon competitions and their techniques for handling weapons.
During the race, the athlete constantly carries a rifle on his body, runs with it the entire distance, and at the firing line in a short moment he transfers it from the transport position to the combat position and performs high-speed shooting.
So the fisherman’s fishing rod should be secured according to this principle:
- when going fishing, hang from the straps behind your shoulders, providing freedom for your hands;
- At the fishing site, you can quickly remove it from the case and conveniently fold it into it.
And for those who like to carry rods horizontally, you can sew one handle in the center of gravity or simply in the middle of the case. Everyone does what is most convenient for them.
How to make a spinning tube from a sewer pipe
First, you need to take the longest leg of the fishing rod and measure it. To this size you need to add 4 centimeters. This is done in order to place pieces of foam rubber about 2 centimeters thick under the feeder. Then you need to take the sewer pipe and measure the required size. The rest of it is sawed off. The sawn-off part of this pipe will be the lower base of the case. It is not suitable for the top part, since the top must be completely flat , and this is very difficult to do when cutting a pipe with your own hands.
We also recommend reading:
Budget spinning reels Riobi Exiya Model range of Salmo wobblers and Salmo Hornet catalog How to properly tie a jig to a fishing line Diagram of how to learn how to tie a hook to a fishing line
Next, you need to insert the butt into the pipe and take a closer look at how well it moves along it. Then the pipe needs to be bent a little so that it becomes oval. After performing this operation, you will notice that the butt moves completely freely throughout the fishing rod case.
The next step will be making the lid of a homemade tube. At the bottom of the sewer pipe, you need to use an awl to make several small holes, which are needed to secure the pieces of foam rubber. There is no need to purchase this material in the store. It can be cut from any unwanted clothing or dishwashing sponge. For example, a few years ago fashionable blouses with shoulder pads were produced. Such products are perfect for assembling a cover for a feeder. From pieces of foam rubber you need to cut a small product according to the dimensions of the cover and insert it into the pipe blank. It is worth attaching the foam rubber to the pipe using threads.
Next, you should move on to covering the fishing rod cover . First you need to sew the bottom part, and then start the longitudinal seam. It is necessary to pay attention to the fact that it must pass at a right angle to the transverse seam. When covering the pipe blank, you need to use fabric with a margin of at least 10 centimeters. The pipe blank must be covered quite tightly with fabric. It is worth remembering that the fabric should not dangle or move when moving. The final seam must be made with the strongest threads available. It is best to flash it at least twice.
Why are tubes and cases needed?
Tubes and covers for fishing rods are needed to:
- To protect the joints of fishing rods from any dust.
- To prevent dirt from getting on the fishing rods.
- To protect fishing rods from breakage, minor scratches or cracks.
Read Fishing for asp
It often happens that after fishing the fishing rod is simply thrown into the sand, onto rocks, etc., which can damage the fishing rod. When transporting, you can also get your fishing rod caught in the trunk or door, and the expensive tackle will be broken.
In addition, even at home, if the fishing rod is stored without a special case, then over time dust will begin to collect at its joints, which will ultimately lead to the creaking of the fishing rod and its rapid wear.
It is dust, dirt and particles of sand that can get from the shore that will unceremoniously scratch the surface of the joints from the inside and outside all the time. Over time, moisture will penetrate into these same scratches, and the joint will quickly lose its strength.
Ultimately, at the most inopportune moment (when casting or hooking), the fishing rod may burst at the joint, which will lead to the end of the entire fishing trip.
In order to avoid such troubles, you need to use special cases and tubes for storing and transporting fishing rods and other gear. Today, such things can be bought in a store or made with your own hands, which will be much cheaper and more interesting.
DIY fishing rod covers - necessary materials and production
Fishing cannot take place without a good fishing rod. When purchasing fishing gear for yourself, you first of all choose a good quality fishing rod. In order to preserve its original appearance, it is necessary to store the fishing rod in a hard tube or soft case.
After all, people don’t go fishing every day, and fishing rods are mostly stored on the hill at home or in a barn, or on the balcony in an apartment. There is a possibility that the fishing rod can be hit by something and it will fall. Thus, a protective case or tube comes to the rescue.
Making a tube cap
Again, we cut out a piece of ordinary plastic, the diameter is slightly wider than the diameter of the pipe circumference, about 0.5 cm. We cut the plastic sheet so long that it goes around the round piece. Glue them together with a glue gun.
Next, wrap it with masking tape and transparent tape. We place a piece of foam rubber inside the tube lid, which is secured with a glue gun. The hard case for the fishing rod is ready.
DIY soft case for fishing rods
I have been active fishing for quite some time and have found many ways to improve the bite. And here are the most effective:
- Bite activator.
Attracts fish in cold and warm water with the help of pheromones included in the composition and stimulates its appetite. It’s a pity that Rosprirodnadzor wants to impose a ban on its sale. - More sensitive gear. Reviews and instructions for other types of gear can be found on the pages of my website.
- Lures using pheromones.
You can get the rest of the secrets of successful fishing for free by reading my other materials on the site.
Conclusion
We really hope that our article will help you make your own exclusive case for your favorite fishing rod, which will protect it from external factors and damage. Remember that it is best to choose high-quality material for manufacturing, and approach the choice responsibly.
It is also very important to take into account the density of the threads with which you will sew all parts of the soft cover for the fishing rod. To connect the parts of a dense case, you need to choose high-quality glue
It is also advisable to use special tools, such as an industrial hair dryer, masking tape, etc.
We wish you the best of luck in your fishing rod case making endeavors. The process of making such items is not very complicated, but it requires attention and perseverance. Take the time to make a comfortable and original case for your fishing trip.
When was the last time you caught dozens of HUGE pike/carp/bream?
We always want to get results from fishing - to catch not three perch, but ten kilogram pikes - what a catch! Each of us dreams of this, but not everyone can do it.
A good catch can be achieved (and we know this) thanks to good bait.
It can be prepared at home or bought in fishing stores. But stores are expensive, and to prepare bait at home, you need to spend a lot of time, and, to be fair, homemade bait does not always work well.
You know that disappointment when you buy bait or prepare it at home and only catch three or four bass?
So maybe it’s time to use a truly working product, the effectiveness of which has been proven both scientifically and in practice on the rivers and ponds of Russia?
The FishAngry bait gives the same result that we cannot achieve on our own, especially since it is cheap, which distinguishes it from other products and there is no need to spend time on production - you order it, it’s delivered and you’re good to go!
Of course, it is better to try once than to hear a thousand times. Moreover, now is the season! A 50% discount on your order is a great bonus!
Find out more about the bait!
Soft case
Soft cases for fishing rods and spinning rods differ from tubes in greater functionality.
They are equipped with multiple pockets for storing food, hooks, and reels. A special durable material that does not allow moisture to pass through is used to sew the bag. This case makes it convenient to carry fishing gear by placing it behind your back. Purchased bags can be single or multi-seat, for transporting one or more fishing rods. The set includes cases for spinning rods, donks and feeders. They are placed in separate housings, which is very convenient, since the tackle will not get caught on the fishing line. You will need the following tools and materials:
- sewing machine;
- zippers;
- bologna, tarpaulin or any moisture-resistant fabric. The size of the material is 180 * 50 cm;
- strong threads.
The drawings always indicate the dimensions of individual parts - this will help you avoid mistakes during the work process. After the sketch, the material and workplace are prepared. You will need a large, flat table. Experts advise doing this:
- First, a pattern is made on cardboard. Next, the tarpaulin material is laid out on the table. The material is cut into two equal parts. A pattern is attached to each piece and outlined. Then the blanks are cut strictly along the lines. After trimming, there will be excess material left; it will be needed to make pockets measuring 30*30 cm.
- Both sections are sewn on a sewing machine. It is advisable to stitch three times. The stitched blank is turned inside out, since the scars should be inside the future bag.
- Now pieces of fabric are applied to the sides, which will serve as pockets. The edges of the workpieces should be folded 5 mm. To make the pockets voluminous, you will need to insert Z-like inserts into them before sewing. You should sew first from the bottom, then the sides and top. Now, stepping back 4 cm from the top edge of the pocket, a cut is made with a knife. A zipper is inserted into it, aligned and sewn. It is advisable to stitch it several times.
- The next step is to sew on the handles. They must be symmetrical to each other.
- Finally, the main lock is sewn on, which will open the soft case. The process is similar to sewing zippers into pockets.
The sewing of the bag is complete. All you have to do is check all the zippers and the bag is ready for use.
How to sew a soft case: materials, pattern, tips
Sewing a soft cover for fishing rods begins with making a pattern. The figure shows the simplest option in the form of a rectangle.
The length of the product is adjusted individually according to the length of the rod, but it is usually not recommended to make a case longer than 1.5 meters
For sewing you will need:
- 2 meters of waterproof fabric (Oxford, Taslan, Avisent, Tafetta). Its standard width is usually 140 cm, so to reduce material waste it is more profitable to sew two covers at once;
- 2 meters of dublerin (material with an adhesive layer). It comes in several types; for a cover it is better to choose one based on dense fabric, this will give the finished product additional strength and wear resistance;
- 3 meters of corsage or belt tape for one handle or 6 meters for two (it is better to take with a small margin);
- 3 “zippers”: two 40 cm each (they will go on pockets), one – 1.5 meters.
It is better to choose synthetic threads, marked “100% polyester”. They are characterized by high strength and elasticity.
There are two most common ways to make a fishing accessory.
Option 1
1. Lay out the fabric on the table or floor, use a marker or chalk to transfer the pattern onto the material, cut the fabric along the lines. You can do it easier by making marks directly on the fabric. To do this, fold the fabric in half, from the wrong side of the fold, measure 12 cm on one side, 23 cm on the other and connect the resulting segments. We will get a truncated cone 150 cm long with a wider lower part.
2. Place the dublerin on the main fabric with the adhesive side down, put on top an auxiliary material that is usually used for ironing (for example, gauze). Iron the surface evenly with a hot iron.
Note! Over time, dublerin can peel off from the main fabric. Additional stitching of the material in the middle and problem areas (edges, folds) will help to avoid this. 3. Sew ready-made pockets to the bottom (wide) part of the future cover. They are made from the remnants of the main fabric, with a zipper or Velcro fastener sewn along the edge.
3. Sew ready-made pockets to the bottom (wide) part of the future cover. They are made from the remnants of the main fabric, with a zipper or Velcro fastener sewn along the edge.
4. Sew 2 handles from grosgrain ribbon across the entire length of the workpiece, along the bottom.
5.Attach straps to the bottom part to tie the rods together (you can buy ready-made ones or make them yourself by sewing Velcro to a strip of fabric).
6.In the direction from the narrow side of the cover to the wide side, sew a long zipper. Then sew the side edges of the cover.
Note! Sewing is done from the reverse side of the product. After completing the work, turn the cover right side out.
The inside of the case can be additionally equipped with protective liners, wide elastic bands or Velcro for fixing fishing rods
Option 2
The pattern is made in the form of a rectangle. To do this, 50 cm is cut from the base material reinforced with dublerin (the fabric will be used for pockets). After this you can start sewing the cover:
- cut the fabric lengthwise into 2 equal parts (you will get 2 pieces of 70*150 cm)
- sew pockets and handle;
- sew the zipper in the direction from bottom to top. Advice! You can take two zippers of 75 cm each and sew them towards each other.
Making a cover for fishing rods with your own hands
Scratches, microcracks and even ordinary dust can cause a breakdown of a fisherman’s main tool at the most inopportune moment. A special protective bag will help you avoid trouble. It’s easy to make a case for fishing rods with your own hands. The accessory can be soft or hard. A hard case (tube) is better able to withstand mechanical stress. The soft version is more compact.
How to sew a soft case: materials, pattern, tips
Sewing a soft cover for fishing rods begins with making a pattern. The figure shows the simplest option in the form of a rectangle.
The length of the product is adjusted individually according to the length of the rod, but it is usually not recommended to make a case longer than 1.5 meters
For sewing you will need:
- 2 meters of waterproof fabric (Oxford, Taslan, Avisent, Tafetta). Its standard width is usually 140 cm, so to reduce material waste it is more profitable to sew two covers at once;
- 2 meters of dublerin (material with an adhesive layer). It comes in several types; for a cover it is better to choose one based on dense fabric, this will give the finished product additional strength and wear resistance;
- 3 meters of corsage or belt tape for one handle or 6 meters for two (it is better to take with a small margin);
- 3 “zippers”: two 40 cm each (they will go on pockets), one – 1.5 meters.
It is better to choose synthetic threads, marked “100% polyester”. They are characterized by high strength and elasticity.
There are two most common ways to make a fishing accessory.
1. Lay out the fabric on the table or floor, use a marker or chalk to transfer the pattern onto the material, cut the fabric along the lines. You can do it easier by making marks directly on the fabric. To do this, fold the fabric in half, from the wrong side of the fold, measure 12 cm on one side, 23 cm on the other and connect the resulting segments. We will get a truncated cone 150 cm long with a wider lower part.
2. Place the dublerin on the main fabric with the adhesive side down, put on top an auxiliary material that is usually used for ironing (for example, gauze). Iron the surface evenly with a hot iron.
Note! Over time, dublerin can peel off from the main fabric. Additional stitching of the material in the middle and problem areas (edges, folds) will help to avoid this.
3. Sew ready-made pockets to the bottom (wide) part of the future cover. They are made from the remnants of the main fabric, with a zipper or Velcro fastener sewn along the edge.
4. Sew 2 handles from grosgrain ribbon across the entire length of the workpiece, along the bottom.
5.Attach straps to the bottom part to tie the rods together (you can buy ready-made ones or make them yourself by sewing Velcro to a strip of fabric).
6.In the direction from the narrow side of the cover to the wide side, sew a long zipper. Then sew the side edges of the cover.
Note! Sewing is done from the reverse side of the product. After completing the work, turn the cover right side out.
The inside of the case can be additionally equipped with protective liners, wide elastic bands or Velcro for fixing fishing rods
Option 2
The pattern is made in the form of a rectangle. To do this, 50 cm is cut from the base material reinforced with dublerin (the fabric will be used for pockets). After this you can start sewing the cover:
- cut the fabric lengthwise into 2 equal parts (you will get 2 pieces of 70*150 cm)
- sew pockets and handle;
- sew the zipper in the direction from bottom to top. Advice! You can take two zippers of 75 cm each and sew them towards each other.
Case for fishing rods and reels: sewing nuances
The cover for fishing rods and reels is cut according to the same principle as conventional soft models, but an additional recess pocket is attached to the outside of the lower part where the reel will be inserted.
When making a reel chamber, it is important to consider the size of the fishing tackle. In addition to the width, you need to measure the length from the tip of the fishing rod to the reel and apply the corresponding marks on the fabric.
The pocket is made according to the size of the coil. It can be soft or hard. In the first case, the compartment must be reinforced with a piece of foam rubber or polyurethane to additionally protect the reel from mechanical damage.
The hard pocket is made from a plastic box lined with waterproof fabric.
The pocket is sewn to the base of the cover in such a way that when laying the gear, the reel fits exactly into the slot intended for it.
Some anglers do it easier. They buy round insulation for pipes made of foamed polyethylene of the required diameter in specialized stores and put it under a heavy press for several hours. The pipe takes on an oval shape, after which it is inserted into a soft case. According to reviews, a fishing rod and reel are protected in such a bag no worse than in a hard tube.
Feeders, large wobblers, a box with hooks - these and many other bulky fishing gear are advisable to store in a large pocket. To make it, we take pieces of fabric measuring 35*35 cm and get to work:
- Fold the side edges about 1 cm and stitch;
- Sew an insert made of folded material to both sides, its width depends on the desired volume, usually 1.5–2 cm is enough;
- The bottom of the pocket should be turned up 3 cm and stitched with a double seam.
Note! The pocket is sewn to the cover according to the following pattern: first the bottom, then the sides, and lastly the top.
Using these instructions, you can sew a separate bag for the feeder if the tackle is large in size.
The fabric pattern is made according to the size of the feeder, adding 10 cm on each side. The insert is stitched on the sides and bottom. A zipper is sewn on top. You can equip the fishing bag with a handle or attach it at the bottom on the outside of the case.
Making a hard case: step-by-step instructions
The presence of fragile tips and a large number of guide rings on spinning and feeder rods make the gear especially vulnerable. Fans of these fishing methods prefer to use a hard case to transport gear.
Review of leashes from Aliexpress
We will need:
- plastic plumbing pipe;
- 2 plugs with a diameter equal to the diameter of the pipe (you can purchase special plumbing plugs or use a low plastic jar). A piece of foam rubber must be glued to their bottom in advance; it will serve as additional protection for the rods;
- a piece of foam rubber 2 cm thick or polystyrene foam;
- special glue for plastic or epoxy resin;
- accessories (bolts, handles, zipper);
- hacksaw for metal.
Note! The length of the tube should correspond to the length of the longest leg of the rod plus 20 cm (a tube of 1.4–1.5 m is considered the most convenient). The diameter is selected so that the rod and reel fit freely inside the pipe and there is a gap (about 4 cm) for gluing the seal.
Operating procedure:
- Use a hacksaw to cut a piece of pipe. Note! The sawing location will be the bottom of the cover;
- Glue a plug to the bottom of the tube so that the side with foam rubber is inside the tube;
- Glue foam rubber inside the case (it’s more convenient to work with polystyrene) to protect the rods from impacts against the walls of the tube;
- Drill holes at the top and bottom of the pipe and attach the handle using bolts. You can take it from an old bag or make it yourself from a corsage or belt ribbon.
If desired, the cover for the spinning rod can be covered with waterproof fabric. The length of the material should be 10 cm greater than the length of the tube, and the width should be equal to the diameter of the pipe.
Note! If a stretch fabric is chosen for work, then its width should be 3–5 cm less than the diameter.
The bottom and longitudinal part are sewn in a straight line. The width of the seams should not be more than 1 cm. The finished cover must be turned right side out and the tube inserted into it (the process is quite labor-intensive).
The outer cover should fit the pipe very tightly. For aesthetics, protruding corners of the fabric can be tucked inside
The final stage of work is making the top cover.
It can be made from leather 5 mm thick. To do this, several overlays are cut out: one with a diameter 3 mm larger than the diameter of the upper part of the tube, 2-3 others - 1.5 mm larger than the diameter of the tube.
Leather blanks are glued or riveted together so that the largest one is on top.
The lid is ready. All that remains is to adjust it with a sharp knife so that it fits tightly, but without unnecessary effort, into the tube. To make it easy to remove the cover (and at the same time not to lose it), a loop is attached to it, which is tied to the edge of the cover.
If the tube was covered with fabric, the lid can be made from the same material: cut a circle along the diameter of the pipe and sew or glue a piece of foam rubber on the underside. The lid will be connected to the main product using a zipper. The photograph clearly shows the principle of fastening.
One part of the zipper is sewn to the soft edge of the outer cover, the other - to the fabric of the plug. A self-made spinning cover has a number of advantages over factory-made analogues. It is made in accordance with the dimensions of a specific gear; additional partitions, compartments and pockets increase the functionality and protective properties of the accessory. Homemade hard cases do not have the two main disadvantages of branded tubes: heavy weight and high cost.
Source: https://intellifishing.ru/snaryazhenie/izgotovlenie-chehla-udochek-svoimi-rukami
We make soft cases for fishing rods and spinning rods
Soft cases will ensure reliable storage of the fishing rod and convenient transportation. They are made from waterproof and durable fabrics; you can additionally sew on pockets for various fishing items.
Materials for production
To create, you will need materials that need to be purchased:
- Waterproof bolognese fabric – 2 meters (canvas, tar are suitable);
- Adhesive dublerin – 2 meters;
- Lightning – one piece – 1.6 meters and two pieces half-meter;
- Corsage ribbon – 2.0 meters;
- Dense thread;
- Sewing tools.