Telescopic fishing rod breakdowns and repairs
To understand how to repair telescopic fishing rods, you need to understand what breakdowns occur most often.
Most often, the knee breaks in its lower, middle or upper part.
Depending on the type of damage, a specific method of repairing the fishing rod is selected.
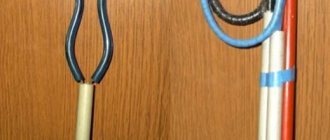
Very often the whip of an ordinary fly rod, which is hollow along the entire length, breaks:
- Usually the first third of the upper length of the whip is damaged. To repair it, you need to select and install a new connecting link.
- Breakage of the whip of the second knee occurs less often. Here it will help to wind the fiberglass to the desired diameter and fit it to the next cone. Of course, the fishing rod will have to be shortened a little, but this will have little effect on the quality of fishing.
- Forms with a monolithic carbon fiber insert rarely break. If used carelessly, the top of the insert may break, but it can be easily repaired with a diamond file and a new connector.
The situation is simpler with the repair of plug rods.
The whip breaks here infrequently, since the load falls on the rubber shock absorber tip. If this happens, the problem can be easily solved by selecting a new Teflon bushing.
Repair of the upper and middle knees is related to the location of the breakdown:
- Breaking the upper part involves building up the lead-in part of the thin elbow so that the connection point moves to the undamaged part of the knee. The breakage site is leveled and covered with a carbon fiber bandage, which can prevent further destruction of the gear.
- If the lower part is broken, they also make a bandage about 6-8 times the diameter of the knee at the fracture site.
In addition, you can straighten the broken areas and install the upper fragment in the lower part:
- The joint is treated with sandpaper inside and out.
- They are usually glued together with epoxy glue, making sure that there is no excess both inside and outside the cavity.
- A cotton swab dipped in solvent will help fight them.
- After the resin has hardened, a two-layer fiberglass bandage is installed on the outside, preventing the form from deteriorating further.
This method is suitable for repairing the upper and middle legs of plug fishing rods.
It is worth talking in more detail about how to repair the lower knees. If such a breakdown occurs, then fixing it consists solely of inserting a bushing and applying a bandage.
It is best to use a carbon fiber sleeve of similar quality to the fishing rod being repaired.
The bandage will have to be done both externally and internally. The length of the sleeve should slightly exceed 6 elbow diameters. The thin elbow should move freely in the sleeve.
The complexity of repairs sometimes forces fishermen to replace the entire docking unit.
But if you nevertheless set about repairing it and did everything correctly, then the repaired fishing rods will not lose their properties at all, only their appearance will suffer a little.
Telescopic rod repair
- VK
Like spinning rods, telescopic and plug fishing rods have several characteristic types of breakdowns, according to which a certain type of repair is selected. Let's look at them in order.
Rod whip repair
A frequent occurrence is the breakage of the whip of a conventional fly rod, which is hollow along the entire length. Most often, the whip is lost in the upper third of its length. The fix is to select and install a new connector. Somewhat less often, a breakdown occurs at the point where the whip exits the second elbow. In this case, winding a fiberglass bandage with subsequent adjustment to the diameter and cone of engagement helps. Of course, in both cases the rod will become a little shorter, but a few centimeters are unlikely to affect the fishing result.
The so-called “sports” whips with a monolithic carbon fiber insert practically do not break. Thanks to a more uniform distribution of forces along the length of the whip, it absorbs the load much better and does not overload the subsequent knee. Rarely does the thin upper part of the carbon fiber insert break due to careless use, but it is not difficult to straighten it with a diamond file and glue a new connector.
An extremely rare failure is the separation of the insert and the hollow lower part of the whip, but this is most likely a manufacturer’s defect. It is treated by gluing the whip back on; For reliability, it is worth wrapping the joint with a thin nylon thread impregnated with epoxy resin or making a microbandage from fiberglass. You can try to look for a suitable whip in the store, but you need to choose exactly the same one (preferably from the same model), approximately equal in rigidity and weight to the broken one.
One option is to replace the hollow whip with a “sports” one, but in no case vice versa, otherwise a stiffer hollow whip will break the second knee even with a small load. Such breakdowns occur quite often.
The situation is much simpler with a plug rod for fishing with shortened equipment. Here, a whip breakage is quite a rare occurrence, since almost all the load is taken by the rubber shock absorber, but even if it does occur, you just need to rearrange or select a new Teflon bushing. A small loss of length can be neglected. When selecting a new whip, it is better to choose the most rigid one and the appropriate diameter. There are often uncut long lengths on sale that can be used as spare parts for plug rods of various models. They are adjusted by cutting them with a diamond file to the required diameter and length.
Repair of upper and middle knees
Repair of these knees depends on the location of the breakdown. If the knee breaks in the upper part, then a simple and effective way is to increase the lead-in part of the thinner knee so that the joint moves to the entire section of the knee. The site of the breakage itself is trimmed and a bandage made of glass or carbon fiber, which will prevent transverse cracking of the upper edge of the knee, must be applied to a length equal to two to three diameters of the broken knee. This repair is very simple, but requires care when adjusting the gear cone.
It's even easier if the breakdown occurred in the lower part of the knee. According to the standard scheme, a bandage with a length equal to six to eight diameters of the knee is applied at the site of the breakdown. The pattern is made from fiberglass (it is not necessary to use carbon fiber for this) and is made in a rectangular shape. When winding, it is advisable to step back 1-2 cm from the place of breakage for ease of work, and then use sandpaper, first coarse, and then with medium grit, to rub in the engagement cone. Repair is more difficult if it breaks approximately in the middle of the knee. Of course, you can use one of the methods described above, but then the length of the rod will decrease by almost half the knee.
The following options are possible: If the knees are sufficiently tapered, insert the upper fragment telescopically into the lower part, having previously leveled the breakage site. The optimal engagement length should be equal to five to seven diameters of the elbow at the point of failure, the minimum – at least three diameters. If the engagement length is shorter, the connection will not be able to withstand the load. The joint must be cleaned with sandpaper on the outside of the elbow to remove varnish, and on the inside to remove special grease that does not provide sufficient adhesion during gluing. Epoxy glue is usually used. When gluing, it is necessary to ensure that no sagging or drops of resin form on the inner surface of the knee; they are removed with a swab moistened with a solvent.
After the resin has polymerized, it is highly advisable to make a narrow (one or two knee diameters long) reinforcing bandage outside, directly at the joint, which will prevent longitudinal cracking of the form. For this, two or three layers of thin fiberglass are enough.
Using the same scheme, the upper and middle legs (from the second to the fifth, and sometimes the sixth) of plug rods for fishing with shortened equipment are repaired. They almost always have sufficient taper to allow such repairs to be made with minimal loss of length.
Repair of lower knees
The most difficult parts to repair are the lower legs of telescopic and plug rods. In fairly expensive and high-quality products, these elbows are almost cylindrical; it is impossible to repair them using the method described above, and you have to do a full repair with gluing in a bushing and applying a bandage. Unlike a spinning rod, more serious requirements are placed on the sleeve: it must be made of carbon fiber, and even better, from a rod of approximately the same class as the one being repaired. Indeed, in addition to centering the broken knees, she has to take a decent load, since it is difficult to get by with just an external bandage (or it will have to be made too thick). The length of the sleeve should be equal to five to seven diameters of the knee at the point of fracture. In this case, the thinner elbow should fit freely into the sleeve located in the thicker one.
Quite often, especially in so-called “mini-telescopes”, this condition cannot be met, and a new lead-in part has to be formed. By the way, the angler is forced to transport the repaired butt knees of plug rods separately precisely because of the bandage and internal sleeve, which prevent the knees from folding into one another. However, this does not interfere with the assembly of the rod to bring it into working condition.
Of course, the bandage for carbon fiber rods, and even more so for plugs, must be made of carbon fabric; it should have a thickness equal to approximately 1.2-1.4 times the thickness of the rod wall at the point of breakage. Only in the most desperate situation can a bandage be made from fiberglass, and in order to maintain sufficient load-bearing capacity it must be 1.5-2 times thicker than the knee wall. A breakage of a plug rod at a joint is extremely unpleasant.
Such repairs are usually so complex that even in a workshop it is often easier to replace the entire docking assembly than to repair a fragmented one. The presence of a repaired area on the plug does not affect its performance at all. Maybe it just worsens the appearance a little.
Common repair cases
Regardless of the type of fishing rod, wear on the joints is inevitable. Of course, an angler can slow it down significantly by keeping the knots clean and cleaning them if necessary. But there are types of fishing (for example, summer jigs) when the rod is laid out dozens of times during fishing, and often the abrasive gets on the rod. I have seen rods that literally fell apart into their component parts in just one season. Meanwhile, strengthening the docking unit is very simple; just apply a bandage made of a couple of layers of thin fiberglass, and then adjust the entry. This kind of work can be done when the unit is already pretty worn out.
A temporary, but quite effective measure to strengthen the docking unit is to wrap the previously degreased entry with two or three layers of wide tape. The tape should be glued as evenly as possible, without bubbles or folds. Such protection is often enough for several fishing trips, and if necessary, it is easy to replace.
Rods with rings
All of the above applied to rods without guides. The latter, unfortunately, make repair work very difficult, since in order to get to the broken knee, they have to be dismantled and then reinstalled. Sometimes it is possible to get by with half measures: remove the ring only from the upper knee, for example, when forming the lead-in part. But working in this case is very inconvenient, and the likelihood of a new breakdown increases greatly, because the rod can simply slip out of your hands. Especially many problems arise when working with modern Bolognese fishing rods, into which manufacturers glue internal plugs made of microporous rubber so that the edges of the knees do not break on the guide rings. It is possible to remove them, but such an operation is often more labor intensive than the repair itself.
Therefore, the best option is to handle the rod as carefully as possible, trying to avoid breakages. Competent and high-quality repair of a fly rod does not greatly affect its structure, weight and strength and often removes a potential weak point. Numerous repairs to a “combat” fishing rod do not affect its structure and strength.
Related articles:
Making a wobbler
Spinning rod restoration
Refinement of rotating spinners
Making kukan for fish
Feeder fishing rod breakdowns and repairs
Repairing a feeder rod while maintaining its length is characterized primarily by the use of a bandage.
The procedure is as follows:
- the broken part is placed on a wooden base lubricated with wax;
- a thin layer of fiberglass is heated and lubricated with epoxy resin;
- cut out a patch slightly longer than the boundaries of the breakage with the ability to wrap it around up to four times;
- the structure is fixed with the help of lavsan film, which is wrapped around fiberglass;
- it is necessary to monitor excess resin - it is important that it does not subsequently interfere with the movement of the knees.
After drying, the fishing rod is dried again with a hairdryer, and the film is removed. Sometimes a fishing rod is repaired using a flexible rod, which is attached with glue to the intact and broken part of the spinning rod and securely fastens them.
Rod repair
Often, you can repair a fishing rod yourself using available tools, rather than buying a new one.
Especially when it comes to expensive items. Here we will consider those cases when the breakdown is truly reparable, i.e. the form did not shatter into pieces. The following are the most typical solutions for repairing broken fishing rods.
Usually, the repair of float rods gives positive results; they can be used without much fear for the location of the breakdown. With spinning rods the situation is much more complicated. Here, the repair site is the starting point for the emergence of a critical zone nearby; subsequent loads undermine the situation... Nevertheless, it is worth trying to repair a broken spinning rod; various options are possible.
Repairing a jammed fishing rod by turning
Let's start with the simplest thing - the telescope's knees jammed. This usually happens with older rods whose joints have worn out over time. But knee jamming can also occur with a new blank if the fillers that are not the best are used in its manufacture, which expand significantly in the heat. There are several ways to repair such a breakdown.
First, you need to try to rotate your knees at the place of the wedge. An assistant will be needed. One person holds the thicker knee, and the other, holding both hands as close to the joint as possible, turns the thinner one. The rotation is performed smoothly without jerking with a gradual increase in force.
Wedging often fails immediately. Then you need to let the rod dry for 7 days. Then repeat the operation. If this does not lead to results (and this happens often), then we will try repair method No. 2.
Elimination of jamming with local heating
You need to heat the place of the spell. But proceed with extreme caution. It is better not to use an open fire, but to heat it over an electric oven. If you act carefully, the joints can be heated using a regular lighter in camping conditions.
It is important to achieve even, complete heating. It is impossible to overheat, since the solidification temperature of individual binders can be no higher than 180 degrees. Liquid components will be released and chemical bonds will be broken. After uniform heating of the thicker part, it expands, after which you can proceed to step No. 1 - turning the knee together.
If the fishing rod is jammed, a blow will help
At home, you can also use the following method, which usually gives a positive result. A thick elbow is tied to a long load, for example, with electrical tape to a metal scrap.
Then the rod is placed on the table, and the thin knee, through a layer of wood, is struck at the end, also with a heavy object, for example, a hammer. One heavy blow - and everything should return to normal.
Worn out fishing rod - basic principles of elimination
Now let's look at how to repair old telescopes, in which the places where the wedging of the knees occur between each other have been demolished so much that one of the knees falls out, and the rod crumbles when casting. It should be borne in mind that over time, the length of the place where the knees join decreases more and more, and the thin knee is getting closer and closer to the state where it will begin to fall out. Such wear is a negative phenomenon that changes the characteristics of the fishing rod, in particular leads to a slowdown in action and reduces the reliability of the entire tackle.
The joining length should be within L= 3d+30mm. Where L is the length of the joint, d is the diameter of the thin elbow.
The basic principle of repairing a fishing rod in this case is to increase the outer diameter of the thin elbow by pouring it. This can be done using different methods, let’s take a closer look
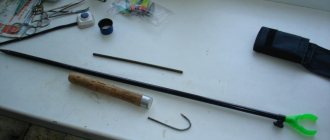
Repairing a broken knee
In practice, fishermen have tested many methods for repairing spinning rods and fishing rods. As noted, they do not always lead to reliable results so that the repair site does not cause problems in the future. However, for anyone who wants to repair a fishing rod, it is recommended that you familiarize yourself with a large number of practical options. Here's one of them.
- There is a fracture in the stock of the carbon rod; a replacement stock cannot be found.
- A fiberglass or fiberglass rod is selected according to the diameter for insertion into the inside - the same fishing rod stock, the end whip..., up to 20 cm long.
- The insert is wrapped in layers of nylon thread so that it fits into the warehouse at the break point with a slight tension.
- The insert is coated with epoxy, you can use other high-quality glue, it is inserted into the inside of the broken fishing rod storage,
- The top of the fracture area is wrapped with a thin nylon thread and coated with glue for a distance of up to 5 cm in both directions.
Carp life hack. Equipment repair and maintenance
In all areas of human life, there are small tricks that are brilliantly simple, but make life much easier. Today we will tell you about some secrets that will be useful to all carp anglers without exception. Carp life hack!
Carp life hack No. 1. Repairing a tent or shelter
Anything can happen when fishing and sometimes the fabric of our shelters is subject to various mechanical damages. We won’t describe now how this can happen, just let’s take a situation - you have a hole in the roof of your tent, or shelter.
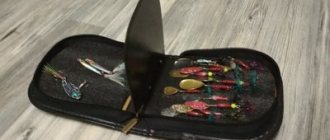
Today, in the clothing industry, the same leather products are successfully used, so-called patches. They can be in the form of a figurine, or just a piece of fabric. Sold in a variety of colors and sizes. They are called “clothing repair patches.” The leading manufacturer in 21st century patch manufacturing is McNett. Which offers you two types of patches - from CORDURA® and Tenacious Tape™. Despite the fact that we remember Cordura from the eternal bags of the FOX FX series, Tenacious Tape material is best suited for tents. It belongs to the Gear Aid line and is intended specifically for repairing punctures, cuts, tears, etc. They can be used to repair inflatable products, backpacks, bags, and the repairs can be performed on the go, which is very important!
Sample patch from McNett
Just cut off the piece we need to size
Glue to the slot
All is ready!
It’s hard to believe, but everything is really as simple as in the photo and does not require any complex operations or the use of various glues and presses.
Carp life hack No. 2. Improving lightning performance
To prevent the zippers of your shelter, tent, or sleeping bag (which is especially important), use the old proven method that our grandparents used. Take a piece of candle wax and rub it on your zippers. Even if you just bought the item and it is very, very new, it will be impossible not to notice that the zippers open and fasten a little faster than before they were waxed.
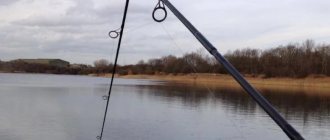
Carp life hack No. 3. Prevention of rod joints
Don't move the candle too far! Now is the time to pay attention to the knee joints of your rods. We hope that you follow the rules for caring for your rods, but we still recommend that you also wax the joints of your rods. This will add smoothness, increase glide, and extend the life of your blanks. Please note that this does not in any way affect the fact that when casting the joint will begin to slip out of the lower knee. Only on the condition that you do not check the joints before casting, and this must be done even under normal conditions when you do not use wax.
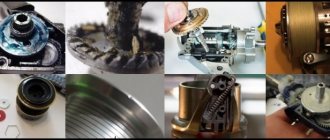
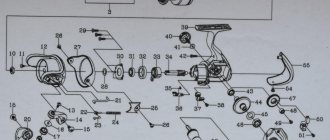
Carp life hack No. 4. Cleaning the coils
WD-40 aerosol was invented in 1953 in California. The creator's name is Norman Larsen. Initially, this liquid was intended as a water-repellent agent that would resist corrosion. And only a couple of years later it turned out that it also has many options for household use. Half of the composition is white spirit solvent, a quarter carbon dioxide, 15% mineral oil and 10% inert ingredients. By the way, sea fishermen love to use it, lubricating their fishing gear with it. There is even a legend that WD-40 contains fish oil, since it was noticed that larger fish were biting on gear treated with this spray.
We do not suggest you use WD-40 as a dip, but cleaning the coils and lubricating their mechanisms is more than enough! Please note that you need to use WD-40 with the addition of SILICONE!
Carp life hack No. 5. Prevention of telescopic stands
In the same way, you can carry out preventative maintenance on your telescopic stands, which will extend like clockwork!
Full or partial copying without the consent of the portal editors is prohibited