Correctly tying the leader to the main line is an important task of any fishing equipment. The reliability of retrieving the caught trophy depends on this manipulation, which is the ultimate goal of every fishing trip. With the advent of new types of corded fishing material, attaching a leash to a fishing line has become more difficult, because each material has its own structural features that affect the quality of the ligament and the fisherman must have full knowledge of this knowledge in order to avoid mistakes in choosing a fishing line with the optimal breaking load limit for his needs. fishing conditions.
In addition to the characteristics of the structure of the fishing lines, it is worth taking into account the conditions in which the fishing session is conducted. After all, sometimes you have to fish in strong currents and with baits that load the lines at the initial stages of fishing to the limit. Deformations during twisting on fishing threads lead the material to reduce breaking loads, and before tying the leash to the main fishing line, you need to determine the final parameters after installing the connection.
The angler will learn how to understand this difficult problem, which characterizes the strength of the knot and thereby the reliability of the entire equipment, from the article presented below.
How to tie a leash to the main line
Tying a leash to a fishing line definitely reduces the reliability of the equipment, but the magnitude of its reduction directly depends on the method of making the knot. Knitting of the leader material can be carried out in various ways, which to a greater or lesser extent have a deformation effect on the fiber of the fishing line material, and the diameters of the cords can be selected according to the final parameters of the connection being made, in order to compensate for the loss of the strength qualities of the knitting. The very method of connecting the leash, based on these facts, should be chosen based on the fishing conditions and the availability of time and skills of the fisherman to carry out the connection in the field.
Important! Each individual node has a different tensile strength.
The implementation of any knitting technique requires minimizing the effects of friction of materials as a result of tightening. Failure to take measures to reduce this negative factor leads to additional hidden and uncontrolled connection defects.
Important! When forming and tightening the nodes, the material to be joined must be subjected to wetting.
We will look at the most popular and easy-to-use knitting technologies in more detail, focusing on the technology of their formation and analyzing the parameters of the final breaking load. Based on this data, it will be much easier for the fisherman to choose an effective method for tying the leash to the fishing line without loss of sensitivity and reliability of installation.
Loop in loop
The loop-to-loop method helps to correctly tie the leash to the fishing line with the least amount of time. The method is one of the most well-known and popular methods in the fishing community, regardless of the type of fishing.
Important! A significant disadvantage of the loop-to-loop method is the low final breaking load of the connection, fluctuating within 70% of the initial value.
Initially, loops are formed at the ends of the connected equipment elements, the leash and the main cord. Next, the end of the fishing line with the loop is folded in half and rotated twice around its axis. Subsequently, all that remains is to insert the loop of the leash into the ring of the loop of the main cord and thread the end of the leash into its own loop and tighten the twist tightly.
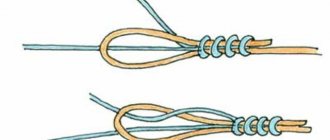
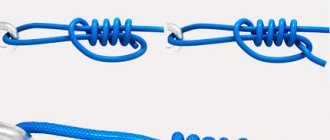
Improved fishing knot
The improved fishing knot technique also refers to a fairly simple type of tie that can be quickly formed under fishing conditions. As a result of using this method, it is possible to tie a leash with a residual breaking load of at least 80% of the entire material. Both wicker and monofilament scaffolding are suitable for connection. In addition, good results are shown by connections of dissimilar scaffolding materials.
Initially, the main cord and the leash planned for use are applied to each other. In the next operation, a leash is wrapped around part of the main cord and its end is pulled to the top. The extended end of the driving material is inserted into the formed loop and is not pulled together at this stage. The tip of the leash is wrapped once around the resulting loop and the resulting knot is already pulled together. The same manipulations in the algorithm presented above are carried out with the tip of the main cord, forming a tie already on the leash of the equipment.
Nail
The most reliable way to connect the leash with the hook and the main cord is using the nail method. Knitting is one of the highest in terms of residual tensile loads, at least 90%, but at the same time it is also one of the most complex shaping technologies, which will require the fisherman to spend time training in order to develop a stable skill in performing the operation. The connection technique is recommended for knitting homogeneous materials with the same diameters, where the greatest efficiency of connections is achieved.
A locking knot is formed on the main line. The leader material and the main cord are placed parallel to each other, leaving the leader line below the base. Next, a leash is made around the main cord one turn, inserting into the loop formed any cylindrical object no more than 5–7 mm in diameter, for example, a fountain pen at home or an extractor in the field. After this, the driving material is made several revolutions around the base and cylinder. Next, thread the tail from the leash along the cylinder into the formed coils and begin to tighten carefully, without breaking the structure of the coils. After making the clamp, the long tip of the leash is cut off near the body of the tied knot.
Eight
Tying the leash to the main line in the field is quite simple, using a figure-of-eight tie. The connection is a simple technology with a final break value of 80%. Due to the manipulations when tying, known to every average person, this technique is widely used among float fishermen, which allows you to quickly and over short distances make the connection necessary to supply the bait.
The main line and the leader material are folded parallel to each other. They begin tying a leash by forming a loop on the sections, which looks like a Flemish one, in the shape of a figure eight. The final stage is the leisurely tightening of the loop, during which the uniform distribution of the connected elements of the equipment is monitored, not allowing one cut to get ahead of the other when tightening. You can moisten the knot being tightened with saliva at the final stage.
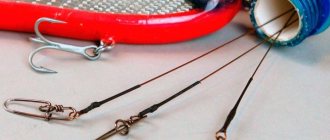
Attaching leashes without knots
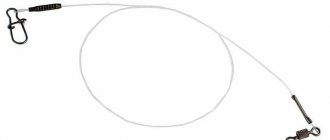
The leash can also be attached to the fishing line using the knotless method. This technique does not require knitting materials, but requires additional accessories, and, in particular, the so-called metal knotless fastener, which is available in factory versions and which can be made independently from thin steel wire. The advantages of knotless fastening include the speed of installation and the reliability of the final result of the connection, which minimally affects the structure of the fishing line material due to deformation. The disadvantages include the weight factor of the equipment, which affects the sensitivity of the installations and makes them rougher.
As a rule, the knotless connection technique is most practical for connecting braided cords. The actual size of the fastener for installation is selected based on the diameter of the threads used in the equipment and the size of the bait. To connect, a number of simple manipulations are used that even a novice fisherman can do.
The connection begins by inserting the fastening ring of the fastener itself into the eye of the tackle. Next, the fishing line is thrown onto the protruding hook of the connector, folding it in half. A folded fishing line is wound onto the connector in turns, 5–7 times, no more. Next, the cord is inserted into the second eye and smoothly tightened, obtaining a reliable connection.
How to properly tie a hook to a tackle
The question “how to properly tie a fishing hook” worries mainly novice fishermen.
Experienced fishermen tie hooks to gear with both a spatula and a ring at the end of the fore-end almost automatically.
Moreover, each fisherman can choose only a couple of running knots for tying a hook, which are used in practice depending on the purpose of the gear.
Let’s say it’s much more convenient for me to tie a hook with a spatula to the tackle, but taking into account the fact that the tackle will be used for catching fish that are not characterized by strong jerks.
However, if you are going to be fishing with the installation of girders on pike or pike perch, then it would be more correct to tie a tee or double hook with a ring with a tuna fishing knot similar to a non-figure eight or with loops formed on a double fishing line.
On two pages of this topic there are descriptions and images of fishing knots that will help novice fishermen correctly tie a hook with a spatula or ring to the fishing line of the tackle.
True, for our own benefit we will have to learn how to knit fishing knots in relation to certain conditions of summer or winter fishing.
As mentioned above, in order to reliably tie hooks of different designs, it is enough to remember only two or three universal knots.
By versatility we mean that with such a knot you can attach to the tackle not only a hook with a spatula or a ring, but also many other attributes of fishing rod rigs. For example, this could be the ring of a snap swivel.
I will draw several fishing knots for tying the end hook with a ring or spatula to the fishing rod rig.
Leash-type binding
Some fishing conditions require a certain location of the leader material with the bait mounted on the hook in the water horizon. The location of the leashes can be either stationary or carried out as a result of the dynamics of the equipment through the animation of the bait by the fisherman or the influence of the current force on the installation element. Attaching a leash for these conditions is more difficult than making direct fastening, but this is also possible by using certain specialized techniques that ultimately satisfy both the reliability of the connection and the preservation of cord materials with optimal breaking loads for fishing. We will consider some of these methods in the continuation of the material.
Side leash type
You need to tie the side leash under the conditions of minimizing the consequences of its tangling with the main cord and other leash elements located on the tackle. Factors that influence rig tangles include the type of knot, the thickness of the line, and the total length of the leader material.
Important! It has been noted that the thicker the cord, the less likely it is to get tangled.
Based on this fact, to form side branches it is rational and practical to use inflated diameters of fishing lines, even at the expense of the sensitivity of installation, placing the main emphasis on the comfort of fishing. One of the most popular and simplest ways out of the situation is the use of cambric equipment. The use of cambric lateral outlet in installation reduces the dominant role of the type of unit. The cambric is threaded onto the leader material, using a diameter that is only slightly larger than the fishing line of the leader element, and they fish comfortably and confidently, without wasting time on unraveling poorly connected rigs.
Retractable type of leash
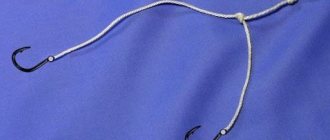
A retractable leash is used for dynamic fishing and the connection formed should prevent the possibility of relaxation of the knot and subsequent self-unraveling of the twist. The principle of operation of the retractable leash is based on the formation of equipment in which a sinker is attached to the end of the main thread, and the leash element itself is mounted 20–40 cm above the load. When fishing, the load is pulled along the bottom, and the leash with the bait follows in the water column, rising to the required water horizon due to the forces of the current or the speed of the reel. A practical mounting option is the blind mounting method with a swivel. So, in order to tie the lead leash to the main line, you need to follow the algorithm of actions presented below.
During the first operation, a sinker is tied to the end of the cord. Higher along the base, a special triple swivel is tied together to secure the outlet, corresponding in its number, and therefore in size, to the diameters of the fishing line. A monofilament or fluorocarbon leash of the required length for the fishing conditions is tied to the side fastening ring of the swivel.
Sliding leash type
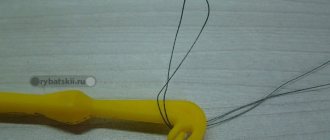
You can make a leash for a fishing rod from a fishing line with a sliding float using the method presented below. The float will be able to move freely through the forest in a space fixed by stoppers, and at the same time the load and bait will be freely immersed to the depth required for fishing conditions. In this method, the stoppers are the clamps for the deep supply of the bait. At the same time, important factors that ensure the necessary fishing parameters are reliable fixation of the stoppers at certain points, at the same time, the fixation should not be tight and, if necessary, its parameters could be changed, in addition, the stoppers should be slightly larger than the diameter of the float mounting eye, but at the same time, they must easily slip through the winding rings of the rod when casting the equipment. Therefore, the basis for installation is a well-formed locking assembly.
Knitting begins by taking a piece of cord at least 20 cm long. This piece is folded in half, leaving a five-centimeter outlet on one side. The long part is made at least five turns around the main thread, and the running end is inserted into the initially formed loop. Next, the twist is moistened and carefully pulled together until it stops. The remaining tails of the nodule are cut off to avoid unnecessary resistance, leaving the ends 1.5-2 mm.
How to increase your fish catch?
Over 7 years of active fishing, I have found dozens of ways to improve the bite. Here are the most effective ones:
- Bite activator . This pheromone additive attracts fish most strongly in cold and warm water. Discussion of the bite activator “Hungry Fish”.
- Increased gear sensitivity. Read the appropriate manuals for your specific type of gear.
- Pheromone -based lures .
How to tie a figure eight knot
- Make the first loop, then the second;
- We make a revolution of the first loop, which we pass into the second and as a result we get a “figure eight”;
- Wet the knot;
- Adjust the size of the loop;
- Tighten the knot.
Figure Eight Knot
How to attach a leash to a fishing rod
The leash is usually attached to the main line of the float rod using the “loop-to-loop” method or using a swivel.
The first option does not require the use of additional devices, but sometimes the leashes can get twisted and therefore swivels are used.
Swivels for float tackle should be very small, since such tackle is very sensitive and fractions of grams of the weight of the swivel affect the load of the float.
Tying a leash (video)
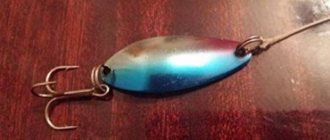
Using carabiner swivels and clasps
To connect the above elements of monofilament and fluorocarbon fishing lines, the improved clinch knot tying technique is used. The final breaking load of the cords does not fall beyond the 90% mark.
The free end of the line is threaded through the swivel of the leash, winding it around the line at least five times, but not yet tightening the assembly all the way. Next, the tail is threaded into the ring formed at the swivel, and the twist is tightened.
The swivel itself is knitted as follows:
- By threading the thread into the ring of the swivel, part of the leash is folded in half.
- Then, folding the material in half again, and not reaching its bend of about 2 cm, the thread is fixed by hand and made three turns around the base. A double thread is inserted into the loop obtained at the end of the leash and tightened, obtaining a stationary type of knitting.
- When tying a carabiner, a weight is initially hung on the end of the fishing line to tension it, and the leash itself is mounted 30 cm above it. A carabiner is subsequently added to the main cord.
The clasp, which helps attach the leash to the fishing line, is knitted according to the technology, first folding the thread in half, forming a loop passing through the clasp. After this, the line is knitted with a regular knot, so that the hook is located inside the loop. It is then passed through the top of the loop and tightened.
How to increase your fish catch?
Over 7 years of active fishing, I have found dozens of ways to improve the bite. Here are the most effective ones:
- Bite activator . This pheromone additive attracts fish most strongly in cold and warm water. Discussion of the bite activator “Hungry Fish”.
- Increased gear sensitivity. Read the appropriate manuals for your specific type of gear.
- Pheromone -based lures .
As you know, in water the strength of fishing lines decreases by about 20-30%, which, of course, must be remembered and taken into account when installing gear.
If the knots are chosen incorrectly, and even tied poorly, the strength of the fishing line is reduced by more than half. It is the knots that largely determine whether your favorite bait, along with the potential catch, will remain in the reservoir forever.
In this article we will look at various fishing knots applicable to both monofilament and braided fishing line. Methods of tying leashes to the main line and methods of tying hooks to leashes will be discussed.
How to knit leashes for fishing
If you are interested in the topic of coil repair and maintenance, we recommend the article - disassembling and lubricating coils
Methods for attaching leashes:
- fisherman's knot
- loop to loop
- retractable leash via swivel
- snake knot
- running node
- surgical knot
- Palomar
Fisherman's knot
A well-known knot that is knitted quite quickly and without any complicated tricks, and therefore is suitable for beginners without experience. A fisherman's knot can be easily tied while fishing.
The use of compounds depending on the fishing method
Depending on the fishing method, sometimes it is necessary to mount not only a fishing line, but also a metal leash, or even several units of them to form a garland. Using examples of the most popular types of fishing, let's look at optimal and practical methods that allow you to rationally connect the leash to the base line.
How to tie a leash to a fishing line on a spinning rod
Spinning fishing is distinguished by the possibility of using most of the types of connections described above. In particular, tying a lead leash and tying a carbine and fastener are the most common connecting manipulations during spinning hunting.
Feeder
In feeder equipment, almost all leashes are attached using a loop-to-loop connection, including all kinds of fittings and an additional leash, which is often required for method and spring feeders. This type of fastening in feeder fishing, despite its not the highest final breaking load in terms of materials, is justified by the speed of installation and the specific requirements of fishing for frequent changes of the leader material.
Float fishing
In float fishing, both blind connections and connections through fittings are used. These features depend on the type of reservoir. In particular, on currents, anglers try to switch to fasteners through fittings, which makes fishing more comfortable, especially if the equipment uses a second leash, which is placed through a swivel. And in moments when the fish are not so active and you have to experiment with the sizes of hooks and leash lengths, often changing these accessories, fasteners significantly save time. In still waters, blind anchorages are mostly used, since the factors of current forces do not play any role here. The only nuance may be the fishing distance.
Important! When casting long distances, the equipment has to be assembled with a reel, resulting in twisting of the cord, which will be prevented by the inclusion of a swivel in the lead element of the equipment.
But it is worth remembering that any addition to the equipment with fastening and connecting elements entails a loss of its sensitivity and unnecessarily alarms the fish.
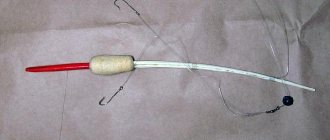
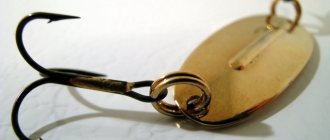
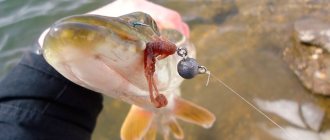
Photo with an additional jig attached.
Here you can see that under the weight of the jig, the leash line has sagged, but still neither the jig nor the leash touches the main line, and a simple hook with an attachment will always be to the side.
Additional leash on the main line of the winter fishing rod
This is also very useful if you equip your winter fishing rods with additional leaders and jigs.
At the end of the article I will share equipment for catching winter bream. And in the summer, from a boat, large bream (from 3 kg and above) confidently take such equipment, and I often use it.
How to tie a hook with double fishing line
The figure shows the sequence of tying a fishing knot from a double line, although it has one drawback.
The hook should be bent from thick wire and have a large diameter ring. The strength of the fishing knot is achieved through double fishing line.
Using a double line knot, a hook with a large inner diameter of the ring can be tied as follows:
Fold the fishing line in half, forming a loop about 10 cm long and pull it through the hook ring. Tie a loop of double line with a simple single knot and wrap the bend around the hook (or swivel).
Moisten a fishing knot formed from double fishing line with saliva and tighten it smoothly.
And pay attention to the fact that you have got a non-tightening fishing knot from a strong articulated joint of a double fishing line with a hook ring, suitable for the free movement of live bait in a pike rig.
How to tie a hook with a ring to a fishing line
The method of tying a hook with a ring using a Canadian figure eight fishing knot is shown in the picture. Using the same knot, you can tie a jig with a through hole to the fishing line.
Here the Canadian figure eight knot is tied onto the shank of the hook, although it can be formed in the same sequence on the hook of a jig.
Due to the ease of formation and reliability of the fastening loop, the fishing knot is very popular among fishermen. The loss of fishing line strength in a tied knot is about 8-10%.
Since the tip of the fishing line comes out from the side of the hook tip, it is advisable to tie hooks with a long shank with a Canadian figure eight. After cutting, at least 2.5 mm of fishing line must be released from under the loop of the fishing knot.