Is it possible to transport a boat on a regular trailer and how to do it
Is it worth telling how important it is to have your own boat for an avid fisherman, hunter or simple outdoor enthusiast?
But even the available watercraft does not eliminate a number of questions and problems. It is known that it takes about an hour to unpack the boat and fill it with air. These data are very approximate, since the exact time depends on many conditions, including the skill of the owner. It is reasonable to assume that many people prefer to transport inflatable boats in equipped condition. There are several ways to transport a boat by car. Note that everything has already been thought out for us, since special trailers have long been on sale, designed specifically for transporting, loading or unloading various boats and small boats.
But the average reader is interested in the question of how to transport your watercraft without investment using available means, so now we are talking about a regular flatbed trailer. Such a trailer is probably used on the farm for transporting various goods. Let us immediately note that it is possible to convert the trailer, turning it into a boat trailer, but this option is not suitable for us, because we do not want to reduce the functionality of the device.
Transportation options
Nowadays, the conversion of trailers Enot, Krepysh, MZSA and a number of other popular models from trusted manufacturers is widely popular among car owners.
There are many ways to adapt a flatbed trailer to a boat trailer. But they are all conditionally divided into 2 categories:
- using a slipway;
- without a slipway.
Motorists living in St. Petersburg, Perm, Khabarovsk, Shakhty or somewhere near good fishing reservoirs do not always want to fish from the shore. You know that fish hide in the most secluded corners. You have to reach them. And for this you need a boat.
Not everyone can afford a boat trailer. But making your on-board vehicle a universal vehicle is a feasible and inexpensive task. If you want to launch and transport a PVC boat on an onboard trailer, choose the option for upgrading it that suits you.
In its pure form, a flatbed trailer has several problems:
- sharp edges on the flaps;
- protruding fasteners (bolts, nuts, screws);
- sharp corners;
- insufficient width of the inner sides (not every boat will fit between them);
- friction of PVC on the bottom and sides provokes abrasion and wear of the material.
That is, a standard car flatbed trailer will not be suitable for transporting a PVC boat. Something needs to be done.
Simple modifications without a slipway
Let's consider several options for upgrading the on-board vehicle, which will allow you to make an excellent universal trailer for almost a few hundred rubles.
- Carpet or linoleum. The point is to purchase similar material, covering the most dangerous areas of the trailer with it. You can completely cover all the metal elements of the trailer with it. This will allow the boat to be transported upside down or keel down. Only on the condition that the outboard motor is uncoupled from the boat;
- Slings with tightening. They are needed to securely secure the watercraft that you load onto the boat. After all, if you simply load it on board, at the first turn and acceleration to normal speed, the lightweight PVC product will simply fly away. It does not carry 330-360 kg, like some wooden or metal boats. That's why slings are needed. They are quite cheap. If you are converting a trailer for a three-meter boat, use 3 trails to have some reserve. Distribute them evenly along the length of the craft. The third sling is used during long-term transportation to prevent longitudinal movements. Therefore, it is laid along the keel line from bow to stern;
The main idea of the refurbishment
Despite the fact that nothing will change radically in the device, you will have to work with it a little. If you transport a boat on a regular trailer without additional improvements, the PVC material will quickly fail, and loading will be associated with a number of problems.
All that needs to be done is to ensure that the load is securely secured. Installing supports on a trailer for transporting a PVC boat is the main modification that needs to be done.
Cradles for the boat can be made of wooden beams, floorboards or metal profiles. Each rail will have to be covered with a suitable material to prevent damage to the PVC or rubber. An underlay for laminate flooring, pipe insulation or carpet is suitable as such a material.
It is unlikely that you can make a universal means for transporting different types of watercraft with your own hands, so you need to focus the design on the parameters of your boat. Cradles must ensure maximum load distribution, therefore their length must correspond to the size of the boat.
lemanD › Blog › Building a boat trailer
A few photos of my MZSA 817701.001-05, the process of modifying the trailer for transporting the Kasatka 365 PVC boat.
Trailer MZSA 817701.001-05 in the version with a 110 cm awning.
We attach corners to the sides
We use floorboards as supports
We fasten with bolts to the corners
We treat it with bioprotection and cover it with carpet
We install a bracket with a winch on the front side
We install a keel roller and eye washers on the rear side to fix the PLM
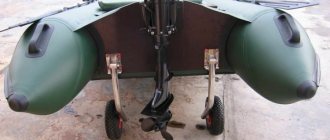
Transporting a boat without removing the motor
Keel roller on the rear side
Comments 21
Hello test trailer. Where did you purchase the keel roller for the tailgate and front stop?
You need a license, but you don't need registration. Well done for the trailer. There are still some left-handed people among us.
I have a license, registration for this kit is not required, thanks for the trailer))
I don’t even understand, Yamaha 10?
It’s clear that it’s not subject to registration, but do you need a driving license?
Winch mount
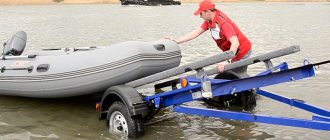
If you have an assistant, it is not so difficult to load an inflatable boat onto a trailer. Its curb weight is 50-60 kg. But such an assistant may not always be nearby. It is desirable to optimize the loading or unloading process, although this no longer applies to re-equipment.
For ease of launching the boat, it is advisable to purchase a dump trailer. All that remains is to drive the car closer to the pond and raise the platform. Putting the boat back on the guides requires some effort. A winch installed in the front of the trailer will greatly facilitate the task.
Buying a winch is not a problem, but installing it on a trailer will require some ingenuity. The mounting bracket is mounted on the front side of the trailer. A bow stop on this same bracket would be a good idea, as your boat will always be transported in the same position. This stop will allow you to visually control the loading procedure.
Keel roller
Whether your boat is flat-bottomed or has a keel on the bottom, casters can be installed to make loading or unloading easy. They are attached to the rear side of the trailer. The purpose of the rollers is to ensure the boat rolls to reduce friction. The video is assembled in several ways, and each master is ready to offer his own design.
An interesting and inexpensive option using a polypropylene pipe that fits onto a metal axle. The length of the roller can be 50-60 cm for a flat-bottomed boat. Experienced specialists recommend not making the roller whole, but cutting the pipe into 10 cm pieces. The second option is conical rollers. They are suitable for watercraft that have a pronounced keel.
Unaccounted for moments
As you might already guess, there is no standard for adapting a trailer for transporting boats. The technology is gradually improving, as owners adopt the experience of their comrades, and at the same time share feedback and new discoveries. The main boundary conditions for work are the model of the boat and trailer, the availability of available tools and materials. That is why unaccounted questions arise, which are most likely an addition to the above.
The first thing I would like to note is that the supports for the boat can be made removable. This will not entail significant financial costs, but in a matter of minutes it will turn the boat trailer into a functional device for the main purpose. Take a close look at your trailer bed. There may be pockets in its corners into which stands for supports can be inserted. If there are none, then the racks will have to be bolted to the sides. This will slightly increase the time it takes to re-equip the trailer, but you can transport any cargo with the cradle without fear of damaging the structure.
Legal issues
All that remains is to consider the question of how traffic police officers will view the additions that have not been made. It is no secret that making a homemade trailer risks sending it to an impound lot, since registering the device is almost impossible. The methods described above are not considered to change the design, that is, they are completely acceptable.
The transported boat exceeds the dimensions of the trailer by the permitted value. This means that it can be transported without additional identification elements. When the traffic police officer sees the removable supports or insert, all his questions should disappear.
Don't forget about transportation rules. Even loads that are optimally sized must be securely secured. Obey the speed limit, as the carrier is considered a potentially dangerous road user for other drivers. Violation of these rules will be punishable by law on a general basis.
Manufacturing a system with a universal drive
The manual system is easy to manufacture. Of the special skills the master is required to do, only own a welding machine. Any metal will do the job. The appearance of the device is not so important, the main thing is performance and resistance to heavy loads. The frame should not be deformed.
Materials and tools:
- Rectangular tube for frame.
- Shaft for the drum, you can use a round tube.
- A sheet of metal with a thickness of at least 3 mm for the manufacture of drum disks.
- Threaded rods M10-M12, 24 cm long – 6 pieces, nuts.
- Tube diameter 14 mm - 6 identical pieces of 20 cm.
- Asterisks - large and small. Chain.
- Hubs to secure the drum to the shaft and secure the shaft to the frame.
- Drive lever.
- Cable with carabiner.
- Welding and electrodes.
- Grinder and grinding disc for it.
- Paint and primer.
- Wrenches included in the set.
Some materials are better purchased - for example, tubes for the studs and shaft. The rest can be picked up from old mechanisms - cars or motorcycles. Any metal will do, even used.
Manufacturing procedure:
- They sketch out a drawing, because this will make it easier to navigate during assembly - you won’t have to stand guessing over the half-finished product and think about what to do next.
- Cut out the frame parts from a pipe with a cross-section of 2 by 2 cm. Connect the frame parts together strictly perpendicularly. The cut on the workpieces is made at an angle of 45 degrees.
- Lay the frame blanks on a flat surface. The joints are spot-tightened by welding, after which they check whether everything is installed correctly. The angles of the connections must be strictly 90 degrees. If there is a lack of accuracy, corrections are made and then the parts are welded.
- Scale is removed with a grinder and a grinding wheel. The finished frame is sanded and then coated with a primer. After the latter has dried, the metal is painted with enamel in 2 layers. You can use regular paint. The goal is to protect the metal from corrosion, since operating conditions will be difficult, with dirt and moisture.
- Creating a drum. Take a sheet of metal and cut out 2 circles, their diameter is about 30 cm. On each circle you need to make 7 holes:
- One in the center. The diameter must match the shaft size.
- 6 holes at a distance of 7 cm.
- The discs are fastened together using pins. The pin is inserted into the hole of one disk in a vertical position. Tubes with a diameter of 14 cm are put on the studs, and a second disk is installed on them. The studs must not only be secured with nuts, but also additionally reinforced with locknuts to ensure reliable connections.
- The drum is ready, now the shaft is mounted. It is made from a metal pipe, but you can take a finished product from any mechanism. The latter option is preferable: since the accuracy of the factory part is higher, vibrations of the drum will be small or absent altogether.
- A large diameter sprocket is mounted on the shaft on the outside of the drum. A sprocket from a motorcycle gearbox will do. To secure the drum to the frame, the outer sides of the shaft must have hubs.
- The drum assembly with the shaft is mounted through the hubs on the frame. The structure is secured with bolts. Before installing the drum, you should prepare a platform on the frame. A drive will be installed on it - manual or electric. When using an electric drive, a motor is placed on the platform with a small sprocket attached to its shaft.
- A universal drive is often installed: a handle is placed on the reverse side of the output shaft of the electric motor. In the absence of electricity, the winch can be turned manually.
- It is important to properly tension the chain. It should not sag, but strong tension is also unacceptable - this will cause the sprockets to wear out faster, and the chain may break. Check the chain tension by rotating the drum - the chain should not hinder its rotation when the cable is unwound.
- The end of the cable is secured to the shaft and wound around the drum. A carabiner is hung on the other, free end of the cable.
- A shank is attached to one end of the frame. With its help, the winch is secured to the car frame.
Read also: Inverter for plasma cutting of metal
The winch is created in a day. Since it will be installed on an SUV, the operating conditions will be appropriate. To prevent dirt and sediment from getting on the drum, it is covered with a casing. This way the mechanism will last longer and the cable will not wear out.
The design is simple, reliable, and easy to make yourself . Yes, it does not have the ability to change the gear ratio, there is no reverse and other additional functions. A self-made electric winch is capable of dragging a heavy load across the terrain, be it a car or something else.
Toyota RAV4 Worker › Logbook › Transportation of a PVC boat. Modification of the VMZ 9.601 trailer. Part 2
Good day!
Winter has not passed in vain. It was time to modify the trailer.
The main purpose of converting a trailer is to transport a boat with an assembled motor, to minimize the loss of time for assembly and disassembly on the shore. All operations for lowering the boat and raising it are carried out by me myself.
Initially, the trailer for transporting a boat was intended to be “breakable”, this allows you to load the boat onto the trailer without outside help.
What ended up happening:
1. The body has been removed from the trailer.
2. A long drawbar has been made. The materials required were: square pipe 40x40 - 1.2 m, 40x20 - 4 m, clamps for attaching the drawbar to the frame - 2 pcs., 1 clamp for fixing the old and new drawbar.
During transportation, all clamps are tightened and thereby provide a rigid structure. When unloading and loading the boat, I loosen the clamps that secure the drawbar to the frame, and move the third clamp, thereby freeing the trailer drawbar.
2. I made two metal structures from a 35x35 corner, which made it possible to raise the supports above the wings of the trailer. Everything is assembled with bolts and, if desired, can be disassembled and compactly stored. Metal structures are attached to the trailer frame using 41mm diameter clamps. used for assembling the exhaust system of Lada cars.
3. As supports I used a 45x200x1800 board, covered on one side with carpet. 4. I installed the lights from the UAZ, and ensured the required distance to the extreme point of the boat (according to the rules, no more than 1 m.)
Now about the procedure for loading a boat onto a trailer:
1. Loosen the clamps securing the drawbar to the trailer frame, free the trailer drawbar from the third clamp. 2. I lift up the trailer and secure it in this state with a stand.
3. I raise the motor so that when tightening the boat it does not rest on the ground. 4. I tighten the boat to the middle of the supports manually. 5. I attach a winch to the extended drawbar. I pull out the sling and fix it to the transom of the boat. 6. I winch the boat onto the supports, making sure that they are in the center of the cylinders. 7. I remove the support and lower the trailer with the boat onto the “new” drawbar. 8. I stretch all the clamps, thereby ensuring rigid fastening of the trailer.
9. I lower the motor 10. Using a spacer and tie, I secure the bow of the boat to the drawbar. 11. I pull the transom to the trailer frame. 12. I use ties to tighten the boat through the cylinders to the trailer frame. 13. To prevent the boat from sliding towards the engine during braking, I attach another tie between the “old” drawbar and the bow eye.
Toyota RAV4 2003, 127 l. With. — tuning
Cars for sale
Toyota RAV4, 2004
Toyota RAV4, 2001
Toyota RAV4, 2003
Toyota RAV4, 2002
Comments 34
Hello, Ruslan! Excellent work, your hands are golden and your brains are sharpened correctly. Ruslan, I wrote you a personal message, I would be grateful for your response. Good luck in your creativity!
Good afternoon, what is the width of the tie (25,35,50) and how do you hold it?
Good evening. I had a trailer like this until it fell apart. Then I bought Moskvich springs and made them on springs. The only catch is that I can’t decide how many sheets to leave. Like now 6 pieces or remove and leave 2 pieces. I’m planning to transport a boat PVC plus shmurdyak. A total of 150 kg. Maybe someone can advise. Thank you.
You can send the drawing by email
Tell me, what screw is on your yamaha15?
Baikal cannot be confused with anything!))) The trailer is awesome!
Cool report! I bought the same one for the occasion, a 3m PVC boat. Can I also have the diagram/dimensions for the drawbar extension?
Hello, if it’s not too much trouble, please send me (you can email) a diagram for extending the drawbar, if of course you have one
Well done! Everything was done with high quality!
Well done! By the way, a load can hang from the back up to a maximum of 2 meters - only a reflective sign is needed
The reflective triangles are lying around waiting for me to install them, but I just can’t get my hands on them.
Good afternoon, dear car owners! I apologize for the off-topic question, but maybe someone still has a body that they don’t need after remodeling and would be willing to buy it for a reasonable price! Ready to buy, otherwise mine is completely rotten! I attach the trailer to the ATV.
Hello! Of course, everything was thought out 100%. But the guys didn’t get to the bottom of anything, because there’s no need to bother, everything edial is simple. I have the same trailer, slightly reinforced. The front bent pipe was replaced, the old one was bent after transporting bricks (on which the pendulums are attached). Now there is a 6mm wall, bent on a pipe bender. The shock absorbers were homemade. Springs from an IZh motorcycle (this is the only thing that fits more or less in diameter , so as not to get caught in the body, there is not enough space) and then the stiffening ribs on the body had to be bent. The front shock absorbers are from Muscovite 2140. At the bottom of the shock absorber there is a washer welded with a groove for the spring, and at the top there is a metal boot (an inverted cup). The shock absorber is inside the spring. And on top the nut tightens the whole thing. And I installed a rubber bump stop on the shock absorber rod. All the same, the springs turned out to be more powerful than the original ones, but still weak. But they can easily take 400 kilograms, even though they sit almost to the bumpers. I transported potatoes once. From the Tula region to the Leningrad region. Roughly 900 km. Withstood it. It was filled almost to the sides Body: the bottom was reinforced welding three pipes from below. The hubs have also been remade. They were turned on a lathe to fit Moskvich tapered front bearings. And of course, the pendulums were remade from a thicker pipe and a new shaft was turned for the bearings. The original remains: the body, half the frame (rear part and factory number), and tires and wheels. I actually just wanted to thank the author of the article for a smart idea. HOW HE MADE A DIP TRUCK TRAILER. And without a single tack welding. I've been wanting to make a dump trailer for a long time. But here it's so simple. If anyone is interested, I can take a photo and post the homemade knots. Good luck on the roads!
Thanks for your feedback. Please post pictures of your shock absorber. There is also a problem with replacing it, but I don’t know what yet. I replaced my springs with Ural springs, replace them too. Ural springs have a thicker coil. If it's not too much trouble, post a sketch of the hub modification. I plan to do this in the winter.
I don’t recommend making hubs like my Moskvich ones. The problem is finding bearings. I advise you to repeat the front Zhiguli classic hubs. You can see the general photo of the trailer (already converted) in my photo. And I’ll take a photo of the rest of the photos of the shock absorber in the garage, throw it away, but you’ll have to wait. When I I'll be in the garage unknown.
An excellent option for modifying the trailer of this model! I really liked it. I will 100% use this drawbar extension design, but I will leave the trailer body! If you have drawings I will be very grateful! Thanks for the report!
Making a trailer trailer for a motorboat on your own
Today, when in some regions it is quite difficult to find good and inexpensive parking for a boat, and to ensure mobility, boaters need a boat trailer, there are two options to obtain ownership of a much-needed vehicle. The first is to purchase an industrial trailer. Trailers from the following manufacturers are currently on the market:
Unfortunately, the prices for the products of these companies range from 700 to 1000 USD, which is quite expensive for the average boater. The second way is to make a trailer yourself. For me, this method is the most preferable due to the fact that I can make a trailer directly for my Sarepta boat and save several hundred dollars. I already had experience in converting a cargo trailer into a trailer for a PVC boat “Cayman-400” (unfortunately, there is no photo), but here the task was more complex - making a trailer from scratch. It is almost impossible to convert any cargo trailer because... for a “solid-hulled” boat up to 5 meters, the trailer track should be about 1900 mm. Cargo trailers with such a track are rare, and when using a regular trailer, the boat will have to be placed above the wheels, which will make it very difficult to lower and lift the boat onto the trailer. Having searched the Internet, I did not find any detailed information on this issue, I had to think for myself and rely on the oral advice of Andy Crimea Whirlwind-30, Moscow, who had already manufactured the trailer on his own, by the way, thanks to him.
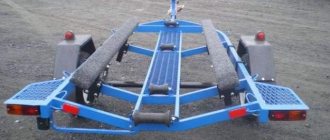
The trailer produced by Vector LLC LAV-81014 was taken as a basis (Fig. 1).
| Fig.1 Trailer manufactured by Vector LLC LAV-81014 |
In my opinion, this trailer is most suitable for transporting boats up to 4.5 m long and with permanent motors weighing from 100 kg. If your boat is shorter and the motor is lighter, or you are removing it altogether, it is advisable to move the axle forward to better balance the trailer. The LAV-81014 trailer uses spring suspension, but I recommend that you use a torsion bar suspension. Although it is less reliable and durable, the ease of installation makes up for all the shortcomings.
Here is a drawing with the dimensions according to which I made the trailer (Fig. 2). I advise you to change the dimensions a little so that the trailer turns out exactly for your boat.
| Rice. 2 Drawing of the manufactured trailer |
Now let's look at the components for making a trailer and their cost. They are divided into two groups. The first includes certified units of industrial production: 1. Torsion axis -3000 rub. 2. Hitch – 270 rub. Secondly, components that can be purchased anywhere or made yourself: 1. Support leg - 490 rubles. 2. Wings – 500 rub. 3. Lighting equipment – 450 rubles. 4. Wiring – 300 rub. 5. Fasteners – 400 rub. 6. Winch – 1300 rub. 7. Wheels – 2200 rub. 8. Keel blocks – 1600 rub. 9. Rolled metal – 2000 rubles. 10. Paint – 850 rub. The total materials needed are 13,360 rubles. or 430 USD. Looking ahead, I’ll tell you how much the specialists’ work cost me: 1. Welder – 500 rubles. 2. Locksmith -300 rub. 3. Painter – 500 rub. Total 1300 rub. or 50 USD. According to preliminary information, the examination will cost me 400 rubles. and registration with the traffic police 300 rubles. Only 700 rub. or 20 USD.
To sum it up, the trailer cost me 500 bucks. The cheapest trailer in Moscow costs 700. For whom 200 bucks is not money, don’t read any further, but immediately follow the above links for ready-made solutions. For the rest, I’ll add that the prototype of my trailer costs 1000 USD at the factory. Of course, I’ll make a reservation that a trailer for a Skif boat costs 500 bucks in Perm, but, as the proverb says, “It’s half a heifer, but it’s a ruble to transport.” True, once on Phishing I offered to cooperate and hire a truck to deliver a dozen trailers to Moscow. The idea was understood by 7 people and was supported by Vasily Rumyantsev, but after a detailed examination of the trailer, I realized that it did not suit me and left the concession. I know nothing about the further fate of the project.
Now I’ll tell you what and where I purchased the components for making the trailer. Everything was searched through Yandex
.
Items 1,2 and 1-3 were purchased from Autoflex-Knott
.
Very kind people, they even delivered it to St. Petersburg for free. Points 6, 7 and 8 in Francardi
, but in general I recommend purchasing from the
Biltema
or ordering from a foreign auto parts company working according to this catalogue, it will be cheaper. I think the rest of the points are clear. Metal warehouses and spare parts stores. Be sure to take receipts and certificates for everything you buy. They will be needed when registering the trailer with the traffic police.
Read also: Listogib LGS 26 drawing
To make the frame I used a rectangular pipe 80x40x3.5. I don’t recommend thinner because... Andy, who made a trailer from 2mm pipe, had problems. All you need is two 8 m long lengths. 5 hours of welder work - and you’re done (Fig. 3). The joints of the pipes must be reinforced with gussets, cutting them with a guillotine (then there won’t be such a mess as I had - I cut them with gas). We drill holes and use M12 bolts to secure the axle and hitch through the bushings. Here it is very important to choose the right balancing and maintain clear perpendicularity to the axis of the central beam. Then we put on the wheels, hook the trailer to the car and drive, checking whether the trailer is being pulled to the side (perpendicularity). Then, having thrown on the tires, we set up the boat and check the balancing. The load on the coupling ball should be between 40-80 kg. If something is wrong, it’s better to immediately re-drill the axle (another advantage of the torsion bar; with a spring suspension you can’t change it that easily).
| Fig.3 Welding the frame |
Now we hang the support leg and safety rope (Fig. 4).
| Fig.4 Installation of support leg and safety rope |
Next, we make a support for the winch from a 60x40x2 pipe and install it (Fig. 5). I want to draw your attention to the lanyard. It serves to secure the boat during transportation. Using a winch for these purposes will lead to rapid breakdown of its gears, as confirmed by two people.
| Fig.5 Installation of winch support |
Now we make wing supports from the same pipe (Fig. 6).
| Fig.6 Installation of wing supports |
And again using this pipe, we make keel block supports (Fig. 7). At first I put one pair, but then I added more because... two can dent or even push through the bottom of the boat. About the supports of the keel rollers, I will only say that metal of at least 4 mm must be chopped on a guillotine and welded. Everything is visible in the picture. I will make a reservation that the roller on the axle should move very easily, otherwise if it gets stuck, the keel of the boat will quickly cut it to an unusable state. By the way, rubber rollers are better suited for plastic boats. I would like to add that you need to select the length of the keel block supports so that the wheels fall on the element of the longitudinal set, then the bottom will sag less. I selected the angle of the wheels using the bottom profile, cutting it out of plywood.
| Fig.7 Manufacturing of keel block supports |
And now the trailer is basically ready (Fig. 8). At this point, I recommend that you carry out running and descent tests, and after making sure that everything is in order, paint and hang the lighting equipment.
| Fig.8 Trailer in a state of intermediate readiness |
After testing I made some changes. The photo (Fig. 9) shows that instead of the second pair of keel blocks, tires were also used.
| Fig. 9 Boat on a trailer during testing |
In addition, it turned out to be very difficult to attach lighting equipment, or rather a backlit plate for the license plate. In the end, I welded a beam from a light pipe, everything fit perfectly on it (Fig. 10).
| Fig. 10 Installation of lighting equipment |
Well, that's all, the trailer is painted and ready for registration (Fig. 11).
| Fig. 11 Trailer in a state of full readiness |
I’ll also add that when transporting a boat, the motor blade is located quite low above the road, and in order not to damage the gearbox in the pits, I recommend transporting the motor in an inclined state using this design (Fig. 12). It also records the lateral displacement of the motor and protects the steering gear. I recommend assembling them first from wood, and only then using the “sharpened” prototype to weld them using the same 60x40x2 pipe. The previous photo (Fig. 9) shows an experimental model of a device made of wood. If the boat is transported over a long distance, it is necessary to secure it with transport tape as can be seen in the same photo (Fig. 9).
| Fig. 12 Support for transporting the motor in the folded position |
Now let’s touch on the issue of registering our vehicle. To register a trailer with the traffic police, it is necessary to carry out an examination of the trailer. This is what the All-Russian Society of Automobile Enthusiasts (VOA) does. Each region has its own. Here are the addresses of SAI branches known to me:
1.St. Petersburg. st. Zhukovsky, 55 tel. 273-47-30 SAI Alexey Pavlovich, 2. Perm All-Russian Society of Motorists, tel. 12-83-14 and 12-69-65, 3. Moscow State Scientific Center of the Russian Federation Federal State Unitary Enterprise NAMI tel. 456-32-31 Fedorov Artyom.
To pass the inspection, the trailer must comply with the following GOST (Thanks again Andy).
TRAILERS FOR PASSENGER VEHICLES Parameters, dimensions and general technical requirements OST 37.001. 220-80
This standard applies to all types of trailers intended for towing by cars and minibuses on the roads of the general USSR network. The standard does not apply to trailers, technical specifications for which the design was approved before the introduction of this standard. The main terms used in the standard and their definitions are given in the reference appendix.
1. PARAMETERS AND DIMENSIONS 1.1. The total design weight of the trailer must not exceed that permitted by the manufacturer of the towing vehicle, must not exceed the curb weight of the towing vehicle, and must not exceed 1800 kg. 1.2. The total structural weight of an unbraked trailer must not exceed that permitted by the manufacturer of the towing vehicle and must not be more than half the curb weight of the towing vehicle. 1.3. The vertical static load in the center of the ball joint of the coupling device for any weight state of the trailer must correspond to the value permitted by the manufacturer of the towing vehicle, but must not be less than 240 N (25 kgf) and more than 980 N (100 kgf). 1.4. The length of the trailer should not be more than 1.5 times the length of the main traction vehicle or more than 8 m. 1.5. The width of the trailer should not exceed the width of the main traction vehicle by more than 200 mm on each side and should not be more than 2.3 m. 1.6. The height of the trailer should not be more than 1.8 times the trailer track width or more than 3 m. 1.7. The center of gravity of a loaded trailer must be located in such a way that the ratio of the height of the center of gravity to the track of the trailer wheels is no more than 0.725. 1.8. The ground clearance of the trailer should not be less than the ground clearance of the main towing vehicle.
2. TECHNICAL REQUIREMENTS 2.1. General requirements 2.1.1. Trailers must be single-axle, but a tandem axle may be used. 2.1 2 A trailer with a horizontal inner floor, installed on a horizontal surface, must have a load of no more than 55% of its total weight on the tire(s) of one side. 2 1.3. The design of the trailer must be designed for movement as part of a road train of the full structural mass at the maximum speed permitted by the manufacturers of the traction vehicles. 2.1.4. The design and dimensions of the trailer drawbar (frame) must ensure the possibility of its deflection relative to the coupling ball installed on the vehicle at the angles specified by OST 37.001.096-77. 2.1.5. Trailers must be equipped with two non-removable safety chains (cables), which in the event of an emergency breakage (breakage) of the towbar should not allow the drawbar to touch the road surface, while ensuring control of the trailer. 2.1.6. Trailers must have two wheel chocks (“shoes”). 2.1.7. Trailers must have space for a jack. 2.1.8. The control for the parking brake system of trailers must be removable and located on the right side in the front of the drawbar (frame). 2.1.9. Trailers must be equipped with wheel protective devices (fenders, mudguards) if body parts do not perform the functions of this device. 2.1.10. The materials used for the manufacture of trailers must have resistance to fire from exposure to water, fuel and oils no lower than the resistance of materials of parts and assemblies for similar purposes of the main traction vehicle. 2.1.11. Painting of trailers and control of the appearance of the coating in accordance with GOST 7593-80. 2.1.12. The trailer must have a climatic design in accordance with GOST 15150-69, corresponding to the climatic design of the main traction vehicle, and must be designed for storage conditions in open areas. 2.1.13. The service life of the trailer in accordance with its purpose and operating conditions is regulated by regulatory and technical documentation approved in the prescribed manner.
Read also: Eternal line for trimmer
2.2. Requirements for systems, components and assemblies 2.2.1. Trailer brake systems must comply with the requirements of OST 37.001.016 70. 2.2.2. The locking device for coupling with a traction vehicle must comply with the requirements of OST 37.001.096-77. 2.2.3. Electrical equipment, external lighting and signaling devices must comply with the requirements of GOST 3940-71. GOST 8769-75, GOST 10984-74 and GOST 20961-75. 2.2.4. Trailers must have brackets (or space) for attaching a license plate in accordance with GOST 3207-77. 2.2.5. To connect to the vehicle's electrical system, the trailer must have a plug in accordance with GOST 9209-76 with a connecting cable. 2.2.6. Trailers must have support legs that ensure the stability of the trailer when uncoupled and do not impair the cross-country ability of the road train. When the vertical static load from the trailer locking device is more than 390 N (40 kgf), the front support leg must be equipped with a lifting-lowering mechanism that ensures installation of the locking device in the position required for coupling (uncoupling). When the mechanism is manually driven, the force on the handle should not exceed 118N (12 kgf).
3. COMPLETENESS 3.1. Trailers equipped with tires that are not unified with the main traction vehicle must have a spare wheel and a device for securing it. 3.2. Trailers must be supplied with the necessary tools and accessories if the set of tools and accessories of the main towing vehicle is insufficient to service the trailer.
4. MARKING 4.1. Trailers must have a nameplate and markings in accordance with industry regulations and technical documentation. 4.2. Trailers must have an additional sign near the locking device in accordance with GOST 12971-67 indicating the total structural weight of the trailer; the maximum static load on the coupling ball.
Terms and definitions adopted in this standard
| Term | Definition |
| Main traction vehicle | According to GOST 3163-76 |
| Twin axle | Two parallel trailer axles, the distance between which does not exceed 1 m. |
If your trailer meets these requirements, passes an examination, and has checks, certificates, and a copy of the welder’s certificate, you will not have any problems registering with the traffic police.
Here is another version of a boat trailer made according to the German model. The retractable and removable frame for electrical equipment deserves special attention (Fig. 13)
| Fig. 13 Trailer made by Oleg from Nikolaev |
The ability to remove it before going into the water will protect the lighting equipment from the harmful effects of water. Unfortunately, I didn’t think of doing this. The only negative, in my opinion, is the rigidly fixed winch support and keel blocks, but if you do not use the trailer to transport other boats, this is quite acceptable. I provide recommendations for making a trailer from the author - Oleg from Nikolaev
| Fig. 14 The process of loading a boat with a winch |
To make the trailer frame, a 60 X 40 box (profile) was used. To make the retractable frame on which the side lights and license plate are located, a 20 X 40 box. The central pipe is 2? (diameter 60 mm), maybe thicker. In this case, I will reinforce the pipe by a quarter of the length from the side of the lock (I will insert a piece of pipe inside and weld it). Axle to wheels pipe 2? , the hubs were sharpened for “Zhiguli” wheels. There is a spring suspension (springs from M-412) + shock absorbers from Zhiguli. Rubber rollers were bought on the factory-made market; they are also suitable for old Vyatka washing machines (squeeze rollers), there is also a lock for the towbar (only with a certificate, otherwise there will be problems when registering with the traffic police) and a 380 kg winch. The support for the ridge of the boat on the central pipe is made movable (or permanently welded if you will not carry another boat) for the convenience of adjusting the weight distribution of the boat relative to the axis of the wheels (these recommendations are very accessible and covered in detail in the KiYa magazine, in my opinion, for 2000 or 2001 year - I recommend you read it before starting work), in principle, that’s why a retractable frame with side lights and a license plate was made, but that’s not the only reason. In order to avoid draining water from the dimensions every time you launch a boat from a trailer (assuming that the trailer is in the water) and not changing the fuses in the car after a short circuit, it is easier to disconnect the electrical connector, unscrew the locking bolts and remove the frame assembly. Rollers for edans can be found ready-made, or you can make them yourself (from the same rollers from a washing machine) - you don’t need much intelligence (for convenience, it is better to make them adjustable in height, for different boats with different deadrises).
| Fig.15 View of the rollers |
The distance from one roll block to another is measured experimentally. There is another option - instead of roller blocks, make runners covered with felt or carpet. It’s also convenient and, most importantly, simpler. The length of the runners is at your discretion. They do it along the entire length of the boat’s cockpit and half its length, as you like. It is important that both the roller blocks and skids fit under the steps so that there is no lateral movement of the boat on the trailer during towing. The trailer is structurally equipped with springs from M-2140 and shock absorbers from VAZ-2101. The wings are integrated from a heavy motorcycle, according to my old MT. The keel blocks are made from squeezing rollers from old washing machines “Vyatka”, “Revtrud”, etc. Branded winch for 350 kg. Electrical equipment is standard. Certified coupling device.
That's basically all for now. I wish you success in your creativity. Many thanks to Andy, Maurice, Oleg and SKR for their help in preparing this article.
PS. Unfortunately, on January 1, 2004, new legislation came into force, which makes it difficult and even almost impossible to register self-made trailers with the traffic police. Therefore, before starting construction, I recommend that you find out about the possibility of registration with your regional MREO.
I made a winch from scrap materials, because... It's a little hard to lift and lower in one. The disadvantages of the design have already been found; it remains to find time to refine them. I’m just learning how to shoot reviews, so don’t scold me too much)))
In the future, I’m thinking of spreading the cables wider so that they don’t rub against the boat and making a platform on which the boat rises.
How to convert a trailer into a boat
4 minutes Author: Konstantin Pavlov 1642
Some people with a car and a boat go one of two ways. The first is to leave the watercraft on the water management territory so that its representatives will guard it from time to time. The second is to transport it using land transport. Naturally, for this you will have to separately purchase a special trailer. Many people don't like this option because no one wants to spend extra money. Sometimes there is simply no space to store two trailers in the same area. For this reason, you can solve the problem in a radical way. If you have an old trailer, you may find it useful to convert it to transport a pvc boat. We will tell you how to do this correctly in this article.
About the characteristics and possibility of manufacturing a trailer for a boat
Sometimes, making a boat trailer with your own hands from existing construction and spare parts is considered the only solution in the current situation. But before you begin such a task, you should study all the characteristics, drawings and technologies.
The completed structure is considered a mobile vehicle, which is subject to the laws and regulations of the State Traffic Safety Inspectorate, traffic rules and must be safe when traveling in conjunction with a tractor-trailer.
When deciding how to make a boat trailer, you should:
- Prepare a project and drawings of boat trailers in accordance with the required overall parameters: height no more than 3.8 m with a boat, width within 2.2 m, length with a tractor up to 20 m;
- Before receiving registration, the trailer must undergo a safety and technical suitability examination by a special certification organization. It is required to coordinate the do-it-yourself boat trailer project and drawings with materials in order to receive a conclusion in the form of a certificate of suitability for use after production;
- After receiving a certificate of suitability, register with the State Traffic Safety Inspectorate and receive a technical certificate and state license. numbers;
- To make a boat trailer, it is recommended to use a certified torsion axle, as well as a factory hitch.
Main features
You can take almost any body trailer as a basis, and even those that have stood in one place for several decades will do. A polyvinyl chloride boat does not have much weight, but it is still recommended to check the selected design for safety margin. To do this, just load several bags of potatoes or stones, throwing them into the back, and then try to drive through areas with difficult terrain. It is advisable to load the trailer so that the resulting weight slightly exceeds the weight of the boat itself.
So you have a trailer that needs to be rebuilt. We begin the procedure by disassembling the body. We will no longer need it in the future, so all we can do is throw it away. In the standard design, the tongue is short, so the bow of the boat may occasionally hit the rear of the vehicle. To prevent such an outcome, it is recommended to extend it by about one meter and provide for the possibility of disassembly. To increase strength, use “kerchiefs” made from pipes measuring 40x40 millimeters. You should end up with something like the trailer illustrated below.
To prevent damage during transportation of the boat, it is recommended to use trays made of boards four centimeters thick. It is not recommended to use a smaller board because this increases the chances that it will crack at one inopportune moment.
It is also worth noting that the conversion may include the installation of additional rear lights. Some craftsmen decide to install lights from a UAZ car. Wings will help protect the boat from the constant ingress of dirt onto its surface. They are not included in the standard trailer package; you will have to purchase them separately. Practice shows that one of the most optimal solutions is to purchase wings from Oka. The average cost varies between 350-400 rubles per set.
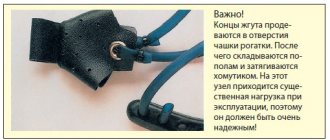
You need to put a little emphasis under your foot. The above-mentioned profile pipe measuring 40x40 millimeters will help with this. Rubber should be riveted using rivets. According to reviews from owners who have already carried out modifications with their own hands, this solution is very successful. The tension tape allows you to prevent possible tossing of the legs of the boat's power unit. You can clearly see it in the photo below.
Some craftsmen decide to equip the boat fastenings with tension tapes. But it’s best to use a one and a half centimeter transom, cut out the plywood and protect it with hot drying oil, attach the whole thing with two eye nuts, add two turnbuckles and a couple of chain links. As a result, the trailer will be able to secure the boat as securely as possible.
This modernization contributes to its strongest fixation on the trailer, ensuring reliability and safety of transportation as a whole.
Manufacturing instructions
A drawing drawn up with calculated data regarding the parameters of the materials used will be a good help in installation work, so you shouldn’t do without it. For convenience, several drawing plans are being developed, reflecting different connection nodes and mechanisms. This will make it faster to assemble parts, not forgetting about small parts.
The trailer manufacturing process consists of the following stages:
The design of the trailer in winter requires control balancing, replacement of rubber when the old one wears out, lubrication of the connecting elements of the chassis
The frame is assembled first. In order for the structure to be strong enough, you need to connect the metal pipes and the profile with a welding machine. You shouldn’t grab the chassis and axle to the frame, but strengthening the joints in the form of gussets made of thin sheet metal won’t hurt.
conclusions
If you have a boat that you use frequently, you don't have to buy an expensive cargo trailer. You can get by with a regular one if you practically don’t need it. As can be seen from the materials below, such a platform for installing a boat apparatus does not require a large investment of time associated with modernizing the design. It is enough to purchase all the necessary fasteners, get rid of the standard body, and adapt the drawbar for a longer load.
If you look at the assortment of any online store that offers this kind of product, you will notice that homemade products help to significantly save money many times over.